
文章目录

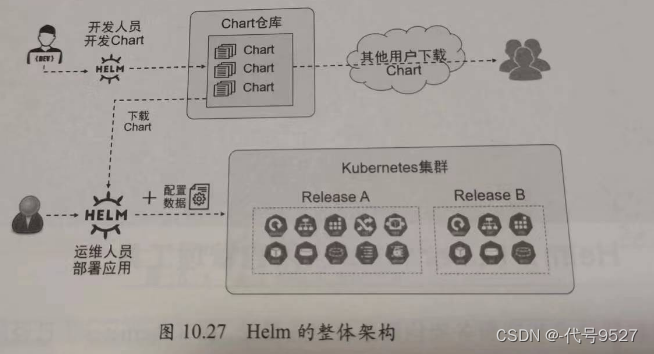
Helm is the best way to find, share, and use software built for Kubernetes.
即helm是kubernetes中查找、分享、构建应用的最佳方式。
一、Helm介绍
1、背景
使用K8s部署一个应用,涉及到很种K8s资源的协作,如Deployment 用于部署应用控制pod、Service 提供服务发现、Secret 配置存储用户名和密码,可能还需要 pv 和 pvc 来提供持久化数据。
这么多资源,且过于分散,使用kubectl来进行维护和创建,体验极差。
由此产生了这三个思考:
- 如何
统一管理、配置和更新这些分散的 k8s 的应用资源文件 - 如何分发和复用一套应用
模板 - 如何将应用的一系列资源
当做一个软件包来管理
基于以上,helm出现。
2、介绍
Helm 是 Kubernetes 的包管理器。包管理器类似于我们在 Ubuntu 中使用的apt、Centos中使用的yum 、在Python中使用 pip,能快速查找、下载和安装软件包。

helm能够将一组K8S资源打包统一管理, 是查找、共享和使用为Kubernetes构建的软件的最佳方式。helm可以理解成k8s的资源整合和再封装。
我的理解,仅供参考:
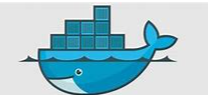
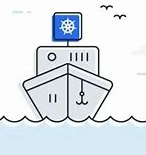
docker产出一个集装箱,kubectl产出一个货轮去载着这个集装箱,但每次把集装箱搬上货轮很烦,因此helm则直接连货轮带搬好的集装箱一起扔了下来。
| docker | kubectl | helm |
|---|---|---|
 |
 |
 |
3、核心概念
Helm 包含两个组件,分别是 helm 客户端 和 Tiller 服务器:
- helm :一个命令行工具,Helm的客户端,用于本地开发及管理chart,chart仓库管理等
- Tiller :Helm 的服务端。Tiller 负责接收 Helm 的请求,
与 k8s 的 apiserver 交互,根据chart 来生成一个 release 并管理 release - chart:Helm的打包格式叫做chart,chart就是一系列k8s文件, 它描述了一组相关的 k8s 集群资源
- release :chart的运行实例,你可以用不同的release name多次安装同一个chart。有点像镜像和容器的关系。
- Repoistory:Helm chart 的仓库,存chart包的

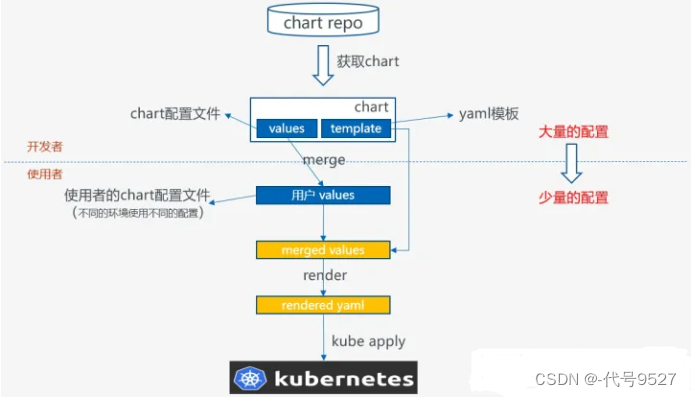
4、chart的基本结构
chart就是一系列文件,包含了一个k8s app应用运行起来的所有要素,比如service, deployment, configmap, serviceaccount, rbac,等。其结构如图:
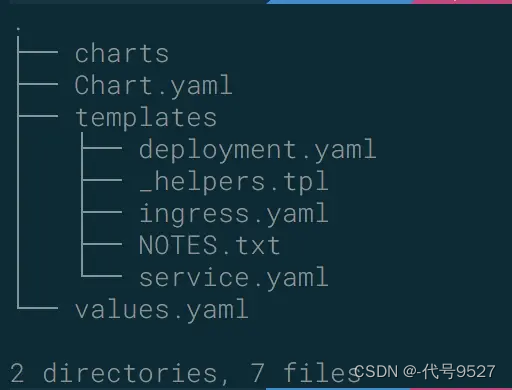
- charts 目录存放依赖的chart
- Chart.yaml 包含Chart的基本信息,包括chart版本,名称等
- templates 目录下存放应用一系列 k8s 资源的 yaml 模板
- _helpers.tpl 此文件中定义一些可重用的模板片断,此文件中的定义在任何资源定义模板中可用
- NOTES.txt 介绍chart 部署后的帮助信息,如何使用chart等
- values.yaml 包含了必要的值定义(默认值), 用于存储 templates 目录中模板文件中用到变量的值
这些要素都是以template文件的形式存在,再结合values文件,最终渲染出能够被k8s执行的yaml文件 。
5、helm官网
helm仓库地址:http://hub.helm.sh/
helm阿里云仓库地址:https://developer.aliyun.com/hub
二、部署Helm
1、安装helm客户端
方式一:手动安装
$ 下载 Helm 二进制文件
$ wget https://storage.googleapis.com/kubernetes-helm/helm-v2.9.1-linux-amd64.tar.gz
$ 解压缩
$ tar -zxvf helm-v2.9.1-linux-amd64.tar.gz
$ 复制 helm 二进制 到bin目录下
$ cp linux-amd64/helm /usr/local/bin/
$ chmod a+x /usr/local/bin/helm
方式二:官方脚本一键安装
$ curl https://raw.githubusercontent.com/kubernetes/helm/master/scripts/get > get_helm.sh
$ chmod 700 get_helm.sh
$ ./get_helm.sh
2、安装Tiller
方式一:指令安装
helm init
# 这个地方默认使用 “https://kubernetes-charts.storage.googleapis.com” 作为缺省的 stable repository 的地址
# googleapis.com 国内是不能访问的,可以使用阿里云的源来配置
helm init --upgrade -i registry.cn-hangzhou.aliyuncs.com/google_containers/tiller:v2.9.1 --stable-repo-url https://kubernetes.oss-cn-hangzhou.aliyuncs.com/charts
# 查看安装情况
kubectl get po -n kube-system |grep -i tiller
但kubernetes 从1.6 版本开始加入了 RBAC 授权。当前的 Tiller 没有定义用于授权的 ServiceAccount, 访问 API Server 时会被拒绝,需要给 Tiller 加入授权:
# 创建 Kubernetes 的服务帐号和绑定角色
# 我直接绑定了admin角色,可以对所有namespace下的资源进行操作

$ kubectl create serviceaccount --namespace kube-system tiller
serviceaccount "tiller" created

$ kubectl create clusterrolebinding tiller-cluster-rule --clusterrole=cluster-admin --serviceaccount=kube-system:tiller
clusterrolebinding.rbac.authorization.k8s.io "tiller-cluster-rule" created
# 给 Tiller 的 deployments 添加刚才创建的 ServiceAccount

$ kubectl patch deploy --namespace kube-system tiller-deploy -p '{"spec":{"template":{"spec":{"serviceAccount":"tiller"}}}}'
deployment.extensions "tiller-deploy" patched
# 查看 Tiller deployments 资源是否绑定 ServiceAccount

$ kubectl get deploy -n kube-system tiller-deploy -o yaml | grep serviceAccount
serviceAccount: tiller
serviceAccountName: tiller
# 查看 Tiller 是否安装成功

$ helm version
Client: &version.Version{SemVer:"v2.9.1", GitCommit:"20adb27c7c5868466912eebdf6664e7390ebe710", GitTreeState:"clean"}
Server: &version.Version{SemVer:"v2.9.1", GitCommit:"20adb27c7c5868466912eebdf6664e7390ebe710", GitTreeState:"clean"}
# 想删除卸载Tiller
# 删除 Tiller 的 deployment
kubectl delete deployment tiller-deploy --namespace kube-system
#或者使用
helm reset
方式二:配置文件安装
和方式一类似,不同的是创建用户绑定角色的操作直接在yaml文件中完成了
apiVersion: v1
kind: ServiceAccount
metadata:
  name: tiller  # 创建tiller用户
  namespace: kube-system
---
apiVersion: rbac.authorization.k8s.io/v1beta1
kind: ClusterRoleBinding
metadata:
  name: tiller
roleRef:
  apiGroup: rbac.authorization.k8s.io
  kind: ClusterRole
  name: cluster-admin  # 绑定admin角色
subjects:
  - kind: ServiceAccount
    name: tiller
    namespace: kube-system
$ kubectl create -f rbac-config.yaml
 serviceaccount/tiller created
 clusterrolebinding.rbac.authorization.k8s.io/tiller created
$ helm init --service-account tiller --skip-refresh
# 查看 Tiller 是否安装成功

$ helm version
Client: &version.Version{SemVer:"v2.9.1", GitCommit:"20adb27c7c5868466912eebdf6664e7390ebe710", GitTreeState:"clean"}
Server: &version.Version{SemVer:"v2.9.1", GitCommit:"20adb27c7c5868466912eebdf6664e7390ebe710", GitTreeState:"clean"}
三、常用指令
helm --help
指令汇总:
helm completion - 为指定的shell生成自动补全脚本
helm create - 使用给定的名称创建chart
helm dependency - 管理chart依赖
helm env - helm客户端环境信息
helm get - 下载命名版本的扩展信息
helm history - 检索发布历史
helm install - 安装chart
helm lint - 验证chart是否存在问题
helm list - 列举发布版本
helm package - 将chart目录打包
helm plugin - 安装、列举或卸载Helm插件
helm pull - 从仓库下载chart并(可选)在本地目录中打开
helm push - 推送chart到远程
helm registry - 从注册表登录或登出
helm repo - 添加、列出、删除、更新和索引chart仓库
helm rollback - 回滚发布到上一个版本
helm search - helm中搜索关键字
helm show - 显示chart信息
helm status - 显示命名版本的状态
helm template - 本地渲染模板
helm test - 执行发布的测试
helm uninstall - 卸载版本
helm upgrade - 升级版本
helm verify - 验证给定路径的chart已经被签名且是合法的
helm version - 打印客户端版本信息
1、仓库相关 helm repo
- 添加一个chart仓库
helm repo add 起名 仓库地址

$ helm repo add stable https://kubernetes.oss-cn-hangzhou.aliyuncs.com/charts

$ helm repo add --username admin --password password myharbor https://harbor.csdn.cn/chartrepo/charts
- 查看已添加的chart仓库列表
helm repo list
- chart仓库内容更新频繁时,update确保本地仓库的数据最新
helm repo update
- 从本地删除一个仓库
helm repo remove 仓库名

$ helm repo remove stable
2、chart相关
- 创建一个chart模板
helm create chartName

$ helm create test
Creating test
- 检查chart中可能存在的问题(依赖和模板配置是否正确等)
helm lint chartDir

$ helm lint mychart/
==> Linting .
[INFO] Chart.yaml: icon is recommended

1 chart(s) linted, no failures
- 打包chart模板
helm package chartDir

$ helm package . # 此时当前目录就是chart的目录
$ helm package test --debug
$ helm package test
Successfully packaged chart and saved it to: /root/test-0.1.0.tgz
- 在仓库种查找可用的chart模板
helm search chartName

$ helm search nginx
- 下载chart到本地目录
# v2用fetch
# v3用pull
helm fetch chartURL
helm fetch repoName/chartName
- 查看chart的详细信息
helm inspect 仓库/chartName

$ helm inspect stable/redis
- 查看chart的可配置选项values
helm inspect values 仓库/chartName

$ helm inspect values stable/redis
可以直接在 YAML 格式的文件中来覆盖上面的任何配置,在安装的时候直接使用该配置文件即可:(config.yaml)
mysqlUser: root
mysqlDatabase: code9527
service:
  type: NodePort

# 安装chart时指定配置文件config.yaml,这样就可以覆盖原有配置

# 这里我定义了用户名和数据库名
# 并把service类型改为NodePort类型
- 渲染template目录下的文件,即values.yaml文件填充,看到k8s资源yaml文件的最终样子
helm template chartDir

$ helm template .
$ helm template mychart
- 安装chart,将chart包发布到k8s集群中安装部署
helm install  chartName

$ helm install  demo-0.1.0.tgz
$ helm install stable/mysql
# 这里的chartName可以是chart包名,
# chart可以是打包的chart,也可以是没打包的chart目录
# 也可以是仓库中的chart
# 指定配置文件安装,覆盖配置
helm install -f configName.yaml
3、release相关
- 查看发布到k8s中的chart对应的releas
# 默认返回部署的或者失败的发布release
helm list
helm ls
参数:
# --namespace
# --max设置返回的数据条数
# --offset显示翻页
- 升级release版本
helm upgrade releaseName chart
# chart参数可以是:
# 1.chart引用('repo/mariadb')
# 2.chart目录路径,打包的chart
# 3.完整URL
# --version指定版本,否则默认更新到最新
- 在chart中重写value,需要使用’–values’参数并传一个文件或者从命令行使用’–set’参数传个配置
helm upgrade myRelease repo/myRelease --version=1.0.0-feature-15379 --set depService.mq.mqLookupPort=4161 --set depService.mq.connectorType=nsq
- 查看release的历史修订版本
helm history releaseName [flags]
# --max设置返回数据的最大条数
$ helm history angry-bird
REVISION    UPDATED                     STATUS          CHART             APP VERSION     DESCRIPTION
1           Mon Oct 3 10:15:13 2016     superseded      alpine-0.1.0      1.0             Initial install
2           Mon Oct 3 10:15:13 2016     superseded      alpine-0.1.0      1.0             Upgraded successfully
3           Mon Oct 3 10:15:13 2016     superseded      alpine-0.1.0      1.0             Rolled back to 2
4           Mon Oct 3 10:15:13 2016     deployed        alpine-0.1.0      1.0             Upgraded successfully
- 将release回退到以前的版本(当然k8s整体资源跟着回退)
helm rollback releaseName [REVISION] [flags]
# REVISION即history指令中的第一列
- 删除release
helm delete releaseName
# v3版本中已弃用
- 查看某个release的状态
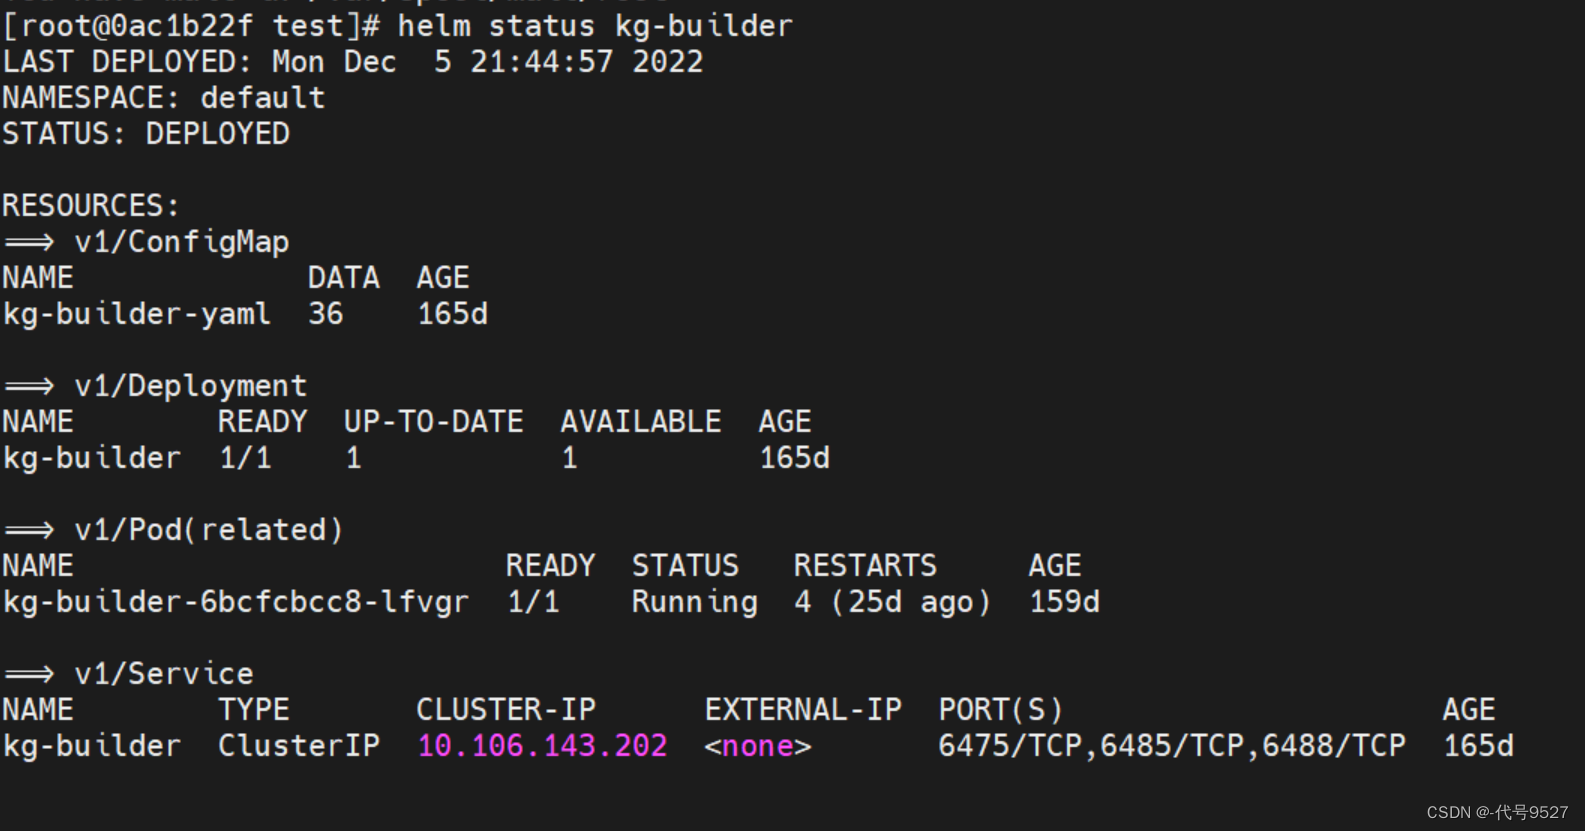
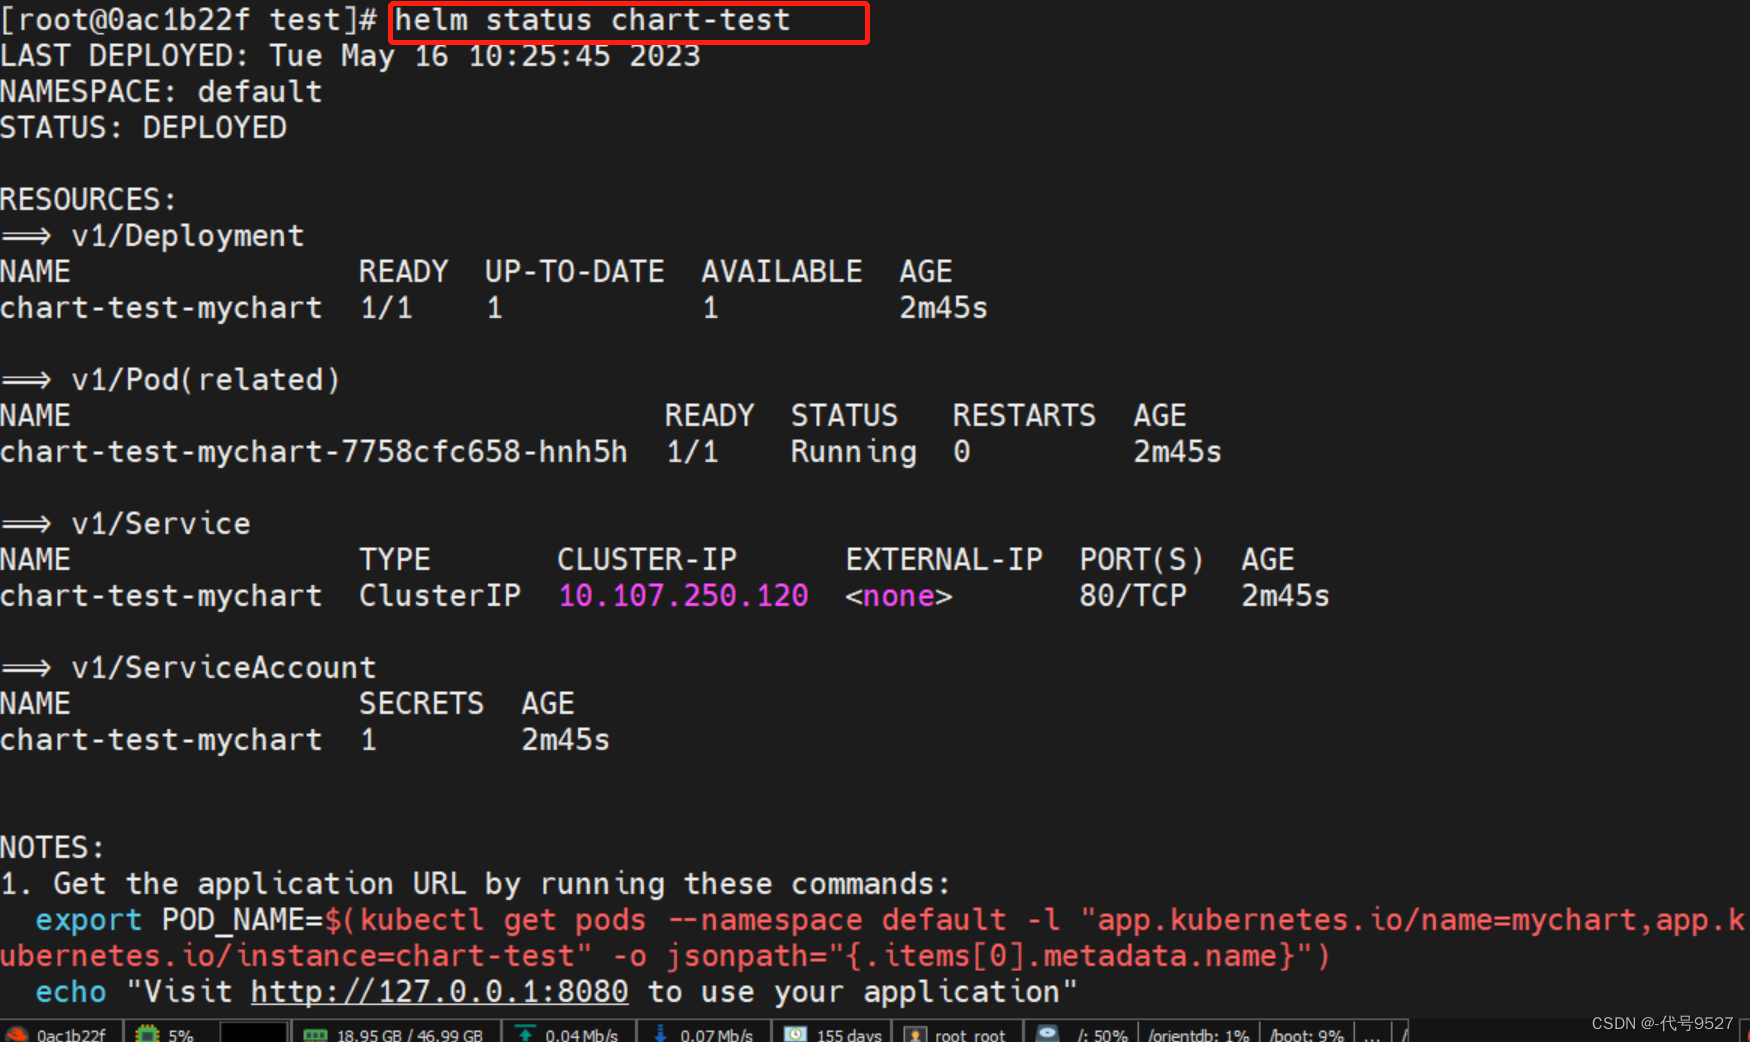
helm status releaseName
# 返回结果包括:
# 1、最后部署时间
# 2、发布版本所在的k8s命名空间,default
# 3、发布状态(可以是: unknown, deployed, uninstalled, superseded, failed, uninstalling, pending-install, pending-upgrade 或 pending-rollback)
# 4、这个release所包含的K8s资源,如ConfigMap、Deployment、Service等
- 查看release指定内容
helm get releaseName

helm get notes releaseName      #查看release的说明信息(相当于chart中的NOTES.TXT)
helm get manifest releaseName   #查看release在k8s中创建出来的资源
helm get hooks releaseName      #查看release的回调创建资源
helm get values releaseName     #查看release的values配置
helm get all releaseName        #查看上述所有内容
4、其他指令
- 查看helm版本
helm version
- helm插件管理
helm plugin list     #查看本地安装好的插件 (插件管理)

helm plugin install pluginURL    #安装插件
例:helm plugin install https://github.com/chartmuseum/helm-push
#最后的url地址为插件的下载地址,可参考 https://github.com/chartmuseum/helm-push

helm plugin uninstall pluginName   #卸载插件
helm plugin update pluginName   #更新插件,将插件升级到最新版本
#在下载插件的时候会保存插件及其下载地址,更新的时候使用原本的下载地址直接下载最新版本替换
四、入门案例
通过一个例子,演示使用helm来创建、打包、分发、安装、升级、回退K8s应用
1、构建第一个chart
创建一个名为mychart的Chart
# 该指令会在当前目录创建一个mychart目录
helm create mychart
查看结构
[centos@root helm]$ tree mychart
mychart
├── charts
├── Chart.yaml
├── templates
│   ├── deployment.yaml
│   ├── _helpers.tpl
│   ├── ingress.yaml
│   ├── NOTES.txt
│   ├── service.yaml
│   └── tests
│       └── test-connection.yaml
└── values.yaml

# Chart.yaml 用于描述这个 Chart的相关信息,包括名字、描述信息以及版本等。

# values.yaml 用于存储 templates 目录中模板文件中用到变量的值。

# NOTES.txt 用于介绍 Chart 部署后的一些信息,例如:如何使用这个 Chart、列出缺省的设置等。

# Templates 目录下是 YAML 文件的模板,该模板文件遵循 Go template 语法。
查看下Chart.yaml文件的内容
$ cat mychart/Chart.yaml
apiVersion: v1
appVersion: "1.0"
description: A Helm chart for Kubernetes
name: mychart
version: 0.1.0
查看values.yaml文件(默认部署的是一个nginx),可以看到这里定义了一些当前chart的默认值,这些值会填充到templates下k8s资源的yaml文件中,完成渲染
# Default values for test.
# This is a YAML-formatted file.
# Declare variables to be passed into your templates.
replicaCount: 1

image:
  repository: nginx
  tag: stable
  pullPolicy: IfNotPresent
service:
  type: ClusterIP
  port: 80

ingress:
  enabled: false
  annotations: {}
    # kubernetes.io/ingress.class: nginx
    # kubernetes.io/tls-acme: "true"
  path: /
  hosts:
    - chart-example.local
  tls: []
  #  - secretName: chart-example-tls
  #    hosts:
  #      - chart-example.local

resources: {}
  # We usually recommend not to specify default resources and to leave this as a conscious
  # choice for the user. This also increases chances charts run on environments with little
  # resources, such as Minikube. If you do want to specify resources, uncomment the following
  # lines, adjust them as necessary, and remove the curly braces after 'resources:'.
  # limits:
  #  cpu: 100m
  #  memory: 128Mi
  # requests:
  #  cpu: 100m
  #  memory: 128Mi

nodeSelector: {}

tolerations: []

affinity: {}
查看templates目录下的k8s资源文件,以service.yaml为例:
apiVersion: v1
kind: Service
metadata:
  name: {{ template "nginx-test.fullname" . }}
  labels:
    app: {{ template "nginx-test.name" . }}
    chart: {{ template "nginx-test.chart" . }}
    release: {{ .Release.Name }}
    heritage: {{ .Release.Service }}
spec:
  type: {{ .Values.service.type }}
  ports:
    - port: {{ .Values.service.port }}
      targetPort: http
      protocol: TCP
      name: http
  selector:
    app: {{ template "nginx-test.name" . }}
    release: {{ .Release.Name }}
- {{ }}是Go语言的标准
- .Values 对象访问 values.yaml 文件的内容
- .Chart 对象用来访问 Chart.yaml 文件的内容
- .Release、.Chart 开头的预定义值可用于任何的模板中
- .Release 对象是 Helm的内置对象之一, 使用 Helm 安装一个 release 时,由 Tiller 分配 release 的名称
检查依赖和模板配置是否正确
# .是当前目录,我就在mychart目录下
$ helm lint .
==> Linting .
[INFO] Chart.yaml: icon is recommended

1 chart(s) linted, no failures
将应用打包:
# 还是.
# 因为我就在mychart目录下
$ helm package .
Successfully packaged chart and saved it to: /home/k8s/mychart/mychart-0.1.0.tgz
此时mychart目录被打包成一个mychart-0.1.0.tgz压缩包,存在当前目录下,并同时被保存到了 Helm 的本地缺省仓库目录中。
# 打包时向输出更加详细的信息,加--debug参数
# 在这里可以看到helm本地缺省仓库目录
$ helm package mychartDir --debug
Successfully packaged chart and saved it to: /home/k8s/mychart-0.1.0.tgz
[debug] Successfully saved /home/k8s/mychart-0.1.0.tgz to /home/k8s/.helm/repository/local
2、将chart包发布到Repository
打包了chart并发布到了helm本地仓库目录,但helm search找不到:
$ helm search mychart
No results found

# 这是因为 Repository 目录中的 Chart 包还没有被 Helm 管理
# 查看已配置的仓库的信息
$ helm repo list

# 注:新版本中执行 helm init 命令后默认会配置一个名为 local 的本地仓库。
# 如果helm repo list 可以看到local选项,则为默认添加了,下面就可以跳过了
接下来在本地启动一个仓库服务,并将其加入到Helm Repo列表中
# 启动仓库服务
# Now serving you on 127.0.0.1:8879
helm server
# 直接helm server,则默认是127.0.0.1
# 仓库的存储目录默认是$HOME/.helm/repository/local
我这里指定路径来做Helm仓库的存储目录,再指定服务器IP:
helm serve --address 10.4.129.177:8888 --repo-path /root/.helm/repository/local --url http://10.4.129.177:8888/charts/

# --address
# --repo-path 我上面指定就是默认目录,写不写效果一样
# --url
如果–repo-path指定了其他目录,而非helm本地仓库默认目录。还要通过 helm repo index 命令将 Chart 的 Metadata 记录更新在 index.yaml 文件中
# 更新 Helm Repository 的索引文件
# $HOME
$ cd $HOME/.helm/repository/local
$ helm repo index --url=http://10.4.129.177:8888 .
接下来将本地 Repository 加入 Helm 的 Repo 列表
$ helm repo add local http://10.4.129.177:8888
"local" has been added to your repositories
再次查找刚构建的mychart包,搜索成功
$ helm repo update
$ helm search mychart
NAME         	CHART VERSION	APP VERSION	DESCRIPTION
local/mychart	0.1.0        	1.0        	A Helm chart for Kubernetes
3、在 Kubernetes 中部署应用
Chart 被发布到仓储后,就可以通过 helm install 命令部署该 Chart。
helm install做的事实际是结合values.yaml将 templates 目录下的模板文件渲染成 Kubernetes能够识别的 YAML 格式。
部署前先执行helm install --dry-run --debug <chart_dir> --name <release_name>命令来验证 Chart 的配置。该输出中包含了模板的变量配置与最终渲染的 YAML 文件。
$ helm install --dry-run --debug local/mychart --name mike-test
[debug] Created tunnel using local port: '46649'

[debug] SERVER: "127.0.0.1:43588"

[debug] Original chart version: ""
[debug] Fetched local/mychart to /root/.helm/cache/archive/mychart-0.1.0.tgz

[debug] CHART PATH: /root/.helm/cache/archive/mychart-0.1.0.tgz

NAME:   tylertest
REVISION: 1
RELEASED: Mon Jul 23 10:39:49 2018
CHART: mychart-0.1.0
USER-SUPPLIED VALUES:
{}

COMPUTED VALUES:
affinity: {}
image:
  pullPolicy: IfNotPresent
  repository: nginx
  tag: stable
ingress:
  annotations: {}
  enabled: false
  hosts:
  - chart-example.local
  path: /
  tls: []
nodeSelector: {}
replicaCount: 1
resources: {}
service:
  port: 80
  type: ClusterIP
tolerations: []

HOOKS:
MANIFEST:

---
# Source: mychart/templates/service.yaml
apiVersion: v1
kind: Service
metadata:
  name: tylertest-mychart
  labels:
    app: mychart
    chart: mychart-0.1.0
    release: tyler-test
    heritage: Tiller
spec:
  type: ClusterIP
  ports:
    - port: 80
      targetPort: http
      protocol: TCP
      name: http
  selector:
    app: mychart
    release: mike-test
---
# Source: mychart/templates/deployment.yaml
apiVersion: apps/v1beta2
kind: Deployment
metadata:
  name: tylertest-mychart
  labels:
    app: mychart
    chart: mychart-0.1.0
    release: tyler-test
    heritage: Tiller
spec:
  replicas: 1
  selector:
    matchLabels:
      app: mychart
      release: tyler-test
  template:
    metadata:
      labels:
        app: mychart
        release: tyler-test
    spec:
      containers:
        - name: mychart
          image: "nginx:stable"
          imagePullPolicy: IfNotPresent
          ports:
            - name: http
              containerPort: 80
              protocol: TCP
          livenessProbe:
            httpGet:
              path: /
              port: http
          readinessProbe:
            httpGet:
              path: /
              port: http
          resources:
            {}
验证通过,接下来部署:
# 部署时需指定 Chart 名及 Release(部署的实例)名。
$ helm install local/mychart --name chart-test
NAME:   chart-test
LAST DEPLOYED: Mon Jul 23 10:41:20 2018
NAMESPACE: default
STATUS: DEPLOYED

RESOURCES:
==> v1/Service
NAME               TYPE       CLUSTER-IP      EXTERNAL-IP  PORT(S)  AGE
chart-test-mychart  ClusterIP  10.254.120.177  <none>       80/TCP   1s

==> v1beta2/Deployment
NAME               DESIRED  CURRENT  UP-TO-DATE  AVAILABLE  AGE
chart-test-mychart  1        0        0           0          0s

==> v1/Pod(related)
NAME                                READY  STATUS   RESTARTS  AGE
chart-test-mychart-6d56f8c8c9-d685v  0/1    Pending  0         0s


NOTES:
1. Get the application URL by running these commands:
  export POD_NAME=$(kubectl get pods --namespace default -l "app=mychart,release=mike-test" -o jsonpath="{.items[0].metadata.name}")
  echo "Visit http://127.0.0.1:8080 to use your application"
  kubectl port-forward $POD_NAME 8080:80
列出的所有已部署的 Release 以及其对应的 Chart
# Revision(更改历史)字段,该字段用于表示某一个 Release 被更新的次数,
# 我们可以用该特性对已部署的 Release 进行回滚
$ helm list
NAME     	REVISION	UPDATED                 	STATUS  	CHART        	NAMESPACE
chart-test	1       	Mon Jul 23 10:41:20 2018	DEPLOYED	mychart-0.1.0	default
helm status 查询一个特定的 Release 的状态
$ helm status chart-test
4、升级和回退
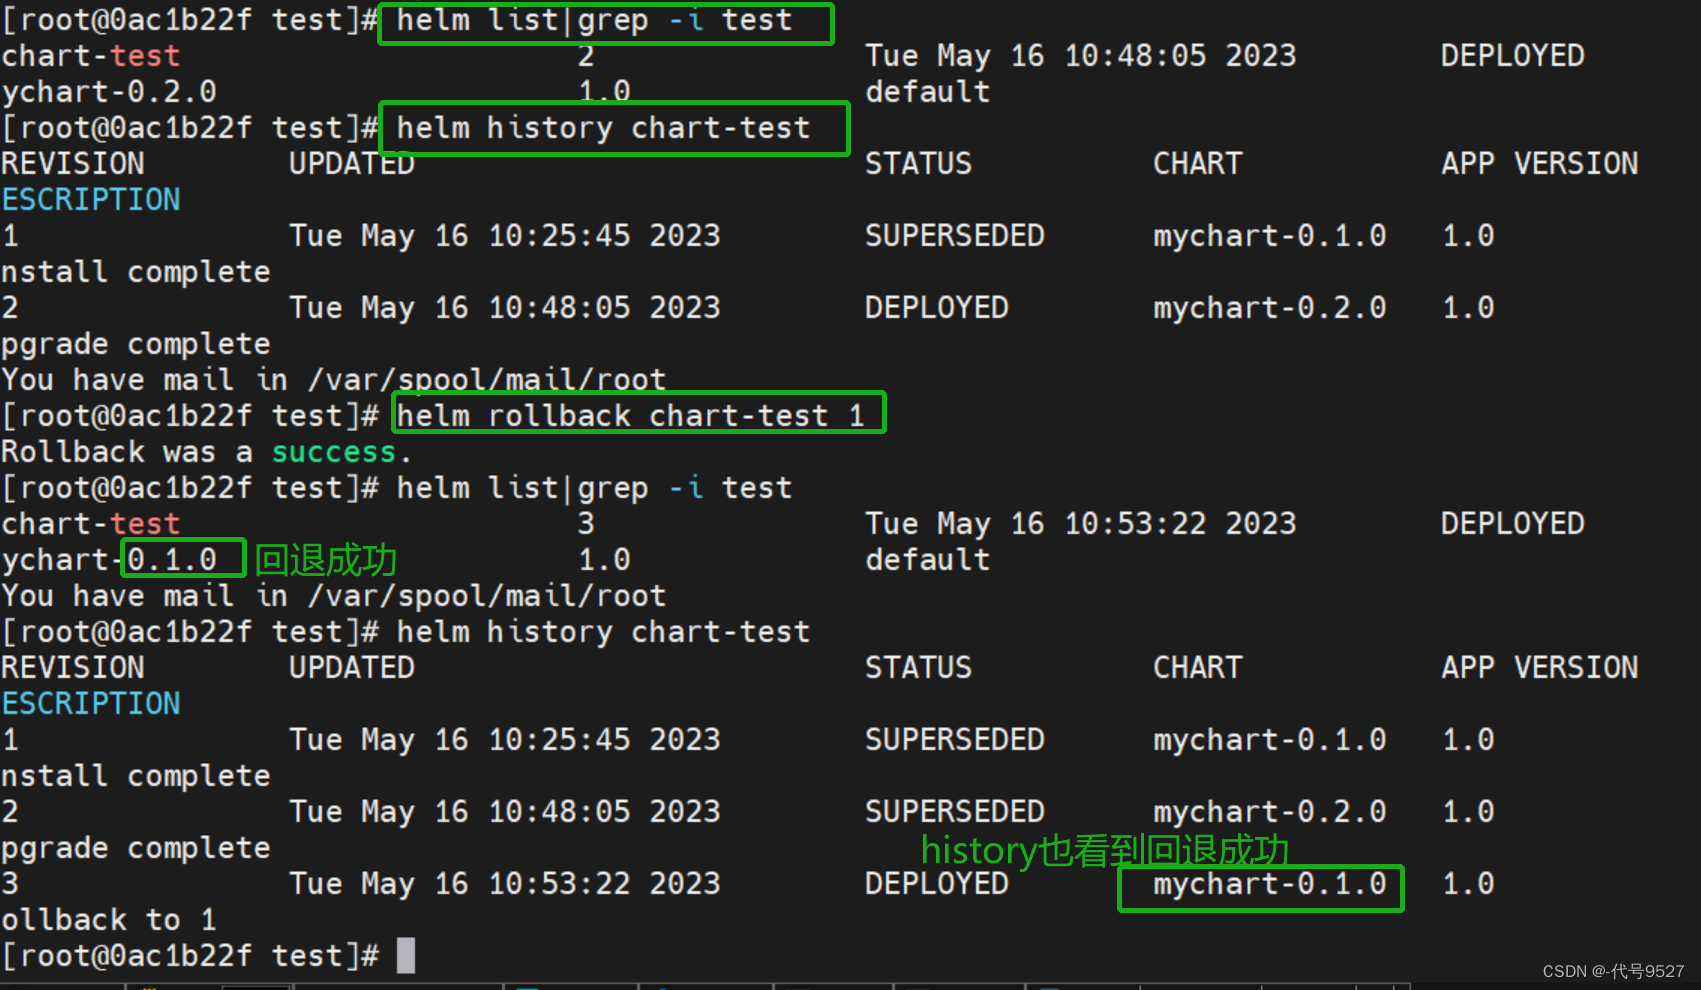
升级和回退的关键就是helm list 输出的结果中的 Revision(更改历史)字段
修改Chart.yaml文件,将版本号从 0.1.0 修改为 0.2.0,然后helm package重新打包并发布到本地仓库
$ cat mychart/Chart.yaml
apiVersion: v1
appVersion: "1.0"
description: A Helm chart for Kubernetes
name: mychart
version: 0.2.0

$ helm package mychart
Successfully packaged chart and saved it to...
[centos@k8s-master helm]$ helm search mychart -l
NAME            CHART VERSION   APP VERSION     DESCRIPTION
local/mychart   0.2.0           1.0             A Helm chart for Kubernetes
local/mychart   0.1.0           1.0             A Helm chart for Kubernetes
helm upgrade 命令将已部署的release升级到新版本,–version 参数指定需要升级的版本号,不指定默认升级到最新
[centos@k8s-master helm]$ helm upgrade chart-test mychart
Release "chart-test" has been upgraded. Happy Helming!
LAST DEPLOYED: Thu Apr 25 09:19:53 2019
NAMESPACE: default
STATUS: DEPLOYED

RESOURCES:
==> v1/Deployment
NAME               READY  UP-TO-DATE  AVAILABLE  AGE
chart-test-mychart  1/1    1           1          25m

==> v1/Pod(related)
NAME                                READY  STATUS   RESTARTS  AGE
chart-test-mychart-545479dd4b-hj9ml  1/1    Running  0         25m

==> v1/Service
NAME               TYPE       CLUSTER-IP    EXTERNAL-IP  PORT(S)  AGE
chart-test-mychart  ClusterIP  10.103.51.57  <none>       80/TCP   25m


NOTES:
1. Get the application URL by running these commands:
  export POD_NAME=$(kubectl get pods --namespace default -l "app.kubernetes.io/name=mychart,app.kubernetes.io/instance=tylertest" -o jsonpath="{.items[0].metadata.name}")
  echo "Visit http://127.0.0.1:8080 to use your application"
  kubectl port-forward $POD_NAME 8080:80
升级成功:

接下来回滚,首先查看这个release的所有变更记录
# 查看一个 Release 的所有变更记录
helm history chart-test
# 回滚
# 1 是history指令结果中的Revision字段
[centos@k8s-master helm]$ helm rollback chart-test 1
Rollback was a success! Happy Helming!
5、删除
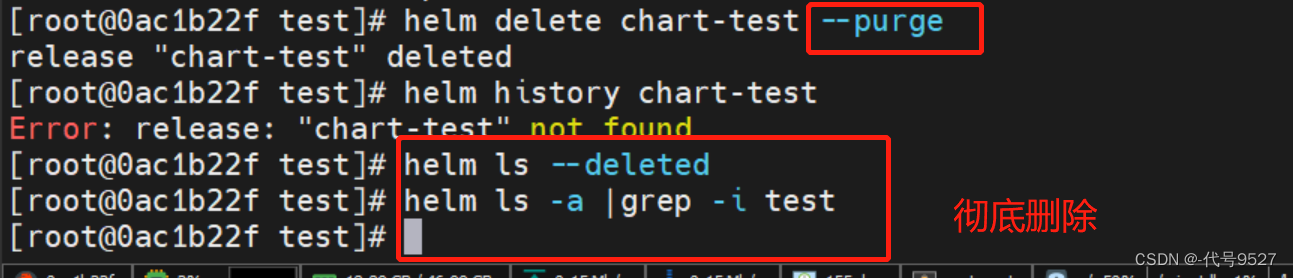
helm delete删除一个已部署的 Release
[centos@k8s-master helm]$ helm delete chart-test
release "chart-test" deleted
helm ls –deleted查看这个release已被标记为delete

但此时这个release的变更记录数据还在,helm history数据正常
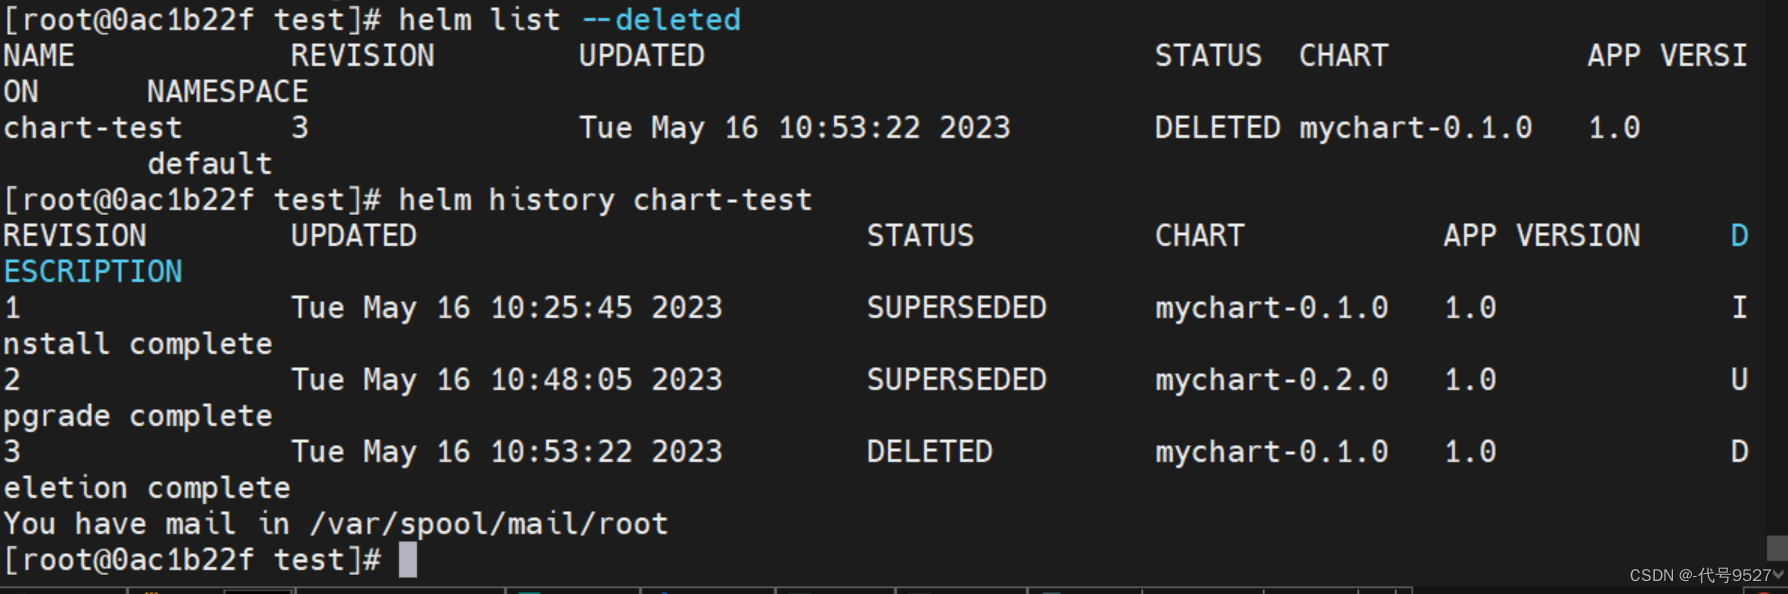
且此时想回滚,还是能成功
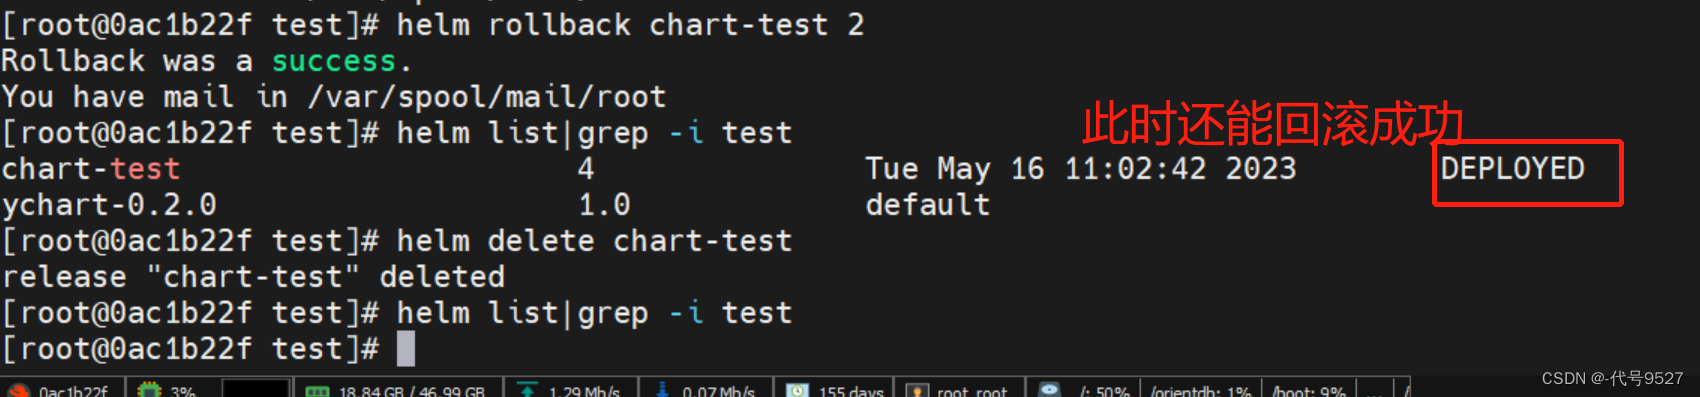
如果要移除指定 Release 所有相关的 Kubernetes 资源和 Release 的历史记录,可以加--purge参数
五、版本说明
1、helm的v2和v3版本
Helm目前有v2和v3版本,v3在v2的基础上做了大大简化,且安全性增强。如图,在v2中,Helm依赖Tiller组件,Tiller组件用于接收Helm客户端发出的指令,与k8s的APIServer交互。
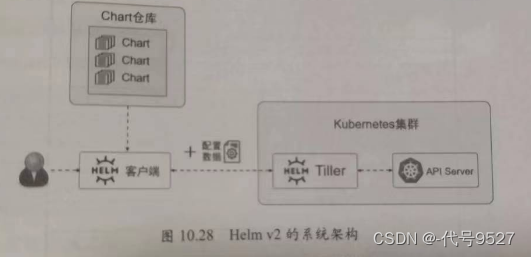
从v3开始,Helm不再使用Tiller组件,而是将与k8s的APIServer交互的功能整合到了Helm客户端程序中。
v2版本迁移到v3版本,参考:https://www.zhaowenyu.com/helm-doc/install/v2_v3_migration.html
2、v2和v3版本的指令区别
| 命令 | Helm2 | Helm3 | 命令区别 | 命令说明 |
|---|---|---|---|---|
| create | 有 | 有 | 无 | create a new chart with the given name |
| delete | 有 | 无 |
– | given a release name, delete the release from Kubernetes |
| dependency | 有 | 有 | 无 | manage a chart’s dependencies |
| fetch | 有 | 无 |
– | download a chart from a repository and (optionally) unpack it in local directory |
| get | 有 | 有 | 有 | download a named release |
| history | 有 | 有 | 无 | fetch release history |
| home | 有 | 无 |
– | displays the location of HELM_HOME |
| init | 有 | 无 |
– | initialize Helm on both client and server |
| inspect | 有 | 无 |
– | inspect a chart |
| install | 有 | 有 | 有 | install a chart archive |
| lint | 有 | 有 | 无 | examines a chart for possible issues |
| list | 有 | 有 | 无 | list releases |
| package | 有 | 有 | 无 | package a chart directory into a chart archive |
| plugin | 有 | 有 | 有 | add, list, or remove Helm plugins |
| repo | 有 | 有 | 无 | add, list, remove, update, and index chart repositories |
| reset | 有 | 无 |
– | uninstalls Tiller from a cluster |
| rollback | 有 | 有 | 无 | roll back a release to a previous revision |
| search | 有 | 有 | 无 | search for a keyword in charts |
| serve | 有 | 无 |
– | start a local http web server |
| status | 有 | 有 | 无 | displays the status of the named release |
| template | 有 | 有 | 无 | locally render templates |
| test | 有 | 有 | 有 | test a release |
| upgrade | 有 | 有 | 无 | upgrade a release |
| verify | 有 | 有 | 无 | verify that a chart at the given path has been signed and is valid |
| version | 有 | 有 | 有 | print the client/server version information |
| env | 无 | 有 | – | Helm client environment information |
| help | 无 | 有 | – | Help about any command |
| pull | 无 | 有 | – | download a chart from a repository and (optionally) unpack it in local directory |
| show | 无 | 有 | – | show information of a chart |
| uninstall | 无 | 有 | – | uninstall a release |
3、v3版本去除的指令
- Tiller的去除,导致了reset命令没有存在的意义,同时init存在仅剩客户端需要设定的功能,所以被去除了。
- fetch命令,而在Helm 3中提供了pull命令予以替代。
- home命令用于显示HELM_HOME环境变量,而在Helm 3中提供env命令可以显示所有的环境变量信息,用增强的功能予以了替换
总之就是做了无用的删除和指令的增强
| 命令 | Helm 2 | Helm 3 | 命令说明 |
|---|---|---|---|
| delete | 有 | 无 | given a release name, delete the release from Kubernetes |
| fetch | 有 | 无 | download a chart from a repository and (optionally) unpack it in local directory |
| home | 有 | 无 | displays the location of HELM_HOME |
| init | 有 | 无 | initialize Helm on both client and server |
| inspect | 有 | 无 | inspect a chart |
| reset | 有 | 无 | uninstalls Tiller from a cluster |
| serve | 有 | 无 | start a local http web server |
4、v3版本中新增的指令
- env是对被删除的命令home的强化
- pull是对被删除的命令fetch的替换
- show是对被删除的命令inspect的替换
- uninstall是功能特性的增强
| 命令 | Helm 2 | Helm 3 | 命令说明 |
|---|---|---|---|
| env | 无 | 有 | Helm client environment information |
| help | 无 | 有 | Help about any command |
| pull | 无 | 有 | download a chart from a repository and (optionally) unpack it in local directory |
| show | 无 | 有 | show information of a chart |
| uninstall | 无 | 有 | uninstall a release |
5、同一指令的变化
| 命令 | Helm 2 | Helm 3 | 命令是否有区别 | Helm 2 命令说明 | Helm 3命令说明 |
|---|---|---|---|---|---|
| get | 有 | 有 | 有 | download a named release | download extended information of a named release |
| install | 有 | 有 | 有 | install a chart archive | install a chart |
| plugin | 有 | 有 | 有 | add, list, or remove Helm plugins | install, list, or uninstall Helm plugins |
| test | 有 | 有 | 有 | test a release | run tests for a release |
| version | 有 | 有 | 有 | print the client/server version information | print the client version information |
6、与K8s的版本适配
不推荐将 Helm 用于比编译它所依赖的版本更高的 Kubernetes 版本,因为 Helm 并没有做出任何向前兼容的保证。
| Helm 版本 | 支持的 Kubernetes 版本 |
|---|---|
| 3.7.x | 1.22.x – 1.19.x |
| 3.6.x | 1.21.x – 1.18.x |
| 3.5.x | 1.20.x – 1.17.x |
| 3.4.x | 1.19.x – 1.16.x |
| 3.3.x | 1.18.x – 1.15.x |
| 3.2.x | 1.18.x – 1.15.x |
| 3.1.x | 1.17.x – 1.14.x |
| 3.0.x | 1.16.x – 1.13.x |
| 2.16.x | 1.16.x – 1.15.x |
| 2.15.x | 1.15.x – 1.14.x |
| 2.14.x | 1.14.x – 1.13.x |
| 2.13.x | 1.13.x – 1.12.x |
| 2.12.x | 1.12.x – 1.11.x |
| 2.11.x | 1.11.x – 1.10.x |
| 2.10.x | 1.10.x – 1.9.x |
| 2.9.x | 1.10.x – 1.9.x |
| 2.8.x | 1.9.x – 1.8.x |
| 2.7.x | 1.8.x – 1.7.x |
| 2.6.x | 1.7.x – 1.6.x |
| 2.5.x | 1.6.x – 1.5.x |
| 2.4.x | 1.6.x – 1.5.x |
| 2.3.x | 1.5.x – 1.4.x |
| 2.2.x | 1.5.x – 1.4.x |
| 2.1.x | 1.5.x – 1.4.x |
| 2.0.x | 1.4.x – 1.3.x |
版权声明:本文内容由互联网用户自发贡献,该文观点仅代表作者本人。本站仅提供信息存储空间服务,不拥有所有权,不承担相关法律责任。如发现本站有涉嫌侵权/违法违规的内容, 请发送邮件至 举报,一经查实,本站将立刻删除。
文章由极客之音整理,本文链接:https://www.bmabk.com/index.php/post/146029.html

