
学习目标
-
本文主要讲解Dubbo集成spring的两种方式——XML和注解,由于篇幅问题,分为上下两篇
第1章 XML方式整合
很多老项目现在依然是采用的xml的方式配置dubbo应用,但是xml方式已经不是现在的主流了,但是这种方式我们依然要掌握的,因为纯注解的方式的底层逻辑依然是采用的xml方式的底层逻辑,掌握xml方式的逻辑对我们掌握spring还是很有帮助的。
1.1 案例
-
生产者
-
applicationProvider.xml
<?xml version="1.0" encoding="UTF-8"?> <beans xmlns="http://www.springframework.org/schema/beans" xmlns:xsi="http://www.w3.org/2001/XMLSchema-instance" xmlns:dubbo="http://code.alibabatech.com/schema/dubbo" xsi:schemaLocation="http://www.springframework.org/schema/beans http://www.springframework.org/schema/beans/spring-beans.xsd http://code.alibabatech.com/schema/dubbo http://code.alibabatech.com/schema/dubbo/dubbo.xsd "> <dubbo:application name="dubbo_provider"/> <!-- 其实就是类似于一个全局变量 --> <dubbo:provider timeout="5000"/> <dubbo:registry address="zookeeper://127.0.0.1:2181" check="false"/> <!-- 如果协议是dubbo,这个就是netty服务端绑定的端口 默认:20880 --> <dubbo:protocol name="dubbo" port="29015"/> <bean id="firstServiceImpl" class="com.example.impl.first.FirstServiceImpl"/> <dubbo:service interface="com.example.service.first.FirstService" ref="firstServiceImpl" timeout="2000"> <!-- <dubbo:method name=""/>--> </dubbo:service> <!--<dubbo:reference interface=""--> </beans> -
生产者启动
package com.example.xml;

import org.springframework.context.support.ClassPathXmlApplicationContext;

import java.util.concurrent.CountDownLatch;

public class XmlProvider {
    public static void main(String[] args) throws InterruptedException {
        ClassPathXmlApplicationContext context = new ClassPathXmlApplicationContext("applicationProvider.xml");
        System.out.println("dubbo service started");
        new CountDownLatch(1).await();
    }
}
-
-
消费者
-
applicationConsumer.xml
<?xml version="1.0" encoding="UTF-8"?> <beans xmlns="http://www.springframework.org/schema/beans" xmlns:xsi="http://www.w3.org/2001/XMLSchema-instance" xmlns:dubbo="http://code.alibabatech.com/schema/dubbo" xsi:schemaLocation="http://www.springframework.org/schema/beans http://www.springframework.org/schema/beans/spring-beans.xsd http://code.alibabatech.com/schema/dubbo http://code.alibabatech.com/schema/dubbo/dubbo.xsd "> <dubbo:application name="dubbo_consumer"/> <!-- 其实就是类似于一个全局变量 --> <dubbo:consumer check="false"/> <dubbo:registry address="zookeeper://127.0.0.1:2181" check="false"/> <dubbo:reference interface="com.example.service.first.FirstService" check="false" id="firstServiceImpl"> <dubbo:method name="getFristStr" timeout="9000"/> </dubbo:reference> </beans> -
消费者启动
public class XmlConsumer {
    public static void main(String[] args) {
        ClassPathXmlApplicationContext context = new ClassPathXmlApplicationContext("applicationConsumer.xml");
        FirstService firstService = (FirstService) context.getBean("firstServiceImpl");
        System.out.println(firstService.getFristStr("eclipse2019"));
    }
}
-
1.2 优势
相较于用dubbo api的方式发布和引用服务,基于xml的方式发布和引用服务就相对简单很多,只要通过简单的xml配置就可以完成服务的发布与引用。
1.3 源码分析
基于xml的方式跟spring的整合,首先我们必须要知道spring的xml解析流程,只有知道这点才能清楚dubbo的自定义标签是如何解析的。
1.3.1 xml解析流程
核心源码在refresh()方法里面,如图:
public class XmlProvider {
    public static void main(String[] args) throws InterruptedException {
        //进入new ClassPathXmlApplicationContext
        ClassPathXmlApplicationContext context = new ClassPathXmlApplicationContext("applicationProvider.xml");
        System.out.println("dubbo service started");
        new CountDownLatch(1).await();
    }
}

public ClassPathXmlApplicationContext(String configLocation) throws BeansException {
    //进入this
    this(new String[] {configLocation}, true, null);
}

public ClassPathXmlApplicationContext(
    String[] configLocations, boolean refresh, @Nullable ApplicationContext parent)
    throws BeansException {

    super(parent);
    setConfigLocations(configLocations);
    if (refresh) {
        //进入
        refresh();
    }
}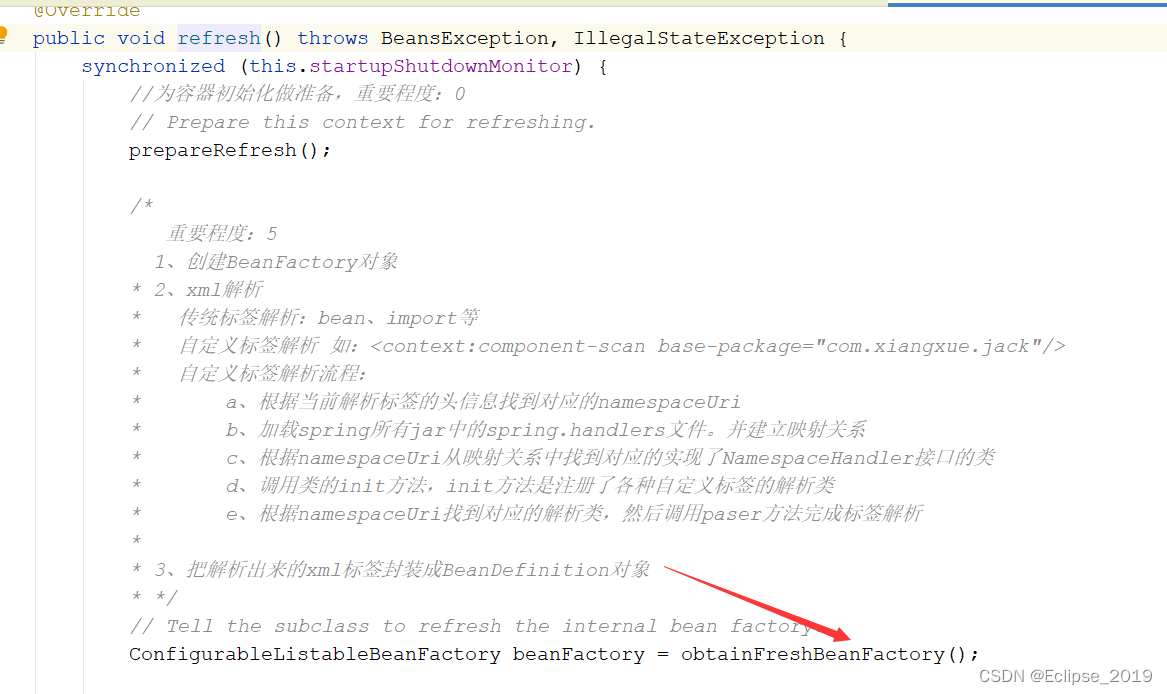

ConfigurableListableBeanFactory beanFactory = obtainFreshBeanFactory();
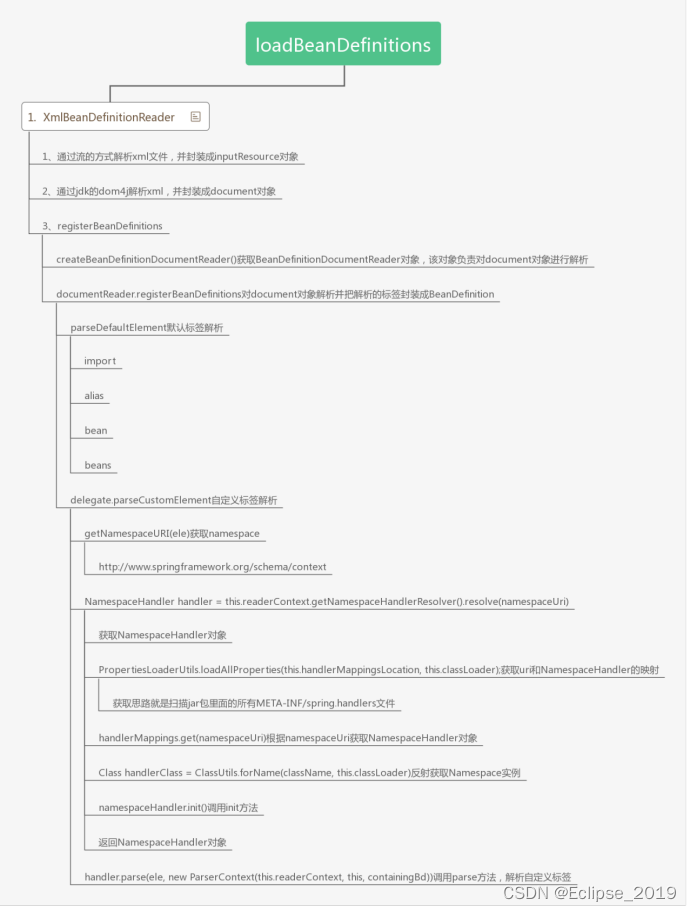
该方法主要进行xml解析工作,流程如下:
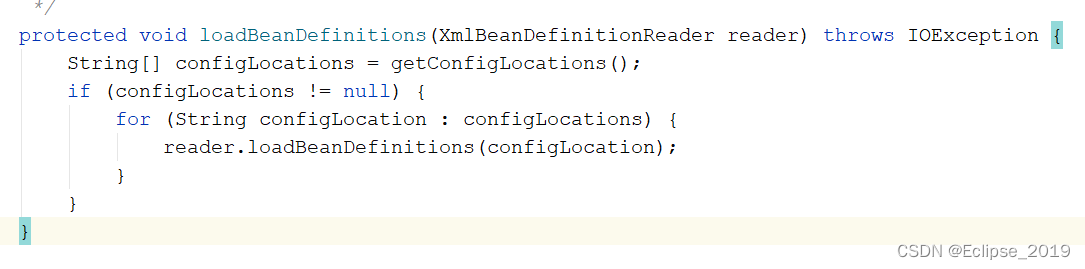
obtainFreshBeanFactory--->AbstractRefreshableApplicationContext.refreshBeanFactory--->XmlWebApplicationCOntext.loadBeanDefinitions--->loadBeanDefinitions--->XmlBeanDefinitionReader.loadBeanDefinitions--->doLoadBeanDefinitions--->registerBeanDefinitions--->DefaultBeanDefinitionDocumentReader.registerBeanDefinitions--->doRegisterBeanDefinitions--->parseBeanDefinitions--->parseCustomElement1、创建XmlBeanDefinitionReader对象

2、通过Reader对象加载配置文件
3、根据加载的配置文件把配置文件封装成document对象
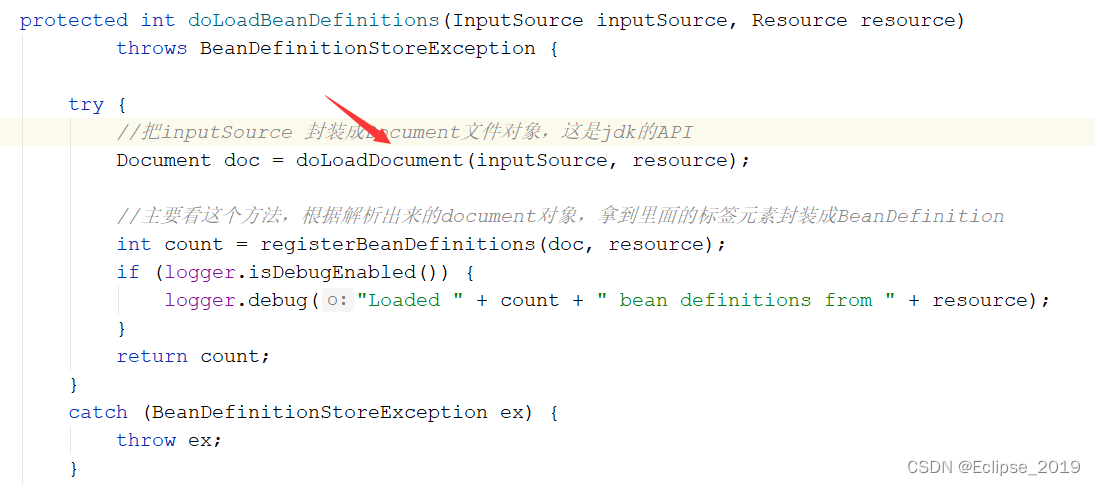
4、创建BeanDefinitionDocumentReader对象,DocumentReader负责对document对象解析

5、默认标签解析流程
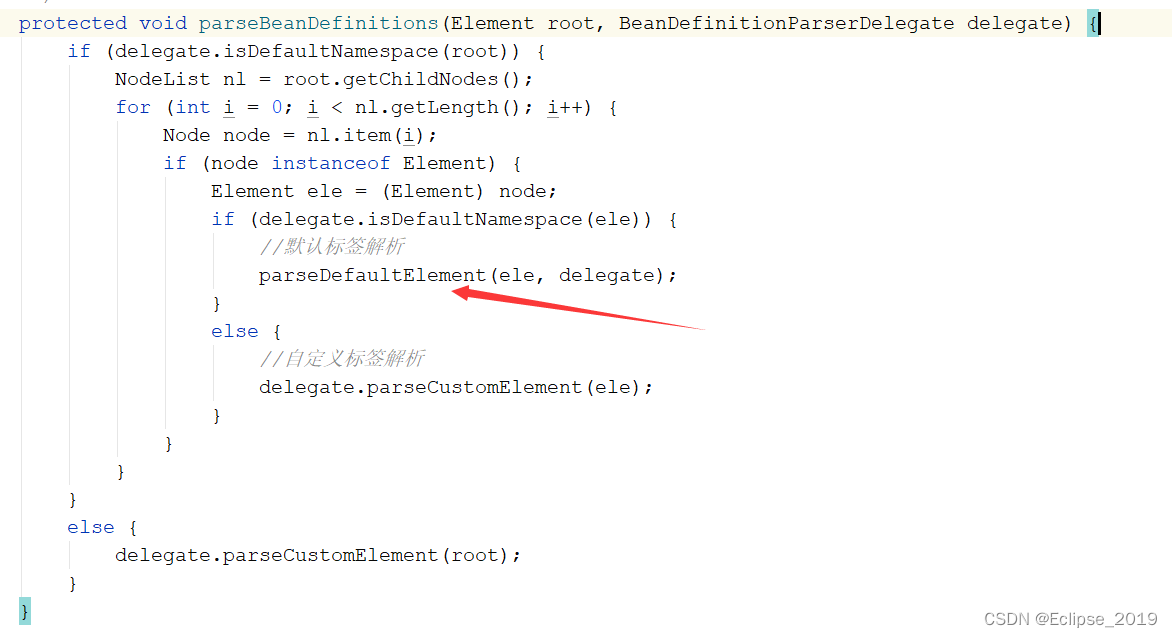
6、自定义标签解析流程
7、最终解析的标签封装成BeanDefinition并缓存到容器中
8、Xml流程图
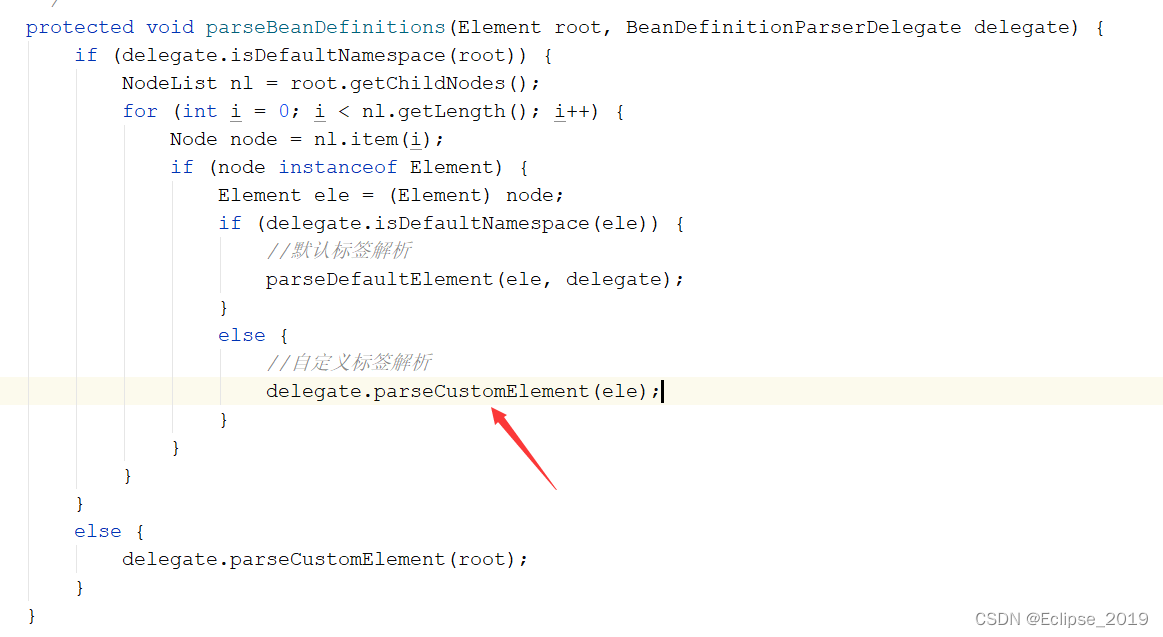
1.3.2 自定义标签解析
1、获取自定义标签的namespace命令空间
例如:http://code.alibabatech.com/schema/dubbo
源码中通过,String namespaceUri = getNamespaceURI(ele); 原始获取到原始的uri,拿dubbo:service标签为例
通过标签头就可以获取到标签对应的uri,xmlns:dubbo=”http://code.alibabatech.com/schema/dubbo“
2、根据命令空间获取NamespaceHandler对象
NamespaceUri和NamespaceHandler之间会建立一个映射,spring会从所有的spring jar包中扫描spring.handlers文件,建立映射关系。
核心逻辑如下:
NamespaceHandler handler = this.readerContext.getNamespaceHandlerResolver().resolve(namespaceUri);
Map<String, Object> handlerMappings = getHandlerMappings();
Object handlerOrClassName = handlerMappings.get(namespaceUri);
3、反射获取NamespaceHandler实例
NamespaceHandler namespaceHandler = (NamespaceHandler)
BeanUtils.instantiateClass(handlerClass);
4、调用init方法
namespaceHandler.init();
5、调用parse方法
handler.parse(ele, new ParserContext(this.readerContext, this, containingBd))dubbo的jar中spring.handlers文件

1.3.3 dubbo中标签解析
前面我们已经熟悉了xml解析和自定义标签解析了,那么接下来就来描述清楚dubbo中的标签的解析流程和需要完成的工作。
以dubbo:service标签的解析为例,看看这个标签解析过程中是如何完成服务的发布的。
标签如下:
<dubbo:service interface="com.example.service.UserService" ref="userServiceImpl" timeout="2000">
</dubbo:service>
1、直接从dubbo jar包中的spring.handlers找到namespaceHandler实例。

2、看init方法确定标签和解析类的映射关系
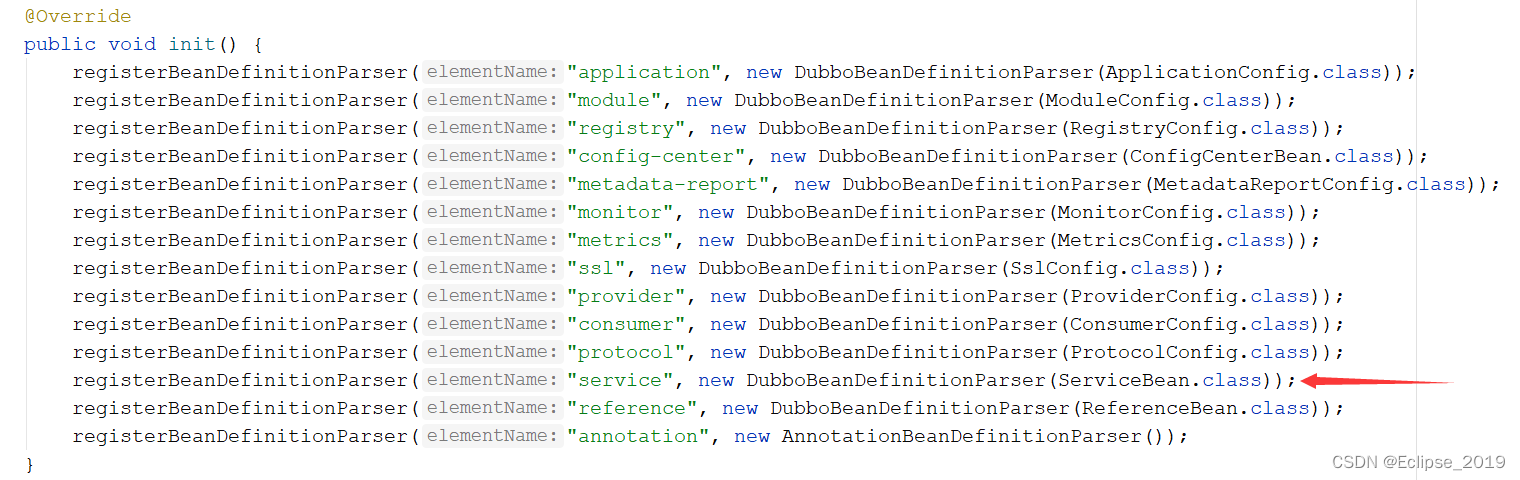
3、DubboNamespaceHandler的parse方法逻辑
核心看一下registerCommonBeans(registry);方法逻辑

在该方法中核心把两个类变成了BeanDefinition对象,让其给spring容器实例化对象。
registerInfrastructureBean(registry, ReferenceAnnotationBeanPostProcessor.BEAN_NAME,ReferenceAnnotationBeanPostProcessor.class);
registerInfrastructureBean(registry, DubboBootstrapApplicationListener.BEAN_NAME,DubboBootstrapApplicationListener.class);
ReferenceAnnotationBeanPostProcessor完成了@DubboReference属性的依赖注入。
DubboBootstrapApplicationListener完成了ServiceBean,ReferenceBean在spring容器启动完成以后,完成了服务的发布和引用功能。
4、DubboBeanDefinitionParser中的parse方法逻辑
该方法的逻辑其实就是把各配置类,例如ServiceBean,把配置类变成BeanDefinition并且交给spring容器实例化,这样ServiceBean就会被spring实例化。
5、ServiceBean中的afterPropertiesSet方法
前面讲过,ServiceBean会被spring容器实例化,由于实现了InitializingBean接口,所以当实例化ServiceBean的时候就会调到afterPropertiesSet方法。
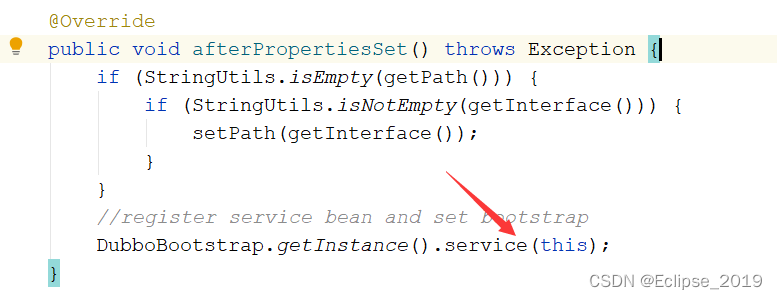
其实在该方法中的核心逻辑就是往ConfigManager中添加ServiceBean的实例,这样当spring容器完成启动后,dubbo的事件监听类DubboBootstrapApplicationListener就会根据ConfigManager中的ServiceBean实例来完成服务的发布。
6、当spring容器完成启动后
当spring容器完成启动后会发布一个ContextRefreshedEvent事件,代码如下,在spring的refresh核心方法中有一个finishRefresh();方法会发布该事件。
前面讲过,由于DubboBootstrapApplicationListener已经通过registerCommonBeans(registry);方法完成了spring的实例化,所以该监听类就会捕获到spring容器启动完成后的ContextRefreshedEvent事件。代码如下:

捕获事件后就会调用onApplicationContextEvent方法,最终会调到DubboBootstrap的start方法。
public synchronized DubboBootstrap start() {
    // avoid re-entry start method multiple times in same thread
    if (isCurrentlyInStart){
        return this;
    }
    isCurrentlyInStart = true;
    try {
        if (started.compareAndSet(false, true)) {
            startup.set(false);
            shutdown.set(false);
            awaited.set(false);
            //这里会完成注册中心和元数据中心的初始化
            initialize();
            if (logger.isInfoEnabled()) {
                logger.info(NAME + " is starting...");
            }
            //这里会发布服务,根据ConfigManager中的配置类发布服务
            doStart();
            if (logger.isInfoEnabled()) {
                logger.info(NAME + " has started.");
            }
        } else {
            if (logger.isInfoEnabled()) {
                logger.info(NAME + " is started, export/refer new services.");
            }
            doStart();
            if (logger.isInfoEnabled()) {
                logger.info(NAME + " finish export/refer new services.");
            }
        }
        return this;
    } finally {
        isCurrentlyInStart = false;
    }
}
private void doStart() {
    // 1. export Dubbo Services
    exportServices();
    // If register consumer instance or has exported services
    if (isRegisterConsumerInstance() || hasExportedServices()) {
        // 2. export MetadataService
        exportMetadataService();
        // 3. Register the local ServiceInstance if required
        registerServiceInstance();
    }
    //这里完成了dubbo服务的引用,也是会从ConfigManager中获取到ReferenceBean实例
    referServices();
    // wait async export / refer finish if needed
    awaitFinish();
    if (isExportBackground() || isReferBackground()) {
        new Thread(() -> {
            while (!asyncExportFinish || !asyncReferFinish) {
                try {
                    Thread.sleep(1000);
                } catch (InterruptedException e) {
                    logger.error(NAME + " waiting async export / refer occurred and error.",e);
                }
            }
            onStarted();
        }).start();
    } else {
        onStarted();
    }
}
private void exportServices() {
for (ServiceConfigBase sc : configManager.getServices()) {
// TODO, compatible with ServiceConfig.export()
ServiceConfig<?> serviceConfig = (ServiceConfig<?>) sc;
serviceConfig.setBootstrap(this);
if (!serviceConfig.isRefreshed()) {
serviceConfig.refresh();
}
if (sc.isExported()) {
continue;
}
if (sc.shouldExportAsync()) {
ExecutorService executor = executorRepository.getServiceExportExecutor();
CompletableFuture<Void> future = CompletableFuture.runAsync(() -> {
try {
if (!sc.isExported()) {
sc.export();
exportedServices.add(sc);
}
} catch (Throwable t) {
logger.error("export async catch error : " + t.getMessage(), t);
}
}, executor);
asyncExportingFutures.add(future);
} else {
if (!sc.isExported()) {
//最终在这里会调到ServiceBean中的export方法完成服务的发布
sc.export();
exportedServices.add(sc);
}
}
}
}//export方法就是服务发布的核心方法,调用到这个方法就可以发布服务
public synchronized void export() {
if (this.shouldExport() && !this.exported) {
this.init();
// check bootstrap state
if (!bootstrap.isInitialized()) {
throw new IllegalStateException("DubboBootstrap is not initialized");
}
if (!this.isRefreshed()) {
this.refresh();
}
if (!shouldExport()) {
return;
}
if (shouldDelay()) {
DELAY_EXPORT_EXECUTOR.schedule(this::doExport, getDelay(),
TimeUnit.MILLISECONDS);
} else {
doExport();
}
if (this.bootstrap.getTakeoverMode() == BootstrapTakeoverMode.AUTO) {
this.bootstrap.start();
}
}
}至此,dubbo的xml方式跟spring整合就分析完成。
下文预告
- Dubbo基于注解的方式集成sping
版权声明:本文内容由互联网用户自发贡献,该文观点仅代表作者本人。本站仅提供信息存储空间服务,不拥有所有权,不承担相关法律责任。如发现本站有涉嫌侵权/违法违规的内容, 请发送邮件至 举报,一经查实,本站将立刻删除。
文章由极客之音整理,本文链接:https://www.bmabk.com/index.php/post/76705.html

