
目录
1. 主机清单
| 角色 | 私网IP |
|---|---|
| k8s-master | 172.16.62.20 |
| k8s-node1 | 172.16.62.21 |
| k8s-node2 | 172.16.62.22 |
 |
2. 创建NFS持久化目录
2.1 安装NFS
- 在k8s集群中的每个节点安装nfs-utils
yum install nfs-utils -y
- 选择一台机器创建共享总目录(为了方便,这里选择主节点)
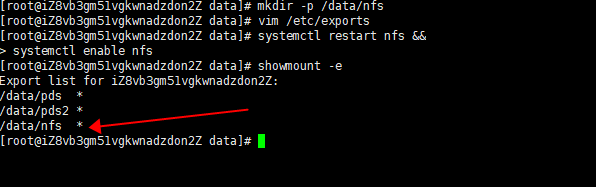
mkdir -p /data/nfs
- 编辑配置
vim /etc/exports
/data/nfs *(rw,no_root_squash)

- 重启服务并验证
# 使配置生效
systemctl restart nfs &&
systemctl enable nfs

# 查看
showmount -e
- 为需要持久化的服务创建子目录(必须创建)
mkdir -p /data/nfs/redis
2.2 创建PV&PVC
- pv不用指定命名空间
- pvc需要指定命名空间,默认为default
- 若有配置hosts映射,可使用映射名代替
# vim 1-pv_pvc.yaml
----------------------------------------------

apiVersion: v1
kind: PersistentVolume
metadata:
  name: redis-pv
spec:
  capacity:
    storage: 10Gi
  accessModes:
  - ReadWriteOnce
  persistentVolumeReclaimPolicy: Retain
  storageClassName: redis-nfs
  nfs:
    path: /data/nfs/redis
    server: 172.16.62.20
---
apiVersion: v1
kind: PersistentVolumeClaim
metadata:
  name: redis-pvc
spec:
  accessModes:
  - ReadWriteOnce
  resources:
    requests:
      storage: 10Gi
  storageClassName: redis-nfs
- 安装
kubectl apply -f 1-pv_pvc.yaml

3. K8S部署
3.1 ConfigMap
- 设置密码:
requirepass 123456
vim 2-configmap.yaml
-----------------------------------

apiVersion: v1
kind: ConfigMap
metadata:
  name: redis
data:
  redis.conf: |+
    requirepass 123456
    protected-mode no
    port 6379
    tcp-backlog 511
    timeout 0
    tcp-keepalive 300
    daemonize no
    supervised no
    pidfile /var/run/redis_6379.pid
    loglevel notice
    logfile ""
    databases 16
    always-show-logo yes
    save 900 1
    save 300 10
    save 60 10000
    stop-writes-on-bgsave-error yes
    rdbcompression yes
    rdbchecksum yes
    dbfilename dump.rdb
    dir /data
    slave-serve-stale-data yes
    slave-read-only yes
    repl-diskless-sync no
    repl-diskless-sync-delay 5
    repl-disable-tcp-nodelay no
    slave-priority 100
    lazyfree-lazy-eviction no
    lazyfree-lazy-expire no
    lazyfree-lazy-server-del no
    slave-lazy-flush no
    appendonly no
    appendfilename "appendonly.aof"
    appendfsync everysec
    no-appendfsync-on-rewrite no
    auto-aof-rewrite-percentage 100
    auto-aof-rewrite-min-size 64mb
    aof-load-truncated yes
    aof-use-rdb-preamble no
    lua-time-limit 5000
    slowlog-log-slower-than 10000
    slowlog-max-len 128
    latency-monitor-threshold 0
    notify-keyspace-events Ex
    hash-max-ziplist-entries 512
    hash-max-ziplist-value 64
    list-max-ziplist-size -2
    list-compress-depth 0
    set-max-intset-entries 512
    zset-max-ziplist-entries 128
    zset-max-ziplist-value 64
    hll-sparse-max-bytes 3000
    activerehashing yes
    client-output-buffer-limit normal 0 0 0
    client-output-buffer-limit slave 256mb 64mb 60
    client-output-buffer-limit pubsub 32mb 8mb 60
    hz 10
    aof-rewrite-incremental-fsync yes
3.2 Deployment
-
ConfigMap生成的配置文件放置于容器内
/etc/redis/redis.conf -
使挂载的ConfigMap生效:
command: ["redis-server","/etc/redis/redis.conf"] -
将容器的
/data持久化到redis-pvc,即172.16.62.20机器的/data/nfs/redis下
vim 3-deployment.yaml
---------------------------------

apiVersion: apps/v1
kind: Deployment
metadata:
  name: redis
  labels:
    app: redis
spec:
  strategy:
    type: Recreate
  selector:
    matchLabels:
      app: redis
  template:
    metadata:
      labels:
        app: redis
      annotations:
        version/date: "20210310"
        version/author: "lc"
    spec:
      containers:
      - name: redis
        image: redis
        imagePullPolicy: Always
        command: ["redis-server","/etc/redis/redis.conf"]
        ports:
        - containerPort: 6379
        volumeMounts:
        - name: redis-config
          mountPath: /etc/redis/redis.conf
          subPath: redis.conf
        - name: redis-persistent-storage
          mountPath: /data
      volumes:
      - name: redis-config
        configMap:
          name: redis
          items:
          - key: redis.conf
            path: redis.conf
      - name: redis-persistent-storage
        persistentVolumeClaim:
          claimName: redis-pvc
3.3 Service
- 通过NodePort方式暴露服务,注意是否开启了指定nodeport(30379)的访问权限
vim 4-service.yaml
---------------------------------

kind: Service
apiVersion: v1
metadata:
  name: redis
spec:
  type: NodePort
  selector:
    app: redis
  ports:
  - port: 6379
    targetPort: 6379
    nodePort: 30379
3.4 运行
-
上述yaml文件可写在一个文件内,用
---分隔 -
一键部署:
kubectl apply -f .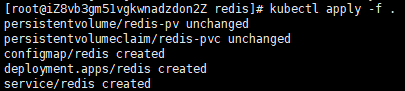

-
查询运行情况

-
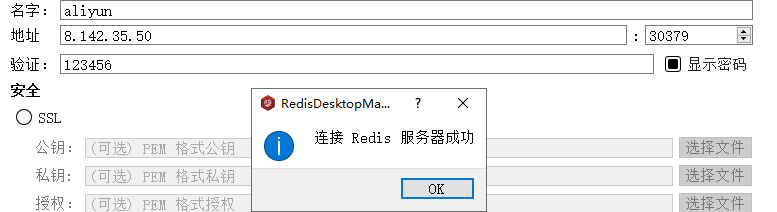
测试:Redis Desktop工具登录:
- 连接地址(集群任一节点的外网IP):8.142.35.50:30379,密码:123456
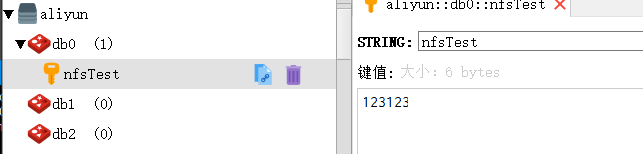
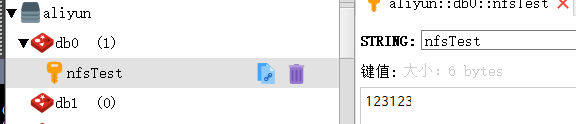
3.5 持久化测试
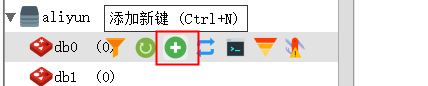
-
添加新键
-
查看键值
-
删除pod

-
自动新建pod后,查询键值是否存在
-
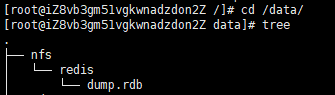
查询是持久化目录是否生成文件
4. 数据迁移
4.1 数据备份
-
若源redis配置有持久化,直接拷贝持久化目录下的dump.rdb
-
若源redis不支持持久化,则进入容器生成dump.rdb并拷出
-
进入容器:
kubectl exec -it redis-xxx /bin/bash -
进入redis命令台:
redis-cli -
密码认证:
auth password -
保存数据:
save -
退出redis命令台:
quit -
退出容器:
exit -
从容器中取出数据:
kubectl cp -n namespace Pod_Name:/data/dump.rdb ./ -
传输至远程主机:
scp dump.rdb root@目标服务器:/目录
-
4.2 数据还原
-
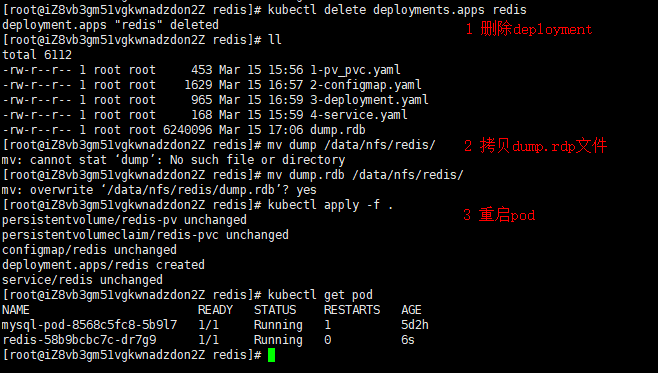
停止redis,直接删除创建的deployment
-
拷贝dump.rdb至目标redis的持久化目录下(注:将覆盖目标redis的数据)
-
重启pod:
kubectl apply -f 3-deployment.yaml
-
查询键值,可发现源redis的数据已全部复现
若本篇内容对您有所帮助,请三连点赞,关注,收藏支持下~
版权声明:本文内容由互联网用户自发贡献,该文观点仅代表作者本人。本站仅提供信息存储空间服务,不拥有所有权,不承担相关法律责任。如发现本站有涉嫌侵权/违法违规的内容, 请发送邮件至 举报,一经查实,本站将立刻删除。
文章由极客之家整理,本文链接:https://www.bmabk.com/index.php/post/70898.html

