
这篇文章将对上一篇文章:SSM项目整合Shiro进行身份验证中的身份验证流程进行分析。
这是项目中的具体使用,分为以下三个步骤:
- 创建Subject对象
- 封装UsernamePasswordToken 对象token
- 调用Subject对象的login方法进行登录认证
Subject currentUser = SecurityUtils.getSubject();
// 把用户名和密码封装为 UsernamePasswordToken 对象
UsernamePasswordToken token = new UsernamePasswordToken(username, password);
currentUser.login(token);
从应用程序角度的来观察如何使用Shiro完成工作,如图(选取自:第一章 Shiro简介——《跟我学Shiro》):

可以看到:应用代码直接交互的对象是Subject,也就是说Shiro的对外API核心就是Subject;其每个API的含义:
- Subject:主体,代表了当前“用户”,这个用户不一定是一个具体的人,与当前应用交互的任何东西都是Subject,如网络爬虫,机器人等;即一个抽象概念;所有Subject都绑定到SecurityManager,与Subject的所有交互都会委托给SecurityManager;可以把Subject认为是一个门面;SecurityManager才是实际的执行者;
- SecurityManager:安全管理器;即所有与安全有关的操作都会与SecurityManager交互;且它管理着所有Subject;可以看出它是Shiro的核心,它负责与后边介绍的其他组件进行交互,如果学习过SpringMVC,你可以把它看成DispatcherServlet前端控制器;
- Realm:域,Shiro从从Realm获取安全数据(如用户、角色、权限),就是说SecurityManager要验证用户身份,那么它需要从Realm获取相应的用户进行比较以确定用户身份是否合法;也需要从Realm得到用户相应的角色/权限进行验证用户是否能进行操作;可以把Realm看成DataSource,即安全数据源。
下面根据这三个步骤来分析相关的类:
一、SecurityUtils
在看SecurityUtils前,先看一下SecurityManager的定义。SecurityManager接口在Shiro中是最为核心的接口。SecurityManager接口的定义:
public interface SecurityManager extends Authenticator, Authorizer, SessionManager {
    //登录
    Subject login(Subject subject, AuthenticationToken authenticationToken) throws AuthenticationException;
   //登出
    void logout(Subject subject);
    //创建subject
    createSubject(SubjectContext context);
}
SecurityUtils类核心功能是获取SecurityManager以及Subject。下面来看看SecurityUtils的方法:
1.操作SecurityManager
首先从ThreadContext中获取,如果没有,则从SecurityUtils属性securityManager中获取。一定要存在一个SecurityManager实例对象,否则抛异常。
   public static SecurityManager getSecurityManager() throws UnavailableSecurityManagerException {
        SecurityManager securityManager = ThreadContext.getSecurityManager();
        if (securityManager == null) {
            securityManager = SecurityUtils.securityManager;
        }
        if (securityManager == null) {
            String msg = "No SecurityManager accessible to the calling code, either bound to the " +
                    ThreadContext.class.getName() + " or as a vm static singleton.  This is an invalid application " +
                    "configuration.";
            throw new UnavailableSecurityManagerException(msg);
        }
        return securityManager;
    }
此静态方法调用主要用于框架开发支持。我们在applicationContext.xml中注入了securityManager,所以无需手动调用此方法创建securityManager。
    public static void setSecurityManager(SecurityManager securityManager) {
        SecurityUtils.securityManager = securityManager;
    }
值得一提的是SecurityManager 在SecuritUtils中是静态的,也就是说SecurityManager对象在应用中是全局唯一的。
private static SecurityManager securityManager;
2.获取Subject
首先从ThreadContext中获取,如果不存在,则创建新的Subject,再存放到ThreadContext中,以便下次可以获取。
public static Subject getSubject() {
	Subject subject = ThreadContext.getSubject();
	if (subject == null) {
		subject = (new Subject.Builder()).buildSubject();
		ThreadContext.bind(subject);
	}
	return subject;
}
在上面的代码中是先调用 Subject.Builder类提供的无参构造方法,然后在这个无参构造方法中,以当前应用全局唯一的SecurityManager对象为参调用了构造方法。对应当前subject创建了subjectContext,并配置SecurityManager对象。如下:
        public Builder() {
            this(SecurityUtils.getSecurityManager());
        }
        public Builder(SecurityManager securityManager) {
            if (securityManager == null) {
                throw new NullPointerException("SecurityManager method argument cannot be null.");
            }
            this.securityManager = securityManager;
            this.subjectContext = newSubjectContextInstance();
            if (this.subjectContext == null) {
                throw new IllegalStateException("Subject instance returned from 'newSubjectContextInstance' " +
                        "cannot be null.");
            }
            this.subjectContext.setSecurityManager(securityManager);
        }
而buildSubject()方法则实际上是调用SecurityManager接口中的createSubject(SubjectContext subjectContext)方法。
        public Subject buildSubject() {
            return this.securityManager.createSubject(this.subjectContext);
        }
通过上面的调用即完成了完成了第一步中当前用户subject的创建。
二、UsernamePasswordToken分析
UsernamePasswordToken继承自AutenticationToken,AuthenticationToken的继承关系如图:
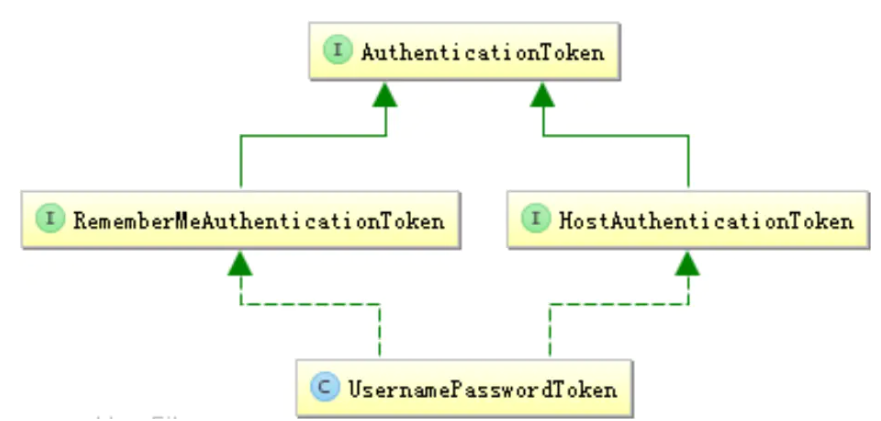
UsernamePasswordToken类是以用户名作为身份,密码作为凭证。也实现了 HostAuthenticationToken,RememberMeAuthenticationToken接口,提供host,rememberMe功能。
public class UsernamePasswordToken implements HostAuthenticationToken, RememberMeAuthenticationToken {
    private String username;

    private char[] password;
    private boolean rememberMe = false;
    private String host;

    public UsernamePasswordToken(final String username, final String password) {
        this(username, password != null ? password.toCharArray() : null, false, null);
    }
//一系列的构造方法
//一系列的getter和setter方法
    public void clear() {
        this.username = null;
        this.host = null;
        this.rememberMe = false;

        if (this.password != null) {
            for (int i = 0; i < password.length; i++) {
                this.password[i] = 0x00;
            }
            this.password = null;
        }

    }
//toString() 方法
}
三、Token是如何传到AuthenticatingRealm的
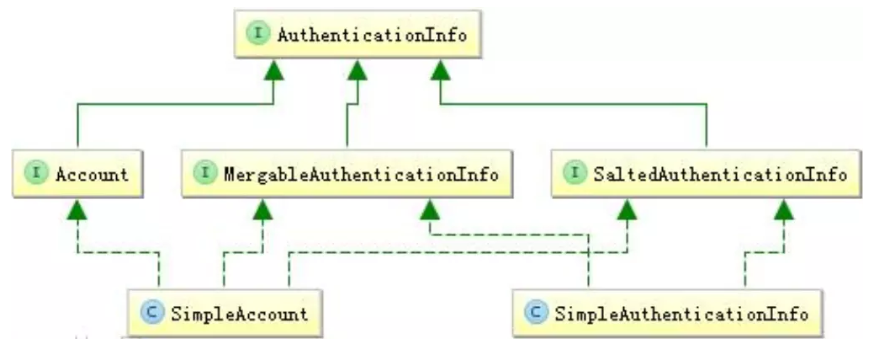
四、SimpleAuthenticationInfo详细分析
AuthenticationInfo对象中存储的是主体(Subject)的身份认证信息,而AuthenticationToken中的身份/凭证是用户提交的数据,还没有经过认证。Shiro会调用CredentialsMatcher对象的doCredentialsMatch方法对AuthenticationInfo对象和AuthenticationToken进行匹配。匹配成功则表示主体(Subject)认证成功,否则表示认证失败。
而项目中使用的SimpleAuthenticationInfo是AuthenticationInfo的子类,AuthenticationInfo继承关系如图:
部分源码如下:
/**
 * 身份集合
 */
protected PrincipalCollection principals;

/**
 * 凭证
 */
protected Object credentials;

/**
 * 加密的盐值
 */
protected ByteSource credentialsSalt;

    public SimpleAuthenticationInfo(Object principal, Object hashedCredentials, ByteSource credentialsSalt, String realmName) {
        this.principals = new SimplePrincipalCollection(principal, realmName);
        this.credentials = hashedCredentials;
        this.credentialsSalt = credentialsSalt;
    }
五、Shiro是怎么进行密码比对的
密码的比对是由AuthenticatingRealm的assertCredentialsMatch方法中调用doCredentialsMatch来进行比对的
    protected void assertCredentialsMatch(AuthenticationToken token, AuthenticationInfo info) throws AuthenticationException {
        CredentialsMatcher cm = getCredentialsMatcher();
        if (cm != null) {
            if (!cm.doCredentialsMatch(token, info)) {
                //not successful - throw an exception to indicate this:
                String msg = "Submitted credentials for token [" + token + "] did not match the expected credentials.";
                throw new IncorrectCredentialsException(msg);
            }
        } else {
            throw new AuthenticationException("A CredentialsMatcher must be configured in order to verify " +
                    "credentials during authentication.  If you do not wish for credentials to be examined, you " +
                    "can configure an " + AllowAllCredentialsMatcher.class.getName() + " instance.");
        }
    }
前面在applicationContext中配置了CredentialsMatcher接口的实现类HashedCredentialsMatcher
    <bean id="jdbcRealm" class="com.learn.shiro.realms.ShiroRealm">
        <property name="credentialsMatcher">
         <!-- 凭证匹配器的类型 -->
        <bean class="org.apache.shiro.authc.credential.HashedCredentialsMatcher">
          <!--加密算法 -->
             <property name="hashAlgorithmName" value="MD5"></property>
         <!-- 加密次数 -->
             <property name="hashIterations" value="1024"></property>
        </bean>
        </property>
    </bean>
于是assertCredentialsMatch()方法中的cm为上面配置的HashedCredentialsMatcher对象,cm.doCredentialsMatch(token, info)接着调用HashedCredentialsMatcher的doCredentialsMatch()方法。
    @Override
    public boolean doCredentialsMatch(AuthenticationToken token, AuthenticationInfo info) {
        Object tokenHashedCredentials = hashProvidedCredentials(token, info);
        Object accountCredentials = getCredentials(info);
        return equals(tokenHashedCredentials, accountCredentials);
    }
继续进入到hashProvidedCredentials()方法实现中,方法中获取到盐值salt后继续调用同名的有salt参数的方法。
    protected Object hashProvidedCredentials(AuthenticationToken token, AuthenticationInfo info) {
        Object salt = null;
        if (info instanceof SaltedAuthenticationInfo) {
            salt = ((SaltedAuthenticationInfo) info).getCredentialsSalt();
        } else {
            //retain 1.0 backwards compatibility:
            if (isHashSalted()) {
                salt = getSalt(token);
            }
        }
        return hashProvidedCredentials(token.getCredentials(), salt, getHashIterations());
    }
在这里就可以看到了Shiro是调用SimpleHash时指定散列算法对用户输入的密码进行加密的。而我们保存在数据库的值也要调用SimpleHash并指定相同的散列算法和salt,如MD5,来加密再保存。这样就提高了用户数据的安全性。
    protected Hash hashProvidedCredentials(Object credentials, Object salt, int hashIterations) {
        String hashAlgorithmName = assertHashAlgorithmName();
        return new SimpleHash(hashAlgorithmName, credentials, salt, hashIterations);
    }
参考:
https://www.iteye.com/blog/jinnianshilongnian-2021439
http://www.iocoder.cn/Shiro/xiaoqiyiye/SessionManager/
版权声明:本文内容由互联网用户自发贡献,该文观点仅代表作者本人。本站仅提供信息存储空间服务,不拥有所有权,不承担相关法律责任。如发现本站有涉嫌侵权/违法违规的内容, 请发送邮件至 举报,一经查实,本站将立刻删除。
文章由极客之家整理,本文链接:https://www.bmabk.com/index.php/post/44344.html

