
在使用Spring构建的应用程序中,适当使用事件发布与监听的机制可以使我们的代码灵活度更高,降低耦合度。Spring提供了完整的事件发布与监听模型,在该模型中,事件发布方只需将事件发布出去,无需关心有多少个对应的事件监听器;监听器无需关心是谁发布了事件,并且可以同时监听来自多个事件发布方发布的事件,通过这种机制,事件发布与监听是解耦的。
本节将举例事件发布与监听的使用,并介绍内部实现原理。
1. 简单案例
接下来我们首先创建一个Spring boot项目来实现一个简单案例。
1.1 自定义事件
Spring中使用ApplicationEvent接口来表示一个事件,所以我们自定义事件MyEvent需要实现该接口:
public class MyEvent extends ApplicationEvent {

    public MyEvent(Object source) {
        super(source);
    }

}
构造器source参数表示当前事件的事件源,一般传入Spring的context上下文对象即可。
1.2 事件发布器
事件发布通过事件发布器ApplicationEventPublisher完成,我们自定义一个事件发布器MyEventPublisher:
@Component
public class MyEventPublisher implements ApplicationEventPublisherAware, ApplicationContextAware {

    private ApplicationContext applicationContext;
    private ApplicationEventPublisher applicationEventPublisher;

    private final Logger logger = LoggerFactory.getLogger(this.getClass());

    @Override
    public void setApplicationContext(ApplicationContext applicationContext) throws BeansException {
        this.applicationContext = applicationContext;
    }

    @Override
    public void setApplicationEventPublisher(ApplicationEventPublisher applicationEventPublisher) {
        this.applicationEventPublisher = applicationEventPublisher;
    }

    public void publishEvent() {
        logger.info("开始发布自定义事件MyEvent");
        MyEvent myEvent = new MyEvent(applicationContext);
        applicationEventPublisher.publishEvent(myEvent);
        logger.info("发布自定义事件MyEvent结束");
    }
}
在自定义事件发布器MyEventPublisher中,我们需要通过ApplicationEventPublisher来发布事件,所以我们实现了ApplicationEventPublisherAware接口,通过回调方法setApplicationEventPublisher为MyEventPublisher的ApplicationEventPublisher属性赋值;同样的,我们自定义的事件MyEvent构造函数需要传入Spring上下文,所以MyEventPublisher还实现了ApplicationContextAware接口,注入了上下文对象ApplicationContext。
publishEvent方法发布了一个自定义事件MyEvent。事件发布出去后,我们接着编写相应的事件监听器。
1.3 注解监听
我们可以方便地通过@EventListener注解实现事件监听,编写MyEventPublisher:
@Component
public class MyAnnotationEventListener {

    private final Logger logger = LoggerFactory.getLogger(this.getClass());

    @EventListener
    public void onMyEventPublished(MyEvent myEvent) {
        logger.info("收到自定义事件MyEvent -- MyAnnotationEventListener");
    }
}
被@EventListener注解标注的方法入参为MyEvent类型,所以只要MyEvent事件被发布了,该监听器就会起作用,即该方法会被回调。
1.4 编程实现监听
除了使用@EventListener注解实现事件的监听外,我们也可以手动实现ApplicationListener接口来实现事件的监听(泛型为监听的事件类型):
@Component
public class MyEventListener implements ApplicationListener<MyEvent> {

    private final Logger logger = LoggerFactory.getLogger(this.getClass());

    @Override
    public void onApplicationEvent(MyEvent event) {
        logger.info("编程监听收到自定义事件MyEvent");
    }
}
1.5 测试
在启动类中测试事件的发布:
@SpringBootApplication
public class SpringEventDemoApplication {

    public static void main(String[] args) {
        ConfigurableApplicationContext context = SpringApplication.run(SpringEventDemoApplication.class, args);
        MyEventPublisher publisher = context.getBean(MyEventPublisher.class);
        publisher.publishEvent();
    }

}
运行程序,输出如下:

可以看到,两个监听器都监听到了事件的发布。此外细心的读者会发现,事件发布和事件监听是同一个线程完成的,过程为同步操作,只有当所有对应事件监听器的逻辑执行完毕后,事件发布方法才能出栈。后面进阶使用会介绍如何使用异步的方式进行事件监听。
2. 事件发布监听原理
2.1 事件发布监听过程
在事件发布方法上打个断点:

以debug的方式启动程序,程序执行到该断点后点击Step Into按钮,程序跳转到AbstractApplicationContext的publishEvent(ApplicationEvent event)方法:
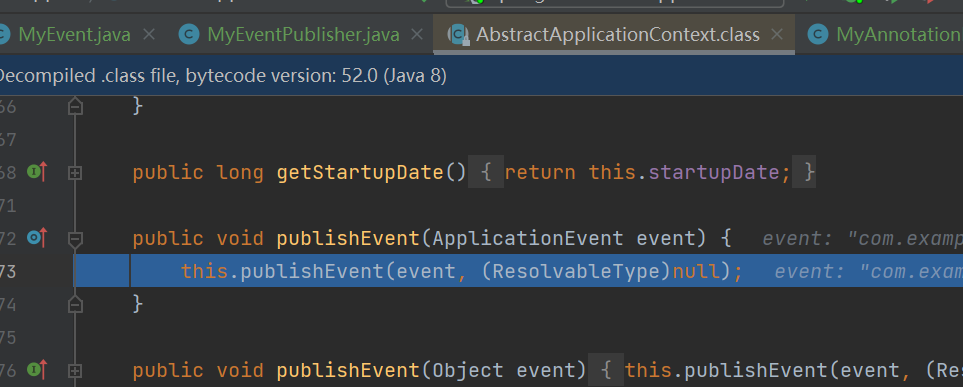
继续点击Step Into,程序跳转到AbstractApplicationContext的publishEvent(Object event, @Nullable ResolvableType eventType)方法:

最上面在判断当前event是否为ApplicationEvent,是的话直接强转为ApplicationEvent,不是的话则使用PayloadApplicationEvent包装。
然后我们来看下面的两个方法:
getApplicationEventMulticaster方法用于获取广播事件用的多播器,源码如下所示:
ApplicationEventMulticaster getApplicationEventMulticaster() throws IllegalStateException {
    if (this.applicationEventMulticaster == null) {
        throw new IllegalStateException("ApplicationEventMulticaster not initialized - call 'refresh' before multicasting events via the context: " + this);
    } else {
        return this.applicationEventMulticaster;
    }
}
这边是直接返回了AbstractApplicationContext的applicationEventMulticaster属性,那他是是何时赋值的呢,下面将会介绍到。
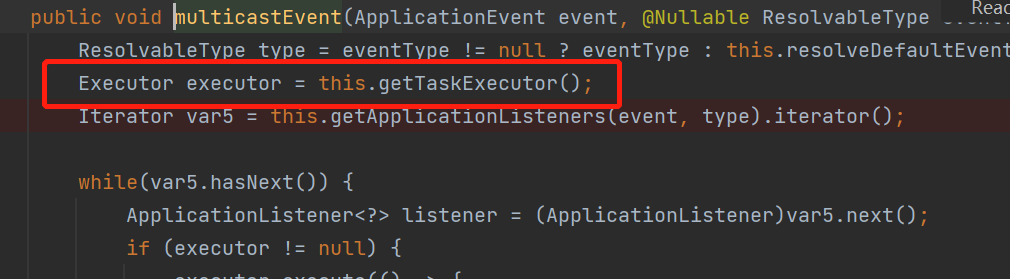
获取到事件多播器后,调用其multicastEvent方法广播事件,点击Step Into进入该方法内部查看具体逻辑:
public void multicastEvent(ApplicationEvent event, @Nullable ResolvableType eventType) {
    ResolvableType type = eventType != null ? eventType : this.resolveDefaultEventType(event);
    Executor executor = this.getTaskExecutor();
    Iterator var5 = this.getApplicationListeners(event, type).iterator();

    while(var5.hasNext()) {
        ApplicationListener<?> listener = (ApplicationListener)var5.next();
        if (executor != null) {
            executor.execute(() -> {
                this.invokeListener(listener, event);
            });
        } else {
            this.invokeListener(listener, event);
        }
    }

}
这里首先获取事件对应的所有监听器,然后遍历。如果executor不为空的话,则通过executor回调监听器逻辑(异步监听)。
查看invokeListener方法源码:
protected void invokeListener(ApplicationListener<?> listener, ApplicationEvent event) {
    ErrorHandler errorHandler = this.getErrorHandler();
    if (errorHandler != null) {
        try {
            this.doInvokeListener(listener, event);
        } catch (Throwable var5) {
            errorHandler.handleError(var5);
        }
    } else {
        this.doInvokeListener(listener, event);
    }

}
继续查看doInvokeListener方法源码:
private void doInvokeListener(ApplicationListener listener, ApplicationEvent event) {
    try {
        listener.onApplicationEvent(event);
    } catch (ClassCastException var6) {
        String msg = var6.getMessage();
        if (msg != null && !this.matchesClassCastMessage(msg, event.getClass())) {
            throw var6;
        }

        Log logger = LogFactory.getLog(this.getClass());
        if (logger.isTraceEnabled()) {
            logger.trace("Non-matching event type for listener: " + listener, var6);
        }
    }

}
在这可以发现是直接通过调用ApplicationListener的onApplicationEvent方法完成事件监听。
上述过程就是整个事件发布与监听的过程。
2.2 多播器创建过程
为了弄清楚AbstractApplicationContext的applicationEventMulticaster属性是何时赋值的(即事件多播器是何时创建的),我们在AbstractApplicationContext的applicationEventMulticaster属性上打个断点:

以debug的方式启动程序,程序跳转到了AbstractApplicationContext的initApplicationEventMulticaster方法中:
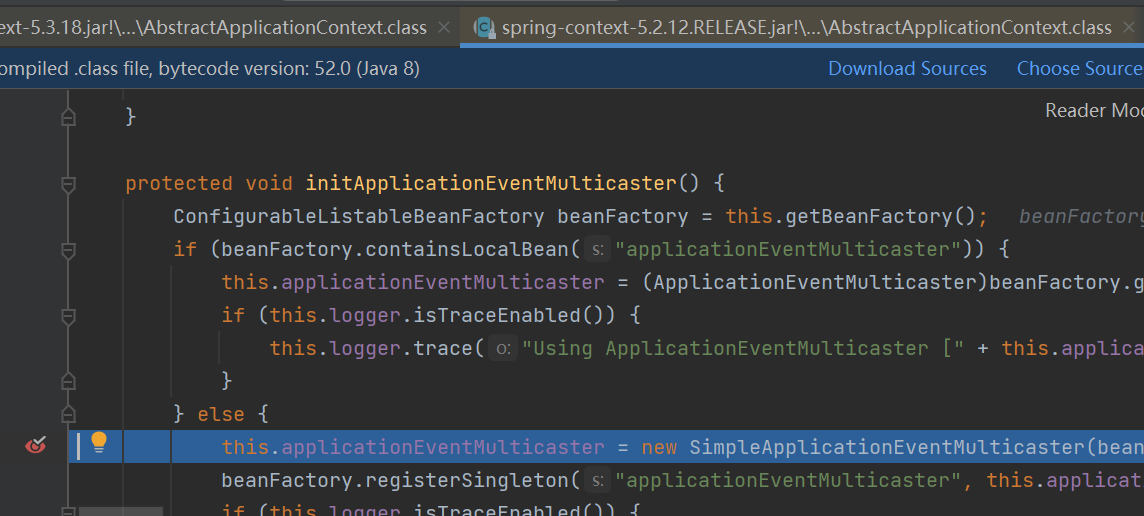
从这段代码中,我们可以看出首先初始化事件多播器,然后判断IOC容器中是否有applicationEventMulticaster的BEAN,如果有则直接赋值;如果没有则创建一个SimpleApplicationEventMulticaster,注册进IOC里面,并赋值。
通过跟踪方法调用栈,我们可以总结出程序执行到上述截图的过程:
- SpringBoot入口类的main方法启动应用:

- run方法内部包含refreshContext方法(刷新上下文):
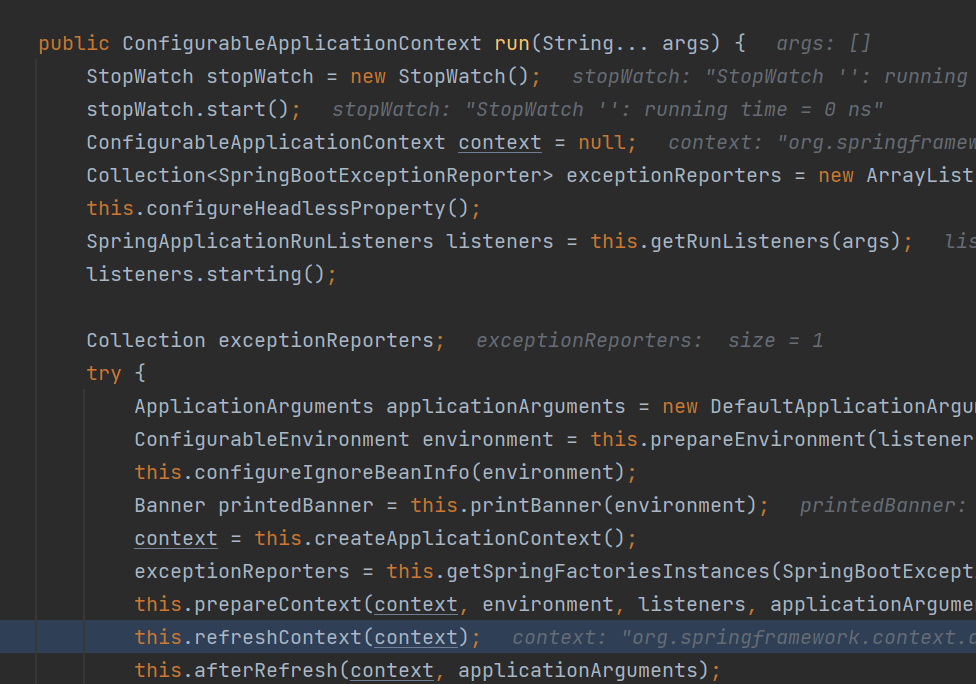
- refresh方法内部包含initApplicationEventMulticaster方法:

- 最后就是
initApplicationEventMulticaster方法创建多播器
2.3 监听器获取过程
在追踪事件发布与监听的过程中,我们知道事件对应的监听器是通过getApplicationListeners方法获取的,查看getApplicationListeners源码:
2.3.1 编程实现监听器注册过程
protected Collection<ApplicationListener<?>> getApplicationListeners(ApplicationEvent event, ResolvableType eventType) {
    //获取事件源的类型,然后构建一个监听器缓存键
    Object source = event.getSource();
    Class<?> sourceType = source != null ? source.getClass() : null;
    AbstractApplicationEventMulticaster.ListenerCacheKey cacheKey = new AbstractApplicationEventMulticaster.ListenerCacheKey(eventType, sourceType);

    //监听器缓存追踪器,用于缓存事件对应的监听器集合
    AbstractApplicationEventMulticaster.CachedListenerRetriever newRetriever = null;
    //通过上面构造的缓存键,从缓存中获取对应的追踪器
    AbstractApplicationEventMulticaster.CachedListenerRetriever existingRetriever = (AbstractApplicationEventMulticaster.CachedListenerRetriever)this.retrieverCache.get(cacheKey);
    //第一次获取是空的,所以还需要走if的逻辑
    if (existingRetriever == null && (this.beanClassLoader == null || ClassUtils.isCacheSafe(event.getClass(), this.beanClassLoader) && (sourceType == null || ClassUtils.isCacheSafe(sourceType, this.beanClassLoader)))) {
        newRetriever = new AbstractApplicationEventMulticaster.CachedListenerRetriever();
        //直接new一个监听器缓存追踪器,放到缓存中
        existingRetriever = (AbstractApplicationEventMulticaster.CachedListenerRetriever)this.retrieverCache.putIfAbsent(cacheKey, newRetriever);
        if (existingRetriever != null) {
            newRetriever = null;
        }
    }

    if (existingRetriever != null) {
        Collection<ApplicationListener<?>> result = existingRetriever.getApplicationListeners();
        if (result != null) {
            return result;
        }
    }

    return this.retrieveApplicationListeners(eventType, sourceType, newRetriever);
}
其中retrieverCache的定义为final Map<ListenerCacheKey, CachedListenerRetriever> retrieverCache = new ConcurrentHashMap<>(64)。
接着查看retrieveApplicationListeners方法(方法见名知意,程序第一次获取事件对应的监听器时,缓存中是空的,所以继续检索获取事件对应的监听器):
private Collection<ApplicationListener<?>> retrieveApplicationListeners(ResolvableType eventType, @Nullable Class<?> sourceType, @Nullable AbstractApplicationEventMulticaster.CachedListenerRetriever retriever) {
    //存放当前事件对应的所有监听器
    List<ApplicationListener<?>> allListeners = new ArrayList();
    //存放过滤后的监听器
    Set<ApplicationListener<?>> filteredListeners = retriever != null ? new LinkedHashSet() : null;
    //存放过滤后的监听器BEAN名称
    Set<String> filteredListenerBeans = retriever != null ? new LinkedHashSet() : null;
    //从defaultRetriever的属性值中获取所有事件的监听器和bean名称集合
    LinkedHashSet listeners;
    LinkedHashSet listenerBeans;
    synchronized(this.defaultRetriever) {
        listeners = new LinkedHashSet(this.defaultRetriever.applicationListeners);
        listenerBeans = new LinkedHashSet(this.defaultRetriever.applicationListenerBeans);
    }

    //遍历所有的监听器,并添加到对应的集合中
    Iterator var9 = listeners.iterator();

    while(var9.hasNext()) {
        ApplicationListener<?> listener = (ApplicationListener)var9.next();
        if (this.supportsEvent(listener, eventType, sourceType)) {
            if (retriever != null) {
                filteredListeners.add(listener);
            }

            allListeners.add(listener);
        }
    }

    if (!listenerBeans.isEmpty()) {
        ConfigurableBeanFactory beanFactory = this.getBeanFactory();
        Iterator var16 = listenerBeans.iterator();

        while(var16.hasNext()) {
            String listenerBeanName = (String)var16.next();

            try {
                if (this.supportsEvent(beanFactory, listenerBeanName, eventType)) {
                    ApplicationListener<?> listener = (ApplicationListener)beanFactory.getBean(listenerBeanName, ApplicationListener.class);
                    if (!allListeners.contains(listener) && this.supportsEvent(listener, eventType, sourceType)) {
                        if (retriever != null) {
                            if (beanFactory.isSingleton(listenerBeanName)) {
                                filteredListeners.add(listener);
                            } else {
                                filteredListenerBeans.add(listenerBeanName);
                            }
                        }

                        allListeners.add(listener);
                    }
                } else {
                    Object listener = beanFactory.getSingleton(listenerBeanName);
                    if (retriever != null) {
                        filteredListeners.remove(listener);
                    }

                    allListeners.remove(listener);
                }
            } catch (NoSuchBeanDefinitionException var13) {
            }
        }
    }

    //对监听器排序
    AnnotationAwareOrderComparator.sort(allListeners);
    if (retriever != null) {
        //将过滤后的监听器集合赋值给事件缓存追踪器对象的相应属性
        if (filteredListenerBeans.isEmpty()) {
            retriever.applicationListeners = new LinkedHashSet(allListeners);
            retriever.applicationListenerBeans = filteredListenerBeans;
        } else {
            retriever.applicationListeners = filteredListeners;
            retriever.applicationListenerBeans = filteredListenerBeans;
        }
    }

    return allListeners;
}
从上面这段代码我们知道,用于遍历的监听器集合对象listeners和listenerBeans的值是从this.defaultRetriever的applicationListeners和applicationListenerBeans属性获取的,所以我们需要关注这些属性是何时被赋值的。defaultRetriever的类型为DefaultListenerRetriever:
我们查看addApplicationListener这个方法:
public void addApplicationListener(ApplicationListener<?> listener) {
    synchronized(this.defaultRetriever) {
        Object singletonTarget = AopProxyUtils.getSingletonTarget(listener);
        if (singletonTarget instanceof ApplicationListener) {
            this.defaultRetriever.applicationListeners.remove(singletonTarget);
        }

        this.defaultRetriever.applicationListeners.add(listener);
        this.retrieverCache.clear();
    }
}
可以看到,赋值操作发生在AbstractApplicationEventMulticaster的addApplicationListener方法中,那么addApplicationListener方法在哪调用的呢:
实际上我们在跟踪多播器创建过程的时候应该看到过相关源码,之前我们在这里创建多播器,那么监听器的注册也肯定实在这里,我们看registerListeners方法:
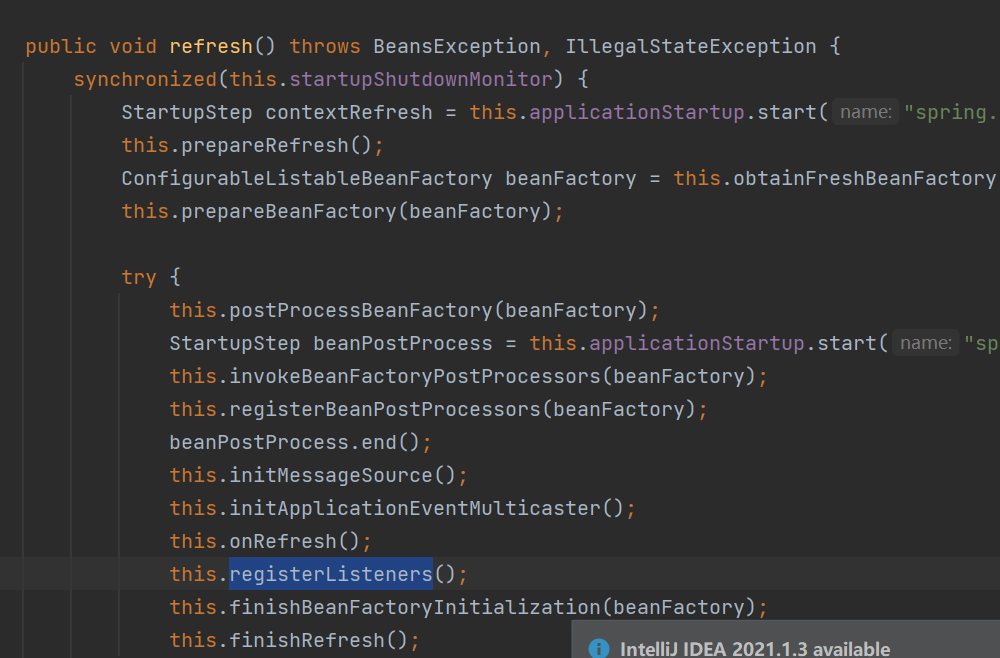
protected void registerListeners() {
    Iterator var1 = this.getApplicationListeners().iterator();

    while(var1.hasNext()) {
        ApplicationListener<?> listener = (ApplicationListener)var1.next();
        this.getApplicationEventMulticaster().addApplicationListener(listener);
    }

    String[] listenerBeanNames = this.getBeanNamesForType(ApplicationListener.class, true, false);
    String[] var7 = listenerBeanNames;
    int var3 = listenerBeanNames.length;

    for(int var4 = 0; var4 < var3; ++var4) {
        String listenerBeanName = var7[var4];
        this.getApplicationEventMulticaster().addApplicationListenerBean(listenerBeanName);
    }

    Set<ApplicationEvent> earlyEventsToProcess = this.earlyApplicationEvents;
    this.earlyApplicationEvents = null;
    if (!CollectionUtils.isEmpty(earlyEventsToProcess)) {
        Iterator var9 = earlyEventsToProcess.iterator();

        while(var9.hasNext()) {
            ApplicationEvent earlyEvent = (ApplicationEvent)var9.next();
            this.getApplicationEventMulticaster().multicastEvent(earlyEvent);
        }
    }

}
看到这里面熟悉的代码,大家应该可以断定这里就是监听器相关的代码了。我们在这里打个断点开始debug.
从方法调用栈我们可以总结出this.defaultRetriever的applicationListeners和applicationListenerBeans属性值赋值的过程:
- 首先main方法启动Boot程序;
run方法内部调用refreshContext刷新容器方法;refresh方法内部调用了registerListener方法注册监听器:registerListeners方法内部从IOC容器获取所有ApplicationListener类型Bean,然后赋值给this.defaultRetriever的applicationListeners和applicationListenerBeans属性。
2.3.2 注解监听器注册过程
查看@EventListener注解源码:
@Target({ElementType.METHOD, ElementType.ANNOTATION_TYPE})
@Retention(RetentionPolicy.RUNTIME)
@Documented
public @interface EventListener {
    @AliasFor("classes")
    Class<?>[] value() default {};

    @AliasFor("value")
    Class<?>[] classes() default {};

    String condition() default "";
}
该类实际上是由EventListenerMethodProcessor处理,所以我们查看他的相关源码。
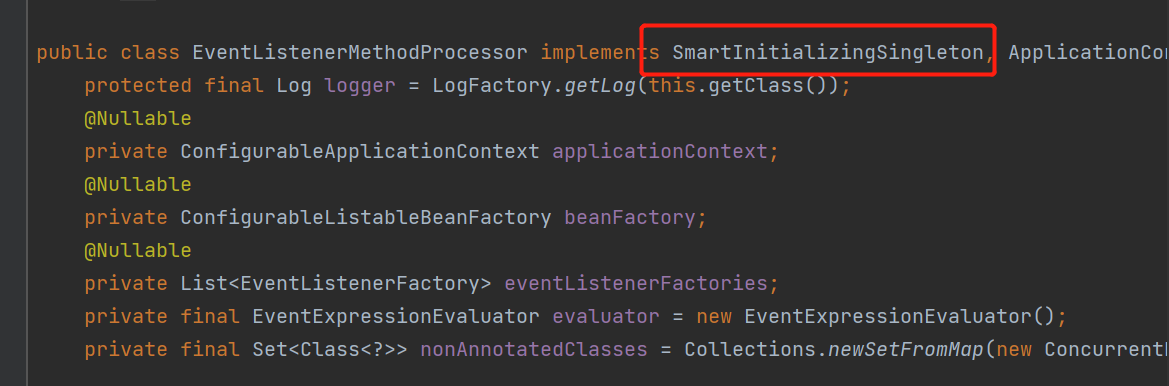
其实现了SmartInitializingSingleton接口,该接口包含afterSingletonsInstantiated方法:

这个方法的调用时机为:单实例Bean实例化后被调用,此时Bean已经被创建出来。
我们查看EventListenerMethodProcessor是如何实现该方法的:
public void afterSingletonsInstantiated() {
    ConfigurableListableBeanFactory beanFactory = this.beanFactory;
    Assert.state(this.beanFactory != null, "No ConfigurableListableBeanFactory set");
    String[] beanNames = beanFactory.getBeanNamesForType(Object.class);
    String[] var3 = beanNames;
    int var4 = beanNames.length;
    //从容器中获取所有OBJECT类型的BEAN,然后遍历
    for(int var5 = 0; var5 < var4; ++var5) {
        String beanName = var3[var5];
        if (!ScopedProxyUtils.isScopedTarget(beanName)) {
            Class type = null;

            try {
                type = AutoProxyUtils.determineTargetClass(beanFactory, beanName);
            } catch (Throwable var10) {
                if (this.logger.isDebugEnabled()) {
                    this.logger.debug("Could not resolve target class for bean with name '" + beanName + "'", var10);
                }
            }

            if (type != null) {
                if (ScopedObject.class.isAssignableFrom(type)) {
                    try {
                        Class<?> targetClass = AutoProxyUtils.determineTargetClass(beanFactory, ScopedProxyUtils.getTargetBeanName(beanName));
                        if (targetClass != null) {
                            type = targetClass;
                        }
                    } catch (Throwable var11) {
                        if (this.logger.isDebugEnabled()) {
                            this.logger.debug("Could not resolve target bean for scoped proxy '" + beanName + "'", var11);
                        }
                    }
                }

                try {
                    //逐个对bean进行处理
                    this.processBean(beanName, type);
                } catch (Throwable var9) {
                    throw new BeanInitializationException("Failed to process @EventListener annotation on bean with name '" + beanName + "'", var9);
                }
            }
        }
    }

}
继续查看processBean方法源码:
private void processBean(String beanName, Class<?> targetType) {
    if (!this.nonAnnotatedClasses.contains(targetType) && AnnotationUtils.isCandidateClass(targetType, EventListener.class) && !isSpringContainerClass(targetType)) {
        Map annotatedMethods = null;

        try {
            //获取被EventListener注解标注的方法
            annotatedMethods = MethodIntrospector.selectMethods(targetType, (methodx) -> {
                return (EventListener)AnnotatedElementUtils.findMergedAnnotation(methodx, EventListener.class);
            });
        } catch (Throwable var12) {
            if (this.logger.isDebugEnabled()) {
                this.logger.debug("Could not resolve methods for bean with name '" + beanName + "'", var12);
            }
        }

        if (CollectionUtils.isEmpty(annotatedMethods)) {
            this.nonAnnotatedClasses.add(targetType);
            if (this.logger.isTraceEnabled()) {
                this.logger.trace("No @EventListener annotations found on bean class: " + targetType.getName());
            }
        } else {
            //如果找到了被注解标记的方法则执行这段操作
            ConfigurableApplicationContext context = this.applicationContext;
            Assert.state(context != null, "No ApplicationContext set");
            List<EventListenerFactory> factories = this.eventListenerFactories;
            Assert.state(factories != null, "EventListenerFactory List not initialized");
            Iterator var6 = annotatedMethods.keySet().iterator();

            while(true) {
                while(var6.hasNext()) {
                    Method method = (Method)var6.next();
                    Iterator var8 = factories.iterator();
                    //通过事件监听器创建方法对应的ApplicationListener对象,然后通过适配器适配,最后将得到的监听器对象添加到上下文中
                    while(var8.hasNext()) {
                        EventListenerFactory factory = (EventListenerFactory)var8.next();
                        if (factory.supportsMethod(method)) {
                            Method methodToUse = AopUtils.selectInvocableMethod(method, context.getType(beanName));
                            ApplicationListener<?> applicationListener = factory.createApplicationListener(beanName, targetType, methodToUse);
                            if (applicationListener instanceof ApplicationListenerMethodAdapter) {
                                ((ApplicationListenerMethodAdapter)applicationListener).init(context, this.evaluator);
                            }

                            context.addApplicationListener(applicationListener);
                            break;
                        }
                    }
                }

                if (this.logger.isDebugEnabled()) {
                    this.logger.debug(annotatedMethods.size() + " @EventListener methods processed on bean '" + beanName + "': " + annotatedMethods);
                }
                break;
            }
        }
    }

}
至此,两种方式注册监听器的原理都搞清楚了。
3. 使用进阶与拓展
3.1 事件监听异步化
通过前面的分析,我们知道事件广播和监听是一个线程完成的同步操作,有时候为了让广播更有效率,我们可以考虑将事件监听过程异步化。
3.1.1 单个异步
先来看看如何实现单个监听器异步。
首先需要在springboot入口类上通过@EnableAsync注解开启异步,然后在需要异步执行的监听器方法上使用@Async注解标注,以MyAnnotationEventListener为例:
@Component
public class MyAnnotationEventListener {

    private final Logger logger = LoggerFactory.getLogger(this.getClass());

    @Async // 异步
    @EventListener
    public void onMyEventPublished(MyEvent myEvent) {
        logger.info("收到自定义事件MyEvent -- MyAnnotationEventListener");
    }
}
启动程序,输出如下:

通过日志可以看出来,该监听器方法已经异步化,执行线程为task-1。
3.1.2 整体异步
通过前面源码分析,我们知道多播器在广播事件时,会先判断是否有指定executor,有的话通过executor执行监听器逻辑。所以我们可以通过指定executor的方式来让所有的监听方法都异步执行:
新建一个配置类:
@Configuration
public class AsyncEventConfigure {

    @Bean(name = AbstractApplicationContext.APPLICATION_EVENT_MULTICASTER_BEAN_NAME)
    public ApplicationEventMulticaster simpleApplicationEventMulticaster() {
        SimpleApplicationEventMulticaster eventMulticaster = new SimpleApplicationEventMulticaster();
        eventMulticaster.setTaskExecutor(new SimpleAsyncTaskExecutor());
        return eventMulticaster;
    }
}
在配置类中,我们注册了一个名称为AbstractApplicationContext.APPLICATION_EVENT_MULTICASTER_BEAN_NAME(即applicationEventMulticaster)的Bean,用于覆盖默认的事件多播器,然后指定了TaskExecutor,SimpleAsyncTaskExecutor为Spring提供的异步任务executor。
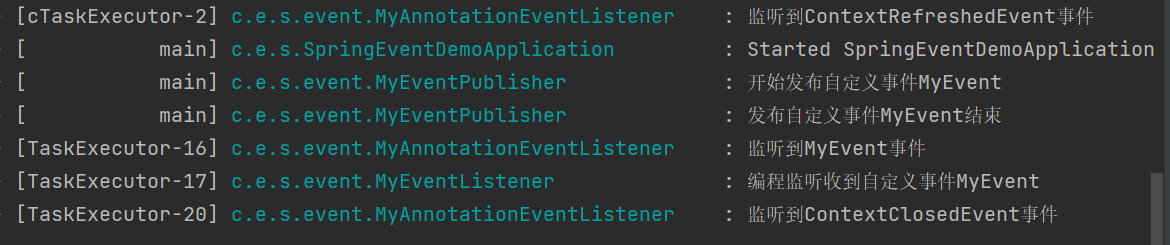
在启动项目前,先把之前在springboot入口类添加的@EnableAsync注解去掉,然后启动项目,输出如下:

可以看到,监听器事件都异步化了。
3.2 多事件监听器
事件监听器除了可以监听单个事件外,也可以监听多个事件(仅@EventListener支持),修改MyAnnotationEventListener:
@Component
public class MyAnnotationEventListener {

    private final Logger logger = LoggerFactory.getLogger(this.getClass());


    @EventListener(classes = {MyEvent.class, ContextRefreshedEvent.class, ContextClosedEvent.class})
    public void onMyEventPublished(ApplicationEvent event) {
        if (event instanceof MyEvent) {
            logger.info("监听到MyEvent事件");
        }
        if (event instanceof ContextRefreshedEvent) {
            logger.info("监听到ContextRefreshedEvent事件");
        }
        if (event instanceof ContextClosedEvent) {
            logger.info("监听到ContextClosedEvent事件");
        }
    }
}
该监听器将同时监听MyEvent、ContextRefreshedEvent和ContextClosedEvent三种类型事件:
3.3 监听器排序
单个类型事件也可以有多个监听器同时监听,这时候可以通过实现Ordered接口实现排序(或者@Order注解标注)。
修改MyEventListener:
@Component
public class MyEventListener implements ApplicationListener<MyEvent>, Ordered {

    private final Logger logger = LoggerFactory.getLogger(this.getClass());

    @Override
    public void onApplicationEvent(MyEvent event) {
        logger.info("收到自定义事件MyEvent,我的优先级较高");
    }

    @Override
    public int getOrder() {
        return 0;
    }
}
修改MyAnnotationEventListener:
@Component
public class MyAnnotationEventListener implements Ordered {

    private final Logger logger = LoggerFactory.getLogger(this.getClass());

    //    @Async // 异步
    @EventListener(classes = {MyEvent.class, ContextRefreshedEvent.class, ContextClosedEvent.class})
    public void onMyEventPublished(ApplicationEvent event) {
        if (event instanceof MyEvent) {
            logger.info("监听到MyEvent事件,我的优先级较低");
        }
        if (event instanceof ContextRefreshedEvent) {
            logger.info("监听到ContextRefreshedEvent事件");
        }
        if (event instanceof ContextClosedEvent) {
            logger.info("监听到ContextClosedEvent事件");
        }
    }

    @Override
    public int getOrder() {
        return 1;
    }
}
启动程序输出如下:

3.4 配合SpEL表达式
@EventListener注解还包含一个condition属性,可以配合SpEL表达式来条件化触发监听方法。修改MyEvent,添加一个boolean类型属性:
public class MyEvent extends ApplicationEvent {

    private boolean flag;

    public boolean isFlag() {
        return flag;
    }

    public void setFlag(boolean flag) {
        this.flag = flag;
    }

    public MyEvent(Object source) {
        super(source);
    }
}
在发布事件的时候,将该属性设置为false:
public void publishEvent() {
    logger.info("开始发布自定义事件MyEvent");
    MyEvent myEvent = new MyEvent(applicationContext);
    myEvent.setFlag(false); // 设置为false
    applicationEventPublisher.publishEvent(myEvent);
    logger.info("发布自定义事件MyEvent结束");
}
在MyAnnotationEventListener的@EventListener注解上演示如何使用SpEL:
@Component
public class MyAnnotationEventListener implements Ordered {

    private final Logger logger = LoggerFactory.getLogger(this.getClass());

    //    @Async // 异步
//    @EventListener(condition = "#event.flag", classes = {MyEvent.class, ContextRefreshedEvent.class, ContextClosedEvent.class})
    @EventListener(condition = "#event.flag", classes = {MyEvent.class})
    public void onMyEventPublished(ApplicationEvent event) {
        if (event instanceof MyEvent) {
            logger.info("监听到MyEvent事件,我的优先级较低");
        }
        if (event instanceof ContextRefreshedEvent) {
            logger.info("监听到ContextRefreshedEvent事件");
        }
        if (event instanceof ContextClosedEvent) {
            logger.info("监听到ContextClosedEvent事件");
        }
    }

    @Override
    public int getOrder() {
        return 1;
    }
}
condition = "#event.flag"的含义为,当前event事件(这里为MyEvent)的flag属性为true的时候执行。
启动程序,输出如下:
[外链图片转存失败,源站可能有防盗链机制,建议将图片保存下来直接上传(img-u2xYPghp-1651672994809)(https://gitee.com/cl1429745331/typora_imgs/raw/master/imgs/image-20220504220107477.png)]
因为我们发布的MyEvent的flag属性值为false,所以上面这个监听器没有被触发。
3.5 事务事件监听器
Spring 4.2开始提供了一个@TransactionalEventListener注解用于监听数据库事务的各个阶段:
- AFTER_COMMIT – 事务成功提交;
- AFTER_ROLLBACK – 事务回滚后;
- AFTER_COMPLETION – 事务完成后(无论是提交还是回滚);
- BEFORE_COMMIT – 事务提交前;
例子:
@TransactionalEventListener(phase = TransactionPhase.AFTER_COMMIT)
public void onTransactionChange(ApplicationEvent event){
    logger.info("监听到事务提交事件");
}
版权声明:本文内容由互联网用户自发贡献,该文观点仅代表作者本人。本站仅提供信息存储空间服务,不拥有所有权,不承担相关法律责任。如发现本站有涉嫌侵权/违法违规的内容, 请发送邮件至 举报,一经查实,本站将立刻删除。
文章由极客之家整理,本文链接:https://www.bmabk.com/index.php/post/16695.html

