
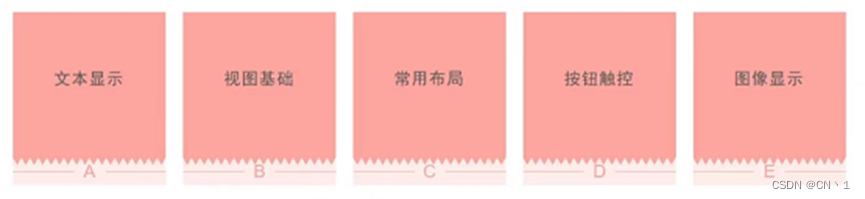
目录
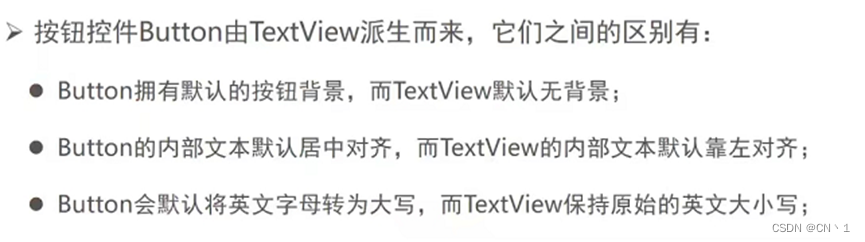
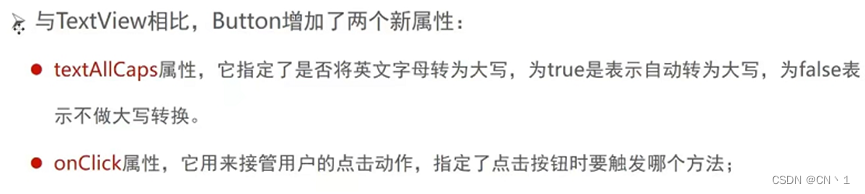
Android开发语言
Java kotlin

Android studio运行app方式
1.Android studio内置手机模拟器
2.USB直连真实机(真实机需要开启开发者模式,并开启开发者选择的USB 调试)
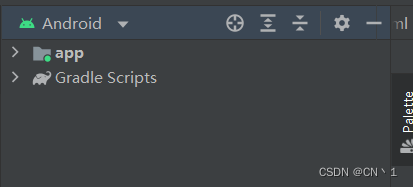
App工程目录结构
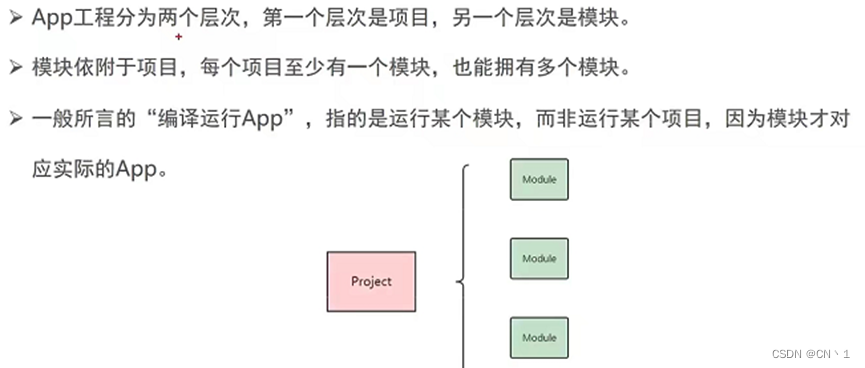
App项目的目录说明

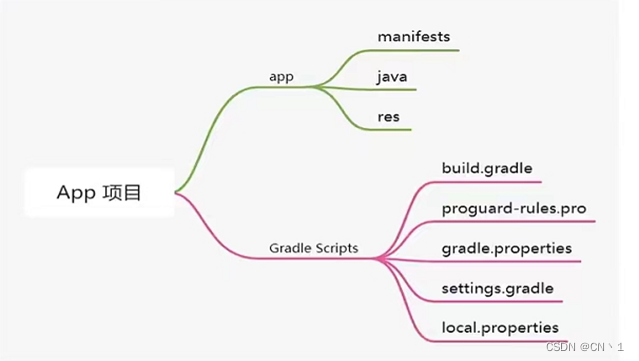
App及Gradle Scripts包含内容说明
Gradle
Gradle是一个项目自动化构建工具,帮我们做了依赖,打包,部署,发布渠道的差异管理等工作。

简单控件
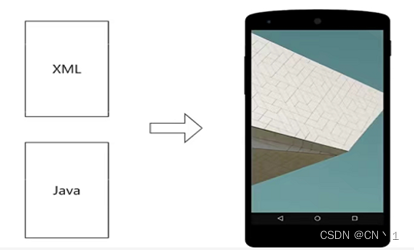
利用XML标记描绘应用界面
在开发中描绘界面和逻辑开发是分开的

界面显示与逻辑处理

Activity
Activity是一个应用程序组件,提供一个页面(屏幕),用来与用户交互。
界面显示和逻辑处理

清单文件
每个应用根目录都必须包含一个AndroidManifest.xml,并且文件名必须一摸一样。
这个文件中包含了APP的配置信息,系统需要根据里面的内容运行APP的代码,显示界面,
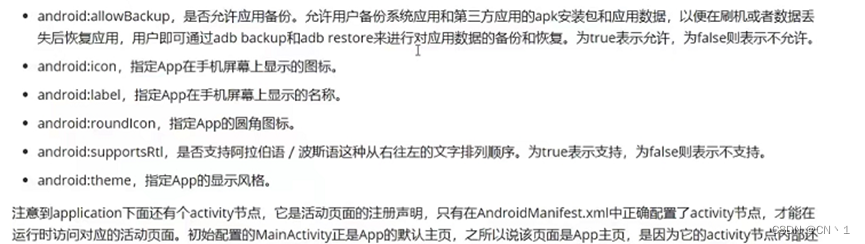
设置app配置信息,是否可备份,页面图标,启动图标等等….
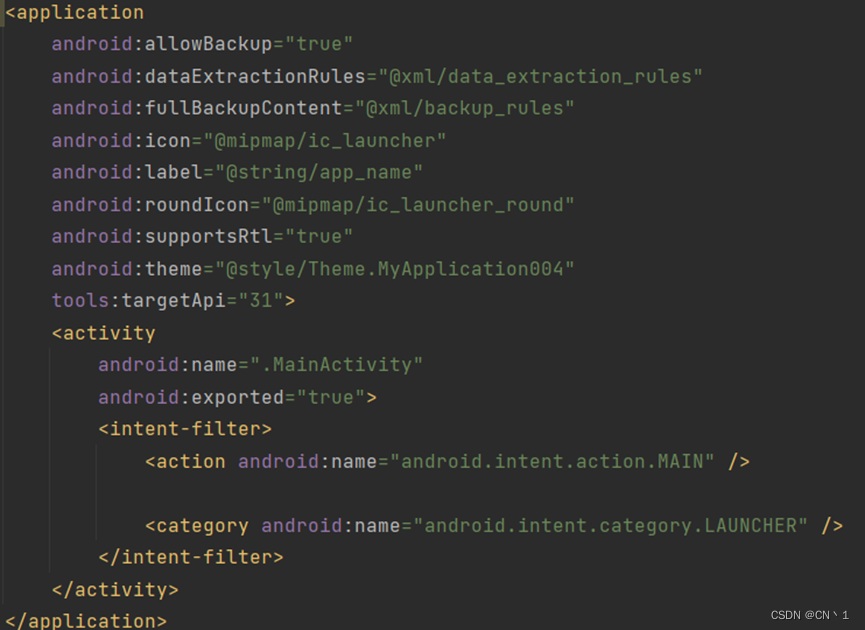
清单文件解读
创建简单文本控件步骤
1.先在layout下创建个activity 用作测试
2.在新建的activity下创建TextView—文本标签
android:layout_width=”wrap_content”
android:layout_height=”wrap_content”
其中wrap content 为:高度宽度包裹内容
android:id=”@+id/tchello”—设置控件ID
3.创建一个测试类
测试类继承AppCompatActivity—重写onCreate方法
4.设置文本控件内容的方式一
setContentView(R.layout.activity_text_view);1.调用setContentview方法—调用activity中设置的文本及文本设置
(R为自动创建的类对象)
TextView tv_hello = findViewById(R.id.tc_hello);
tv_hello.setText(R.string.hello);
2.通过调用findviewById参数为:activity中设置的ID
Tvhello接收后,再调用setText修改内容信息
设置文本大小

单位:px,dp和sp
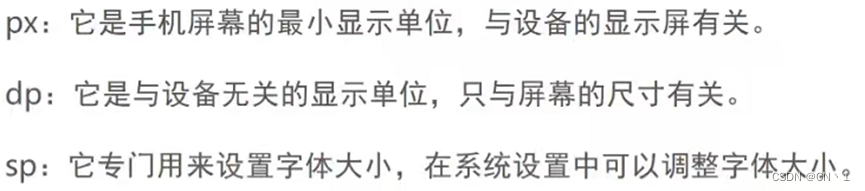
px,dp,sp ,dpi,dp和像素密度的解释
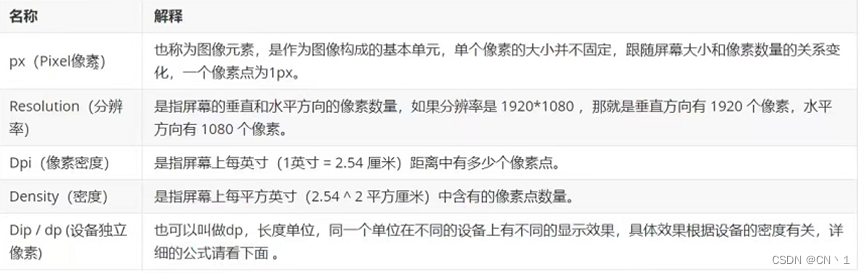
计算规则
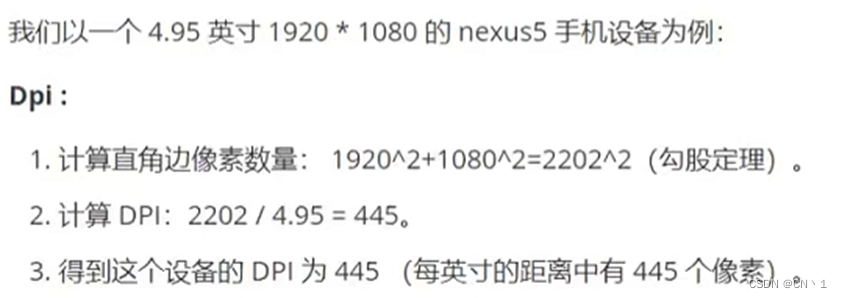
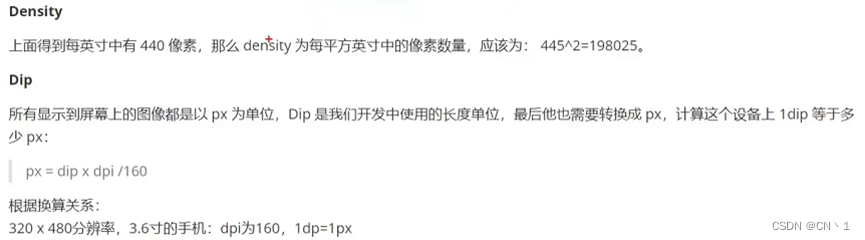
Dip大小与dpi有关—dpi大小与屏幕尺寸和分辨率有关
Px=dp*像素密度
所以,dip(dp)与像素密度有关,不与设备系统设置有关。

总结:

设置文本颜色
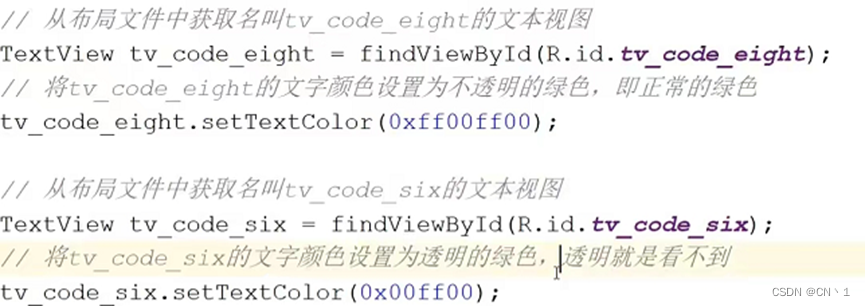
在JAVA代码中调用setTextColor方法调用文本颜色
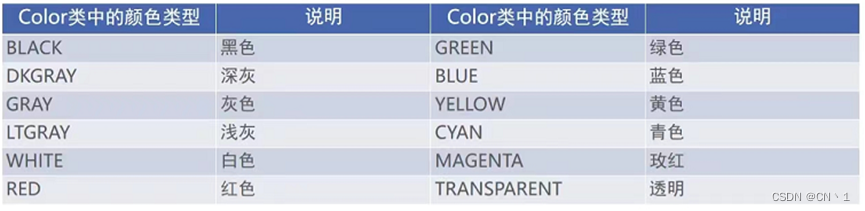
 RGB颜色定义
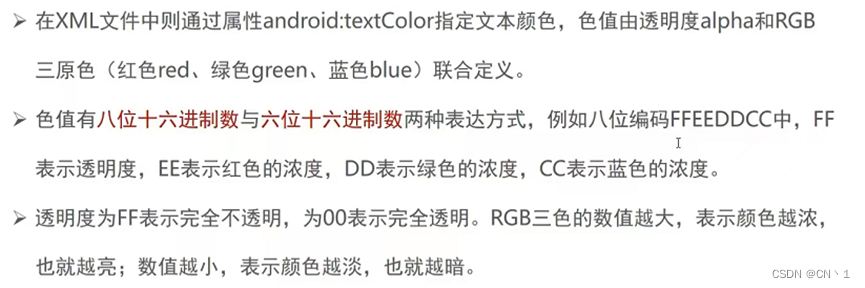
实例:
八进制和六进制颜色设置:
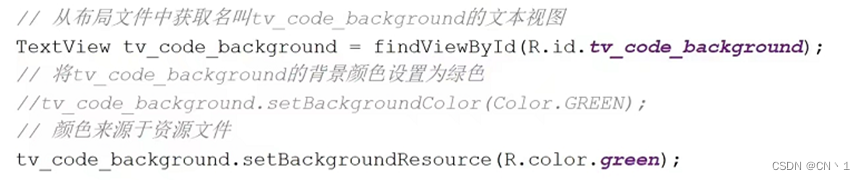
背景颜色的设置
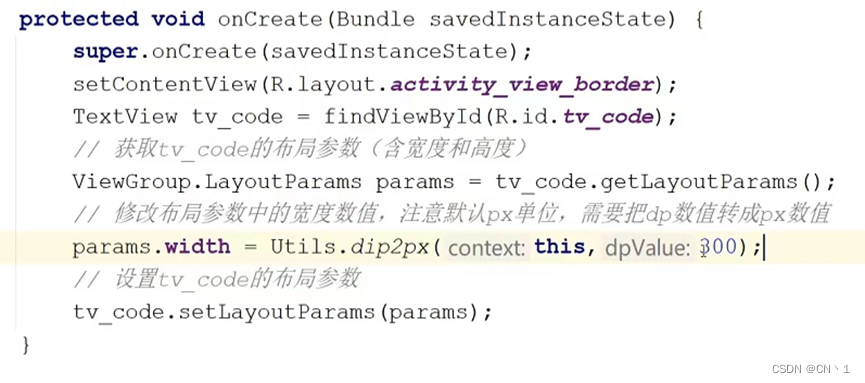
设置视图的宽高

自定义方法:将dp转为px
实现:

设置宽高实例:
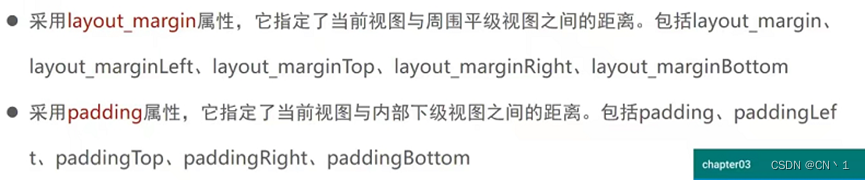
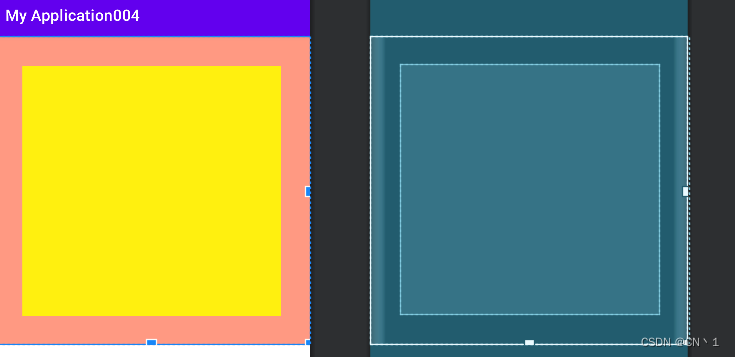
设置视图间距
设置视图间距的两种方式
 <TextView
        android:layout_width="match_parent"
        android:layout_height="match_parent"
        android:background="#fff00f"
        android:layout_margin="100px"
        android:padding="50dp"/>

    <TextView
        android:layout_width="match_parent"
        android:layout_height="match_parent"
        android:background="#ff0000"
        android:layout_margin="5px"/>
效果:
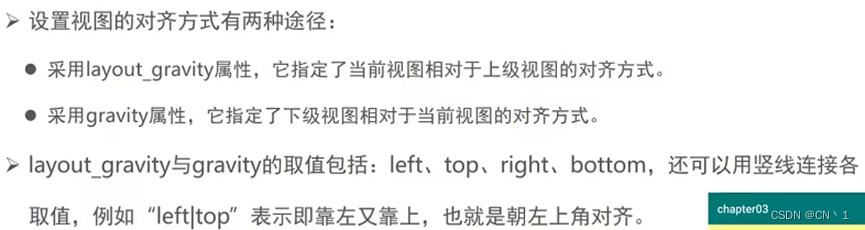
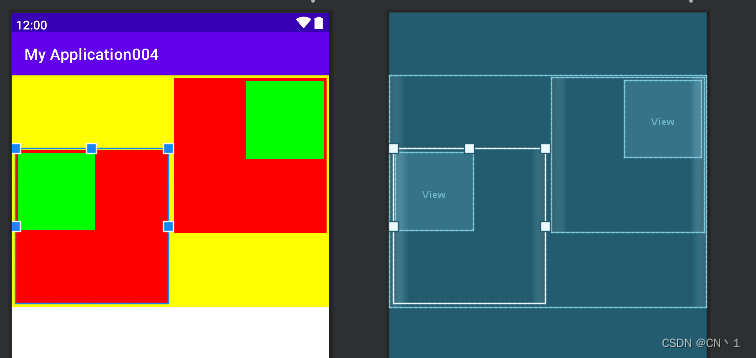
设置视图的对齐方式
<LinearLayout xmlns:android="http://schemas.android.com/apk/res/android"
    android:layout_width="match_parent"
    android:layout_height="300dp"
    android:background="#ffff00"
    android:orientation="horizontal">

    <LinearLayout
        android:layout_width="match_parent"
        android:layout_height="200dp"
        android:background="#ff0000"
        android:layout_weight="1"
        android:layout_margin="10px"
        android:layout_gravity="bottom"
        android:padding="10px"
        android:gravity="left">

        <View
            android:layout_width="100dp"
            android:layout_height="100dp"
            android:background="#00ff00"/>

    </LinearLayout>
    <LinearLayout
        android:layout_width="match_parent"
        android:layout_height="200dp"
        android:layout_margin="10px"
        android:background="#ff0000"
        android:layout_weight="1"
        android:padding="10px"
        android:gravity="right"
        >
        <View
            android:layout_width="100dp"
            android:layout_height="100dp"
            android:background="#00ff00"/>

    </LinearLayout>
</LinearLayout>
效果:
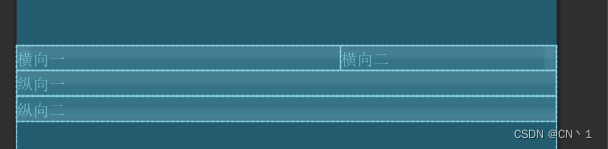
布局
LinearLayout(线性布局)
LinearLayout的权重说明
例:
a.weight=1
b.weight=2
则a占权重的三分之一,b占权重的三分之二
<LinearLayout xmlns:android="http://schemas.android.com/apk/res/android"
    android:layout_width="match_parent"
    android:layout_height="match_parent"
    android:orientation="vertical">

    <LinearLayout
        android:layout_width="match_parent"
        android:layout_height="wrap_content"
        android:orientation="horizontal">

        <TextView
            android:layout_width="0dp"
            android:layout_height="match_parent"
            android:layout_weight="3"
            android:text="横向一"/>
        <TextView
            android:layout_width="0dp"
            android:layout_height="match_parent"
            android:layout_weight="2"
            android:text="横向二"/>

    </LinearLayout>
    <LinearLayout
        android:layout_width="match_parent"
        android:layout_height="wrap_content"
        android:orientation="vertical">

        <TextView
            android:layout_width="match_parent"
            android:layout_height="0dp"
            android:layout_weight="1"
            android:text="纵向一"
            />

        <TextView
            android:layout_width="match_parent"
            android:layout_height="0dp"
            android:layout_weight="1"
            android:text="纵向二"
            />

    </LinearLayout>
 </LinearLayout>
效果:
RelativeLayout(相对布局)
<?xml version="1.0" encoding="utf-8"?>
<!--相对布局-->
<RelativeLayout xmlns:android="http://schemas.android.com/apk/res/android"
xmlns:app="http://schemas.android.com/apk/res-auto"
xmlns:tools="http://schemas.android.com/tools"
android:layout_width="match_parent"
android:layout_height="300dp"
android:background="#009987"
>
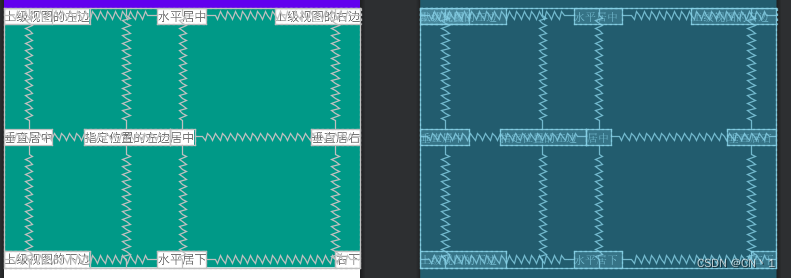
<TextView
android:id="@+id/tv_defual"
android:layout_width="wrap_content"
android:layout_height="wrap_content"
android:text="默认位置"
android:background="#ffffff"/>
<TextView
android:id="@+id/tv_parententer"
android:layout_width="wrap_content"
android:layout_height="wrap_content"
android:layout_centerInParent="true"
android:text="居中"
android:background="#ffffff"/>
<TextView
android:id="@+id/tv_parentleft"
android:layout_width="wrap_content"
android:layout_height="wrap_content"
android:layout_alignParentLeft="true"
android:text="上级视图的左边"
android:background="#ffffff"/>
<TextView
android:id="@+id/tv_parentright"
android:layout_width="wrap_content"
android:layout_height="wrap_content"
android:layout_alignParentRight="true"
android:text="上级视图的右边"
android:background="#ffffff"/>
<TextView
android:id="@+id/tv_parentbottom"
android:layout_width="wrap_content"
android:layout_height="wrap_content"
android:layout_alignParentBottom="true"
android:text="上级视图的下边"
android:background="#ffffff"/>
<TextView
android:id="@+id/tv_enterhorizontal"
android:layout_width="wrap_content"
android:layout_height="wrap_content"
android:layout_centerHorizontal="true"
android:text="水平居中"
android:background="#ffffff"/>
<TextView
android:id="@+id/tv_centerVertical"
android:layout_width="wrap_content"
android:layout_height="wrap_content"
android:layout_centerVertical="true"
android:text="垂直居中"
android:background="#ffffff"/>
<TextView
android:id="@+id/tv_enterbottom"
android:layout_width="wrap_content"
android:layout_height="wrap_content"
android:layout_alignParentBottom="true"
android:layout_centerHorizontal="true"
android:text="水平居下"
android:background="#ffffff"/>
<TextView
android:id="@+id/tv_enterright"
android:layout_width="wrap_content"
android:layout_height="wrap_content"
android:layout_alignParentRight="true"
android:layout_centerVertical="true"
android:text="垂直居右"
android:background="#ffffff"/>
<TextView
android:id="@+id/tv_bottomright"
android:layout_width="wrap_content"
android:layout_height="wrap_content"
android:layout_alignParentRight="true"
android:layout_alignParentBottom="true"
android:text="右下"
android:background="#ffffff"/>
<TextView
android:id="@+id/tv_toenterleft"
android:layout_width="wrap_content"
android:layout_height="wrap_content"
android:layout_toLeftOf="@id/tv_parententer"
android:layout_centerVertical="true"
android:text="指定位置的左边"
android:background="#ffffff"/>
</RelativeLayout>效果:
GridLayout(网格布局)
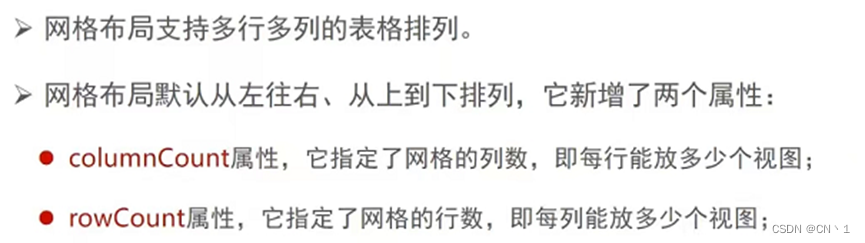
可以使用rowweight/columnweight指定权重、
<?xml version="1.0" encoding="utf-8"?>
<!--网格布局-->
<GridLayout xmlns:android="http://schemas.android.com/apk/res/android"
    xmlns:app="http://schemas.android.com/apk/res-auto"
    xmlns:tools="http://schemas.android.com/tools"
    android:layout_width="match_parent"
    android:layout_height="match_parent"
    android:rowCount="2"
    android:columnCount="2">

    <TextView
        android:layout_width="0dp"
        android:layout_height="wrap_content"
        android:layout_columnWeight="1"
        android:text="one"
        android:textColor="#000000"
        android:background="#ECA4A4"
        android:gravity="center"/>

    <TextView
        android:layout_width="0dp"
        android:layout_height="wrap_content"
        android:layout_columnWeight="1"
        android:text="two"
        android:gravity="center"
        android:textColor="#000000"
        android:background="#85CA35"/>
    <TextView
        android:layout_width="0dp"
        android:layout_height="wrap_content"
        android:layout_columnWeight="1"
        android:gravity="center"
        android:text="three"
        android:textColor="#000000"
        android:background="#E4B31F"/>
    <TextView
        android:layout_width="0dp"
        android:layout_height="wrap_content"
        android:layout_columnWeight="1"
        android:gravity="center"
        android:text="four"
        android:textColor="#000000"
        android:background="#0C9BDC"/>


</GridLayout>
效果:

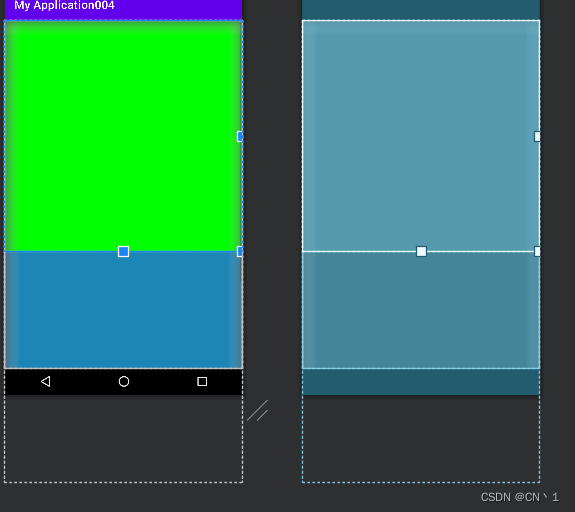
ScrollView(滚动视图)
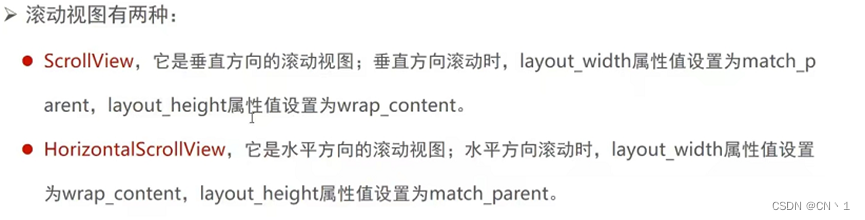
垂直滚动演示
 <ScrollView
        android:layout_width="match_parent"
        android:layout_height="wrap_content">

        <LinearLayout
            android:layout_width="match_parent"
            android:layout_height="wrap_content"
            android:orientation="vertical">

            <TextView
                android:layout_width="match_parent"
                android:layout_height="400dp"
                android:background="#00ff00" />

            <TextView
                android:layout_width="match_parent"
                android:layout_height="400dp"
                android:background="#1C86B6"/>
        </LinearLayout>

    </ScrollView>
效果:发布运行后可垂直滚动
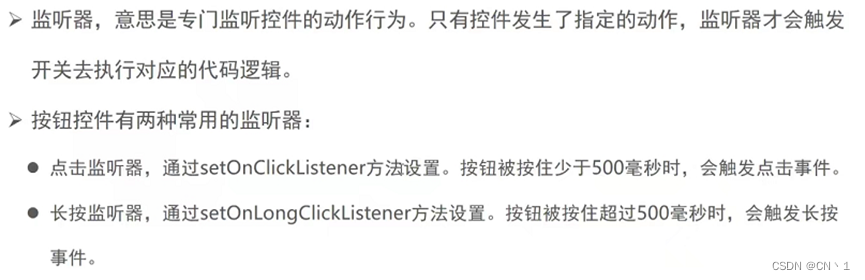
按钮属性
// OnClick基本淘汰
单击事件的长按事件
版权声明:本文内容由互联网用户自发贡献,该文观点仅代表作者本人。本站仅提供信息存储空间服务,不拥有所有权,不承担相关法律责任。如发现本站有涉嫌侵权/违法违规的内容, 请发送邮件至 举报,一经查实,本站将立刻删除。
文章由极客之家整理,本文链接:https://www.bmabk.com/index.php/post/154598.html

