
前言


本文为 【Spring】Resources与Spring表达式语言(SpEL) 等相关知识,下边将对Resources(包含:Resource接口、内置的 Resource的实现、ResourceLoader接口、应用环境和资源路径),验证、数据绑定和类型转换(包含:BeanWrapper、PropertyEditor属性编辑器、类型转换、配置 DataBinder进行数据验证)等,Spring表达式语言(SpEL)(具体包含:SpEL简介、Bean 定义中的表达式)等进行详尽介绍~
📌博主主页:小新要变强 的主页
👉Java全栈学习路线可参考:【Java全栈学习路线】最全的Java学习路线及知识清单,Java自学方向指引,内含最全Java全栈学习技术清单~
👉算法刷题路线可参考:算法刷题路线总结与相关资料分享,内含最详尽的算法刷题路线指南及相关资料分享~
👉Java微服务开源项目可参考:企业级Java微服务开源项目(开源框架,用于学习、毕设、公司项目、私活等,减少开发工作,让您只关注业务!)
↩️本文上接:最新最全面的Spring详解(二)——classpath扫描和组件管理
目录
文章标题

三、Resources
Java拥有标准【java.net.URL】类和各种URL前缀的标准处理程序,不幸的是,对于所有底层资源的访问来说,还不够充分。 例如,没有标准化的【URL】用来访问需要从类路径或相对于【ServletContext】获取资源的方式,而spring为我们解决了这些问题。
1️⃣Resource接口
Spring的【Resource】接口位于【org.springframework.core.io】 包,他抽象了对资源的访问的能力。 下面提供了【Resource】接口的概述, Spring本身广泛地使用了Resource接口。
public interface Resource extends InputStreamSource {

    boolean exists();
    boolean isReadable();
    boolean isOpen();
    boolean isFile();
    URL getURL() throws IOException;
    URI getURI() throws IOException;
    File getFile() throws IOException;
    ReadableByteChannel readableChannel() throws IOException;
    long contentLength() throws IOException;
    long lastModified() throws IOException;
    Resource createRelative(String relativePath) throws IOException;
    String getFilename();
    String getDescription();
}
2️⃣内置的 Resource的实现
Spring包含了几个内置的 Resource 实现,如下所示:
🍀(1)UrlResource
UrlResource包装了java.net.URL,可以用来访问任何需要通过URL访问的对象,例如文件、HTTPS目标、FTP目标等。 所有URL都用一个标准化的“String”表示,这样就可以使用适当的标准化前缀来表示不同类型的URL。 这包括用于访问文件系统路径的’ file: ‘,用于通过https协议访问资源的’ https: ‘,用于通过ftp访问资源的’ ftp: ‘等。
🍀(2)ClassPathResource
该类表示应该从【类路径】中获取的资源。 它使用线程上下文类装入器、给定的类装入器或给定的类装入资源。
🍀(3)FileSystemResource
这是【java.io】的【Resource】实现。
🍀(4)PathResource
这是一个【java.nio.file】的【资源】实现。
🍀(5)ServletContextResource
这是【ServletContext】资源的【Resource】实现,它解释了相关web应用程序根目录中的相对路径。
🍀(6)InputStreamResource
一个【InputStreamResource】是一个给定的【InputStream】的【Resource】实现。 只有当没有特定的【资源】实现适用时,才应该使用它。 特别是,如果可能的话,最好使用【ByteArrayResource】或任何基于文件的【Resource】实现。
🍀(7)ByteArrayResource
这是一个给定字节数组的【资源】实现。 它为给定的字节数组创建一个ByteArrayInputStream。
它可以从任何给定的字节数组加载内容,而不需要求助于一次性使用的InputStreamResource。
3️⃣ResourceLoader接口
ResourceLoader 接口定义了加载资源的基本能力和方式。 下面的例子显示了 ResourceLoader接口定义:
public interface ResourceLoader {

    Resource getResource(String location);

    ClassLoader getClassLoader();
}
所有应用程序上下文(applicationContext)都实现了【ResourceLoader】接口。 因此,可以所有的【应用程序上下文实现(ClassPathXmlA...)】都拥有加载资源的能力。
当您在特定的应用程序上下文中调用’ getResource() ‘时,如果指定的位置路径【没有特定的前缀】,您将返回【适合该特定应用程序上下文中】的’ Resource ‘类型。 例如,假设以下代码片段是在’ ClassPathXmlApplicationContext ‘实例上运行的:
Resource template = ctx.getResource("some/resource/path/myTemplate.txt");
- 针对
ClassPathXmlApplicationContext,该代码返回’ ClassPathResource ‘。 - 针对
FileSystemXmlApplicationContext实例运行相同的方法,它将返回 ‘FileSystemResource’。 - 针对
WebApplicationContext,它会返回’ ServletContextResource ‘。它同样会为每个上下文返回适当的对象。
另一方面,你也可以通过指定特殊的【’ classpath: ‘前缀】来强制使用【ClassPathResource】,无论应用程序的上下文类型是什么,如下面的示例所示:
Resource template = ctx.getResource("classpath:some/resource/path/myTemplate.txt");
类似地,您可以通过指定任何标准的java.net.URL前缀来强制使用【UrlResource】。 下面的例子使用了【file】和【https】前缀:
Resource template = ctx.getResource("file:///some/resource/path/myTemplate.txt");
Resource template = ctx.getResource("https://myhost.com/resource/path/myTemplate.txt");
下表总结了将’ String ‘对象转换为’ Resource ‘对象的策略:
| 前缀 | 举例 | 说明 |
| classpath: | classpath:com/myapp/config.xml |
从类路径加载。 |
| file: | file:///data/config.xml |
作为一个“URL”从文件系统加载。 请参见’ FileSystemResource ’ Caveats。 |
| https: | https://myserver/logo.png |
作为一个 URL加载。 |
| (none) | /data/config.xml |
依赖于底层的 ApplicationContext。 |
4️⃣应用环境和资源路径
本节介绍如何【使用资源】创建应用程序上下文,包括使用XML的快捷方式、使用通配符以及其他细节。
🍀(1)构建应用程序上下文
应用程序上下文构造函数通常采用【字符串或字符串数组】作为资源的位置路径,例如组成上下文定义的XML文件。
当这样的位置路径没有前缀时,从该路径构建并用于加载beanDifination的特定【Resource】类型取决于我们使用的这个特定的应用程序上下文。 例如,考虑下面的例子,它创建了一个’ ClassPathXmlApplicationContext ‘:
ApplicationContext ctx = new ClassPathXmlApplicationContext("conf/appContext.xml");
beanDifination是从类路径加载的,因此他使用了【ClassPathResource】。 但是,考虑下面的例子,它创建了一个’ FileSystemXmlApplicationContext ‘:
ApplicationContext ctx =
    new FileSystemXmlApplicationContext("conf/appContext.xml");
现在从【文件系统】位置加载beanDifination(在本例中,相对于当前工作目录)。
注意,在位置路径上使用特殊的【classpath前缀】或标准URL前缀会覆盖为加载beanDifination而创建的【默认类型Resource】。 考虑以下例子:
ApplicationContext ctx =
    new FileSystemXmlApplicationContext("classpath:conf/appContext.xml");
使用【FileSystemXmlApplicationContext】从类路径加载beanDifination。 然而,它仍然是一个“FileSystemXmlApplicationContext”。 如果它随后被用作【ResourceLoader】,任何没有前缀的路径仍然被视为文件系统路径。
🍀(2)源路径中的通配符
应用程序上下文构造函数值中的资源路径可以是简单路径,每个路径都有到【目标资源】的一对一映射。当然,也可以包含特殊的【classpath*:】前缀或【内部ant模式】, 后者实际上都是通配符。
注意,这种通配符特定于在应用程序上下文构造函数中使用资源路径(或直接使用“PathMatcher”实用程序类层次结构时),并在构造时解析。 它与“资源”类型本身无关。 你不能使用’ classpath*: ‘前缀来构造一个【实际的Resource】,因为一个resource一次只指向一个资源。
Ant-style的匹配原则
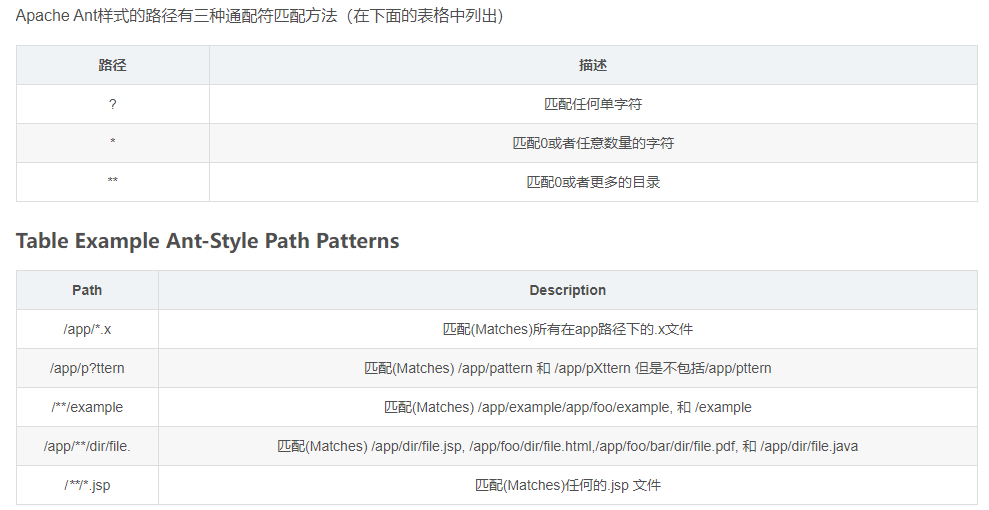
Ant-style 模式
路径位置可以包含ant样式的模式,如下例所示:
/WEB-INF/*-context.xml
com/mycompany/**/applicationContext.xml
file:C:/some/path/*-context.xml
classpath:com/mycompany/**/applicationContext.xml
当路径位置包含【ant样式模式】时,解析器将遵循更复杂的过程来尝试解析通配符。
classpath * :前缀
当构造基于xml的应用上下文时,位置字符串可以使用特殊的’ classpath*: ‘前缀,如下所示:
ApplicationContext ctx =
    new ClassPathXmlApplicationContext("classpath*:conf/appContext.xml");
classpath:和classpath * :的区别
- classpath: : 表示从该工程中的类路径中加载资源,classpath:和classpath:/是等价的,都是相对于类的根路径。资源文件库标准的在文件系统中,也可以在JAR或ZIP的类包中。
- classpath * : 假设多个JAR包或文件系统类路径都有一个相同的配置文件,classpath:只会在第一个加载的类路径下查找,而【classpath*:】会扫描所有这些JAR包及类路径下出现的同名文件。
四、验证、数据绑定和类型转换
1️⃣BeanWrapper
bean包中一个非常重要的类是【BeanWrappe】接口及其相应的实现(【BeanWrapperImpl】)。 正如在javadoc中引用的,【BeanWrapper】提供了【设置和获取属性值】、【获取属性描述符】等功能。 此外,【BeanWrapper】提供了对嵌套属性的支持,允许对子属性进行无限深度的检索。 说的简单一点,就是这个类能帮助我对使用更简单的api通过反射操作一个bean的属性。
我们以设置和获取基本和嵌套属性为例
设置和获取属性是通过【BeanWrapper】的’ setPropertyValue ‘和’ getPropertyValue ‘重载方法变体来完成的。 下表显示了这些约定的一些例子:
| 表达式 | 释义 |
|---|---|
name |
指示属性“name”对应于“getName()”或“isName()”和“setName(…)”方法。 |
account.name |
指示属性’ account ‘的嵌套属性’ name ‘,该属性对应于(例如)’ getAccount(). setname() ‘或’ getAccount(). getname() ‘方法。 |
account[2] |
指示索引属性’ account ‘的third元素。 索引属性的类型可以是’ array ‘、’ list ‘或其他自然有序的集合。 |
account[COMPANYNAME] |
指示由“account”、“map”属性的“COMPANYNAME”键索引的映射条目的值。 |
下面两个示例类使用’ BeanWrapper ‘来获取和设置属性:
public class Company {

    private String name;
    private Employee managingDirector;

    public String getName() {
        return this.name;
    }

    public void setName(String name) {
        this.name = name;
    }

    public Employee getManagingDirector() {
        return this.managingDirector;
    }

    public void setManagingDirector(Employee managingDirector) {
        this.managingDirector = managingDirector;
    }
}
public class Employee {

    private String name;

    private float salary;

    public String getName() {
        return this.name;
    }

    public void setName(String name) {
        this.name = name;
    }

    public float getSalary() {
        return salary;
    }

    public void setSalary(float salary) {
        this.salary = salary;
    }
}
下面的代码片段展示了如何【检索和操作】实例化后的’ Company ’ 和’ Employee ’ 的一些属性:
BeanWrapper company = new BeanWrapperImpl(new Company());
// setting the company name..
company.setPropertyValue("name", "Some Company Inc.");
// ... can also be done like this:
PropertyValue value = new PropertyValue("name", "Some Company Inc.");
company.setPropertyValue(value);

// ok, let's create the director and tie it to the company:
BeanWrapper jim = new BeanWrapperImpl(new Employee());
jim.setPropertyValue("name", "Jim Stravinsky");
company.setPropertyValue("managingDirector", jim.getWrappedInstance());

// retrieving the salary of the managingDirector through the company
Float salary = (Float) company.getPropertyValue("managingDirector.salary");
2️⃣PropertyEditor属性编辑器
Spring使用【PropertyEditor】的概念来实现【对象】和【字符串】之间的转换。
例如,【Date】可以用人类可读的方式表示(如”2007-14-09″),而我们仍然可以将人类可读的形式转换回原始日期(或者,更好的是,将任何以人类可读形式输入的日期转换回【Date 对象】。 这种行为可以通过注册类型为【java.beans.PropertyEditor 】的自定义编辑器来实现。
Spring中使用PropertyEditor的几个例子:
- 通过使用【PropertyEditor】实现来设置bean的属性。
- 在Spring的MVC框架中解析HTTP请求参数是通过使用各种各样的【PropertyEditor】实现来完成的,后续学mvc的时候会讲。
Spring有许多内置的【PropertyEditor】实现,这使得我们的工作变得更加简单。 它们都位于【org.springframework.beans】中的propertyeditors包中。 默认情况下,大多数是由【BeanWrapperImpl】注册的。 下表描述了Spring提供的各种【PropertyEditor】实现:
| 分类 | 释义 |
|---|---|
ClassEditor |
将表示类的字符串解析为实际类,反之亦然。 当未找到类时,将抛出一个’ IllegalArgumentException ‘。 默认情况下,由’ BeanWrapperImpl ‘注册。 |
CustomBooleanEditor |
【布尔属性】的属性编辑器。完成字符串和布尔值的转化。 默认情况下,由’ BeanWrapperImpl ‘注册。 |
CustomCollectionEditor |
集合的属性编辑器,将给定的描述集合的字符串转化为目标【集合类型】。 |
CustomDateEditor |
可自定义的属性编辑器,支持自定义【日期格式】。 默认未注册。 必须根据需要使用适当的格式进行用户注册。 |
ByteArrayPropertyEditor |
字节数组的编辑器, 将字符串转换为对应的字节表示形式。 默认情况下由’ BeanWrapperImpl ‘注册。 |
CustomNumberEditor |
可自定义任何【数字类】的属性编辑器,如“整数”、“长”、“Float”或“Double”。 默认情况下,由’ BeanWrapperImpl ‘注册,但可以通过将其自定义实例注册为自定义编辑器来覆盖。 |
FileEditor |
将字符串解析为【java.io.file】的对象。 默认情况下,由’ BeanWrapperImpl ‘注册。 |
LocaleEditor |
可以将字符串解析为’ Locale ‘对象,反之亦然(字符串格式为’ [language][country][variant] ‘,与’ Locale ‘的’ toString() ‘方法相同)。 也接受空格作为分隔符,作为下划线的替代。 默认情况下,由’ BeanWrapperImpl ‘注册。 |
PatternEditor |
可以将字符串解析为’ java.util.regex。 模式的对象,反之亦然。 |
PropertiesEditor |
可以转换字符串到’ Properties ‘对象。 默认情况下,由’ BeanWrapperImpl ‘注册。 |
StringTrimmerEditor |
修剪字符串的属性编辑器。 允许将空字符串转换为’ null ‘值。 默认情况下未注册-必须是用户注册的。 |
URLEditor |
可以将URL的字符串表示形式解析为实际的’ URL ‘对象。 默认情况下,由’ BeanWrapperImpl ‘注册。 |
注册额外的自定义【PropertyEditor】实现
当将bean属性设置为【字符串值】时,Spring IoC容器最终使用标准JavaBeans的PropertyEditor实现将这些字符串转换为属性的复杂类型。 Spring预注册了许多自定义的【PropertyEditor】实现(例如,将一个表示为字符串的类名转换为’ class ‘对象)。 此外,Java的标准JavaBeans 【PropertyEditor】查找机制允许对类的【 PropertyEditor 】进行适当的命名,并将其放置在与其提供支持的类相同的包中,这样就可以自动找到它。
如果需要注册其他自定义的【propertyeEditors】,可以使用几种机制,其实本质是一样的。
- 第一种手动的方法(通常不方便也不推荐)是使用【ConfigurableBeanFactory】接口的【registerCustomEditor()】方法,这里您必须佣有一个【BeanFactory】引用,比如我们可以写一个【beanFactoryPostProccessor】。
- 另一种(稍微方便一点)机制是使用名为【CustomEditorConfigurer】的特殊beanFactoryPostProccessor,这是spring给我们提供的,下边的案例演示了这个方式。
标准【PropertyEditor】实例用于将表示为字符串的属性值转换为属性的实际复杂类型。 你可以使用【CustomEditorConfigurer】,一个beanFactoryPostProccessor,来方便地添加对附加的【PropertyEditor】实例的支持到【ApplicationContext】。
考虑下面的例子,它定义了一个名为【ExoticType】的用户类和另一个名为【DependsOnExoticType】的类,后者需要将【ExoticType】设置为属性:
package example;

public class ExoticType {

    private String name;

    public ExoticType(String name) {
        this.name = name;
    }
}

public class DependsOnExoticType {

    private ExoticType type;

    public void setType(ExoticType type) {
        this.type = type;
    }
}
我们希望能够将type属性分配为字符串,【PropertyEditor】将其转换为实际的【ExoticType】实例。 下面的beanDifination展示了如何建立这种关系:
<bean id="sample" class="example.DependsOnExoticType">
    <!-- 这里没有使用rel,二十使用value,这个会当做字符串进行解析 -->
    <property name="type" value="aNameForExoticType"/>
</bean>
【PropertyEditor】实现类似如下:
// converts string representation to ExoticType object
package example;

public class ExoticTypeEditor extends PropertyEditorSupport {
	// 容器发现需要一个对象的实例,而只是找到了一个字符串,就会根据type的类型匹配这个转化器
    // 这个转化器会进行构造
    public void setAsText(String text) {
        setValue(new ExoticType(text.toUpperCase()));
    }
}
最后,下面的例子展示了如何使用【CustomEditorConfigurer】向【ApplicationContext】注册新的【PropertyEditor】,然后它将能够在需要时使用它:
public class CustomEditorConfigurer implements BeanFactoryPostProcessor, Ordered
这家伙是一个BeanFactoryPostProcessor,他会在创建好bean工厂后进行注册:
@Override
public void postProcessBeanFactory(ConfigurableListableBeanFactory beanFactory) throws BeansException {
    if (this.propertyEditorRegistrars != null) {
        for (PropertyEditorRegistrar propertyEditorRegistrar : this.propertyEditorRegistrars) {
            beanFactory.addPropertyEditorRegistrar(propertyEditorRegistrar);
        }
    }
    if (this.customEditors != null) {
        this.customEditors.forEach(beanFactory::registerCustomEditor);
    }
}
需要我们写的仅仅是在xml中注册一下即可:
<bean class="org.springframework.beans.factory.config.CustomEditorConfigurer">
    <property name="customEditors">
        <map>
            <entry key="example.ExoticType" value="example.ExoticTypeEditor"/>
        </map>
    </property>
</bean>
我们还可以使用PropertyEditorRegistrar
下面的例子展示了如何创建自己的【propertyeditorregistry】实现:
package com.foo.editors.spring;

public final class CustomPropertyEditorRegistrar implements PropertyEditorRegistrar {

    public void registerCustomEditors(PropertyEditorRegistry registry) {

        // it is expected that new PropertyEditor instances are created
        registry.registerCustomEditor(ExoticType.class, new ExoticTypeEditor());

        // you could register as many custom property editors as are required here...
    }
}
下一个例子展示了如何配置一个【CustomEditorConfigurer】,并将一个【CustomPropertyEditorRegistrar】的实例注入其中:
<bean class="org.springframework.beans.factory.config.CustomEditorConfigurer">
    <property name="propertyEditorRegistrars">
        <list>
            <ref bean="customPropertyEditorRegistrar"/>
        </list>
    </property>
</bean>

<bean id="customPropertyEditorRegistrar"
    class="com.foo.editors.spring.CustomPropertyEditorRegistrar"/>
3️⃣类型转换
Spring 3核心包提供了一个【通用类型转换系统】。 在Spring容器中,您可以使用此系统作为【PropertyEditor】的替代方案,将外部化bean属性值字符串转换为所需的属性类型。
🍀(1)Converter的API
实现类型转换逻辑很简单,如下面的接口定义所示:
package org.springframework.core.convert.converter;

public interface Converter<S, T> {

    T convert(S source);
}
创建你自己的转换器,需要实现【转换器】接口,并使用泛型“S”作为你要转换的【原始类型】,“T”作为你要转换的【目标类型】。
core.convert中提供了几个转换器实现。 其中包括从字符串到数字和其他常见类型的转换器。 下面的例子显示了’ StringToInteger ‘类,它是一个典型的’ Converter ‘实现:
package org.springframework.core.convert.support;

final class StringToInteger implements Converter<String,Integer> {

    public Integer convert(String source) {
        return Integer.valueOf(source);
    }
}
🍀(2)ConversionService的 API
【conversionservice】定义了一个用于在运行时执行类型转换逻辑的统一API:
package org.springframework.core.convert;

public interface ConversionService {

    boolean canConvert(Class<?> sourceType, Class<?> targetType);

    <T> T convert(Object source, Class<T> targetType);

    boolean canConvert(TypeDescriptor sourceType, TypeDescriptor targetType);

    Object convert(Object source, TypeDescriptor sourceType, TypeDescriptor targetType);
}
大多数【ConversionService】实现也实现【ConverterRegistry】,它提供了一个用于注册转换器的API。
spring提供了一个强大的【ConversionService】实现,即 【GenericConversionService】 ,他是适合在大多数环境中使用的通用实现。Spring会选择’ ConversionService’,并在框架需要执行类型转换时使用它。
要在Spring中注册默认的’ conververService ‘,请添加以下带有【converversionservice】id ‘的beanDifination:
<bean id="conversionService"
    class="org.springframework.context.support.ConversionServiceFactoryBean"/>
默认的【converversionservice】可以在字符串、数字、枚举、集合、映射和其他常见类型之间进行转换。 要使用您自己的【自定义转换器】来补充或覆盖默认转换器,请设置【converters】属性。 属性值可以实现任何’ Converter ‘、’ ConverterFactory ‘或’ GenericConverter ‘接口。
<bean id="conversionService"
        class="org.springframework.context.support.ConversionServiceFactoryBean">
    <property name="converters">
        <set>
            <bean class="example.MyCustomConverter"/>
        </set>
    </property>
</bean>
4️⃣配置 DataBinder进行数据验证
从Spring 3开始,你就可以用一个【Validator】配置一个【DataBinder】实例。 一旦配置完成,您就可以通过调用【binder.validate() 】来调用【 Validator】。 任何验证’ Errors ‘都会自动添加到绑定的’ BindingResult ‘中。
下面的例子展示了如何通过编程方式使用DataBinder在绑定到目标对象后调用验证逻辑:
// 绑定一个要验证的实例
DataBinder dataBinder = new DataBinder(new User(105,"22","22"));
// 绑定一个验证的规则
dataBinder.addValidators(new Validator() {
    @Override
    public boolean supports(Class<?> clazz) {
        return clazz == User.class;
    }

    @Override
    public void validate(Object target, Errors errors) {
        User user = (User)target;
        if (user.getId() > 100){
            errors.rejectValue("id","202","值太大了");
        }
    }
});
// 开始验证
dataBinder.validate();
// 获取验证的结果
BindingResult bindingResult = dataBinder.getBindingResult();
List<ObjectError> allErrors = bindingResult.getAllErrors();
for (ObjectError allError : allErrors) {
    System.out.println(allError);
}
五、Spring表达式语言(SpEL)
1️⃣SpEL简介
本节介绍【SpEL接口及其表达式语言】的简单使用。 下面的代码引入了SpEL API来计算字符串字面表达式’ Hello World ‘。
ExpressionParser parser = new SpelExpressionParser();
Expression exp = parser.parseExpression("'Hello World'");
String message = (String) exp.getValue();
消息变量的值是“Hello World”。
【ExpressionParser】接口【负责解析表达式字符串】。 在前面的示例中,表达式字符串是由单引号表示的字符串字面量。 【Expression】接口负责计算前面定义的表达式字符串。 当调用parser 时,可以抛出ParseException和EvaluationException两个异常。
【Expression】接口负责【计算前面定义的表达式字符串】。 SpEL支持广泛的特性,例如调用方法、访问属性和调用构造函数。
在下面的方法调用示例中,我们甚至可以在字符串字面量上调用【concat】方法:
ExpressionParser parser = new SpelExpressionParser();
Expression exp = parser.parseExpression("'Hello World'.concat('!')");
String message = (String) exp.getValue();
’ message ‘的值现在是’Hello World!’。
下面的例子调用了’ String ‘属性【bytes】:
ExpressionParser parser = new SpelExpressionParser();

// invokes 'getBytes()'
Expression exp = parser.parseExpression("'Hello World'.bytes");
byte[] bytes = (byte[]) exp.getValue();
这一行将字面值转换为字节数组。
SpEL还通过使用标准点表示法(如’ prop1.prop2.prop3 ‘)和相应的属性值设置来支持嵌套属性。 也可以访问公共字段。
下面的例子展示了如何使用点表示法来获取文字的长度:
ExpressionParser parser = new SpelExpressionParser();

// invokes 'getBytes().length'
Expression exp = parser.parseExpression("'Hello World'.bytes.length");
int length = (Integer) exp.getValue();
还可以调用String的构造函数而不是使用字符串字面值,如下例所示:
ExpressionParser parser = new SpelExpressionParser();
Expression exp = parser.parseExpression("new String('hello world').toUpperCase()");
String message = exp.getValue(String.class);
从字面量构造一个新的’ String ‘,并使其为大写。
SpEL更常见的用法是提供一个针对特定对象实例(称为根对象)求值的表达式字符串。 下面的例子展示了如何从’ Inventor ‘类的实例中检索’ name ‘属性:
// Create and set a calendar
GregorianCalendar c = new GregorianCalendar();
c.set(1856, 7, 9);

// The constructor arguments are name, birthday, and nationality.
Inventor tesla = new Inventor("Nikola Tesla", c.getTime(), "Serbian");

ExpressionParser parser = new SpelExpressionParser();

Expression exp = parser.parseExpression("name"); // Parse name as an expression
String name = (String) exp.getValue(tesla);
// name == "Nikola Tesla"
// 这个表达式在比较连个名字是不是’Nikola Tesla‘
exp = parser.parseExpression("name == 'Nikola Tesla'");
boolean result = exp.getValue(tesla, Boolean.class);
// result == true
2️⃣ Bean 定义中的表达式
您可以使用SpEL表达式和基于xml或基于注解的配置元数据来定义【BeanDefinition】实例。 在这两种情况下,定义表达式的语法形式都是#{<expression string>}。
🍀(1)XML配置
属性或构造函数参数值可以通过使用表达式设置,如下例所示:
<bean id="numberGuess" class="org.spring.samples.NumberGuess">
    <property name="randomNumber" value="#{ T(java.lang.Math).random() * 100.0 }"/>

    <!-- other properties -->
</bean>
应用程序上下文中的所有bean都可以作为【具有公共bean名称】的预定义【变量】使用。 这包括用于访问运行时环境的标准上下文bean,如【environment】(类型为’ org.springframework.core.env.Environment ‘),以及【systemProperties】和【systemEnvironment 】(类型为’ Map<String, Object> ‘)。
下面的示例显示了对【systemProperties】 bean的SpEL变量访问:
<bean id="taxCalculator" class="org.spring.samples.TaxCalculator">
    <property name="defaultLocale" value="#{systemProperties['user.region'] }"/>

    <!-- other properties -->
</bean>
注意,这里不需要在预定义变量前加上’ # ‘符号。
您还可以通过名称引用其他bean属性,如下例所示:
<bean id="numberGuess" class="org.spring.samples.NumberGuess">
    <property name="randomNumber" value="#{ T(java.lang.Math).random() * 100.0 }"/>

    <!-- other properties -->
</bean>

<bean id="shapeGuess" class="org.spring.samples.ShapeGuess">
    <property name="initialShapeSeed" value="#{ numberGuess.randomNumber }"/>

    <!-- other properties -->
</bean>
🍀(2)注解配置
要指定默认值,可以在字段、方法和方法或构造函数参数上放置“@Value”注解。
设置字段的默认值的示例如下:
public class FieldValueTestBean {

    @Value("#{ systemProperties['user.region'] }")
    private String defaultLocale;

    public void setDefaultLocale(String defaultLocale) {
        this.defaultLocale = defaultLocale;
    }

    public String getDefaultLocale() {
        return this.defaultLocale;
    }
}
下面的例子展示了一个等价的属性setter方法:
public class PropertyValueTestBean {

    private String defaultLocale;

    @Value("#{ systemProperties['user.region'] }")
    public void setDefaultLocale(String defaultLocale) {
        this.defaultLocale = defaultLocale;
    }

    public String getDefaultLocale() {
        return this.defaultLocale;
    }
}
自动连接的方法和构造函数也可以使用’ @Value ‘注解,如下面的例子所示:
public class SimpleMovieLister {

    private MovieFinder movieFinder;
    private String defaultLocale;

    @Autowired
    public void configure(MovieFinder movieFinder,
            @Value("#{ systemProperties['user.region'] }") String defaultLocale) {
        this.movieFinder = movieFinder;
        this.defaultLocale = defaultLocale;
    }

    // ...
}
public class MovieRecommender {

    private String defaultLocale;

    private CustomerPreferenceDao customerPreferenceDao;

    public MovieRecommender(CustomerPreferenceDao customerPreferenceDao,
            @Value("#{systemProperties['user.country']}") String defaultLocale) {
        this.customerPreferenceDao = customerPreferenceDao;
        this.defaultLocale = defaultLocale;
    }

    // ...
}
🍀(3)语法参考
本节描述Spring表达式语言的工作原理。 它涵盖以下主题:
(1) 文字表达方式
支持的文字表达式类型有字符串、数字值(int、real、hex)、布尔值和空值。 字符串由单引号分隔。 若要将单引号本身放入字符串中,请使用两个单引号字符。
下面的例子显示了文字的简单用法。 通常,它们不会像这样单独使用,而是作为更复杂表达式的一部分使用——例如,在逻辑比较运算符的一侧使用文字。
ExpressionParser parser = new SpelExpressionParser();

// evals to "Hello World"
String helloWorld = (String) parser.parseExpression("'Hello World'").getValue();

double avogadrosNumber = (Double) parser.parseExpression("6.0221415E+23").getValue();

// evals to 2147483647
int maxValue = (Integer) parser.parseExpression("0x7FFFFFFF").getValue();

boolean trueValue = (Boolean) parser.parseExpression("true").getValue();

Object nullValue = parser.parseExpression("null").getValue();
数字支持使用负号、指数符号和小数点。 默认情况下,使用Double.parseDouble()解析实数。
(2) Arrays, Lists, Maps
使用句点来指示嵌套的属性值。
// evals to 1856
int year = (Integer) parser.parseExpression("birthdate.year + 1900").getValue(context);

String city = (String) parser.parseExpression("placeOfBirth.city").getValue(context);
More Actions允许属性名称的首字母不区分大小写。 因此,上面例子中的表达式可以写成“生日”。 “年+ 1900”和“出生地点”。 分别城”。 此外,可以通过方法调用访问属性——例如,’ getPlaceOfBirth(). getcity() ‘而不是’ placeOfBirth.city ‘。
使用方括号表示法获取数组和列表的内容,示例如下:
ExpressionParser parser = new SpelExpressionParser();
EvaluationContext context = SimpleEvaluationContext.forReadOnlyDataBinding().build();

// Inventions Array

// evaluates to "Induction motor"
String invention = parser.parseExpression("inventions[3]").getValue(
        context,tesla,String.class);

// Members List

// evaluates to "Nikola Tesla"
String name = parser.parseExpression("members[0].name").getValue(
        context,ieee,String.class);

// List and Array navigation
// evaluates to "Wireless communication"
String invention = parser.parseExpression("members[0].inventions[6]").getValue(
        context,ieee,String.class);
(3) 内联列表
可以使用{}符号在表达式中直接表示列表。
// evaluates to a Java list containing the four numbers
List numbers = (List) parser.parseExpression("{1,2,3,4}").getValue(context);

List listOfLists = (List) parser.parseExpression("{{'a','b'},{'x','y'}}").getValue(context);
{} 它本身就是一个空列表。 出于性能原因,如果列表本身完全由固定的字面值组成,则创建一个常量列表来表示表达式(而不是在每次求值时构建一个新列表)。
(4) 内联映射
您还可以使用{key:value} 表示法在表达式中直接表示映射。 下面的例子展示了如何做到这一点:
// evaluates to a Java map containing the two entries
Map inventorInfo = (Map) parser.parseExpression("{name:'Nikola',dob:'10-July-1856'}").getValue(context);

Map mapOfMaps = (Map) parser.parseExpression("{name:{first:'Nikola',last:'Tesla'},dob:{day:10,month:'July',year:1856}}").getValue(context);
{:}它本身就是一个空映射。 出于性能原因,如果映射本身由固定的文字或其他嵌套的常量结构(列表或映射)组成,则创建一个常量映射来表示表达式(而不是在每次求值时构建一个新映射)。 map键的引用是可选的(除非键包含句号(’ . ‘))。 上面的例子没有使用引号键。
(5) 数组结构
可以使用熟悉的Java语法构建数组,也可以提供一个初始化式,以便在构造时填充数组。 下面的例子展示了如何做到这一点:
int[] numbers1 = (int[]) parser.parseExpression("new int[4]").getValue(context);

// Array with initializer
int[] numbers2 = (int[]) parser.parseExpression("new int[]{1,2,3}").getValue(context);

// Multi dimensional array
int[][] numbers3 = (int[][]) parser.parseExpression("new int[4][5]").getValue(context);
You cannot currently supply an initializer when you construct a multi-dimensional array.
(6) 方法调用
您可以使用典型的Java编程语法来调用方法。 您还可以在文字上调用方法。 也支持变量参数。 下面的例子展示了如何调用方法:
// string literal, evaluates to "bc"
String bc = parser.parseExpression("'abc'.substring(1,3)").getValue(String.class);

// evaluates to true
boolean isMember = parser.parseExpression("isMember('Mihajlo Pupin')").getValue(
        societyContext, Boolean.class);
(7) 运算符
Spring表达式语言支持以下类型的操作符:
- 关系运算符
- 逻辑运算符
- 数学运算符
- 赋值运算符
关系运算符
使用标准操作符表示法支持关系操作符(等于、不等于、小于、小于或等于、大于和大于或等于)。 下面的例子展示了一些操作符示例:
// evaluates to true
boolean trueValue = parser.parseExpression("2 == 2").getValue(Boolean.class);

// evaluates to false
boolean falseValue = parser.parseExpression("2 < -5.0").getValue(Boolean.class);

// evaluates to true
boolean trueValue = parser.parseExpression("'black' < 'block'").getValue(Boolean.class);
除了标准的关系操作符外,SpEL还支持instanceof和基于正则表达式的matches操作符。 下面的例子展示了两者的例子:
// evaluates to false
boolean falseValue = parser.parseExpression(
        "'xyz' instanceof T(Integer)").getValue(Boolean.class);

// evaluates to true
boolean trueValue = parser.parseExpression(
        "'5.00' matches '^-?\\d+(\\.\\d{2})?$'").getValue(Boolean.class);

// evaluates to false
boolean falseValue = parser.parseExpression(
        "'5.0067' matches '^-?\\d+(\\.\\d{2})?$'").getValue(Boolean.class);
每个符号运算符也可以指定为纯字母等效符。 这避免了所使用的符号对嵌入表达式的文档类型(例如XML文档)具有特殊意义的问题。 对应文本为:
- lt (<)
- gt (>)
- le (<=)
- ge (>=)
- eq (==)
- ne (!=)
- div (/)
- mod (%)
- not (!).
所有的文本操作符都是不区分大小写的。
逻辑运算符
SpEL支持以下逻辑操作符:
- and (&&)
- or (||)
- not (!)
下面的示例演示如何使用逻辑运算符:
// -- AND --

// evaluates to false
boolean falseValue = parser.parseExpression("true and false").getValue(Boolean.class);

// evaluates to true
String expression = "isMember('Nikola Tesla') and isMember('Mihajlo Pupin')";
boolean trueValue = parser.parseExpression(expression).getValue(societyContext, Boolean.class);

// -- OR --

// evaluates to true
boolean trueValue = parser.parseExpression("true or false").getValue(Boolean.class);

// evaluates to true
String expression = "isMember('Nikola Tesla') or isMember('Albert Einstein')";
boolean trueValue = parser.parseExpression(expression).getValue(societyContext, Boolean.class);

// -- NOT --

// evaluates to false
boolean falseValue = parser.parseExpression("!true").getValue(Boolean.class);

// -- AND and NOT --
String expression = "isMember('Nikola Tesla') and !isMember('Mihajlo Pupin')";
boolean falseValue = parser.parseExpression(expression).getValue(societyContext, Boolean.class);
数学运算符
你可以在数字和字符串上使用加法运算符(+)。 您可以只在数字上使用减法(-)、乘法(*)和除法(/)操作符。 您还可以对数字使用模(%)和指数幂(^)运算符。 执行标准操作符优先级。 下面的例子展示了使用中的数学运算符:
// Addition
int two = parser.parseExpression("1 + 1").getValue(Integer.class);  // 2

String testString = parser.parseExpression(
        "'test' + ' ' + 'string'").getValue(String.class);  // 'test string'

// Subtraction
int four = parser.parseExpression("1 - -3").getValue(Integer.class);  // 4

double d = parser.parseExpression("1000.00 - 1e4").getValue(Double.class);  // -9000

// Multiplication
int six = parser.parseExpression("-2 * -3").getValue(Integer.class);  // 6

double twentyFour = parser.parseExpression("2.0 * 3e0 * 4").getValue(Double.class);  // 24.0

// Division
int minusTwo = parser.parseExpression("6 / -3").getValue(Integer.class);  // -2

double one = parser.parseExpression("8.0 / 4e0 / 2").getValue(Double.class);  // 1.0

// Modulus
int three = parser.parseExpression("7 % 4").getValue(Integer.class);  // 3

int one = parser.parseExpression("8 / 5 % 2").getValue(Integer.class);  // 1

// Operator precedence
int minusTwentyOne = parser.parseExpression("1+2-3*8").getValue(Integer.class);  // -21
赋值运算
要设置属性,请使用赋值操作符(=)。 这通常是在调用 setValue中完成的,但也可以在调用getValue中完成。 下面的例子展示了使用赋值操作符的两种方法:
Inventor inventor = new Inventor();
EvaluationContext context = SimpleEvaluationContext.forReadWriteDataBinding().build();

parser.parseExpression("name").setValue(context, inventor, "Aleksandar Seovic");

// alternatively
String aleks = parser.parseExpression(
        "name = 'Aleksandar Seovic'").getValue(context, inventor, String.class);
(8) 类型
你可以使用特殊的’ T ‘操作符来指定一个’ java.lang.Class ‘(类型)的实例。 静态方法也可以通过使用此操作符来调用。 ’ StandardTypeLocator ‘(它可以被替换)是建立在对’ java。 朗的包。 这意味着’ T() ‘引用’ java。 Lang ‘包不需要完全限定,但所有其他类型引用必须是完全限定的。 下面的示例演示如何使用“T”操作符:
Class dateClass = parser.parseExpression("T(java.util.Date)").getValue(Class.class);

Class stringClass = parser.parseExpression("T(String)").getValue(Class.class);

boolean trueValue = parser.parseExpression(
        "T(java.math.RoundingMode).CEILING < T(java.math.RoundingMode).FLOOR")
        .getValue(Boolean.class);
(9)构造函数
你可以使用new操作符来调用构造函数。 你应该对所有类型使用完全限定类名,除了那些位于 java. lang package ( Integer , Float , String ,等等)。 下面的例子展示了如何使用new操作符来调用构造函数:
Inventor einstein = p.parseExpression(
        "new org.spring.samples.spel.inventor.Inventor('Albert Einstein', 'German')")
        .getValue(Inventor.class);

// create new Inventor instance within the add() method of List
p.parseExpression(
        "Members.add(new org.spring.samples.spel.inventor.Inventor(
            'Albert Einstein', 'German'))").getValue(societyContext);
(10) 变量
可以使用#variableName语法引用表达式中的变量。 变量是通过在EvaluationContext实现上使用setVariable方法设置的。
下面的例子展示了如何使用变量。
Inventor tesla = new Inventor("Nikola Tesla","Serbian");

// 我们必须创建一个上下文,在上下文中定义变量
EvaluationContext context = SimpleEvaluationContext.forReadWriteDataBinding().build();
context.setVariable("newName","Mike Tesla");

parser.parseExpression("name = #newName").getValue(context,tesla);
System.out.println(tesla.getName())  // "Mike Tesla"
(11) Bean 的引用
如果计算上下文已经配置了bean解析器,那么您可以使用@符号从表达式中查找bean。
下面的例子展示了如何做到这一点:
// 定义一个容器
ApplicationContext ctx = new AnnotationConfigApplicationContext(A.class);
// 创建一个解析器
ExpressionParser parser = new SpelExpressionParser();
// 定义一个表达式上下文
StandardEvaluationContext context = new StandardEvaluationContext();
// 这个地方规定了我要从哪里查找bean,我们的具体实现是BeanFactoryResolver,代表了从容器中获取
context.setBeanResolver(new BeanFactoryResolver(ctx));
Object bean = parser.parseExpression("@messageListener").getValue(context);
要访问FactoryBean本身,应该在bean名称前加上’ & ‘符号。 下面的例子展示了如何做到这一点:
ExpressionParser parser = new SpelExpressionParser();
StandardEvaluationContext context = new StandardEvaluationContext();
context.setBeanResolver(new MyBeanResolver());

// This will end up calling resolve(context,"&foo") on MyBeanResolver during evaluation
Object bean = parser.parseExpression("&foo").getValue(context);
(12) 三元运算符 (If-Then-Else)
可以使用三元运算符在表达式中执行if-then-else条件逻辑。 下面的例子显示了一个最小的示例:
String falseString = parser.parseExpression(
        "false ? 'trueExp' : 'falseExp'").getValue(String.class);
在这种情况下,布尔值false导致返回字符串值’false exp ’ 。 下面是一个更现实的例子:
Expression exp = parser.parseExpression("'Hello World'.bytes.length gt 2 ? 2:3")
后记

👉Java全栈学习路线可参考:【Java全栈学习路线】最全的Java学习路线及知识清单,Java自学方向指引,内含最全Java全栈学习技术清单~
👉算法刷题路线可参考:算法刷题路线总结与相关资料分享,内含最详尽的算法刷题路线指南及相关资料分享~
版权声明:本文内容由互联网用户自发贡献,该文观点仅代表作者本人。本站仅提供信息存储空间服务,不拥有所有权,不承担相关法律责任。如发现本站有涉嫌侵权/违法违规的内容, 请发送邮件至 举报,一经查实,本站将立刻删除。
文章由极客之音整理,本文链接:https://www.bmabk.com/index.php/post/154162.html

