
简单的博客系统
需求分析
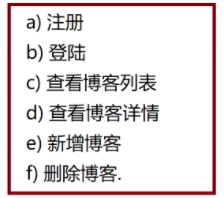
1)注册新用户
2)登陆已有用户
3)展示博客列表(每项包含了文章的标题,作者)
点击标题就会跳转到文章详情页.
分页功能也暂时不考虑
4)文章详情页中,可以看到文章标题,作者,文章内容
评论功能,分类功能,推荐相关文章功能等,先不考虑
5)发布新的博客(不考虑富文本编辑.)
6)删除自己的博客
数据库设计
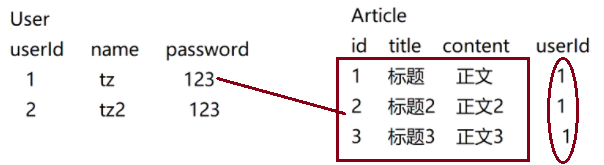
1、提取需求中的实体
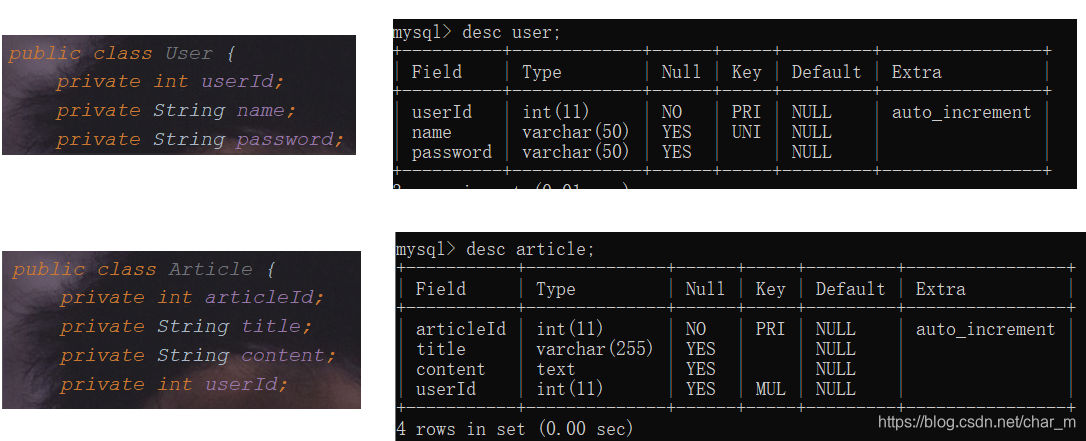
两张表User Article
2、实体的属性
用户: 名字 密码
文章: 标题 内容
3、实体之间关系
一对多
a)user表中加入一个userId字段,身份标识
b)Article表中加入一个userId字段,表示该文章是哪个用户发的
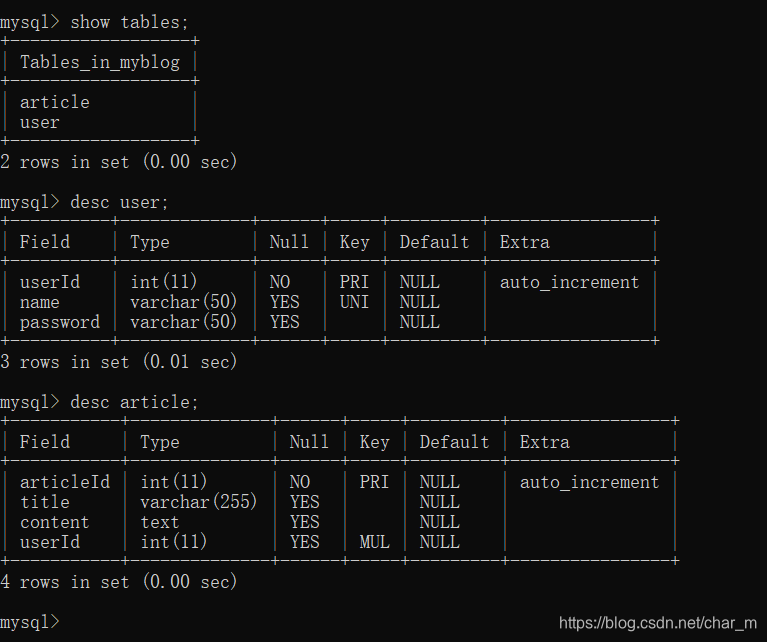
数据库建表
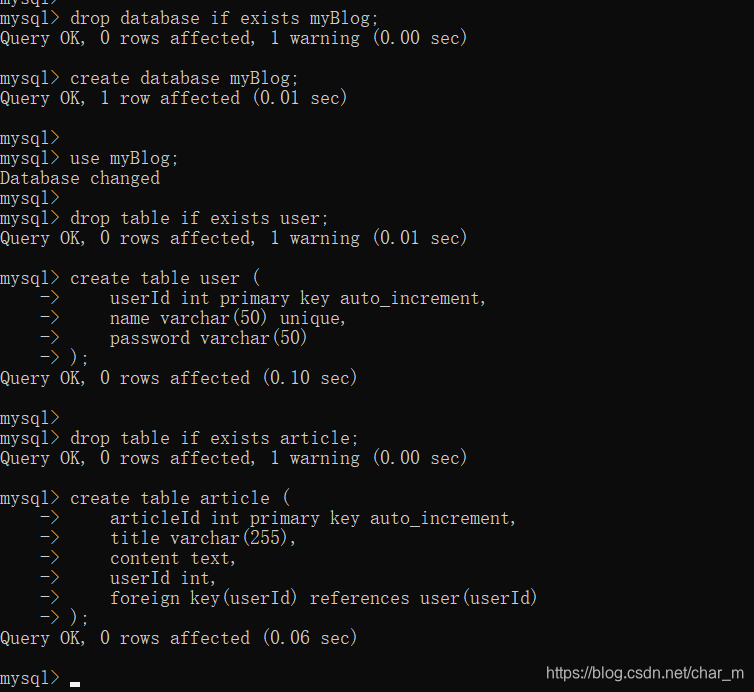
drop database if exists myBlog;
create database myblog;

use myblog;

drop table if exists user;
create table user (
    userId int primary key auto_increment,
    name varchar(50) unique,
    password varchar(50)
);

drop table if exists article;
create table article (
    articleId int primary key auto_increment,
    title varchar(255),
    content text,
    userId int,
    foreign key(userId) references user(userId)
);
Java代码操作
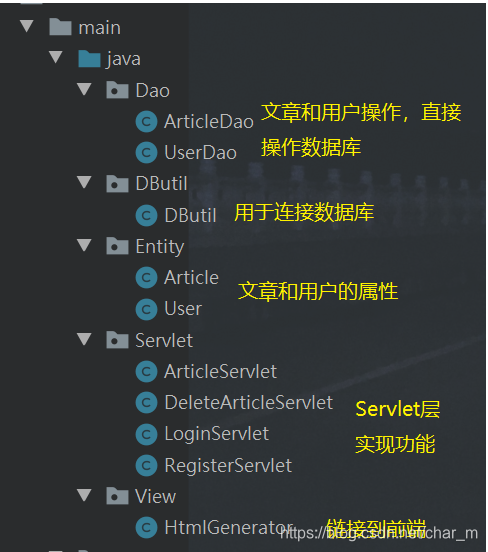
a)创建一个类,管理数据库的连接
import com.mysql.jdbc.jdbc2.optional.MysqlDataSource;

import javax.sql.DataSource;
import java.sql.Connection;
import java.sql.PreparedStatement;
import java.sql.ResultSet;
import java.sql.SQLException;

public class DButil {
    private static String url = "jdbc:mysql://127.0.0.1:3306/blog?characterEncoding=utf-8&useSSL=true";
    private static String username = "root";
    private static String password = "";

    private static volatile DataSource DATASOURCE = null;

    private static DataSource getDATASOURCE() {
        //双层校验锁

        if(DATASOURCE == null){
            synchronized (DButil.class){
                if(DATASOURCE == null){
                    DATASOURCE = new MysqlDataSource();
                    ((MysqlDataSource)DATASOURCE).setUrl(url);
                    ((MysqlDataSource)DATASOURCE).setUser(username);
                    ((MysqlDataSource)DATASOURCE).setPassword(password);
                }
            }
        }
        return DATASOURCE;
    }

    public static Connection getConnect(){
        try{
            //从池子中获取连接
            Connection connection = getDATASOURCE().getConnection();
            return connection;
        } catch (SQLException e) {
            e.printStackTrace();
            throw new RuntimeException("获取数据库连接失败!");
        }
    }

    //断开连接
    public static void getClose(Connection connection,
                                PreparedStatement statement,
                                ResultSet resultSet){
        if(resultSet != null){
            try {
                resultSet.close();
            } catch (SQLException e) {
                e.printStackTrace();
            }
        }
        if(statement != null){
            try {
                statement.close();
            } catch (SQLException e) {
                e.printStackTrace();
            }
        }
        if(connection != null){
            try {
                connection.close();
            } catch (SQLException e) {
                e.printStackTrace();
            }
        }
    }
}
b)创建实体类
创建一个User类和Article类
这俩类的属性,要和数据库表结构,是相关联的
public class User {
    private int userId;
    private String userName;
    private String password;

    public int getUserId() {
        return userId;
    }

    public void setUserId(int userId) {
        this.userId = userId;
    }

    public String getUserName() {
        return userName;
    }

    public void setUserName(String userName) {
        this.userName = userName;
    }

    public String getPassword() {
        return password;
    }

    public void setPassword(String password) {
        this.password = password;
    }

    @Override
    public String toString() {
        return "User{" +
                "userId=" + userId +
                ", userName='" + userName + '\'' +
                ", password='" + password + '\'' +
                '}';
    }
}
public class Article {
    private int articleId;
    private String articleTitle;
    private String articleContent;
    private int userId;

    public int getArticleId() {
        return articleId;
    }

    public void setArticleId(int articleId) {
        this.articleId = articleId;
    }

    public String getArticleTitle() {
        return articleTitle;
    }

    public void setArticleTitle(String articleTitle) {
        this.articleTitle = articleTitle;
    }

    public String getArticleContent() {
        return articleContent;
    }

    public void setArticleContent(String articleContent) {
        this.articleContent = articleContent;
    }

    public int getUserId() {
        return userId;
    }

    public void setUserId(int userId) {
        this.userId = userId;
    }

    @Override
    public String toString() {
        return "Article{" +
                "articleId=" + articleId +
                ", articleTitle='" + articleTitle + '\'' +
                ", articleContent='" + articleContent + '\'' +
                ", userId=" + userId +
                '}';
    }
}
c)实现数据库的基本的增删改查
DAO表示数据访问层.
通过UserDao这个类来完成针对用户的数据库表操作.
import DButil.DButil;
import Entity.User;

import java.sql.Connection;
import java.sql.PreparedStatement;
import java.sql.ResultSet;
import java.sql.SQLException;

public class UserDao {

    //新增用户(注册)
    public void add(User user){
        Connection connection = null;
        PreparedStatement preparedStatement = null;

        String sql = "insert into user values (null ,?,?)";

        try {
            connection = DButil.getConnect();
            preparedStatement = connection.prepareStatement(sql);
            preparedStatement.setString(1,user.getUserName());
            preparedStatement.setString(2,user.getPassword());

            int ret = preparedStatement.executeUpdate();
            if (ret != 1) {
                System.out.println("插入新用户失败!");
                return;
            }
            System.out.println("插入新用户成功");
        } catch (SQLException e) {
            e.printStackTrace();
        }finally {
            DButil.getClose(connection,preparedStatement,null);
        }
    }

    //按照名字查找用户(登录)
    public User findUserByName(String name){
        Connection connection = null;
        PreparedStatement preparedStatement = null;
        ResultSet resultSet = null;

        String sql="select * from user where userName=?";
        try{
            assert connection != null;
            connection = DButil.getConnect();
            preparedStatement = connection.prepareStatement(sql);
            preparedStatement.setString(1,name);
            resultSet = preparedStatement.executeQuery();
            if (resultSet.next()){
                User user = new User();
                user.setUserId(resultSet.getInt("userId"));
                user.setUserName(resultSet.getString("userName"));
                user.setPassword(resultSet.getString("password"));
                return user;


            }
        } catch (SQLException e) {
            e.printStackTrace();
        }finally {
            DButil.getClose(connection,preparedStatement,resultSet);
        }
        return null;
    }

    //通过id查找用户
    public User findUserById(int id){
        Connection connection = null;
        PreparedStatement preparedStatement = null;
        ResultSet resultSet = null;

        String sql = "select * from user where userId = ?";
        try{
            connection = DButil.getConnect();
            preparedStatement = connection.prepareStatement(sql);
            preparedStatement.setInt(1,id);
            resultSet = preparedStatement.executeQuery();
            if (resultSet.next()){
                User user = new User();
                user.setUserId(resultSet.getInt("userId"));
                user.setUserName(resultSet.getString("userName"));
                user.setPassword(resultSet.getString("password"));
                return user;

            }

        } catch (SQLException e) {
            e.printStackTrace();
        }finally {
            DButil.getClose(connection,preparedStatement,resultSet);
        }
        return null;

    }

   /* public static void main(String[] args) {
        UserDao userDao = new UserDao();
        User user = new User();
        user.setUserName("hhh");
        user.setPassword("123");

        userDao.add(user);

        System.out.println(findUserByName("hhh"));
        System.out.println(findUserById(1));
    }*/

}
通过ArticleDao这个类完成针对文章的数据库表操作.
import DButil.DButil;
import Entity.Article;

import java.sql.Connection;
import java.sql.PreparedStatement;
import java.sql.ResultSet;
import java.sql.SQLException;
import java.util.ArrayList;
import java.util.List;

public class ArticleDao {
    //1、新增文章(发布博客)
    public static void add(Article article){
        Connection connection = null;
        PreparedStatement preparedStatement = null;


        String sql = "insert into article values (null,?,?,?)";
        try{
            connection = DButil.getConnect();
            preparedStatement = connection.prepareStatement(sql);
            preparedStatement.setString(1,article.getArticleTitle());
            preparedStatement.setString(2,article.getArticleContent());
            preparedStatement.setInt(3,article.getUserId());

            int ret = preparedStatement.executeUpdate();
            if(ret != 1){
                System.out.println("文章添加失败!");
                return;
            }else {
                System.out.println("文章添加成功!");
            }

        } catch (SQLException e) {
            e.printStackTrace();
        }finally {
            DButil.getClose(connection,preparedStatement,null);
        }
    }
    //2、查看文章列表(把所有文章信息都查出来,不查正文)\
    public List<Article> findArticleList(){
        Connection connection = null;
        PreparedStatement preparedStatement = null;
        ResultSet resultSet = null;
        List<Article> articleList = new ArrayList<>();


        String sql = "select articleId,articleTitle,userId from article";
        try{
            connection = DButil.getConnect();
            preparedStatement = connection.prepareStatement(sql);
            resultSet = preparedStatement.executeQuery();

            while (resultSet.next()){
             Article article = new Article();
             article.setArticleId(resultSet.getInt("articleId"));
             article.setArticleTitle(resultSet.getString("articleTitle"));
             article.setUserId(resultSet.getInt("userId"));

             articleList.add(article);

            }
            return articleList;

        } catch (SQLException e) {
            e.printStackTrace();
        }finally {
            DButil.getClose(connection,preparedStatement,resultSet);
        }
        return null;
    }
    //3、根据文章id查看指定文章详情(查看正文)
    public Article findArticleByArticleId(int articleId){
        Connection connection = null;
        PreparedStatement preparedStatement = null;
        ResultSet resultSet = null;


        String sql = "select * from article where articleId=?";
        try{
            connection = DButil.getConnect();
            preparedStatement = connection.prepareStatement(sql);
            preparedStatement.setInt(1,articleId);
            resultSet = preparedStatement.executeQuery();

            if (resultSet.next()){
                Article article = new Article();
                article.setArticleId(resultSet.getInt("articleId"));
                article.setArticleTitle(resultSet.getString("articleTitle"));
                article.setArticleContent(resultSet.getString("articleContent"));
                article.setUserId(resultSet.getInt("userId"));
                return article;
            }

        } catch (SQLException e) {
            e.printStackTrace();
        }finally {
            DButil.getClose(connection,preparedStatement,resultSet);
        }
        return null;

    }

    //4、删除指定文章(给定文章ID删除)
    public void  deleteArticle(int articleId){
        Connection connection = null;
        PreparedStatement preparedStatement = null;

        String sql ="delete from article where articleId =?";
        try{
            connection = DButil.getConnect();
            preparedStatement = connection.prepareStatement(sql);
            preparedStatement.setInt(1,articleId);
            int ret = preparedStatement.executeUpdate();
            if(ret != 1){
                System.out.println("删除文章失败!");
                return;
            }else {
                System.out.println("删除文章成功!");
            }
        } catch (SQLException e) {
            e.printStackTrace();
        }finally {
            DButil.getClose(connection,preparedStatement,null);
        }
    }

   /*public static void main(String[] args) {
        ArticleDao articleDao = new ArticleDao();
        Article article = new Article();
        article.setArticleTitle("爱你就像爱生命");
        article.setArticleContent("一想到你我这张丑脸就泛起微笑!");
        article.setUserId(1);
        articleDao.add(article);
       *//* System.out.println(findArticleList());
        System.out.println(findArticleByArticleId(4));*//*
    }
*/
}
前后端接口设计并实现
约定,服务器都能接收啥样的请求,每个请求具体的格式如何,对应的响应结果又如何.(自定制协议,基于http的基础上进行拓展)
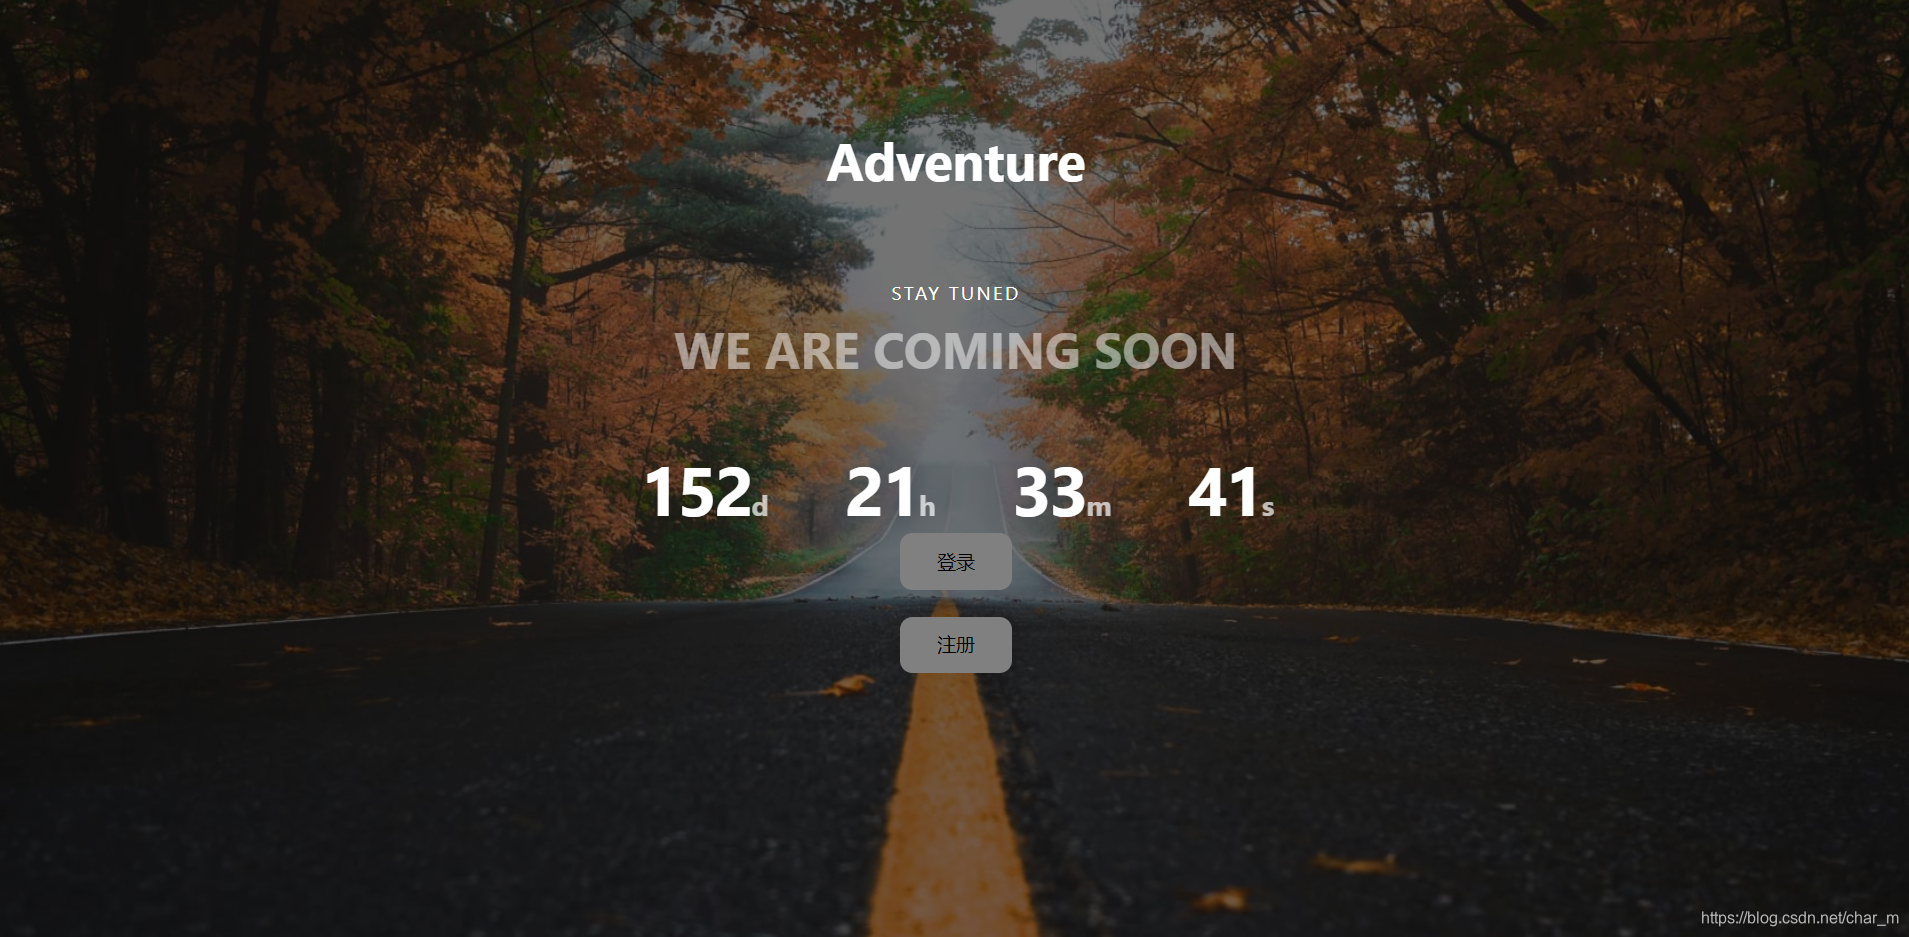
1)获取注册页面
GET/register.html(GET /signup.html)
前后端按照同一种方式开发
<!DOCTYPE html>
<html lang="zxx">

<head>
    <title>注册</title>
    <!-- Meta tags -->
    <meta charset="UTF-8">
    <meta name="viewport" content="width=device-width, initial-scale=1.0">
    <meta http-equiv="X-UA-Compatible" content="ie=edge">
    <!-- //Meta tags -->
    <link rel="stylesheet" href="css/style.css" type="text/css" media="all" /><!-- Style-CSS -->
</head>

<body>
<section class="w3l-coming-soon">
    <div class="bgimg text-center">
        <div class="topleft">
            <a class="brand-logo" href="#index.html">Adventure</a>
        </div>
        <div class="middle">
            <h2>Stay Tuned</h2>
            <h1>We ARE COMING SOON</h1>

            <p id="demo"></p>

            <div class="form-right-inf">
                <form action="register" method="post" >
                    <div class="forms-gds">
                        <input type="text" name="userName" placeholder="请输入用户名" >
                        <br/>
                        <input type="text" name="password" placeholder="请输入密码" >
                        <br/>
                        <button class="btn theme-button">注册</button>
                    </div>
                </form>

            </div>
        </div>
        <!-- copyright -->
        <!-- //copyright -->
    </div>

</section>

</body>
</html>
响应:
注册页面,页面上带有两个输入框(输入用户名密码)一个提交按钮
2)实现注册功能(注册页面中提交的form表单数据,需要服务器处理)
请求:
POST/register
name = XXX&password=XXX
import Dao.UserDao;
import Entity.User;
import View.HtmlGenerator;

import javax.servlet.ServletException;
import javax.servlet.http.HttpServlet;
import javax.servlet.http.HttpServletRequest;
import javax.servlet.http.HttpServletResponse;
import java.io.IOException;

public class RegisterServlet extends HttpServlet {
    @Override
    protected void doPost(HttpServletRequest req, HttpServletResponse resp) throws ServletException, IOException {
        req.setCharacterEncoding("utf-8");
        resp.setContentType("text/html; charset=utf-8");
        String name = req.getParameter("userName");
        String password = req.getParameter("password");
        // 1. 获取到前端提交的数据(用户名, 密码), 校验是否合法.
        if(name == null|| "".equals(name) || password == null|| "".equals(password)){
            String html = HtmlGenerator.getMessagePage("用户名或者密码为空!",
                    "register.html");
            resp.getWriter().write(html);
            return;
        }

        // 2. 拿着用户名在数据库中查一下, 看看当前用户名是否已经存在. 如果存在, 认为注册失败(用户名不能重复)
        UserDao userDao = new UserDao();
        User existUser = userDao.findUserByName(name);

        if(existUser != null){
            String html = HtmlGenerator.getMessagePage("用户名重复!","register.html");
            resp.getWriter().write(html);
            return;
        }
        // 3. 根据前端提交的数据, 构造 User 对象并插入到数据库中.
        User user = new User();
        user.setUserName(name);
        user.setPassword(password);
        userDao.add(user);

        // 4. 返回一个结果页面, 提示当前注册成功.
        String html = HtmlGenerator.getMessagePage("注册成功!",
                "login.html");
        resp.getWriter().write(html);

    }
}
响应:
返回一个提示页面,告诉用户注册成功还是失败,并且能跳转到登录页面
3)获取登录页面
请求
GET/login.html
<!DOCTYPE html>
<html lang="zxx">

<head>
    <title>登录</title>
    <!-- Meta tags -->
    <meta charset="UTF-8">
    <meta name="viewport" content="width=device-width, initial-scale=1.0">
    <meta http-equiv="X-UA-Compatible" content="ie=edge">
    <!-- //Meta tags -->
    <link rel="stylesheet" href="css/style.css" type="text/css" media="all" /><!-- Style-CSS -->
</head>

<body>
<section class="w3l-coming-soon">
    <div class="bgimg text-center">
        <div class="topleft">
            <a class="brand-logo" href="#index.html">Adventure</a>
        </div>
        <div class="middle">
            <h2>Stay Tuned</h2>
            <h1>We ARE COMING SOON</h1>

            <p id="demo"></p>

            <div class="form-right-inf">
                <form action="login" method="post" >
                    <div class="forms-gds">
                        <input type="text" name="userName" placeholder="请输入用户名" >
                        <br/>
                        <input type="text" name="password" placeholder="请输入密码" >
                        <br/>
                        <button class="btn theme-button">登录</button>
                    </div>
                </form>

            </div>
        </div>
        <!-- copyright -->
        <!-- //copyright -->
    </div>

</section>

</body>
</html>
在这里插入代码片
响应:
返回一个登陆页面,包含两个输入框和一个登录按钮
4)实现登录功能(登陆页面提交的数据,需要服务器来处理
请求:
POST/login
name = XXX&password=XXX
import Dao.UserDao;
import Entity.User;
import View.HtmlGenerator;
import javax.servlet.ServletException;
import javax.servlet.http.HttpServlet;
import javax.servlet.http.HttpServletRequest;
import javax.servlet.http.HttpServletResponse;
import javax.servlet.http.HttpSession;
import java.io.IOException;
public class LoginServlet extends HttpServlet {
@Override
protected void doPost(HttpServletRequest req, HttpServletResponse resp) throws ServletException, IOException {
req.setCharacterEncoding("utf-8");
resp.setContentType("text/html; charset=utf-8");
String name = req.getParameter("userName");
String password = req.getParameter("password");
// 1. 获取到用户名和密码. 并进行简单校验
if(name == null || "".equals(name) || password == null || "".equals(password)){
String html = HtmlGenerator.getMessagePage("用户名或者密码为空!","login.html");
resp.getWriter().write(html);
return;
}
// 2. 数据库中查找, 看用户是否存在.
// 3. 对比密码是否匹配
UserDao userDao = new UserDao();
User user = userDao.findUserByName(name);
if(user == null || !password.equals(user.getPassword())){
String html = HtmlGenerator.getMessagePage("用户名或者密码错误!","login.html");
resp.getWriter().write(html);
return;
}
// 4. 匹配成功则认为登陆成功, 创建一个 Session
HttpSession httpSession = req.getSession(true);
httpSession.setAttribute("user",user);
// 5. 返回一个登陆成功的提示页面
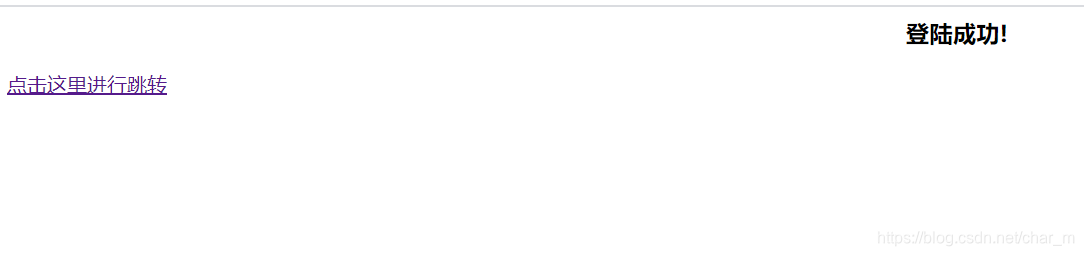
String html = HtmlGenerator.getMessagePage("登陆成功!",
"article");
resp.getWriter().write(html);
}
}
响应:
返回一个提示页面,告诉用户登录成功还是失败
5)获取文章列表
请求:
GET/article
响应:
返回文章的列表页面(包含一些文章的标题,点击标题进入到详情页)
6)获取文章详细内容
请求:
GET /article?articleld= 1
响应:
返回文章的详情页(包含文章的内容)
7)新增/发布文章
请求:
POST /article
title=xxx&content= xXXX
响应:
返回一一个提示页面,告诉用户发布成功还是失败.
5-7
import Dao.ArticleDao;
import Dao.UserDao;
import Entity.Article;
import Entity.User;


import View.HtmlGenerator;

import javax.servlet.ServletException;
import javax.servlet.http.HttpServlet;
import javax.servlet.http.HttpServletRequest;
import javax.servlet.http.HttpServletResponse;
import javax.servlet.http.HttpSession;
import java.io.IOException;
import java.util.List;

public class ArticleServlet extends HttpServlet {

    //获取文章列表 获取文章详细内容
    @Override
    protected void doGet(HttpServletRequest req, HttpServletResponse resp) throws ServletException, IOException {
        req.setCharacterEncoding("utf-8");
        resp.setContentType("text/html; charset=utf-8");
        // 1. 判定用户的登陆状态. 如果用户尚未登陆, 就要提示用户来登陆.
        HttpSession httpSession = req.getSession(false);
        if (httpSession == null) {
            String html = HtmlGenerator.getMessagePage("您尚未登陆",
                    "login.html");
            resp.getWriter().write(html);
            return;
        }
        User user = (User) httpSession.getAttribute("user");
        // 2. 判断请求中是否存在 articleId 参数.
        String articleIdStr = req.getParameter("articleId");
        if (articleIdStr == null) {
            //  a) 没有这个参数就去执行获取文章列表操作articleDao中查找文章列表不需要id
            getAllArticleList(user, resp);

        } else {
            //  b) 有这个参数就去执行获取文章详情操作.
            getOneArticle(Integer.parseInt(articleIdStr), user, resp);

        }
    }
        private void getAllArticleList(User user, HttpServletResponse resp) throws IOException  {
            // 1. 查找数据库
            ArticleDao articleDao = new ArticleDao();
            List<Article> articleList = articleDao.findArticleList();
            // 2. 构造页面
            String html = HtmlGenerator.getArticleListPage(articleList, user);
            resp.getWriter().write(html);


        }
        private void getOneArticle(int articleId, User user, HttpServletResponse resp) throws IOException {
            // 1. 查找数据库
            ArticleDao articleDao = new ArticleDao();
            Article article = articleDao.findArticleByArticleId(articleId);
            if (article == null) {
                //文章未找到
                String html = HtmlGenerator.getMessagePage("文章不存在",
                        "article");
                resp.getWriter().write(html);
                return;
            }
            // 2. 根据作者id 找到作者信息, 进一步得到作者姓名
            UserDao userDao = new UserDao();
            User author = userDao.findUserById(article.getUserId());
            // 3. 构造页面
            String html = HtmlGenerator.getArticleDetailPage(article, user, author);
            resp.getWriter().write(html);

        }

    //实现新增文章
    @Override
    protected void doPost(HttpServletRequest req, HttpServletResponse resp) throws ServletException, IOException {
        req.setCharacterEncoding("utf-8");
        resp.setContentType("text/html; charset=utf-8");
        // 1. 判定用户的登陆状态. 如果用户尚未登陆, 就要提示用户来登陆.
        HttpSession httpSession = req.getSession(false);
        if (httpSession == null) {
            String html = HtmlGenerator.getMessagePage("您尚未登陆",
                    "login.html");
            resp.getWriter().write(html);
            return;
        }
        User user = (User) httpSession.getAttribute("user");

        // 2. 从请求中读取浏览器提交的数据(title, content), 并进行简单校验
        String title = req.getParameter("articleTitle");
        String content = req.getParameter("articleContent");
        if (title == null || "".equals(title)
                || content == null || "".equals(content)) {
            String html = HtmlGenerator.getMessagePage("提交的标题或者正文为空!",
                    "article");
            resp.getWriter().write(html);
            return;
        }
        // 3. 把数据插入到数据库中.
        ArticleDao articleDao = new ArticleDao();
        Article article = new Article();
        article.setArticleTitle(title);
        article.setArticleContent(content);
        article.setUserId(user.getUserId());
        articleDao.add(article);
        // 4. 返回一个插入成功的页面.
        String html = HtmlGenerator.getMessagePage("发布成功!","article");
        resp.getWriter().write(html);
        return;
    }
}
8)删除文章
请求:
GET /deleteArticle?articleld= 1
import Dao.ArticleDao;
import Entity.Article;
import Entity.User;
import View.HtmlGenerator;

import javax.servlet.ServletException;
import javax.servlet.http.HttpServlet;
import javax.servlet.http.HttpServletRequest;
import javax.servlet.http.HttpServletResponse;
import javax.servlet.http.HttpSession;
import java.io.IOException;

public class DeleteArticleServlet extends HttpServlet {
    @Override
    protected void doGet(HttpServletRequest req, HttpServletResponse resp) throws ServletException, IOException {
        req.setCharacterEncoding("utf-8");
        resp.setContentType("text/html;charset=utf-8");
        // 1. 验证用户的登陆状态, 如果未登陆, 肯定不能删除.
        HttpSession httpSession = req.getSession(false);
        if(httpSession == null){
            String html = HtmlGenerator.getMessagePage("您尚未登录!","login.html");
            resp.getWriter().write(html);
            return;
        }
        User user = (User) httpSession.getAttribute("user");

        // 2. 读取请求内容, 获取到要删除的文章 id
        String articleIdStr = req.getParameter("articleId");
        if (articleIdStr == null || "".equals(articleIdStr)) {
            String html = HtmlGenerator.getMessagePage("要删除的文章 id 有误!",
                    "article");
            resp.getWriter().write(html);
            return;
        }
        // 3. 根据文章 id 查找到该文章的作者. 当前用户如果就是作者, 才能删除, 否则删除失败.
        ArticleDao articleDao = new ArticleDao();
        Article article = articleDao.findArticleByArticleId(Integer.parseInt(articleIdStr));
        if(article.getUserId() != user.getUserId()){
            String html = HtmlGenerator.getMessagePage("您只能删除自己的文章!",
                    "article");
            resp.getWriter().write(html);
            return;
        }
        // 4. 真正执行数据库删除操作
        articleDao.deleteArticle(Integer.parseInt(articleIdStr));
        // 5. 返回一个 "删除成功" 的页面.
        String html = HtmlGenerator.getMessagePage("删除成功!",
                "article");
        resp.getWriter().write(html);

    }
}
响应:
返回一个提示页面,告诉用户删除成功还是失败.
import Entity.Article;
import Entity.User;
import java.util.List;
public class HtmlGenerator {
public static String getMessagePage(String message, String nextUrl) {
StringBuilder stringBuilder = new StringBuilder();
stringBuilder.append("<html>");
stringBuilder.append("<head>");
stringBuilder.append("<meta charset=\"utf-8\">");
stringBuilder.append("<title>提示页面</title>");
stringBuilder.append("</head>");
stringBuilder.append("<body>");
stringBuilder.append("<h3 style=\"clear:both;text-align:center;\">");
stringBuilder.append(message);
stringBuilder.append("</h3>");
stringBuilder.append(String.format("<a href=\"%s\" style=\"clear:both;text-align:center;\"> 点击这里进行跳转 </a>",
nextUrl));
stringBuilder.append("</body>");
stringBuilder.append("</html>");
return stringBuilder.toString();
}
// 按照字符串拼装的方式, 生成 html
public static String getArticleListPage(List<Article> articles, User user) {
StringBuilder stringBuilder = new StringBuilder();
stringBuilder.append("<html>");
stringBuilder.append("<head>");
stringBuilder.append("<meta charset=\"utf-8\">");
stringBuilder.append("<title>提示页面</title>");
stringBuilder.append("<style>");
// style 标签内部就是写 CSS 的逻辑
stringBuilder.append(".article {" +
"color: #333;" +
"text-decoration: none;" +
// "display: inline-block;" +
"width: 200px;" +
"height: 50px;" +
"}");
stringBuilder.append(".article:hover {" +
"color: white;" +
"background-color: orange;" +
"}");
stringBuilder.append("body {" +
"background-repeat: none;" +
"background-position: 0 center;" +
"}");
stringBuilder.append("</style>");
stringBuilder.append("</head>");
stringBuilder.append("<body>");
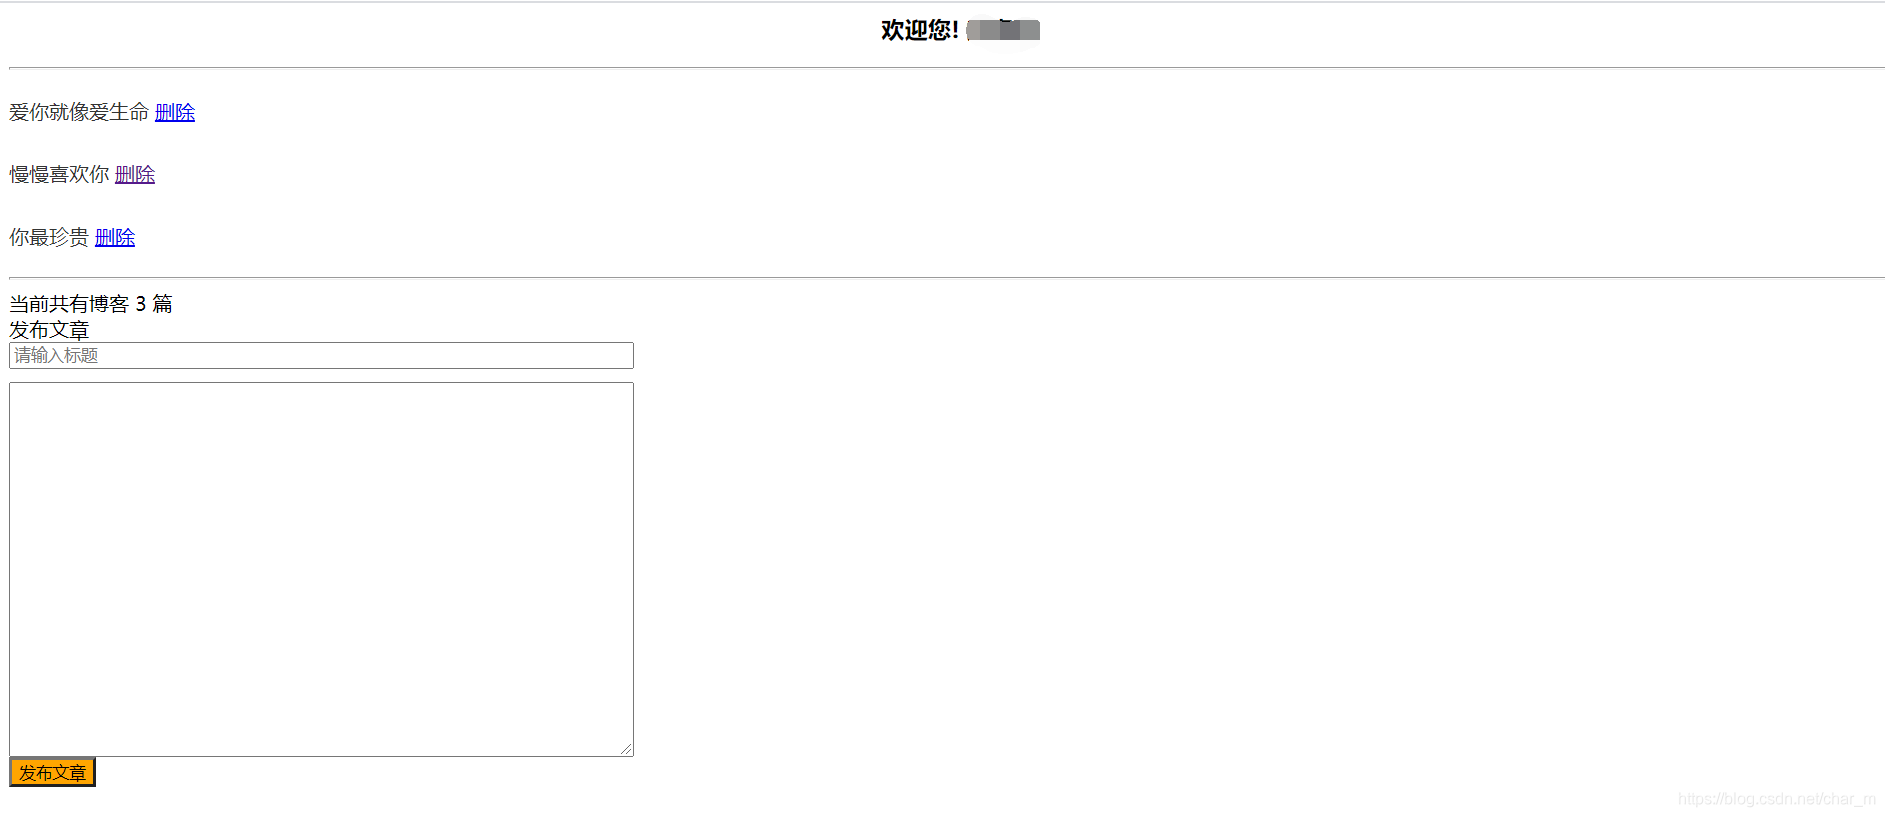
stringBuilder.append("<h3 style=\"clear:both;text-align:center; \"> 欢迎您! " + user.getUserName() + "</h3>");
stringBuilder.append("<hr>");
// 要有一个文章列表. 显示每个文章的标题.
for (Article article : articles) {
stringBuilder.append(String.format("<div style=\"width: 200px; height: 50px; line-height: 50px\"> <a class=\"article\" href=\"article?articleId=%d\"> %s </a>" +
"<a href=\"deleteArticle?articleId=%d\"> 删除 </a></div>",
article.getArticleId(), article.getArticleTitle(), article.getArticleId()));
}
stringBuilder.append("<hr>");
stringBuilder.append(String.format("<div>当前共有博客 %d 篇</div>", articles.size()));
// 在这里新增发布文章的区域
stringBuilder.append("<div> 发布文章 </div>");
stringBuilder.append("<div>");
stringBuilder.append("<form method=\"post\" action=\"article\">");
stringBuilder.append("<input type=\"text\" style=\"width: 500px; margin-bottom: 10px;\" name=\"articleTitle\" placeholder=\"请输入标题\">");
stringBuilder.append("<br>");
stringBuilder.append("<textarea name=\"articleContent\" style=\"width: 500px; height: 300px;\"></textarea>");
stringBuilder.append("<br>");
stringBuilder.append("<input style=\"background-color: #FFA500;\" type=\"submit\" value=\"发布文章\">");
stringBuilder.append("</form>");
stringBuilder.append("</div>");
stringBuilder.append("</body>");
stringBuilder.append("</html>");
return stringBuilder.toString();
}
public static String getArticleDetailPage(Article article, User user, User author) {
StringBuilder stringBuilder = new StringBuilder();
stringBuilder.append("<html>");
stringBuilder.append("<head>");
stringBuilder.append("<meta charset=\"utf-8\">");
stringBuilder.append("<title>提示页面</title>");
stringBuilder.append("<style>");
// style 标签内部就是写 CSS 的逻辑
stringBuilder.append("a {" +
"color: #333;" +
"text-decoration: none;" +
"display: inline-block;" +
"width: 200px;" +
"height: 50px;" +
"}");
stringBuilder.append("a:hover {" +
"color: white;" +
"background-color: orange;" +
"}");
stringBuilder.append("body {" +
"background-repeat: none;" +
"background-position: 0 center;" +
"}");
stringBuilder.append("</style>");
stringBuilder.append("</head>");
stringBuilder.append("<body>");
stringBuilder.append("<h3 style=\"clear:both;text-align:center;\"> 欢迎您! " + user.getUserName() + "</h3>");
stringBuilder.append("<hr>");
stringBuilder.append(String.format("<h1>%s</h1>", article.getArticleTitle()));
stringBuilder.append(String.format("<h4>作者: %s</h4>", author.getUserName()));
// 构造正文的地方.
// HTML 中本来就不是用 \n 表示换行的.
stringBuilder.append(String.format("<div>%s</div>", article.getArticleContent()
.replace("\n", "<br>")));
stringBuilder.append("</body>");
stringBuilder.append("</html>");
return stringBuilder.toString();
}
}
成果
关于前端大家可以自己套模板就好啦
版权声明:本文内容由互联网用户自发贡献,该文观点仅代表作者本人。本站仅提供信息存储空间服务,不拥有所有权,不承担相关法律责任。如发现本站有涉嫌侵权/违法违规的内容, 请发送邮件至 举报,一经查实,本站将立刻删除。
文章由极客之家整理,本文链接:https://www.bmabk.com/index.php/post/152922.html

