
1,unicloud-db组件联表查询
1.1 多个临时表组成的数组
在script中申明db
const db = uniCloud.database()
在data中定义collection数组
        collection: [
          db.collection('quanzi_articles').getTemp(),
          db.collection('uni-id-users').field("_id,username,nickname,avatar_file").getTemp()
        ]
1.2 在页面渲染数据
在script中引入封装的获取用户名和头像方法
import { giveName, giveAvatar } from "../../utils/tools.js"
在methods中使用一下
    methods: {
      giveName,
      giveAvatar
    }
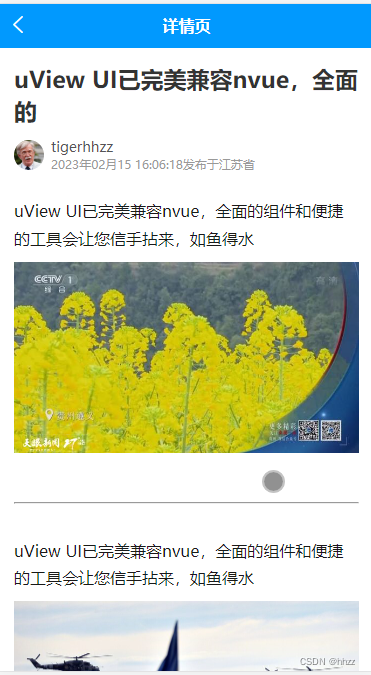
渲染用户名、头像、发布时间与省份地址
          <view class="userinfo">
            <view class="avatar">
              <image :src="giveAvatar(data)" mode="aspectFill"></image>
            </view>
            <view class="text">
              <view class="name">{{giveName(data)}}</view>
              <view class="small">
                <uni-dateformat :date="data.publish_date" format="yyyy年MM月dd hh:mm:ss" /> 发布于{{data.province}}
              </view>
            </view>
          </view>
1.3 解决后台报错问题
页面加载完成了,但数据还没有请求到。
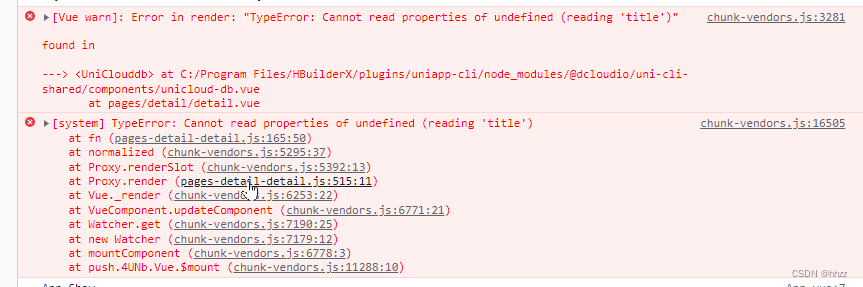

解决方案:
渲染数据前,加上loading状态,等loading完成后再进行页面渲染数据(类似有个兜底的方法)
<view v-else-if="loading"></view>
加入骨架屏效果
        <view v-else-if="loading">
          <u-skeleton rows="5" title loading></u-skeleton>
        </view>
2,JQL语法与unicloudDB组件转换
虽然unicloudDB组件在页面中查询渲染数据很便捷,但是遇到复杂的业务查询,前端组件就显得力不从心。
一般我们使用jql数据库查询,在js中处理复杂业务逻辑。
2.1 改造unicloudDB组件为使用js处理
data中定义loadState和detailObj
loadState: true,
detailObj: null
methods中定义获取数据方法
      //联表查询获取数据
      getData() {
        const artTemp = db.collection('quanzi_articles').getTemp()
        const userTemp = db.collection('uni-id-users').field("_id,username,nickname,avatar_file").getTemp()
        db.collection(artTemp, userTemp).where(`_id =="${this.artid}"`).get({
          getOne: true
        }).then(res => {
          console.log(res)
          this.loadState = false
          this.detailObj = res.result.data
        })
      }
将页面中原来的data全部改为detailObj。
至此页面正常显示:
2.2 底部点赞区域
整个盒子移到v-else中。
        <!-- 底部 点赞内容 -->
        <view class="like">
          <!-- 点赞 -->
          <view class="btn">
            <text class="iconfont icon-good-fill"></text>
            <text v-if="detailObj.like_count">{{detailObj.like_count}}</text>
          </view>
          <!-- 游览 -->
          <view class="users">
            <image src="../../static/images/user.jpg" mode="aspectFill"></image>
          </view>
          <view class="text"><text class="num">{{detailObj.view_count}}</text>人看过</view>
        </view>
2.3 错误的处理(没有文章id的页面跳转错误解决)
在onload做判断
      if (!e.id) {
        this.errFun();
        return;
      }
methods中封装错误处理方法
      //错误的处理(没有文章id的页面跳转错误解决方法)
      errFun() {
        uni.showToast({
          title: "参数有误",
          icon: "none"
        })
        setTimeout(() => {
          uni.reLaunch({
            url: "/pages/index/index"
          })
        }, 1000)
      },
如果文章id错误,那么data就不存在报错的解决方法
完善getdata()方法
    //联表查询获取数据
      getData() {
        const artTemp = db.collection('quanzi_articles').getTemp()
        const userTemp = db.collection('uni-id-users').field("_id,username,nickname,avatar_file").getTemp()
        db.collection(artTemp, userTemp).where(`_id =="${this.artid}"`).get({
          getOne: true
        }).then(res => {
          console.log(res)
          //如果文章id不存在
          if (!res.result.data) {
            this.errFun();
            return;
          }
          this.loadState = false
          this.detailObj = res.result.data
        }).catch(err => {
          this.errFun();
        })
      }
版权声明:本文内容由互联网用户自发贡献,该文观点仅代表作者本人。本站仅提供信息存储空间服务,不拥有所有权,不承担相关法律责任。如发现本站有涉嫌侵权/违法违规的内容, 请发送邮件至 举报,一经查实,本站将立刻删除。
文章由极客之音整理,本文链接:https://www.bmabk.com/index.php/post/135734.html

