
Ribbon的使用 4/9
1、Ribbon负载均衡
1.1 Ribbon简介
Spring Cloud Ribbon是基于Netflix Ribbon实现的一套客户端负载均衡的工具。
简单地说,Ribbon是Netflix发布的开源项目,主要功能是提供客户端的软件负载均衡算法和服务调用。Ribbon客户端组件提供一系列完善的配置项如连接超时,重试等。简单地说,就是在配置文件中列出Load Balancer(简称LB)后面所有机器,Ribbon会自动的帮助你基于某种规则(如简单轮询,随机连接等)去连接这些机器。我们很容易使用Ribbon实现自定义的负载均衡算法
注意:Ribbon目前也进入维护,基本上不准备更新了
1.2 Ribbon功能
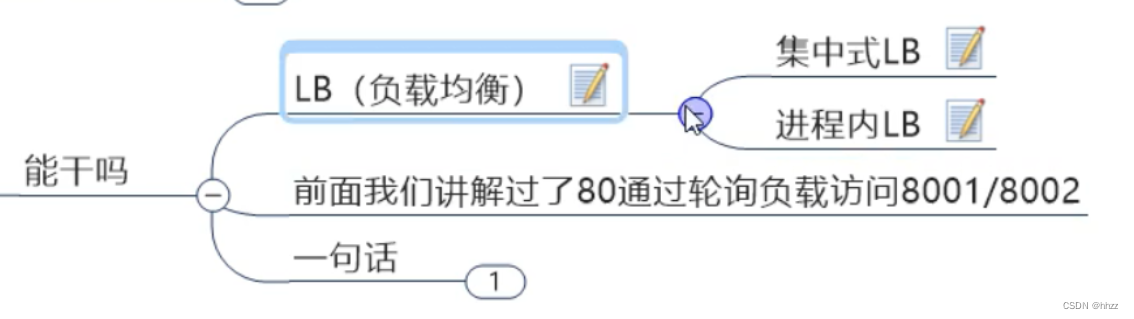

- 集中式LB
即在服务的消费方和提供方之间使用独立的LB设施(可以是硬件,如F5,也可以是软件,如Nginx),由该设施负责把访问请求通过某种策略转发至服务提供方
- 进程内LB
将LB逻辑集成到消费方,消费方从服务注册中心获知有哪些地址可用,然后自己再从这些地址中选择一个合适的服务器。
Ribbon就属于进程内LB,它只是一个类库,集成于消费方进程,消费方通过它来获取到服务提供方的地址。
两者区别:
-
简单地说就是将用户的请求平均分摊到多个服务上,从而达到系统的HA(高可用)。
常见的负载均衡软件有Nginx,LVS,硬件F5等。 -
Ribbon本地负载均衡客户端和Nginx服务端负载均衡区别
Nginx是服务器负载均衡,客户端所有请求都会交给Nginx,然后由Nginx实现转发请求。即负载均衡是由服务端实现的。
Ribbon本地负载均衡,在调用微服务接口时候,会在注册中心上获取注册信息服务列表之后缓存到JVM本地,从而在本地实现RPC远程服务调用技术
Ribbon就是负载均衡+RestTemplate
Ribbon其实就是一个软件实现负载均衡的客户端组件,他可以和其他所需请求的客户端结合使用,和Eureka结合只是其中的一个实例

Ribbon在工作时分成两步:
- 第一步先选择EurekaSever,它优先选择在同一区域内负载较少的server。
- 第二步再根据用户指定的策略,在从server取到的服务注册列表中选择一个地址。
其中Ribbon提供了多种策略:比如轮询,随机和根据响应时间的加权等。
1.3 使用Ribbon:
- 默认我们使用eureka的新版本时,它默认集成了ribbon:
        <!-- 服务注册中心的客户端端 eureka-client -->
        <!-- https://mvnrepository.com/artifact/org.springframework.cloud/spring-cloud-starter-eureka-server -->
        <dependency>
            <groupId>org.springframework.cloud</groupId>
            <artifactId>spring-cloud-starter-netflix-eureka-client</artifactId>
        </dependency>
这个>spring-cloud-starter-netflix-eureka-client中集成了ribbon了
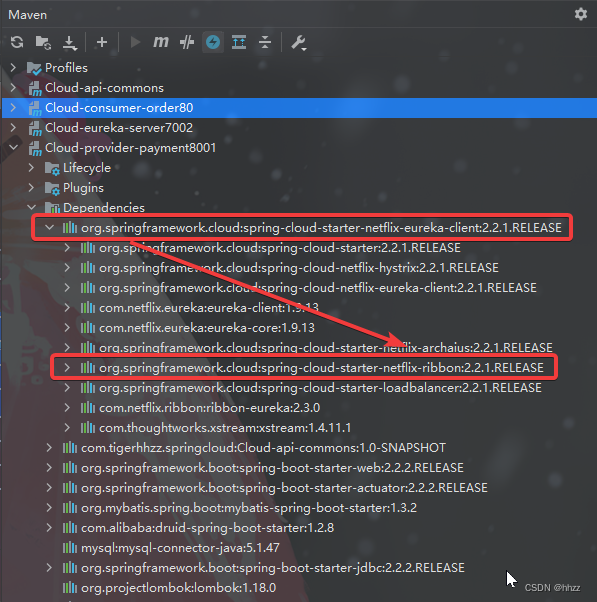
我们也可以手动引入ribbon,放到order模块中,因为只有order访问pay时需要负载均衡。
	//ribbon依赖
    <dependency>
      <groupId>org.springframework.cloud</groupId>
      <artifactId>spring-cloud-starter-netflix-ribbon</artifactId>
      <version>2.2.1.RELEASE</version>
      <scope>compile</scope>
    </dependency>
- RestTemplate扩展说明
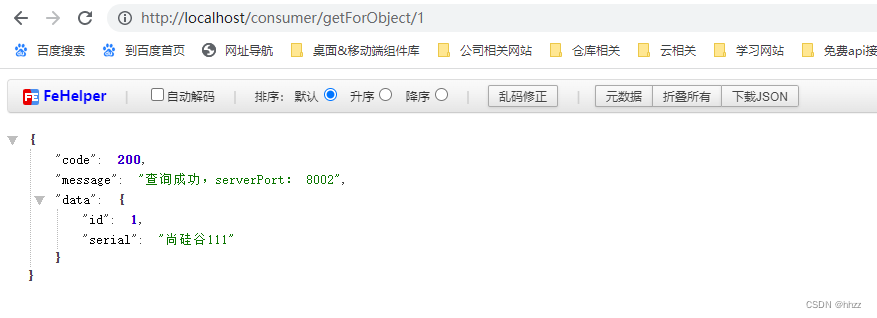
== getForObject/getForEntity方法的演示==
- getForObject方法的演示
getForObject返回对象为响应体中数据转化成的对象,基本上可以理解为JSON
    @GetMapping("/consumer/getForObject/{id}")
    public CommonResult<Payment> getPaymentById1(@PathVariable("id") Long id){
        return restTemplate.getForObject(PAYMENT_URL+"/payment/"+id, CommonResult.class);
    }
- getForEntity方法的演示
getForEntity返回的对象为ResponseEntity对象,包含了响应中的一些重要信息,比如响应头、响应状态码、响应体等
    @GetMapping("/consumer/getForEntity/{id}")
    public CommonResult<Payment> getPaymentById2(@PathVariable("id") Long id){
        ResponseEntity<CommonResult> entity = restTemplate.getForEntity(PAYMENT_URL+"/payment/"+id, CommonResult.class);
        if(entity.getStatusCode().is2xxSuccessful()){
            return entity.getBody();
        }else{
            return new CommonResult(444,"操作失败");
        }
    }

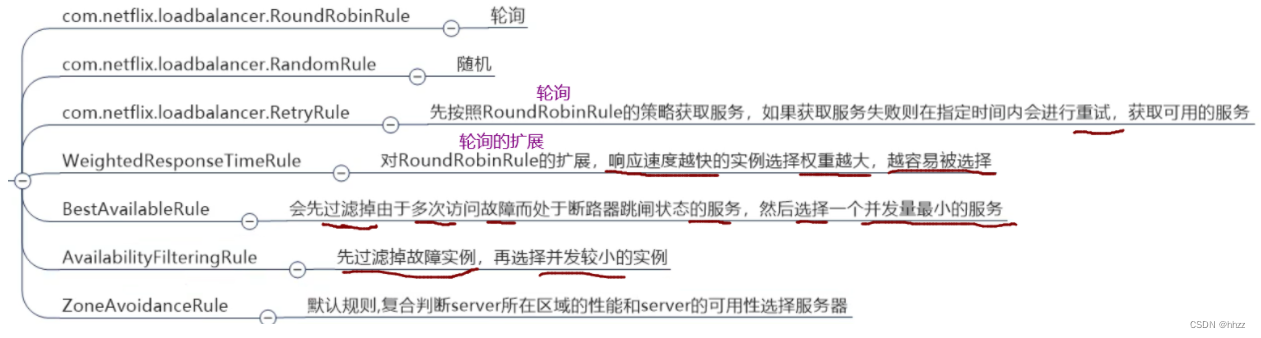
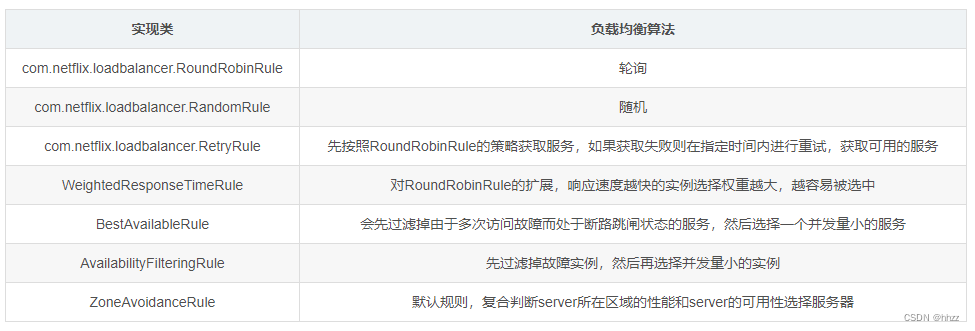
1.3.1 Ribbon常用负载均衡算法
IRule:根据特定算法从服务列表中选择一个要访问的服务
Rule接口有7个实现类,每个实现类代表一个负载均衡算法
继承关系图:
实现类 负载均衡算法
1.3.2 使用Ribbon
负载均衡算法上的替换
配置注意事项:
官方文档明确给出警告:
我们自定义的算法配置类不能放在@ComponentScan所扫描的当前包及其子包下,否则我们自定义的这个配置类就会被所有的Ribbon客户端所共享,达不到特殊定制化的目的
说白了就是不能放在主启动类所在的包以及他所在包的子包
- 创建一个跟springcloud同级的包,起名为myribbonrule
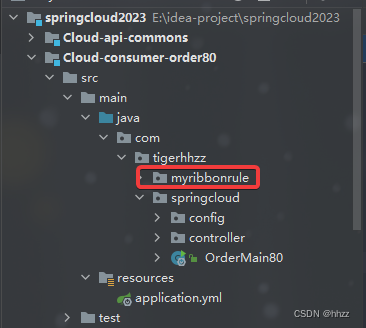
- 创建配置类,指定负载均衡算法
自定义的ribbon负载均衡配置类:
package com.tigerhhzz.myribbonrule;

import com.netflix.loadbalancer.IRule;
import com.netflix.loadbalancer.RandomRule;
import org.springframework.context.annotation.Bean;
import org.springframework.context.annotation.Configuration;

/**
 * @author tigerhhzz
 * @date 2023/4/10 11:24
 */
@Configuration
public class MyselfRibbonRule {

    @Bean
    public IRule myRule() {

        return new RandomRule();   //定义为随机
    }
}
默认的轮询算法换成随机算法
- 在主启动类上加一个注解@RibbonClient
package com.tigerhhzz.springcloud;

import com.tigerhhzz.myribbonrule.MyselfRibbonRule;
import lombok.extern.slf4j.Slf4j;
import org.springframework.boot.SpringApplication;
import org.springframework.boot.autoconfigure.SpringBootApplication;
import org.springframework.cloud.netflix.eureka.EnableEurekaClient;
import org.springframework.cloud.netflix.ribbon.RibbonClient;

@Slf4j
@SpringBootApplication
@EnableEurekaClient
@RibbonClient(name = "CLOUD-PROVIDER-SERVICE",configuration = MyselfRibbonRule.class)
public class OrderMain80{
    public static void main(String[] args){
        SpringApplication.run(OrderMain80.class,args);
        log.info("OrderMain80启动成功~~~~~~~~~~~~~~~~~~~");
    }
}

//name:代表哪个服务提供者要使用我们配置的算法
//configuretion:指定我们的算法配置类
表示,访问CLOUD-PROVIDER-SERVICE的服务时,使用我们自定义的负载均衡算法
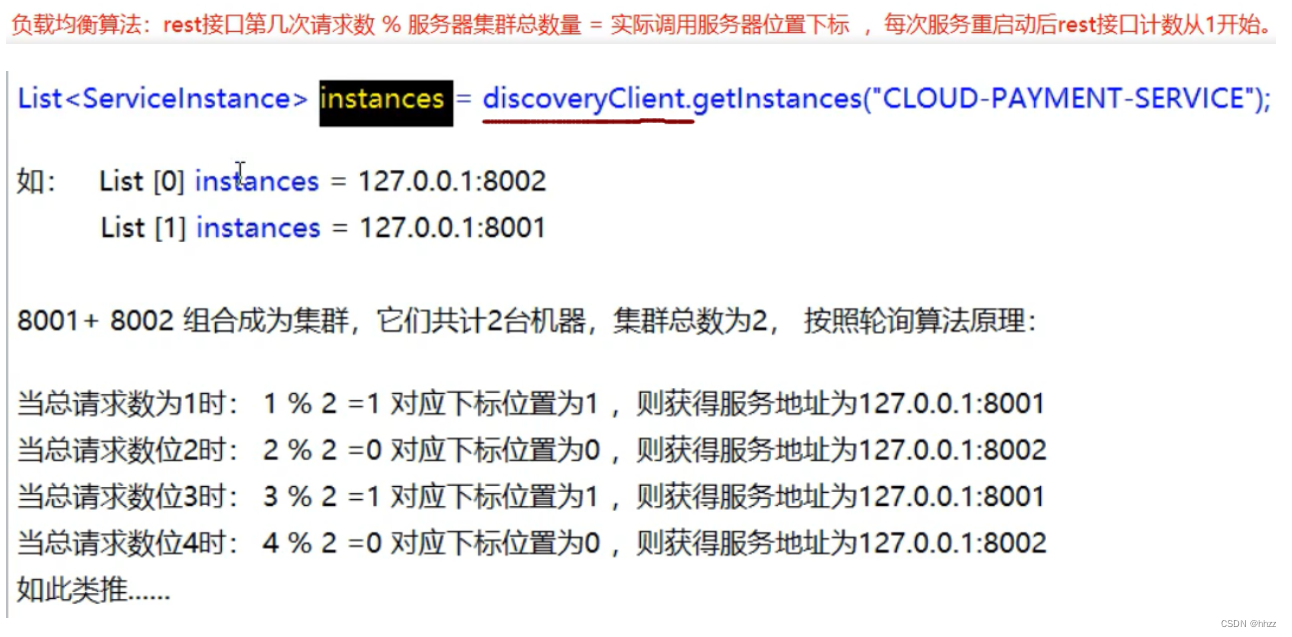
1.3.3 ribbon的轮询算法原理
1.3.4 手写一个负载均衡轮询算法
- 改造模块(8001,8002),的controller方法
给模块(8001,8002),的controller方法添加一个方法,返回当前节点端口
    @GetMapping("/payment/lb")
    public String getPaymentLB(){
        return serverPort;
    }
- 修改order80模块
去掉@LoadBalanced注解
package com.tigerhhzz.springcloud.config;

import org.springframework.cloud.client.loadbalancer.LoadBalanced;
import org.springframework.context.annotation.Bean;
import org.springframework.context.annotation.Configuration;
import org.springframework.web.client.RestTemplate;

/**
 * @author tigerhhzz
 * @date 2023/4/8 22:52
 */
@Configuration
public class ApplicationContextConfig {

    @Bean
    //@LoadBalanced   //注释掉这个注解
    public RestTemplate getRestTemplate(){
        return new RestTemplate();
        /*
        RestTemplate提供了多种便捷访问远程http服务的方法,
        是一种简单便捷的访问restful服务模板类,是spring提供的用于rest服务的客户端模板工具集
        */
    }
}
- 新建自定义ribbon负载均衡接口
package com.tigerhhzz.myloadbanlance;

import org.springframework.cloud.client.ServiceInstance;

import java.util.List;

/**
 * @author tigerhhzz
 * @date 2023/4/10 17:24
 */
public interface myloadbanlance {
    ServiceInstance instance(List<ServiceInstance> instances);
}
- 自定义ribbon负载均衡接口实现类
package com.tigerhhzz.myloadbanlance;

import org.springframework.cloud.client.ServiceInstance;
import org.springframework.stereotype.Component;

import java.util.List;
import java.util.concurrent.atomic.AtomicInteger;

/**
 * @author tigerhhzz
 * @date 2023/4/10 17:25
 */
@Component
public class myloadbanlanceImpl implements myloadbanlance{


    private AtomicInteger atomicInteger = new AtomicInteger(0);

    //获取下一个要调用的服务id
    public final int getIncrement() {
        int current;
        int next;
        do {
            current = this.atomicInteger.get();
            next = current >= 2147483647 ? 0 : current+1;

        }while (!this.atomicInteger.compareAndSet(current,next));
        System.out.println("------------第几次访问:次数next"+next);
        return next;

    }

    @Override
    public ServiceInstance instance(List<ServiceInstance> instances) {
        //拿到id,进行取余得到真正要调用服务的下标
        int index = getIncrement() % instances.size();
        return instances.get(index);
    }
}
- 在80模块的controller中增加一个测试接口 @GetMapping(“payment/lb”)
package com.tigerhhzz.springcloud.controller;

import com.tigerhhzz.myloadbanlance.myloadbanlance;
import com.tigerhhzz.springcloud.entities.CommonResult;
import com.tigerhhzz.springcloud.entities.Payment;
import lombok.extern.slf4j.Slf4j;
import org.springframework.cloud.client.ServiceInstance;
import org.springframework.cloud.client.discovery.DiscoveryClient;
import org.springframework.http.ResponseEntity;
import org.springframework.web.bind.annotation.*;
import org.springframework.web.client.RestTemplate;

import javax.annotation.Resource;
import java.net.URI;
import java.util.List;

@RestController
@Slf4j
@RequestMapping("comsumer")
public class OrderController {

    //远程调用的 地址
    //public static final String PAYMENY_URL = "http://localhost:8001";

    //远程调用的 地址
    public static final String PAYMENT_URL = "http://cloud-provider-service";

    @Resource
    private RestTemplate restTemplate;
    @Resource
    private myloadbanlance myloadbanlance;
    @Resource
    private DiscoveryClient discoveryClient;

    @PostMapping("payment/create")
    public CommonResult<Payment> create (@RequestBody Payment payment){

        return restTemplate.postForObject(PAYMENT_URL + "/payment/create",//请求地址
                                          payment,//请求参数
                                          CommonResult.class);//返回类型
    }

    @GetMapping("payment/{id}")
    public CommonResult<Payment> getPaymentById(@PathVariable("id")Long id){
        return restTemplate.getForObject(PAYMENT_URL + "/payment/" + id,//请求地址
                                         CommonResult.class);//返回类型
    }

    @GetMapping("getForObject/{id}")
    public CommonResult<Payment> getPaymentById1(@PathVariable("id") Long id){
        return restTemplate.getForObject(PAYMENT_URL+"/payment/"+id, CommonResult.class);
    }

    @GetMapping("getForEntity/{id}")
    public CommonResult<Payment> getPaymentById2(@PathVariable("id") Long id){
        ResponseEntity<CommonResult> entity = restTemplate.getForEntity(PAYMENT_URL+"/payment/"+id, CommonResult.class);
        if(entity.getStatusCode().is2xxSuccessful()){
            return entity.getBody();
        }else{
            return new CommonResult(444,"操作失败");
        }
    }

    @GetMapping("payment/lb")
    public String getPaymentLB() {
        List<ServiceInstance> instances = discoveryClient.getInstances("cloud-provider-service");
        if (instances == null || instances.size() == 0) {
            return null;
        }
        ServiceInstance serviceInstance = myloadbanlance.instance(instances);
        URI uri = serviceInstance.getUri();
        System.out.println(uri+"/payment/lb");
        return restTemplate.getForObject(uri+"/payment/lb",String.class);
//        return uri+"/payment/lb";
    }


}
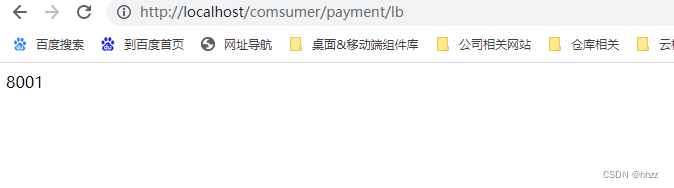
1.3.5 启动服务,测试
注意:手写自定义的轮询算法的包必须放在启动类同一目录中,要不然spring启动后,扫描不到自己写的自定义轮询算法类

版权声明:本文内容由互联网用户自发贡献,该文观点仅代表作者本人。本站仅提供信息存储空间服务,不拥有所有权,不承担相关法律责任。如发现本站有涉嫌侵权/违法违规的内容, 请发送邮件至 举报,一经查实,本站将立刻删除。
文章由极客之音整理,本文链接:https://www.bmabk.com/index.php/post/135664.html

