
Swagger是一个简单但功能强大的API表达工具。它具有地球上最大的API工具生态系统,数以千计的开发人员, 使用几乎所有的现代编程语言,都在支持和使用Swagger。使用Swagger生成API,我们可以得到交互式文档, 自动生成代码的SDK以及API的发现特性等。
Swagger2可以利用注解快速、自动地生成接口文档页面,方便调用方查阅!
这一篇讲解如何在Spring Boot中集成Swagger2.
先来张效果图:
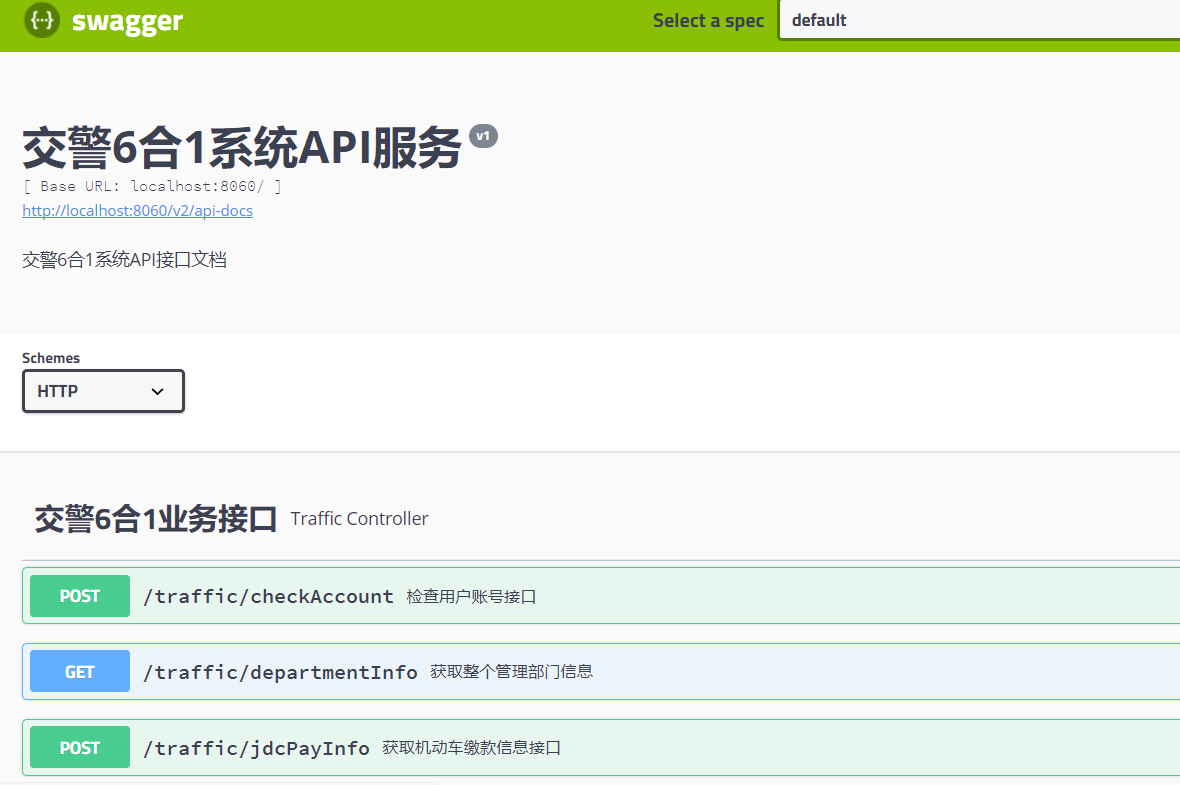
可以看到Swagger-Ui是以controller分类,点击一个controller可以看到其中的具体接口,再点击接口就可以看到接口的信息了,如图:
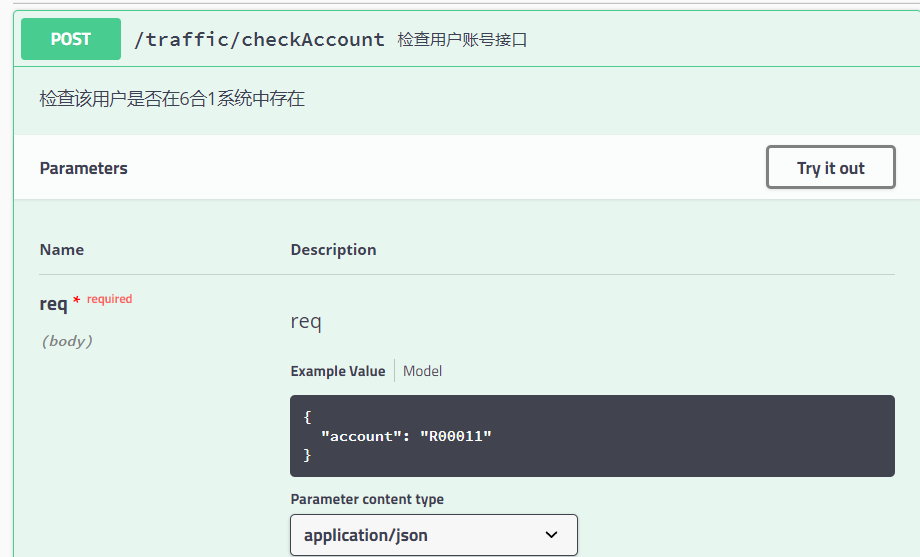
我们可以看到该接口的请求方式,返回数据信息和需要传递的参数.而且以上数据是自动生成的,即使代码有一些修改, Swagger文档也会自动同步修改.非常的方便。
构建RESTful API
在使用Swagger2前我们需要有一个RESTful API的项目,Spring Boot创建RESTful API项目非常的方便和快速。
Spring Boot构建RESTful API极为简单,实际就是Spring MVC。
比如我的机具管理API如下,提供了3个接口:
1 2 3 4 5 6 7 8 9 10 11 12 13 14 15 16 17 18 19 20 21 22 23 24 25 26 27 28 29 30 31 32 33 34 35 36 37 38 39 40 41 42 43 44 45 46 47 48 49 50 51 52 53 54 55 56 57 58 59 |
@RestController
@RequestMapping("/traffic")
public class TrafficController {

    @Autowired
    private OutTrafficService ts;
    private Logger logger = LoggerFactory.getLogger(this.getClass());

    /**
     * 判断该账户是否存在于交警6合1系统
     *
     * @param req
     * @return
     */
    @RequestMapping(value = "/checkAccount", method = RequestMethod.POST)
    public ResponseEntity<AccountResponse> checkTrafficAccount(@RequestBody TrafficAccountReq req) {
        logger.info("检查用户账号接口 start...");
        AccountResponse result = ts.checkTrafficAccount(req);
        return new ResponseEntity<>(result, HttpStatus.OK);
    }

    /**
     * 根据业务流水号获取机动车缴款信息
     *
     * @param req
     * @return
     */
    @RequestMapping(value = "/jdcPayInfo", method = RequestMethod.POST)
    public ResponseEntity<JDCPayInfoResponse> getJDCPayInfo(@RequestBody TrafficPayJDCReq req) {
        logger.info("获取机动车缴款信息接口 start...");
        JDCPayInfoResponse result = ts.getJDCPayinfo(req);
        return new ResponseEntity<>(result, HttpStatus.OK);
    }

    /**
     * 根据身份证获取缴款信息
     *
     * @param req
     * @return
     */
    @RequestMapping(value = "/jsrPayInfo", method = RequestMethod.POST)
    public ResponseEntity<JSZPayInfoResponse> getJSZPayinfo(@RequestBody TrafficPayJSZReq req) {
        logger.info("获取驾驶证缴款信息接口 start...");
        JSZPayInfoResponse result = ts.getJSZPayinfo(req);
        return new ResponseEntity<>(result, HttpStatus.OK);
    }

    /**
     * 获取整个管理部门信息
     *
     * @return
     */
    @RequestMapping(value = "/departmentInfo", method = RequestMethod.GET)
    public ResponseEntity<DepartmentInfoResponse> getDepartmentinfo() {
        logger.info("获取整个管理部门信息 start...");
        DepartmentInfoResponse result = ts.getDepartmentinfo();
        return new ResponseEntity<>(result, HttpStatus.OK);
    }
}
|
添加Swagger2依赖
maven依赖:
1 2 3 4 5 6 7 8 9 10 11 |
<!-- swagger2 集成-->
<dependency>
    <groupId>io.springfox</groupId>
    <artifactId>springfox-swagger2</artifactId>
    <version>2.8.0</version>
</dependency>
<dependency>
    <groupId>io.springfox</groupId>
    <artifactId>springfox-swagger-ui</artifactId>
    <version>2.8.0</version>
</dependency>
|
我自己也定制过一个ui,github地址:https://github.com/yidao620c/springfox-swagger-ui
创建Swagger2的Java配置类
通过@Configuration注解,表明它是一个配置类,@EnableSwagger2 注解开启swagger2。 apiInfo() 方法配置一些基本的信息。createRestApi() 方法指定扫描的包会生成文档, 默认是显示所有接口,可以用@ApiIgnore注解标识该接口不显示。
1 2 3 4 5 6 7 8 9 10 11 12 13 14 15 16 17 18 19 20 21 22 23 24 25 26 27 28 29 30 31 32 33 34 35 |
@Configuration
@EnableSwagger2
public class Swagger2Config {

    @Bean
    public Docket createRestApi() {
        return new Docket(DocumentationType.SWAGGER_2)
                .produces(Sets.newHashSet("application/json"))
                .consumes(Sets.newHashSet("application/json"))
                .protocols(Sets.newHashSet("http", "https"))
                .apiInfo(apiInfo())
                .forCodeGeneration(true)
                .useDefaultResponseMessages(false)
                .select()
                // 指定controller存放的目录路径
                .apis(RequestHandlerSelectors.basePackage("com.xncoding.modules.traffic.controller"))
//                .paths(PathSelectors.ant("/api/v1/*"))
                .paths(PathSelectors.any())
                .build();
    }

    private ApiInfo apiInfo() {
        return new ApiInfoBuilder()
                // 文档标题
                .title("XX系统API服务")
                // 文档描述
                .description("XX系统API接口文档简要描述")
                // .termsOfServiceUrl("https://github.com/yidao620c")
                .version("v1")
                .license("MIT 协议")
                .licenseUrl("http://www.opensource.org/licenses/MIT")
                .contact(new Contact("熊能", "https://github.com/yidao620c", "yidao620@gmail.com"))
                .build();
    }
}
|
添加Swagger2注解
通过在接口上面添加注解方式可配置丰富接口的信息,先看一个例子:
1 2 3 4 5 6 7 8 9 10 11 12 13 14 15 16 17 18 19 20 21 22 23 24 25 26 27 28 29 30 31 |
@Api(value = "交警业务接口类", tags = "交警6合1业务接口", description = "主要任务和交警的专网通信")
@ApiResponses(value = {
        @ApiResponse(code = 200, message = "请求正常完成"),
        @ApiResponse(code = 400, message = "请求中有语法问题,或不能满足请求"),
//        @ApiResponse(code = 401, message = "未授权客户机访问数据"),
//        @ApiResponse(code = 403, message = "服务器接受请求,但是拒绝处理"),
//        @ApiResponse(code = 404, message = "服务器找不到给定的资源,文档不存在"),
        @ApiResponse(code = 500, message = "服务器出现异常")}
)
@RestController
@RequestMapping("/traffic")
public class TrafficController {

    @Autowired
    private OutTrafficService ts;
    private Logger logger = LoggerFactory.getLogger(this.getClass());

    /**
     * 判断该账户是否存在于交警6合1系统
     *
     * @param req
     * @return
     */
    @ApiOperation(value = "检查用户账号接口", notes = "检查该用户是否在6合1系统中存在", produces = "application/json")
    @RequestMapping(value = "/checkAccount", method = RequestMethod.POST)
    public ResponseEntity<AccountResponse> checkTrafficAccount(@RequestBody TrafficAccountReq req) {
        logger.info("检查用户账号接口 start...");
        AccountResponse result = ts.checkTrafficAccount(req);
        return new ResponseEntity<>(result, HttpStatus.OK);
    }
}
|
Swagger2提供了一些注解来丰富接口的信息,常用的有:
说明:
- @Api:用在类上,说明该类的作用
- @ApiOperation:用在方法上,说明方法的作用
- @ApiImplicitParams:用在方法上包含一组参数说明
- @ApiImplicitParam:用在@ApiImplicitParams注解中,指定一个请求参数的各个方面
- paramType:参数放在哪个地方
- header–>请求参数的获取:@RequestHeader
- query–>请求参数的获取:@RequestParam
- path(用于restful接口)–>请求参数的获取:@PathVariable
- body(不常用)
- form(不常用)
- name:参数名
- dataType:参数类型
- required:参数是否必须传
- value:参数的意思
- defaultValue:参数的默认值
- paramType:参数放在哪个地方
- @ApiResponses:用于表示一组响应
- @ApiResponse:用在@ApiResponses中,一般用于表达一个错误的响应信息
- code:数字,例如400
- message:信息,例如”请求参数没填好”
- response:抛出异常的类
- @ApiModel:描述一个Model的信息(这种一般用在post创建的时候,使用@RequestBody这样的场景,请求参数无法使用@ApiImplicitParam注解进行描述的时候)
- @ApiModelProperty:描述一个model的属性
以上这些就是最常用的几个注解了。
具体其他的注解,查看:
https://github.com/swagger-api/swagger-core/wiki/Annotations#apimodel
更多请参考Swagger注解文档
与Shiro集成配置
注意如果Spring Boot使用过Shiro或Spring Security框架,需要将相应的URL访问权限放开,以Shiro为例,添加匿名访问过滤器:
1 2 3 4 5 6 7 |
filterChainDefinitionMap.put("/api/v1/**", "anon"); //API接口

// swagger接口文档
filterChainDefinitionMap.put("/v2/api-docs", "anon");
filterChainDefinitionMap.put("/webjars/**", "anon");
filterChainDefinitionMap.put("/swagger-resources/**", "anon");
filterChainDefinitionMap.put("/swagger-ui.html", "anon");
|
访问SwaggerUI
访问http://localhost:8080/swagger-ui.html页面查看API文档
如果使用的是swagger-bootstrap-ui,请访问http://localhost:8080/doc.html
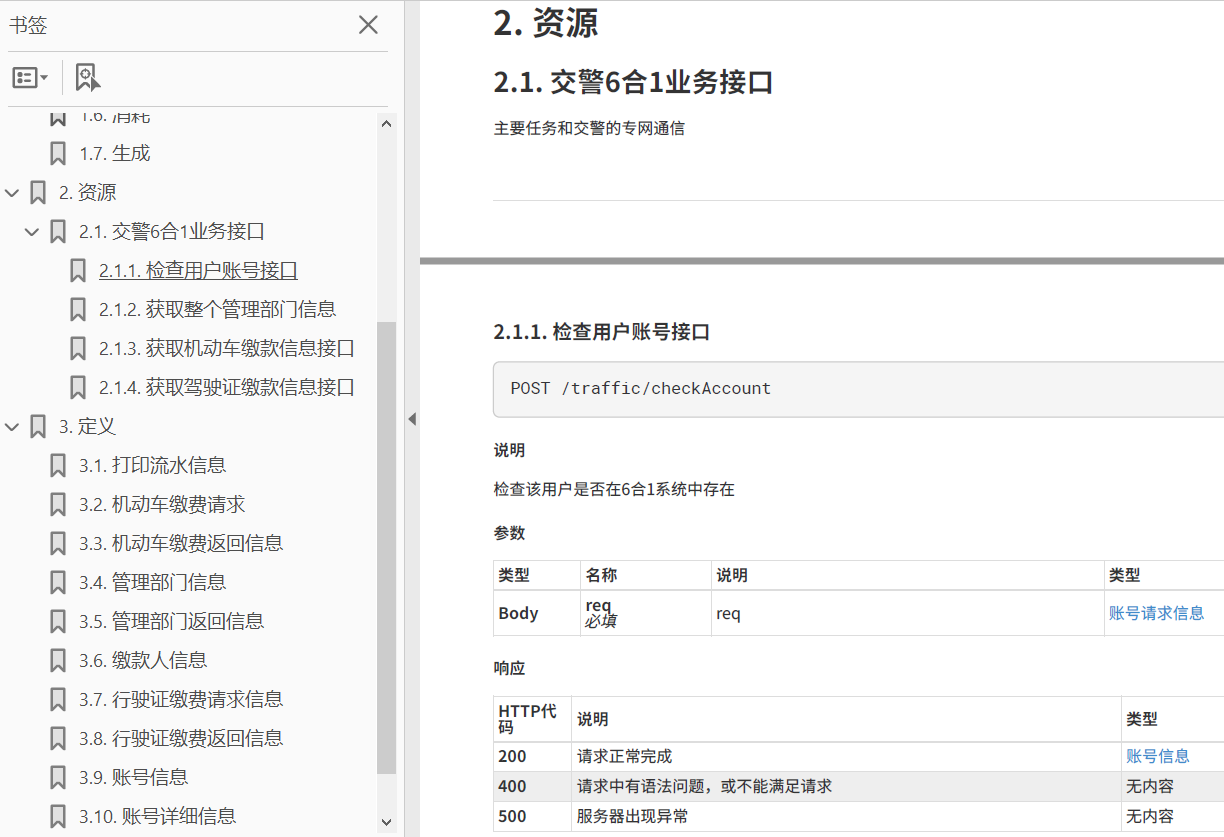
生成PDF文档
参考我的另一篇文章 使用Swagger生成RESTful API文档
这里我通过SpringBoot + Swagger2方式来生成AsciiDoc,然后剩下的步骤和上面博客一样。
maven依赖
1 2 3 4 5 6 7 8 9 10 11 12 |
<dependency>
    <groupId>org.pegdown</groupId>
    <artifactId>pegdown</artifactId>
    <version>1.6.0</version>
    <scope>test</scope>
</dependency>
<dependency>
    <groupId>io.github.swagger2markup</groupId>
    <artifactId>swagger2markup</artifactId>
    <version>1.3.1</version>
    <scope>test</scope>
</dependency>
|
另外修改下surefire插件,增加2个系统属性,也就是swagger.json和adoc文件生成的位置:
1 2 3 4 5 6 7 8 9 10 11 12 |
<plugin>
    <groupId>org.apache.maven.plugins</groupId>
    <artifactId>maven-surefire-plugin</artifactId>
    <version>2.20</version>
    <configuration>
        <systemPropertyVariables>
            <swaggerOutputDir>${project.basedir}/src/main/resources/swagger</swaggerOutputDir>
            <asciiDocOutputDir>${project.basedir}/src/main/resources/swagger/swagger</asciiDocOutputDir>
        </systemPropertyVariables>
        <skip>true</skip>
    </configuration>
</plugin>
|
编写单元测试方法
原理是通过SpringBoot的MockMvc启动后访问/v2/api-docs,这个是Swagger的接口数据,然后保存为swagger.json,
1 2 3 4 5 6 7 8 9 10 11 12 13 14 15 16 17 18 19 20 21 22 23 24 25 26 27 28 29 30 31 32 33 34 35 36 37 38 39 40 41 42 43 44 45 46 47 48 |
@AutoConfigureMockMvc
@RunWith(SpringRunner.class)
@SpringBootTest(classes = Application.class, webEnvironment = SpringBootTest.WebEnvironment.RANDOM_PORT)
public class Swagger2MarkupTest {
    @Autowired
    private MockMvc mockMvc;

    private static final Logger LOG = LoggerFactory.getLogger(Swagger2MarkupTest.class);

    @Test
    public void createSpringFoxSwaggerJson() throws Exception {
//        String outputDir = System.getProperty("swaggerOutputDir"); // mvn test
        MvcResult mvcResult = this.mockMvc.perform(get("/v2/api-docs")
                .accept(MediaType.APPLICATION_JSON))
                .andExpect(status().isOk())
                .andReturn();
        MockHttpServletResponse response = mvcResult.getResponse();
        String swaggerJson = response.getContentAsString();
//        Files.createDirectories(Paths.get(outputDir));
//        try (BufferedWriter writer = Files.newBufferedWriter(Paths.get(outputDir, "swagger.json"), StandardCharsets.UTF_8)){
//            writer.write(swaggerJson);
//        }
        LOG.info("--------------------swaggerJson create --------------------");
        convertAsciidoc(swaggerJson);
        LOG.info("--------------------swagon.json to asciiDoc finished --------------------");
    }

    /**
     * 将swagger.yaml或swagger.json转换成漂亮的 AsciiDoc
     * 访问:http://localhost:9095/v2/api-docs
     * 将页面结果保存为src/main/resources/swagger.json
     */
    private void convertAsciidoc(String swaggerStr) {
//        Path localSwaggerFile = Paths.get(System.getProperty("swaggerOutputDir"), "swagger.json");
        Path outputFile = Paths.get(System.getProperty("asciiDocOutputDir"));
        Swagger2MarkupConfig config = new Swagger2MarkupConfigBuilder()
                .withMarkupLanguage(MarkupLanguage.ASCIIDOC)
                .withOutputLanguage(Language.ZH)
                .withPathsGroupedBy(GroupBy.TAGS)
                .withGeneratedExamples()
                .withoutInlineSchema()
                .build();
        Swagger2MarkupConverter converter = Swagger2MarkupConverter.from(swaggerStr)
                .withConfig(config)
                .build();
        converter.toFile(outputFile);
    }
}
|
执行之后会在resources/swagger/下面生成swagger.adoc,在swagger.adoc的顶部加入:
1 2 |
:toclevels: 3 :numbered: |
注意有个空行分割,目的是左边导航菜单是3级,并且自动加序号。为了美化显示,根据你的需要调整表格宽度,比如
1 |
cols=".^2,.^3,.^9,.^4,.^2" |
替换成:
1 |
cols=".^2,.^3,.^6,.^4,.^5" |
然后在/resources目录下面执行:
1 |
asciidoctor-pdf -r asciidoctor-pdf-cjk-kai_gen_gothic -a pdf-style=KaiGenGothicCN swagger/swagger.adoc |
更详细的安装字体和asciidoctor-pdf命令的方法,请参考上面的博客,将adoc文件转换成好看的PDF。
版权声明:本文内容由互联网用户自发贡献,该文观点仅代表作者本人。本站仅提供信息存储空间服务,不拥有所有权,不承担相关法律责任。如发现本站有涉嫌侵权/违法违规的内容, 请发送邮件至 举报,一经查实,本站将立刻删除。
文章由极客之家整理,本文链接:https://www.bmabk.com/index.php/post/124618.html

