
详细源码私信博主获取!!!!!!!!!
web综合案例
学习目标
目标1:完成用户与角色的绑定功能
目标2:完成登陆功能的快速开发
目标3:完成登陆用户菜单控制的功能
目标4:完成登陆用户权限校验的功能
1. 用户与角色
1.1 绑定用户与角色关系数据准备
(1)在用户模块下的\WEB-INF\pages\system\user\list.jsp页面中找到角色按钮,对应的点击事件和函数的绑定都已完成,roleList方法中向后台UserServelt发送请求,执行userRoleList方法,传递参数用户id
(2)找到UserServlet,添加方法
@Override
protected void doGet(HttpServletRequest request, HttpServletResponse response) throws ServletException, IOException {
    String operation = request.getParameter("operation");
    if("list".equals(operation)){
        this.list(request,response);
    }
    //中间的省略
    else if("userRoleList".equals(operation)){
        this.userRoleList(request,response);
    }
}
private void userRoleList(HttpServletRequest request, HttpServletResponse response) throws ServletException, IOException {
    String userId = request.getParameter("id");
    User user = userService.findById(userId);
    //将数据加载到指定区域,供页面获取
    request.setAttribute("user,user);
    //获取所有的角色列表
    List<Role> all = roleService.findAllRoleByUserId(userId);
    request.setAttribute("roleList",all);
    //跳转页面
    request.getRequestDispatcher("/WEB-INF/pages/system/user/role.jsp").forward(request,response);
}
同时从day03的课程资料中找到:模块页面\user\role.jsp,拷贝到工程/WEB-INF/pages/system/user/目录下
(3)在RoleService接口中添加查询方法,根据用户id查询角色列表
List<Role> findAllRoleByUserId(String userId);
(4)在对应的实现类中去实现该方法
@Override
public List<Role> findAllRoleByUserId(String userId) {
    SqlSession sqlSession = null;
    try{
        //1.获取SqlSession
        sqlSession = MapperFactory.getSqlSession();
        //2.获取Dao
        RoleDao roleDao = MapperFactory.getMapper(sqlSession,RoleDao.class);
        //3.调用Dao层操作
        return roleDao.findAllRoleByUserId(userId);
    }catch (Exception e){
        throw new RuntimeException(e);
        //记录日志
    }finally {
        try {
            TransactionUtil.close(sqlSession);
        }catch (Exception e){
            e.printStackTrace();
        }
    }
}
(5)在dao接口RoleDao中添加查询方法findAllRoleByUserId
List<Role> findAllRoleByUserId(String userId);
(6)在映射配置文件RoleDao.xml中添加对应的查询
    <!--配置根据ID查询-->
<select id="findAllRoleByUserId" parameterType="java.lang.String" resultMap="BaseResultMap">
	SELECT
		role_id,
		NAME,
		CASE
			WHEN role_id IN (SELECT role_id FROM ss_role_user WHERE user_id = #{'userId'})
			THEN 'checked'
			ELSE ''
		END
		AS remark
	FROM
		ss_role
</select>
(7)修改页面/WEB-INF/pages/system/user/role.jsp,添加checked
<form id="urform" action="${ctx}/system/user?operation=updateRole" method="post">
    <input type="hidden" name="userId" value="${user.id}"/>
    <div class="textbox" id="centerTextbox">
        <div style="text-align:left">
            <c:forEach items="${roleList}" var="role" varStatus="vs">
                <span style="padding:3px;margin-right:30px;width: 160px;display: inline-block">
        <input type="checkbox" name="roleIds" value="${role.id}" ${role.remark}/>${role.name}
                </span>
            </c:forEach>
        </div>
    </div>
</form>
(8)启动项目测试!
1.2 绑定用户与角色关系
现在要真正去绑定用户与角色的关系,前台页面提交表单后会将用户的id和选择的角色的id传递到后台servlet
(1)在UserServlet中添加新的方法
@Override
protected void doGet(HttpServletRequest request, HttpServletResponse response) throws ServletException, IOException {
    String operation = request.getParameter("operation");
    if("list".equals(operation)){
        this.list(request,response);
    }
    //中间的省略
    else if("userRoleList".equals(operation)){
        this.userRoleList(request,response);
    }else if("updateRole".equals(operation)){
        this.updateRole(request,response);
    }
}
private void updateRole(HttpServletRequest request, HttpServletResponse response) throws IOException {
    String userId = request.getParameter("userId");
    String[] roleIds = request.getParameterValues("roleIds");
    userService.updateRole(userId,roleIds);
    //跳转回到页面list
    response.sendRedirect(request.getContextPath()+"/system/user?operation=list");
}
(2)在UserService接口中添加一个新的方法updateRole
void updateRole(String userId, String[] roleIds);
(3)在对应的实现类中去实现
@Override
public void updateRole(String userId, String[] roleIds) {
    SqlSession sqlSession = null;
    try{
        //1.获取SqlSession
        sqlSession = MapperFactory.getSqlSession();
        //2.获取Dao
        UserDao userDao = MapperFactory.getMapper(sqlSession,UserDao.class);
        userDao.deleteRole(userId);
        for(String roleId : roleIds){
            userDao.updateRole(userId,roleId);
        }
        //4.提交事务
        TransactionUtil.commit(sqlSession);
    }catch (Exception e){
        TransactionUtil.rollback(sqlSession);
        throw new RuntimeException(e);
        //记录日志
    }finally {
        try {
            TransactionUtil.close(sqlSession);
        }catch (Exception e){
            e.printStackTrace();
        }
    }
}
(4)在dao接口UserDao中添加两个方法
void deleteRole(String userId);

void updateRole(@Param("userId") String userId, @Param("roleId")String roleId);
(5)在该接口对应的映射配置文件中添加两个操作
<!--配置根据roleId删除关系表数据-->
<delete id="deleteRole" parameterType="java.lang.String">
    delete from ss_role_user
    where user_id = #{userId,jdbcType=VARCHAR}
</delete>

<!--配置全字段插入,当某个字段没有值时,插入null-->
<insert id="updateRole" parameterType="map">
    insert into ss_role_user (role_id, user_id)
    values (#{roleId,jdbcType=VARCHAR}, #{userId,jdbcType=VARCHAR})
</insert>
(6)启动项目进行测试!
2. 登陆
2.1 登陆功能快速开发
(1)找到项目webapp/login.jsp登陆页面,修改form表单提交的action路径
<form action="${pageContext.request.contextPath}/login?operation=login" method="post">
</form>
(2)在后台UserServlet添加登陆的方法
@Override
protected void doGet(HttpServletRequest request, HttpServletResponse response) throws ServletException, IOException {
    String operation = request.getParameter("operation");
    if("list".equals(operation)){
        this.list(request,response);
    }
    //中间省略
    else if("login".equals(operation)){
        this.login(request,response);
    }
}
private void login(HttpServletRequest request, HttpServletResponse response) throws ServletException, IOException {
    String email = request.getParameter("email");
    String pwd = request.getParameter("password");
    User user = userService.login(email,pwd);
    if(user != null) {
        request.getSession().setAttribute("loginUser", user);
        //跳转页面
        request.getRequestDispatcher("/WEB-INF/pages/home/main.jsp").forward(request, response);
    }else{
        response.sendRedirect(request.getContextPath()+"/login.jsp");
    }
}
(3)在因为层接口UserService中添加登陆的方法
/**
     * 根据邮箱和密码登录
     * @param email
     * @param pwd
     * @return
     */
    User login(String email, String pwd);
(4)在对应的实现类中去实现登陆方法
@Override
public User login(String email, String pwd) {
    SqlSession sqlSession = null;
    try{
        //1.获取SqlSession
        sqlSession = MapperFactory.getSqlSession();
        //2.获取Dao
        UserDao userDao = MapperFactory.getMapper(sqlSession,UserDao.class);
        //3.调用Dao层操作
        pwd = MD5Util.md5(pwd);
        return userDao.findByEmailAndPwd(email,pwd);
    }catch (Exception e){
        throw new RuntimeException(e);
        //记录日志
    }finally {
        try {
            TransactionUtil.close(sqlSession);
        }catch (Exception e){
            e.printStackTrace();
        }
    }
}
(5)在UserDao接口中添加查询方法
User findByEmailAndPwd(@Param("email")String email, @Param("password")String pwd);
(6)在UserDao.xml中添加查询
<select id="findByEmailAndPwd" parameterType="map" resultMap="BaseResultMap">
    select
    <include refid="Base_Column_List"/>
    from ss_user
    where email = #{email,jdbcType=VARCHAR} and password = #{password,jdbcType=VARCHAR}
</select>
(7)将原本在webapp/pages/home下的所有页面统一挪到/WEB-INF/pages下,注意是连同home目录一起挪
(8)修改/WEB-INF/pages/home/main.jsp内容区的路径
<!-- 内容区域 -->
<div class="content-wrapper">
    <iframe id="iframe" name="iframe"
            style="overflow:visible;"
            scrolling="auto"
            frameborder="no" height="100%" width="100%"
            src="${ctx}/system/user?operation=home"></iframe>
</div>
(9)在后台UserServlet中添加方法
@Override
protected void doGet(HttpServletRequest request, HttpServletResponse response) throws ServletException, IOException {
    String operation = request.getParameter("operation");
    if("list".equals(operation)){
        this.list(request,response);
    }
    //中间省略
    else if("home".equals(operation)){
        this.home(request,response);
    }
}
private void home(HttpServletRequest request, HttpServletResponse response) throws ServletException, IOException {
    request.getRequestDispatcher("/WEB-INF/pages/home/home.jsp").forward(request, response);
}
(10)启动项目测试
2.2 用户菜单控制数据准备
我们先来完成登陆后的注销操作,这是一套的
(1)找到/WEB-INF/pages/home/header.jsp中找到注销,添加请求连接
<div class="pull-right">
    <a href="${ctx}/system/user?operation=logout" class="btn btn-default btn-flat">注销</a>
</div>
(2)在后台UserServlet中添加对应的方法logout
@Override
protected void doGet(HttpServletRequest request, HttpServletResponse response) throws ServletException, IOException {
    String operation = request.getParameter("operation");
    if("list".equals(operation)){
        this.list(request,response);
    }
    //中间的省略
    else if("login".equals(operation)){
        this.login(request,response);
    }else if("logout".equals(operation)){
        this.logout(request,response);
    }else if("home".equals(operation)){
        this.home(request,response);
    }
}
private void logout(HttpServletRequest request, HttpServletResponse response) throws ServletException, IOException {
    request.getSession().removeAttribute("loginUser");
    response.sendRedirect(request.getContextPath()+"/login.jsp");
}
(3)在用户登陆的时候需要去查询该用户对应的角色对应的所有模块,因此需要在后台的UserServlet中修改用户登陆的方法,添加数据的查询
private void login(HttpServletRequest request, HttpServletResponse response) throws ServletException, IOException {
    String email = request.getParameter("email");
    String pwd = request.getParameter("password");
    User user = userService.login(email,pwd);
    if(user != null) {
        request.getSession().setAttribute("loginUser", user);
        //如果登录成功,加载该用户对应的角色对应的所有模块
        List<Module> moduleList = userService.findModuleById(user.getId());
        request.setAttribute("moduleList",moduleList);
        //跳转页面
        request.getRequestDispatcher("/WEB-INF/pages/home/main.jsp").forward(request, response);
    }else{
        response.sendRedirect(request.getContextPath()+"/login.jsp");
    }
}
(4)在UserService接口中添加方法findModuleById
/**
     * 根据用户id查询所有可以操作的菜单对象
     * @param id 用户的id
     * @return
     */
    List<Module> findModuleById(String id);
(5)在实现类中去实现该方法
@Override
public List<Module> findModuleById(String id) {
    SqlSession sqlSession = null;
    try{
        //1.获取SqlSession
        sqlSession = MapperFactory.getSqlSession();
        //2.获取Dao
        ModuleDao moduleDao = MapperFactory.getMapper(sqlSession,ModuleDao.class);
        //3.调用Dao层操作
        return moduleDao.findModuleByUserId(id);
    }catch (Exception e){
        throw new RuntimeException(e);
        //记录日志
    }finally {
        try {
            TransactionUtil.close(sqlSession);
        }catch (Exception e){
            e.printStackTrace();
        }
    }
}
(6)在ModuleDao接口中添加查询方法findModuleByUserId
List<Module> findModuleByUserId(String id);
(7)在ModuleDao.xml中添加对应的查询
<select id="findModuleByUserId" parameterType="java.lang.String" resultMap="BaseResultMap">
        /*userid->用户角色关系表->roleid->角色模块关系表->moduleid->module信息*/
        SELECT DISTINCT
          m.module_id, m.parent_id, m.name, m.ctype, m.state, m.curl, m.remark
        FROM
            ss_module AS m,
            ss_role_module AS rm,
            ss_role_user AS ru
        WHERE
            m.module_id = rm.module_id
        AND	rm.role_id = ru.role_id
        AND	ru.user_id = #{id,jdbcType=VARCHAR}
    </select>
至此:用户的角色对应的模块数据已查询出来了,后续就是要在页面进行控制展示
2.3 登陆用户菜单控制
(1)找到/WEB-INF/pages/home/aside.jsp页面,添加用户菜单的展示
<!-- sidebar menu: : style can be found in sidebar.less -->
<ul class="sidebar-menu">
    <li class="header">菜单</li>

    <c:forEach items="${moduleList}" var="item">
        <c:if test="${item.ctype==0}">
            <li class="treeview">
                <a href="#">
                    <i class="fa fa-cube"></i> <span>${item.name}</span>
                    <span class="pull-right-container"><i class="fa fa-angle-left pull-right"></i></span>
                </a>
                <ul class="treeview-menu">
                    <c:forEach items="${moduleList}" var="item2">
                        <c:if test="${item2.ctype==1 && item2.parentId == item.id}">
                            <li id="${item2.id}">
                                <a οnclick="setSidebarActive(this)" href="${ctx}/${item2.curl}" target="iframe">
                                    <i class="fa fa-circle-o"></i>${item2.name}
                                </a>
                            </li>
                        </c:if>
                    </c:forEach>
                </ul>
            </li>
        </c:if>
    </c:forEach>
启动项目进行测试
3.权限校验
3.1 获取请求url
(1)创建过滤器:com.itheima.web.filters.AuthorFilter
@WebFilter(value = "/*")
public class AuthorFilter implements Filter {

    private FilterConfig filterConfig;

    /**
     * 初始化方法,获取过滤器的配置对象
     * @param filterConfig
     * @throws ServletException
     */
    @Override
    public void init(FilterConfig filterConfig) throws ServletException {
        this.filterConfig = filterConfig;
    }

    @Override
    public void doFilter(ServletRequest req, ServletResponse resp, FilterChain chain) throws IOException, ServletException {
        //1.定义和协议相关的请求和响应对象
        HttpServletRequest request ;
        HttpServletResponse response;
        try{
            //2.把参数转换成协议相关的对象
            request = (HttpServletRequest)req;
            response = (HttpServletResponse)resp;

            //1.获取本次操作
            String url = request.getRequestURI();
            String queryString = request.getQueryString();

            //1.当前获取到的url:   /system/dept
            url = url.substring(1);
            //2.当前获取到的查询参数:operation=list       operation=toEdit&id=100
            int index = queryString.indexOf('&');
            if(index != -1){
                queryString = queryString.substring(0,index);
            }
            url = url + "?" + queryString;

            //2.获取到当前登录人允许的操作

            //3.比对本次操作是否在当前登录人允许的操作范围内
            //3.1如果允许,放行
            //3.2不允许跳转到非法访问页

            //6.放行
            chain.doFilter(request,response);
        }catch (Exception e){
            e.printStackTrace();
        }
    }

    @Override
    public void destroy() {
        //可以做一些清理操作
    }
}
3.2 获取登陆用户可执行操作
(1)登陆成功后需要将用户的觉得对应的模块信息存放到session,找到UserServlet中的登陆方法login,
private void login(HttpServletRequest request, HttpServletResponse response) throws ServletException, IOException {
    String email = request.getParameter("email");
    String pwd = request.getParameter("password");
    User user = userService.login(email,pwd);
    if(user != null) {
        request.getSession().setAttribute("loginUser", user);
        //如果登录成功,加载该用户对应的角色对应的所有模块
        List<Module> moduleList = userService.findModuleById(user.getId());
        request.setAttribute("moduleList",moduleList);

        //当前登录用户对应的可操作模块的所有url拼接成一个大的字符串
        StringBuffer sbf = new StringBuffer();
        for(Module m: moduleList){
            sbf.append(m.getCurl());
            sbf.append(',');
        }
        request.getSession().setAttribute("authorStr",sbf.toString());

        //跳转页面
        request.getRequestDispatcher("/WEB-INF/pages/home/main.jsp").forward(request, response);
    }else{
        response.sendRedirect(request.getContextPath()+"/login.jsp");
    }
}
(2)修改AuthorFilter
@Override
public void doFilter(ServletRequest req, ServletResponse resp, FilterChain chain) throws IOException, ServletException {
    //1.定义和协议相关的请求和响应对象
    HttpServletRequest request ;
    HttpServletResponse response;
    HttpSession session;
    try{
        //2.把参数转换成协议相关的对象
        request = (HttpServletRequest)req;
        response = (HttpServletResponse)resp;
        session = request.getSession();
        //1.获取本次操作
        String url = request.getRequestURI();
        //.css   .js    .png   .jpg   .index
        if(url.endsWith(".css")
           || url.endsWith(".js")
           || url.endsWith(".png")
           || url.endsWith(".jpg")
           || url.endsWith("index.jsp")
           || url.endsWith("login.jsp")){
            chain.doFilter(request,response);
            return;
        }
        String queryString = request.getQueryString();
        if(queryString.endsWith("operation=login")){
            chain.doFilter(request,response);
            return;
        }


        //1.当前获取到的url:   /system/dept
        url = url.substring(1);
        //2.当前获取到的查询参数:operation=list       operation=toEdit&id=100
        int index = queryString.indexOf('&');
        if(index != -1){
            queryString = queryString.substring(0,index);
        }
        url = url + "?" + queryString;

        //2.获取到当前登录人允许的操作
        String authorStr = session.getAttribute("authorStr").toString();
        //3.比对本次操作是否在当前登录人允许的操作范围内
        //3.1如果允许,放行
        //3.2不允许跳转到非法访问页

        //6.放行
        chain.doFilter(request,response);
    }catch (Exception e){
        e.printStackTrace();
    }
}
(3)启动项目在模块管理功能中去添加一些数据,如下所示
![[外链图片转存失败,源站可能有防盗链机制,建议将图片保存下来直接上传(img-2ytD2uDp-1660785293291)(./img/1.png)]](https://blog-1305504063.cos.ap-beijing.myqcloud.com/cdf5a61b-b7dc-11ed-81d3-5cea1d84200c.png)


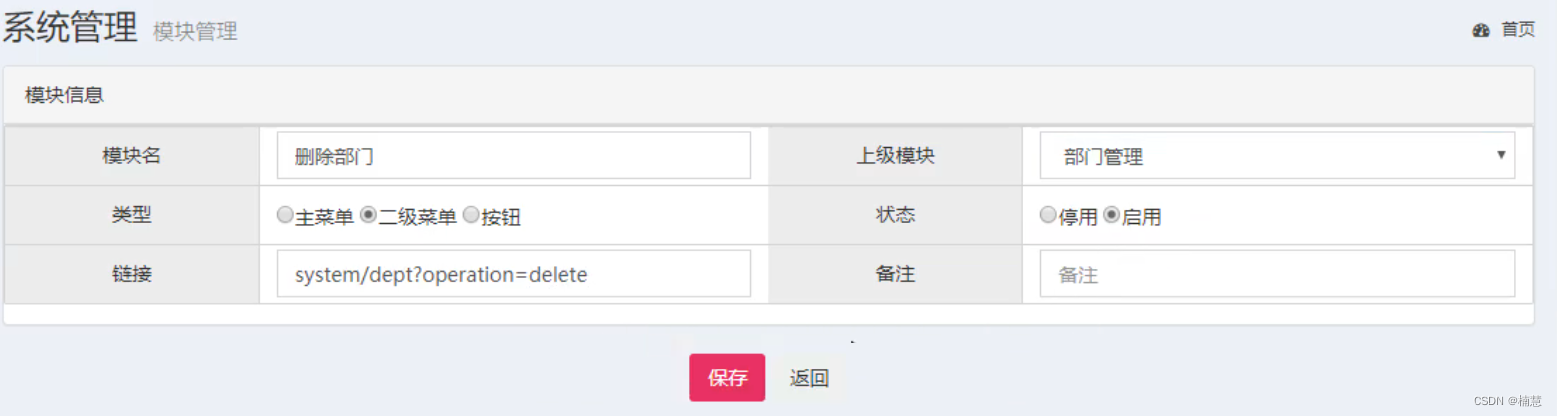
然后需要在角色管理中为对应的角色进行授权
3.3 权限校验
开始授权
(1)从day03的课程资料中找到模块页面/unauthorized.jsp,拷贝到项目的webapp下即可
(2)更改AuthorFilter,
@Override
public void doFilter(ServletRequest req, ServletResponse resp, FilterChain chain) throws IOException, ServletException {
    HttpServletRequest request ;
    HttpServletResponse response;
    HttpSession session;
    try{
        request = (HttpServletRequest)req;
        response = (HttpServletResponse)resp;
        session = request.getSession();

        //1.获取本次操作
        String url = request.getRequestURI();
        //.css   .js    .png   .jpg   .index
        if(url.endsWith(".css")
           || url.endsWith(".js")
           || url.endsWith(".png")
           || url.endsWith(".jpg")
           || url.endsWith("index.jsp")
           || url.endsWith("unauthorized.jsp")
           || url.endsWith("login.jsp")){
            chain.doFilter(request,response);
            return;
        }
        String queryString = request.getQueryString();
        if(queryString.endsWith("operation=login")
           ||queryString.endsWith("operation=home")
           ||queryString.endsWith("operation=logout")){
            chain.doFilter(request,response);
            return;
        }
        //1.当前获取到的url:   /system/dept
        url = url.substring(1);
        //2.当前获取到的查询参数:operation=list       operation=toEdit&id=100
        int index = queryString.indexOf('&');
        if(index != -1){
            queryString = queryString.substring(0,index);
        }
        url = url + "?" + queryString;

        //2.获取到当前登录人允许的操作
        String authorStr = session.getAttribute("authorStr").toString();

        //3.比对本次操作是否在当前登录人允许的操作范围内
        if(authorStr.contains(url)){
            //3.1如果允许,放行
            chain.doFilter(request,response);
            return;
        }else{
            //3.2不允许跳转到非法访问页
            response.sendRedirect(request.getContextPath()+"/unauthorized.jsp");
        }
    }catch (Exception e){
        e.printStackTrace();
    }
}
(3)对于页面上的元素,如果没有操作权限,我们直接让用户看不到即可,怎么操作呢?在页面上做一个判断,我们举一个例子,其他操作都是一样的
找到/WEB-INF/pages/system/user/list.jsp,
<div class="btn-group">
    <c:if test="${sessionScope.authorStr.contains('system/user?operation=toAdd')}">
        <button type="button" class="btn btn-default" title="新建" οnclick='location.href="${ctx}/system/user?operation=toAdd"'><i class="fa fa-file-o"></i> 新建</button>
    </c:if>
    <button type="button" class="btn btn-default" title="删除" οnclick='deleteById()'><i class="fa fa-trash-o"></i> 删除</button>
    <button type="button" class="btn btn-default" title="刷新" οnclick="window.location.reload();"><i class="fa fa-refresh"></i> 刷新</button>
    <c:if test="${sessionScope.authorStr.contains('system/user?operation=userRoleList')}">
        <button type="button" class="btn btn-default" title="角色" οnclick="roleList()"><i class="fa fa-user-circle-o"></i> 角色</button>
    </c:if>
</div>
(4)启动项目,测试
版权声明:本文内容由互联网用户自发贡献,该文观点仅代表作者本人。本站仅提供信息存储空间服务,不拥有所有权,不承担相关法律责任。如发现本站有涉嫌侵权/违法违规的内容, 请发送邮件至 举报,一经查实,本站将立刻删除。
文章由极客之家整理,本文链接:https://www.bmabk.com/index.php/post/120285.html

