
一、TableLayout的概述
表格布局是以行数和列数来确定位置进行排列。就像一间教室,确定好行数与列数就能让同学有序入座。
注意:我们需要先添加<TableRow容器,每添加一个就会多一行,然后再往<TableRow容器中添加其它组件。
二、TableLayout的属性
2.1 、TableLayout(表格布局)的样式,就像是一张表格。每个TableLayout,都由多个TableRow组成,每个TableRow就是一行,有几个TableRow就有几行。TableLayout不会显示行号和列号,也没有分割线,其行数和列数都可以进行操作。
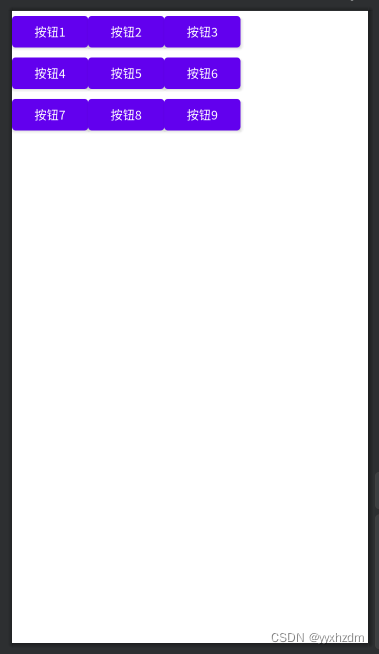
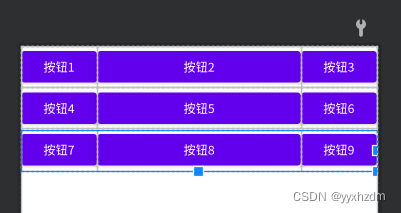
下面是 3 (行) x 3(列) 的TableLayout基本使用,其xml布局文件table_layout.xml如下:
<?xml version="1.0" encoding="utf-8"?>
<TableLayout xmlns:android="http://schemas.android.com/apk/res/android"
    android:layout_width="match_parent"
    android:layout_height="match_parent">

    <TableRow>

        <Button
            android:id="@+id/button01"
            android:layout_width="wrap_content"
            android:layout_height="wrap_content"
            android:text="按钮1" />

        <Button
            android:id="@+id/button02"
            android:layout_width="wrap_content"
            android:layout_height="wrap_content"
            android:text="按钮2" />

        <Button
            android:id="@+id/button03"
            android:layout_width="wrap_content"
            android:layout_height="wrap_content"
            android:text="按钮3" />
    </TableRow>

    <TableRow>

        <Button
            android:id="@+id/button04"
            android:layout_width="wrap_content"
            android:layout_height="wrap_content"
            android:text="按钮4" />

        <Button
            android:id="@+id/button05"
            android:layout_width="wrap_content"
            android:layout_height="wrap_content"
            android:text="按钮5" />

        <Button
            android:id="@+id/button06"
            android:layout_width="wrap_content"
            android:layout_height="wrap_content"
            android:text="按钮6" />
    </TableRow>

    <TableRow>

        <Button
            android:id="@+id/button07"
            android:layout_width="wrap_content"
            android:layout_height="wrap_content"
            android:text="按钮7" />

        <Button
            android:id="@+id/button08"
            android:layout_width="wrap_content"
            android:layout_height="wrap_content"
            android:text="按钮8" />

        <Button
            android:id="@+id/button09"
            android:layout_width="wrap_content"
            android:layout_height="wrap_content"
            android:text="按钮9" />
    </TableRow>
</TableLayout>
效果图:

2.2 、TableLayout的android:shrinkColumns属性,当TableRow里边的空间布满布局的时候,指定列自动延伸以填充可用部分。当TableRow里边的控件还没有布满布局时,android:shrinkColumns不起作用。
下面的布局文件table_layout2.xml,演示了android:shrinkColumns属性的使用:
<?xml version="1.0" encoding="utf-8"?>
<TableLayout xmlns:android="http://schemas.android.com/apk/res/android"
    android:layout_width="match_parent"
    android:layout_height="match_parent"
    android:shrinkColumns="2">

    <TableRow>

        <Button
            android:id="@+id/button01"
            android:layout_width="wrap_content"
            android:layout_height="wrap_content"
            android:text="按钮1" />
        <!-- android:text="按钮1AAAAAAAAAAAAAAA" -->
        <Button
            android:id="@+id/button02"
            android:layout_width="wrap_content"
            android:layout_height="wrap_content"
            android:text="按钮2" />
        <!-- android:text="按钮2AAAAAAAAAAAAAAA" -->
        <Button
            android:id="@+id/button03"
            android:layout_width="wrap_content"
            android:layout_height="wrap_content"
            android:text="按钮3AAAAAAAAAAAAAAA" />
    </TableRow>

    <TableRow>

        <Button
            android:id="@+id/button04"
            android:layout_width="wrap_content"
            android:layout_height="wrap_content"
            android:text="按钮4" />

        <Button
            android:id="@+id/button05"
            android:layout_width="wrap_content"
            android:layout_height="wrap_content"
            android:text="按钮5" />

        <Button
            android:id="@+id/button06"
            android:layout_width="wrap_content"
            android:layout_height="wrap_content"
            android:text="按钮6" />
    </TableRow>

    <TableRow>

        <Button
            android:id="@+id/button07"
            android:layout_width="wrap_content"
            android:layout_height="wrap_content"
            android:text="按钮7" />

        <Button
            android:id="@+id/button08"
            android:layout_width="wrap_content"
            android:layout_height="wrap_content"
            android:text="按钮8" />

        <Button
            android:id="@+id/button09"
            android:layout_width="wrap_content"
            android:layout_height="wrap_content"
            android:text="按钮9" />
    </TableRow>
</TableLayout>
效果图:
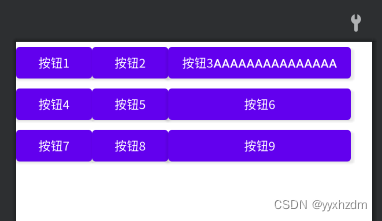
 从上面的实际效果图片可以看到,当TableLayout设置了android:shrinkColumns属性,则在TableRow中的控件如果超长的话,设置指定的列为可收缩的列。当可收缩的列太宽(内容过多)不会被挤出屏幕。当需要设置多列为可收缩时,将列序号用逗号隔开。
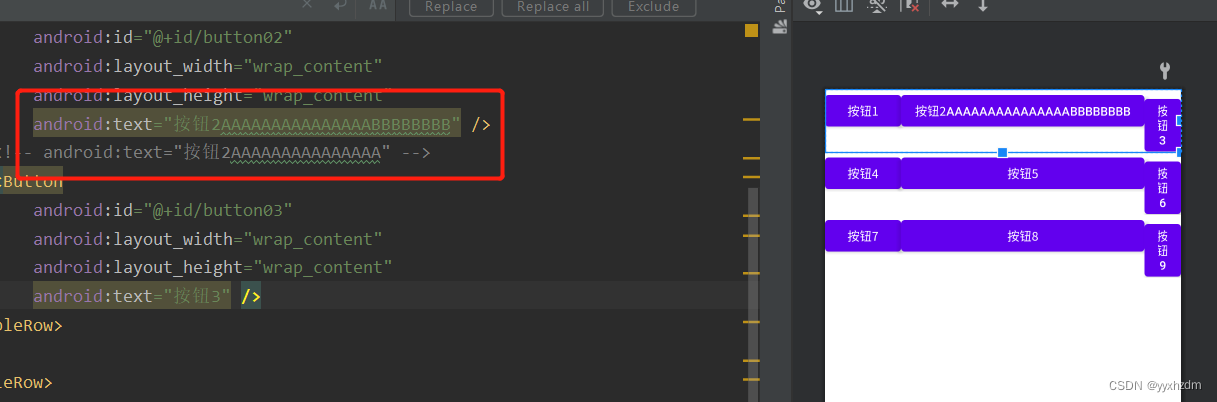
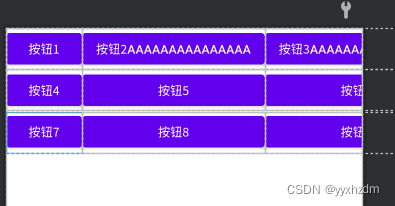
2.3 、下面的布局文件table_layout3.xml,演示了没有设置android:shrinkColumns属性,则在TableRow中的控件超长,也不会自动延伸以填充可用部分。
<?xml version="1.0" encoding="utf-8"?>
<TableLayout xmlns:android="http://schemas.android.com/apk/res/android"
    android:layout_width="match_parent"
    android:layout_height="match_parent">

    <TableRow>

        <Button
            android:id="@+id/button01"
            android:layout_width="wrap_content"
            android:layout_height="wrap_content"
            android:text="按钮1" />
        <!-- android:text="按钮1AAAAAAAAAAAAAAA" -->
        <Button
            android:id="@+id/button02"
            android:layout_width="wrap_content"
            android:layout_height="wrap_content"
            android:text="按钮2AAAAAAAAAAAAAAA" />
        <!-- android:text="按钮2" -->
        <Button
            android:id="@+id/button03"
            android:layout_width="wrap_content"
            android:layout_height="wrap_content"
            android:text="按钮3AAAAAAAAAAAAAAA" />
    </TableRow>

    <TableRow>

        <Button
            android:id="@+id/button04"
            android:layout_width="wrap_content"
            android:layout_height="wrap_content"
            android:text="按钮4" />

        <Button
            android:id="@+id/button05"
            android:layout_width="wrap_content"
            android:layout_height="wrap_content"
            android:text="按钮5" />

        <Button
            android:id="@+id/button06"
            android:layout_width="wrap_content"
            android:layout_height="wrap_content"
            android:text="按钮6" />
    </TableRow>

    <TableRow>

        <Button
            android:id="@+id/button07"
            android:layout_width="wrap_content"
            android:layout_height="wrap_content"
            android:text="按钮7" />

        <Button
            android:id="@+id/button08"
            android:layout_width="wrap_content"
            android:layout_height="wrap_content"
            android:text="按钮8" />

        <Button
            android:id="@+id/button09"
            android:layout_width="wrap_content"
            android:layout_height="wrap_content"
            android:text="按钮9" />
    </TableRow>
</TableLayout>
效果图:
2.4、TableLayout的android:stretchColumns属性,用于指定列对空白部分进行填充。
下面的布局文件table_layout4.xml,演示了android:stretchColumns属性的使用:
<?xml version="1.0" encoding="utf-8"?>
<TableLayout xmlns:android="http://schemas.android.com/apk/res/android"
    android:layout_width="match_parent"
    android:layout_height="match_parent"
    android:stretchColumns="1">

    <TableRow>

        <Button
            android:id="@+id/button01"
            android:layout_width="wrap_content"
            android:layout_height="wrap_content"
            android:text="按钮1"/>

        <Button
            android:id="@+id/button02"
            android:layout_width="wrap_content"
            android:layout_height="wrap_content"
            android:text="按钮2"/>
        <!-- android:text="按钮2" -->
        <Button
            android:id="@+id/button03"
            android:layout_width="wrap_content"
            android:layout_height="wrap_content"
            android:text="按钮3"/>
    </TableRow>

    <TableRow>

        <Button
            android:id="@+id/button04"
            android:layout_width="wrap_content"
            android:layout_height="wrap_content"
            android:text="按钮4"/>

        <Button
            android:id="@+id/button05"
            android:layout_width="wrap_content"
            android:layout_height="wrap_content"
            android:text="按钮5"/>

        <Button
            android:id="@+id/button06"
            android:layout_width="wrap_content"
            android:layout_height="wrap_content"
            android:text="按钮6"/>
    </TableRow>

    <TableRow>

        <Button
            android:id="@+id/button07"
            android:layout_width="wrap_content"
            android:layout_height="wrap_content"
            android:text="按钮7"/>

        <Button
            android:id="@+id/button08"
            android:layout_width="wrap_content"
            android:layout_height="wrap_content"
            android:text="按钮8"/>

        <Button
            android:id="@+id/button09"
            android:layout_width="wrap_content"
            android:layout_height="wrap_content"
            android:text="按钮9"/>
    </TableRow>
</TableLayout>
效果图:
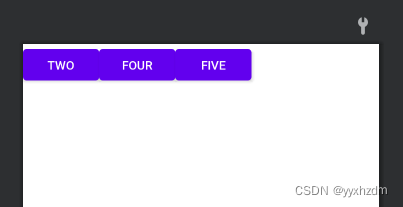
2.5、collapseColumns(隐藏列)
流程:在TableRow中定义5个按钮后,接着在最外层的TableLayout中添加以下属性:
android:collapseColumns = “0,2”,就是隐藏第一与第三列,代码如下:
<?xml version="1.0" encoding="utf-8"?>
<TableLayout xmlns:android="http://schemas.android.com/apk/res/android"
    android:layout_width="match_parent"
    android:layout_height="match_parent"
    android:stretchColumns="1">

    <TableLayout
        android:id="@+id/TableLayout2"
        android:layout_width="fill_parent"
        android:layout_height="wrap_content"
        android:collapseColumns="0,2">

        <TableRow>

            <Button
                android:layout_width="wrap_content"
                android:layout_height="wrap_content"
                android:text="one" />

            <Button
                android:layout_width="wrap_content"
                android:layout_height="wrap_content"
                android:text="two" />

            <Button
                android:layout_width="wrap_content"
                android:layout_height="wrap_content"
                android:text="three" />

            <Button
                android:layout_width="wrap_content"
                android:layout_height="wrap_content"
                android:text="four" />

            <Button
                android:layout_width="wrap_content"
                android:layout_height="wrap_content"
                android:text="five" />
        </TableRow>
    </TableLayout>
</TableLayout>
效果图:
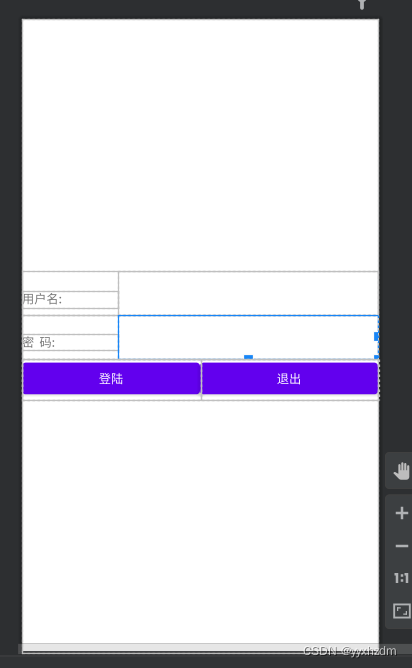
三、使用实例
使用TableLayout来完成简单的登录界面,运行效果图如下:
流程解析:
(1).调用gravity属性,设置为center_vertical,让布局里面的组件在竖直方向上居中
(2).将TableLayout中的第一和第四列设置为可拉伸
(3).在每个TableRow中添加两个TextView,用于拉伸填满该行,这样可以让表格水平居中
android:stretchColumns=”0,3” 设置为0.3,是为了让两边都充满,那么中间部分就可以居中了
<TableLayout xmlns:android="http://schemas.android.com/apk/res/android"
    android:id="@+id/TableLayout1"
    android:layout_width="match_parent"
    android:layout_height="match_parent"
    android:background="#FFFFFF"
    android:gravity="center_vertical"
    android:stretchColumns="0,3">

    <TableRow>
        <TextView
            android:layout_width="wrap_content"
            android:layout_height="wrap_content"
            android:text="用户名:" />

        <EditText
            android:layout_width="wrap_content"
            android:layout_height="wrap_content"
            android:minWidth="300dp" />

    </TableRow>

    <TableRow>

        <TextView
            android:layout_width="wrap_content"
            android:layout_height="wrap_content"
            android:text="密  码:" />

        <EditText
            android:layout_width="wrap_content"
            android:layout_height="wrap_content"
            android:minWidth="300dp" />
    </TableRow>

    <TableRow>

        <Button
            android:layout_width="0dp"
            android:layout_height="wrap_content"
            android:layout_weight="1"
            android:text="登陆" />

        <Button
            android:layout_width="0dp"
            android:layout_height="wrap_content"
            android:layout_weight="1"
            android:text="退出" />
    </TableRow>

</TableLayout>
效果图:
版权声明:本文内容由互联网用户自发贡献,该文观点仅代表作者本人。本站仅提供信息存储空间服务,不拥有所有权,不承担相关法律责任。如发现本站有涉嫌侵权/违法违规的内容, 请发送邮件至 举报,一经查实,本站将立刻删除。
文章由极客之音整理,本文链接:https://www.bmabk.com/index.php/post/119103.html

