
一、EditText(输入框)介绍
EditText在开发中也是经常使用的控件,比如,要实现一个登录页面,需要用户输入账号、密码等信息,然后我们或得用户输入的内容,把它交给服务器来判断。因此,这一节我们需要学习如何在布局文件中实现编辑框,然后获得编辑框的内容。
EitText是一个非常重要的组件,可以说它是用户和Android应用进行数据传输窗户,有了它就等于有了一扇和Android应用传输的门,通过它用户可以把数据传给Android应用,然后得到我们想要的数据。
EditText是TextView的子类,所以TextView的方法和特性同样存在于EditText中。
EditText有一些属性可以设置EditText的特性,比如最大长度,空白提示文字等。有时候我们有一些特属的需要,要求只能在EditText中输入特定个数的字符,比如身份证号、手机号吗等。这时候就可以通过android:maxLength属性来设置最大输入字符个数,比如android:maxLength=“4”就表示最多能输入4个字符,再多了就输入不进去了。有时候我们需要说明你定义的这个EditText是做什么用的,比如让输入“用户名”,或者输入“电话号码”等,但是你又不想在EditText前面加一个TextView来说明这是输入“用户名”的,因为这会使用一个TextView,那么怎么办呢?EditText为我们提供了android:hint来设置当EditText内容为空时显示的文本,这个文本只在EditText为空时显示,你输入字符的时候就消失了,不影响你的EditText的文本。
二、EditText(输入框)属性
2.1、android:text 设置文本内容
2.2、android:textColor 设置字体颜色
2.3、android:hint 设置内容为空时候显示的文本
2.4、android:textColorHint 设置内容为空时显示的文本的颜色
2.5、EditText的一个重要属性是inputType,用于为EditText设置输入类型,其属性值主要有以下一些:
android:inputType=none:普通字符。
android:inputType=text:普通字符。
android:inputType=textCapCharacters:字母大写。
android:inputType=textCapWords:首字母大写。
android:inputType=textCapSentences:仅第一个字母大写。
android:inputType=textAutoCorrect:自动完成。
android:inputType=textAutoComplete:自动完成。
android:inputType=textMultiLine:多行输入。
android:inputType=textImeMultiLine:输入法多行(如果支持)。
android:inputType=textNoSuggestions:不提示。
android:inputType=textUri:网址。
android:inputType=textEmailAddress:电子邮件地址。
android:inputType=textEmailSubject:邮件主题。
android:inputType=textShortMessage:短讯。
android:inputType=textLongMessage:长信息。
android:inputType=textPersonName:人名。
android:inputType=textPostalAddress:地址。
android:inputType=textPassword:密码。
android:inputType=textVisiblePassword:可见密码。
android:inputType=textWebEditText:作为网页表单的文本。
android:inputType=textFilter:文本筛选过滤。
android:inputType=textPhonetic:拼音输入。
android:inputType=number:数字。
android:inputType=numberSigned:带符号数字格式。
android:inputType=numberDecimal:带小数点的浮点格式。
android:inputType=phone:拨号键盘。
android:inputType=datetime:时间日期。
android:inputType=date:日期键盘。
android:inputType=time:时间键盘。
2.6、android:maxLength 限制显示的文本长度,超出部分不显示
2.7、android:minLines 设置文本的最小行数
2.8、android:gravity 设置文本位置,如设置成“center”,文本将居中显示
2.9、android:layout_gravity 设置内部文本的居中方式
2.10、android:drawableLeft 在text的左边输出一个drawable,如图片
2.11、android:drawablePadding 设置text与drawable(图片)的间隔,与drawableLeft、drawableRight、drawableTop、drawableBottom一起使用,可设置为负数,单独使用没有效果。
2.12、android:digits 设置允许输入哪些字符。如“0123456789abcdefghijklmnopqrstuvwxyz”
2.13、android:ellipsize 设置当文字过长时,该控件该如何显示
start:省略号显示在开头
end:省略号显示在结尾
middle:省略号显示在中间
marquee:以跑马灯的方式显示(动画横向移动)
2.14、android:lines 设置文本的行数,设置两行就显示两行,即使第二行没有数据
2.15、android:lineSpacingExtra 设置行间距
2.16、android:singleLine android:singleLine
2.17、android:textStyle 设置字形,可以设置一个或多个,用”|”隔开
bold:粗体
italic:斜体
bolditalic:又粗又斜
三、示例
3.1、效果图
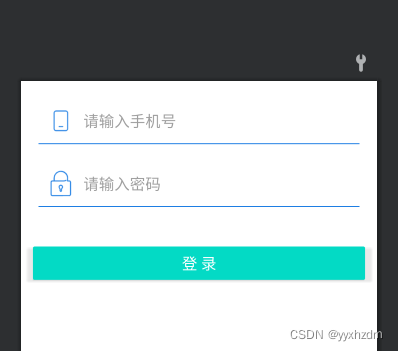

3.2、XMl代码
<?xml version="1.0" encoding="utf-8"?>
<LinearLayout xmlns:android="http://schemas.android.com/apk/res/android"
    android:layout_width="match_parent"
    android:layout_height="match_parent"
    android:orientation="vertical">

    <EditText
        android:id="@+id/et_phone"
        android:layout_width="match_parent"
        android:layout_height="wrap_content"
        android:layout_marginLeft="20dp"
        android:layout_marginRight="20dp"
        android:background="@null"
        android:inputType="number"
        android:maxLength="11"
        android:hint="请输入手机号"
        android:drawablePadding="10dp"
        android:padding="10dp"
        android:drawableLeft="@mipmap/icon_phone"
        android:drawableBottom="@drawable/shape_et_bottom_line"
        android:layout_marginTop="20dp"/>

    <EditText
        android:id="@+id/et_password"
        android:layout_width="match_parent"
        android:layout_height="wrap_content"
        android:layout_marginLeft="20dp"
        android:layout_marginRight="20dp"
        android:layout_marginTop="10dp"
        android:background="@null"
        android:inputType="textPassword"
        android:maxLength="16"
        android:padding="10dp"
        android:drawablePadding="10dp"
        android:hint="请输入密码"
        android:drawableBottom="@drawable/shape_et_bottom_line"
        android:drawableLeft="@mipmap/icon_password"/>

    <TextView
        android:id="@+id/tv_login"
        style="@style/Widget.AppCompat.Button.Colored"
        android:layout_width="match_parent"
        android:layout_height="50dp"
        android:layout_marginLeft="10dp"
        android:layout_marginRight="10dp"
        android:layout_marginTop="30dp"
        android:text="登 录"
        android:textColor="#ffffffff"
        android:textSize="18sp" />
</LinearLayout>
android:background=”@null” 输入框无背景
android:drawableBottom=”@drawable/shape_et_bottom_line” 底部引入一个shape布局文件,这个布局文件就是输入框的下划线。
shape_et_bottom_line.xml内容如下:
<?xml version="1.0" encoding="utf-8"?>
<shape xmlns:android="http://schemas.android.com/apk/res/android"
    android:shape="rectangle" >

    <solid android:color="#1E7EE3" />
    <size android:height="1dp" android:width="500dp"/>

</shape>
android:drawableleft=”@mipmap/icon_phone”
android:drawableleft=”@mipmap/icon_password” 这两个是账号、密码的图标


EditeText还有哪些功能?
1.监听用户输入的内容.
有这样一个场景,一个搜索框,只要用户输入了内容就去请求服务器,于是我们在Activity里面监听EditeText文本改变事件。
EditText etOne= findViewById(R.id.et_phone);
etOne.addTextChangedListener(new TextWatcher() {
@Override
public void beforeTextChanged(CharSequence s, int start, int count, int after) {
Log.i(“Ansen”,”内容改变之前调用:”+s);
}
@Override
public void onTextChanged(CharSequence s, int start, int before, int count) {
Log.i(“Ansen”,”内容改变,可以去告诉服务器:”+s);
}
@Override
public void afterTextChanged(Editable s) {
Log.i(“Ansen”,”内容改变之后调用:”+s);
}
});
首先我们通过id找到EditText控件,并且添加监听函数,内部内实现TextWatcher接口,重写三个方法。我们可以在onTextChanged方法中告诉服务器我要搜索的内容。
本节小结:
本节给大家介绍了Android UI控件中的EditText(输入框)控件,用法有很多,当然上述情况肯定满足不了实际需求的,实际开发中我们可能需要根据自己的需求来自定义EditText!当然,这就涉及到了自定义控件这个高级一点的主题了,在进阶部分我们会对Android中的自定义控件进行详细的讲解!现在会用就可以了…
版权声明:本文内容由互联网用户自发贡献,该文观点仅代表作者本人。本站仅提供信息存储空间服务,不拥有所有权,不承担相关法律责任。如发现本站有涉嫌侵权/违法违规的内容, 请发送邮件至 举报,一经查实,本站将立刻删除。
文章由极客之音整理,本文链接:https://www.bmabk.com/index.php/post/119098.html

