
SpringBoot
时间安排:
    08:30 -- 09:30  面试题
    09:30 -- 12:00  上课

    14:00 -- 15:00  练习
    15:00 -- 17:30  上课
    17:30 -- 18:00  练习

    19:00 -- 21:30  晚自习
本章知识点
一 敏捷开发
1.1 什么是敏捷开发
 敏捷开发以用户的需求进化为核心,采用迭代、循序渐进的方法进行软件开发。
 在敏捷开发中,软件项目在构建初期被切分成多个子项目,各个子项目的成果都经过测试,具备可视、可集成和可运行使用的特征。换言之,就是把一个大项目分为多个相互联系,但也可独立运行的小项目,并分别完成,在此过程中软件一直处于可使用状态。[ 其实就是使用 maven工具 构建父子工程 ]
1.2 敏捷开发的优势
如果不进行maven父子工程搭建 会有什么问题[一期项目 项目搭建方式 有什么问题 ]:

一、业务耦合性高,体积大,All in One

所有的业务都在一个大工程里面,体积庞大,如果需求变更频繁,无法快速满足新业务快速上线和持续交付。

二、部署麻烦

开发时,一处修改,需要重启整个服务,启动耗时长。
每次局部小改动上线,需要对整个系统重新打包部署,部署周期长。

三、水平扩展性差

由于是单体应用,不能做某些局部功能对高并发要求高而单独部署,从而造成服务在某些时段响应特别慢。

四、稳定性差

在某一时段,一个高并发请求会导致整个服务宕机,轻则响应慢,重则停止对外提供服务。给用户造成不可估量的损失。

五、代码维护成本高

业务在不停迭代的同时,源代码也在不停的更新迭代,源代码的作者也是换了一波又一波,造成后来者很难理解和维护这些代码,更为恐怖的是多处地方出现重复的代码。
参考:深入理解SpringBoot(二)——SpringBoot基本概念
https://blog.csdn.net/chengyuhaomei520/article/details/127189723?spm=1001.2014.3001.5506


1.3 敏捷开发项目拆分方式
横向拆分,即按照不同的业务功能,拆分成不同的微服务,如天气数据采集、数据存储、天气查询等服务,形成独立的业务领域微服务集群[springcloud]
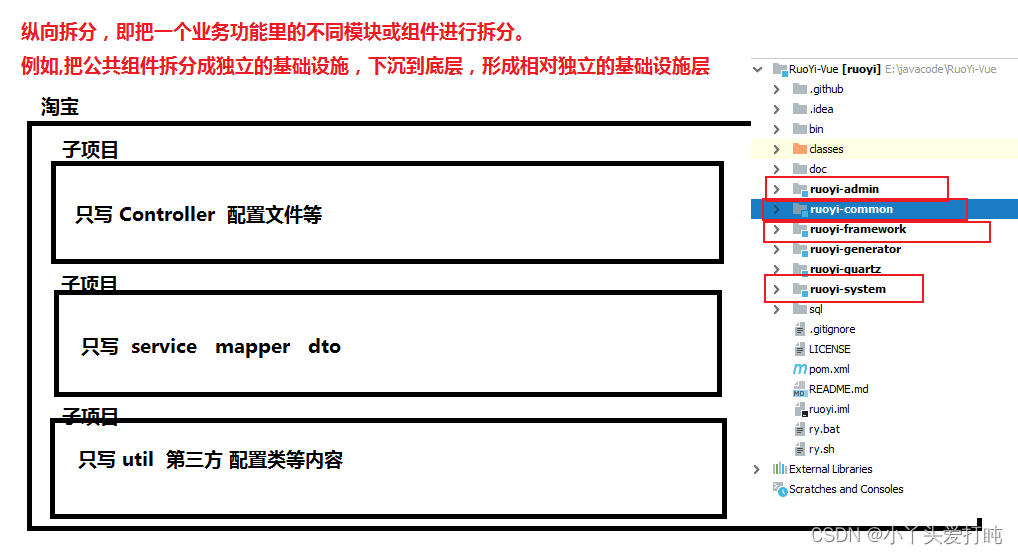
纵向拆分,即把一个业务功能里的不同模块或组件进行拆分。例如,把公共组件拆分成独立的基础设施,下沉到底层,形成相对独立的基础设施层

1.4 项目拆分
1 创建一个 maven 的 quickstrat项目
2 将当前项目的所文件夹删除 [因为当前项目是一个 父项目不允许有任何的内容]
3 将当前项目 pom文件 类型改成 pom [父工程创建完成]
<?xml version="1.0" encoding="UTF-8"?>

<project xmlns="http://maven.apache.org/POM/4.0.0" xmlns:xsi="http://www.w3.org/2001/XMLSchema-instance"
  xsi:schemaLocation="http://maven.apache.org/POM/4.0.0 http://maven.apache.org/xsd/maven-4.0.0.xsd">
  <modelVersion>4.0.0</modelVersion>

  <groupId>com.aaa.haha</groupId>
  <artifactId>demo01</artifactId>
  <version>1.0-SNAPSHOT</version>
  <packaging>pom</packaging>


</project>
4 创建子项目

  选中父项目--右键--new--- module 创建子项目
  haha-admin  [web项目]
  haha-system [java项目]
  haha-common [java项目]

  此时父子项目创建完成
    A 在子项目的pom文件中 会有一个 parent标签 表明当前项目是哪个项目的子项目
<parent>
        <artifactId>demo01</artifactId>
        <groupId>com.aaa.haha</groupId>
        <version>1.0-SNAPSHOT</version>
    </parent>
B 在父项目中 会有一个 module 标签 表明当前有哪些子项目
 <modules>
    <module>haha-admin</module>
    <module>haha-system</module>
    <module>haha-common</module>
  </modules>
5 建立依赖关系
  haha-admin  [web项目]   : Controller控制层代码
  haha-system [java项目]  : service 业务层代码 mapper 持久层代码
  haha-common [java项目]  : 工具类等内容

  按照三层架构的思想 controller调用 service  代码 此时父子工程搭建完成之后  无法调用的
  所以我们需要建立项目之前的依赖
<?xml version="1.0" encoding="UTF-8"?>

<project xmlns="http://maven.apache.org/POM/4.0.0" xmlns:xsi="http://www.w3.org/2001/XMLSchema-instance"
         xsi:schemaLocation="http://maven.apache.org/POM/4.0.0 http://maven.apache.org/xsd/maven-4.0.0.xsd">
    <parent>
        <artifactId>demo01</artifactId>
        <groupId>com.aaa.haha</groupId>
        <version>1.0-SNAPSHOT</version>
    </parent>

    <modelVersion>4.0.0</modelVersion>
    <artifactId>haha-admin</artifactId>
    <packaging>war</packaging>

    <dependencies>

        <dependency>
            <groupId>com.aaa.haha</groupId>
            <artifactId>haha-system</artifactId>
            <version>1.0-SNAPSHOT</version>
        </dependency>


    </dependencies>


</project>
6 导入jar包
 方式1 :在总pom中导入  这样 所有的项目都可以使用
        我们不采用这种方式 例如 我们总pom中 导入 lombok 这样 所有的子项目都可以使用
        但是   haha-admin  里面写controller的 根本用不到lombok

方式2  :哪个项目需要用什么jar包 哪个项目进行导入

  haha-admin  [web项目]   :  springmvc
  haha-system [java项目]  :  mysql-java-connection  mybatis  spring
  haha-common [java项目]  :  hutool lombok spring

此时要注意  jar包会传递  所以我们需要阻断传递
 <!-- spring-boot-devtools -->
        <dependency>
            <groupId>org.springframework.boot</groupId>
            <artifactId>spring-boot-devtools</artifactId>
            <optional>true</optional> <!-- 表示依赖不会传递 -->
        </dependency>


<dependencies>

        <!-- https://mvnrepository.com/artifact/org.projectlombok/lombok -->
        <dependency>
            <groupId>org.projectlombok</groupId>
            <artifactId>lombok</artifactId>
            <version>1.18.22</version>
            <scope>provided</scope>
        </dependency>

    </dependencies>
核心思想:
    1 专职专项  哪个地方需要什么 则在哪导入
    2 如果jar包 只有当前工程使用 则阻断传递
    3 jar包多个工程都需要用到 在最基层导入
7 版本控制
  jar包导入完成之后  如果需要升级版本  只需要改依赖坐标的 <version></version> 就可以了
  但是 现在jar包分散在不同的项目中  所以我们如果项目体量太大 很难找到jar包的所在位置
  所以我们需要进行版本控制:
    在父项目中  :
<?xml version="1.0" encoding="UTF-8"?>

<project xmlns="http://maven.apache.org/POM/4.0.0" xmlns:xsi="http://www.w3.org/2001/XMLSchema-instance"
  xsi:schemaLocation="http://maven.apache.org/POM/4.0.0 http://maven.apache.org/xsd/maven-4.0.0.xsd">
  <modelVersion>4.0.0</modelVersion>


  <groupId>com.aaa.haha</groupId>
  <artifactId>demo01</artifactId>
  <version>1.0-SNAPSHOT</version>
  <packaging>pom</packaging>

  <modules>
    <module>haha-admin</module>
    <module>haha-system</module>
    <module>haha-common</module>
  </modules>

  <properties>
     <lombok.version>1.18.22</lombok.version>
  </properties>

  <dependencyManagement>
       <dependencies>
         <!-- https://mvnrepository.com/artifact/org.projectlombok/lombok -->
         <dependency>
           <groupId>org.projectlombok</groupId>
           <artifactId>lombok</artifactId>
           <version>${lombok.version}</version>
           <scope>provided</scope>
         </dependency>
       </dependencies>
  </dependencyManagement>

</project>


在子项目中:
<?xml version="1.0" encoding="UTF-8"?>

<project xmlns="http://maven.apache.org/POM/4.0.0" xmlns:xsi="http://www.w3.org/2001/XMLSchema-instance"
         xsi:schemaLocation="http://maven.apache.org/POM/4.0.0 http://maven.apache.org/xsd/maven-4.0.0.xsd">
    <parent>
        <artifactId>demo01</artifactId>
        <groupId>com.aaa.haha</groupId>
        <version>1.0-SNAPSHOT</version>
    </parent>
    <modelVersion>4.0.0</modelVersion>

    <artifactId>haha-common</artifactId>

    <dependencies>
        <dependency>
            <groupId>org.projectlombok</groupId>
            <artifactId>lombok</artifactId>
        </dependency>
    </dependencies>

</project>

在父项目中 使用 <dependencyManagement> 管理所有的jar包 这个标签的作用是 代表当前项目中 引入哪些依赖 但是并不传递给子项目  此时子项目 如果用到 <dependencyManagement> 中管理的依赖 此时只需要导入 不需要填写版本号。这样做 依然遵循 子项目导入jar包各取所需 ,并且修改版本的时候 只需要在父pom中修改即可
1.5 boot的由来
我们之前的开发都是使用ssm框架。如果需要搭建一个项目,则ssm整合。大家试想一下,ssm整合其实是一个机械性操作。
所以spring就发现了这个问题,所以他们就要提出解决方案。如果再需要进行ssm整合,则不需要那么麻烦。
spring帮我们创建了一个父项目。在父项目中将spring的产品 以及其他第三方框架进行整合 ,程序要再去开发的时候 ,只需要继承spring整合好的父项目。然后进行开发。让程序员只专注于开发。
spring将这个父项目 命名为 springboot 。
也就是说 我们玩springboot 技术上还是以前的那一些,只不过不需要自己去整合了。
Spring Boot是由Pivotal团队提供的全新框架,其设计目的是用来简化新Spring应用的初始搭建以及开发过程。该框架使用了特定的方式来进行配置,从而使开发人员不再需要定义样板化的配置。通过这种方式,Spring Boot 致力于在蓬勃发展的快速应用开发领域(rapid application development)成为领导者。
SpringBoot是由Pivotal团队在2013年开始研发、2014年4月发布第一个版本的全新开源的轻量级框架。它基于Spring4.0设计,不仅继承了Spring框架原有的优秀特性,而且还通过简化配置来进一步简化了Spring应用的整个搭建和开发过程。另外SpringBoot通过集成大量的框架使得依赖包的版本冲突,以及引用的不稳定性等问题得到了很好的解决。
SpringBoot所具备的特征有:
(1)可以创建独立的[Spring]应用程序,并且基于其Maven或Gradle插件,可以创建可执行的JARs和WARs;
(2)内嵌Tomcat或Jetty等Servlet容器;
(3)提供自动配置的“starter”项目对象模型(POMS)以简化[Maven]配置;
(4)尽可能自动配置Spring容器;约定大于配置
(5)提供准备好的特性,如指标、健康检查和外部化配置;
(6)绝对没有代码生成,不需要XML配置。
二 boot项目入门
2.1 boot项目搭建
1 创建项目
2 在总pom中 添加依赖  [我们当前项目要作为 boot的子项目 所以 要将boot 添加成 parent ]

 <parent>
    <groupId>org.springframework.boot</groupId>
    <artifactId>spring-boot-starter-parent</artifactId>
    <version>2.5.1</version>
  </parent>
3 添加依赖 在common中添加依赖
      <dependency>
        <groupId>org.springframework.boot</groupId>
        <artifactId>spring-boot-starter-web</artifactId>
      </dependency>
总pom:
<?xml version="1.0" encoding="UTF-8"?>

<project xmlns="http://maven.apache.org/POM/4.0.0" xmlns:xsi="http://www.w3.org/2001/XMLSchema-instance"
  xsi:schemaLocation="http://maven.apache.org/POM/4.0.0 http://maven.apache.org/xsd/maven-4.0.0.xsd">
  <modelVersion>4.0.0</modelVersion>

  <parent>
    <groupId>org.springframework.boot</groupId>
    <artifactId>spring-boot-starter-parent</artifactId>
    <version>2.5.1</version>
  </parent>


  <groupId>com.aaa.haha</groupId>
  <artifactId>demo01</artifactId>
  <version>1.0-SNAPSHOT</version>
  <packaging>pom</packaging>


  <modules>
    <module>haha-admin</module>
    <module>haha-system</module>
    <module>haha-common</module>
  </modules>

  <properties>

  </properties>

  <dependencyManagement>
       <dependencies>


       </dependencies>
  </dependencyManagement>

</project>
4 在admin中创建一个 启动类   启动类的位置!!!
package com.aaa.haha;

import org.springframework.boot.SpringApplication;
import org.springframework.boot.autoconfigure.SpringBootApplication;

@SpringBootApplication
public class App {

    public static void main(String[] args) {
        SpringApplication.run(App.class,args);
    }
}
5 创建一个 controller测试
package com.aaa.haha.controller;


import org.springframework.web.bind.annotation.RequestMapping;
import org.springframework.web.bind.annotation.RestController;

@RestController
@RequestMapping("haha")
public class HahaController {


    @RequestMapping("hehe")
    public String   test(){
        return  "hello  boot";
    }

}
6 运行测试 启动类的main函数 运行
2.2 boot依赖和starter的理解
在boot项目中  引入的第三方都是 starter
 <dependency>
            <groupId>org.springframework.boot</groupId>
            <artifactId>spring-boot-starter-web</artifactId>
        </dependency>

该如何理解stater呢?

我们从maven的pom中开始看起:
在我们的总pom中 将当前项目作为 springboot的子项目
<parent>
    <groupId>org.springframework.boot</groupId>
    <artifactId>spring-boot-starter-parent</artifactId>
    <version>2.5.1</version>
  </parent>
点进去 查看这个pom  这个项目 主要是插件管理 其也是一个子项目  再看他的父项目
 <modelVersion>4.0.0</modelVersion>
  <parent>
    <groupId>org.springframework.boot</groupId>
    <artifactId>spring-boot-dependencies</artifactId>
    <version>2.5.1</version>
  </parent>
  <artifactId>spring-boot-starter-parent</artifactId>
  <packaging>pom</packaging>
  <name>spring-boot-starter-parent</name>

再点进去  这个项目是根项目  用来整合框架的
<modelVersion>4.0.0</modelVersion>
  <groupId>org.springframework.boot</groupId>
  <artifactId>spring-boot-dependencies</artifactId>
  <version>2.5.1</version>
  <packaging>pom</packaging>
  <name>spring-boot-dependencies</name>
我们在这个pom中发现 <dependencyManagement> 原来 boot就是一个父项目
 整合了200框架 我们需要什么就到什么即可

 而 200框架 很多都是联用的  我们ssm整合的时候 需要什么就导入什么  在boot中简化了
 类似于 肯德基套餐的效果
    夏日缤纷套餐: 鸡腿堡  可乐 薯条  哈哈
    校园优惠套餐: 鸡腿堡  雪碧 薯条 鸡柳  哈哈
 而 springboot 中的 starter 就是套餐的思想 我们发现 我们仅仅导入一个依赖
 <dependency>
            <groupId>org.springframework.boot</groupId>
            <artifactId>spring-boot-starter-web</artifactId>
        </dependency>
    此时 spring springmvc  jackson 等内容全有了
2.3 配置文件
boot配置文件有两种类型:  properties 和 yml

一般我们都是放到  admin项目下的 resources 中的 config
以前我们使用spring springmvc的时候 配置文件的类型是 xml格式
在springboot中 配置文件有两种类型:  properties    yml

此时我们创建  application.properties
此时我们创建  application.yml

这是springboot的约定大于配置
1 约定从哪里来的
  <resources>
      <resource>
        <directory>${basedir}/src/main/resources</directory>
        <filtering>true</filtering>
        <includes>
          <include>**/application*.yml</include>
          <include>**/application*.yaml</include>
          <include>**/application*.properties</include>
        </includes>
      </resource>
      <resource>
        <directory>${basedir}/src/main/resources</directory>
        <excludes>
          <exclude>**/application*.yml</exclude>
          <exclude>**/application*.yaml</exclude>
          <exclude>**/application*.properties</exclude>
        </excludes>
      </resource>

 2 配置项是如何被读取并执行内容
   当我们配置到配置文件中的内容,boot会有一个配置类去读取配置文件的内容

@ConfigurationProperties(
    prefix = "server",
    ignoreUnknownFields = true
)
public class ServerProperties {
    private Integer port;
    private InetAddress address;


实际开发中 ,git的分支其实就有很多环境线上:prod(正式)、stageing(预发)线下:test(公共测试环境)、dev(研发自用环境)
boot中也是有不同环境的配置文件的 ,不同的配置文件在不同的场景中进行使用
此时我们创建不同环境得配置文件
    application-dev.properties
    application-test.properties
    application-pro.properties

每个配置文件用来配置不同环境中的信息
在总配置文件中application.properties 选取使用哪一种配置环境

spring.profiles.active=dev

这是环境配置文件选取的一种方式 ,还可以通过maven进行选取[maven添加插件] ,还可以启动类配置
2.4 boot启动流程【面试题 自己整理】
我们启动springboot项目 其实就是在main函数中 执行了一句代码
SpringApplication.run(App.class,args);

此时boot就启动了 他是如何启动的呢? 核心操作就在这个 run函数中
 run(添加SpringBootApplication注解的字节码  , main函数的参数  )

main函数的参数 是用来配置 启动信息的      我们java代码执行的时候 javac java 命令
添加SpringBootApplication注解的字节码  用来自动配置的(约定)
我们查看一下run的源代码
public static ConfigurableApplicationContext run(Class<?> primarySource, String... args) {
		return run(new Class<?>[] { primarySource }, args);
}
此时我们再看这个run
public static ConfigurableApplicationContext run(Class<?>[] primarySources, String[] args) {
		return new SpringApplication(primarySources).run(args);
}
这个run中干了两件事情 1 new SpringApplication(primarySources)
                   2 用这个对象调用 run函数

A 创建这个对象    new SpringApplication(primarySources) 做了这些事情
public SpringApplication(ResourceLoader resourceLoader, Class<?>... primarySources) {
		this.resourceLoader = resourceLoader;
        // 断言 测试用到的
		Assert.notNull(primarySources, "PrimarySources must not be null");
		this.primarySources = new LinkedHashSet<>(Arrays.asList(primarySources));
		this.webApplicationType = WebApplicationType.deduceFromClasspath();
		this.bootstrapRegistryInitializers = getBootstrapRegistryInitializersFromSpringFactories();
		setInitializers((Collection) getSpringFactoriesInstances(ApplicationContextInitializer.class));
		setListeners((Collection) getSpringFactoriesInstances(ApplicationListener.class));
		this.mainApplicationClass = deduceMainApplicationClass();
	}

B 对象调用run
    public ConfigurableApplicationContext run(String... args) {
		StopWatch stopWatch = new StopWatch();
		stopWatch.start();
		DefaultBootstrapContext bootstrapContext = createBootstrapContext();
		ConfigurableApplicationContext context = null;
		configureHeadlessProperty();
		SpringApplicationRunListeners listeners = getRunListeners(args);
		listeners.starting(bootstrapContext, this.mainApplicationClass);
		try {
			ApplicationArguments applicationArguments = new DefaultApplicationArguments(args);
			ConfigurableEnvironment environment = prepareEnvironment(listeners, bootstrapContext, applicationArguments);
			configureIgnoreBeanInfo(environment);
			Banner printedBanner = printBanner(environment);
			context = createApplicationContext();
			context.setApplicationStartup(this.applicationStartup);
			prepareContext(bootstrapContext, context, environment, listeners, applicationArguments, printedBanner);
			refreshContext(context);
			afterRefresh(context, applicationArguments);
			stopWatch.stop();
			if (this.logStartupInfo) {
				new StartupInfoLogger(this.mainApplicationClass).logStarted(getApplicationLog(), stopWatch);
			}
			listeners.started(context);
			callRunners(context, applicationArguments);
		}
		catch (Throwable ex) {
			handleRunFailure(context, ex, listeners);
			throw new IllegalStateException(ex);
		}

		try {
			listeners.running(context);
		}
		catch (Throwable ex) {
			handleRunFailure(context, ex, null);
			throw new IllegalStateException(ex);
		}
		return context;
	}
2.5 boot自动装配原理
 SSM的时候 配置整合MyBatis 是如何实现的?
     我们需要手动将 mybatis 配置成 spring的 bean 交给spring管理

    <!-- 属性文件加载  我们现在要使用 druid的数据库连接池
         druid的数据库连接池有一个配置文件  druid.properties 里面都是druid的配置信息
         此时在spring的配置文件中 需要去读druid.properties中的信息
         在spring 中可以配置PropertyPlaceholderConfigurer 这样的bean
         这个bean 就会根据location 配置的地址classpath:druid.properties
         去读取配置信息
     -->
    <bean class="org.springframework.beans.factory.config.PropertyPlaceholderConfigurer">
        <property name="location" value="classpath:druid.properties"></property>
    </bean>

    <!-- 我们当前项目 使用的数据库连接池是 阿里巴巴的 druid
         数据库连接池的使用  创建数据库连接池对象 ,需要连接对象conn的时候  从连接池对象中获取
         此时我们使用spring  创建连接池对象的工作就交给spring
         配置当前bean  class 是com.alibaba.druid.pool.DruidDataSource
         此时spring就会管理数据库连接池对象的创建
     -->
    <bean id="dataSource" class="com.alibaba.druid.pool.DruidDataSource" >
        <property name="driverClassName" value="${jdbc.driverClassName}"/>
        <property name="url"             value="${jdbc.url}"/>
        <property name="username"        value="${jdbc.username}"/>
        <property name="password"        value="${jdbc.password}"/>
    </bean>


    <!--  spring整合 mybatis SqlSessionFactoryBean -->
    <bean id="sqlFactory" class="org.mybatis.spring.SqlSessionFactoryBean">
        <!-- 使用哪个数据库连接池  此时使用 ref引用 dataSource 代表使用的是 上面的 druid数据库连接池  -->
        <property name="dataSource" ref="dataSource" />
        <!-- 配置 mybatis的 配置文件位置-->
        <property name="configLocation" value="classpath:mybatis-config.xml" />
        <!-- 扫描 所有的  mapper.xml文件的位置 注意 此处容易出问题  -->
        <property name="mapperLocations" value="classpath:mapper/*Mapper.xml"></property>
        <!--别名扫描-->
        <property name="typeAliasesPackage"  value="com.aaa.pojo"></property>
    </bean>


    <!-- mapper 扫描接口  -->
    <bean class="org.mybatis.spring.mapper.MapperScannerConfigurer">
        <!--  mapper对应的接口的包名  -->
        <property name="basePackage" value="com.aaa.mapper" />
        <!--  扫描接口的时候 要知道为谁扫描的-->
        <property name="sqlSessionFactoryBeanName" value="sqlFactory" />
    </bean>

但是springboot 不需要这么麻烦  只需要导包 然后再properties配置即可


boot 约定大于配置 。我们在ssm中都需要配置包扫描等等的内容 但是在boot中不需要配置 因为默认的约定是添加 @SpringBootApplication注解类的下级 全部被扫描 这个注解是一个复合注解

@Target(ElementType.TYPE)
@Retention(RetentionPolicy.RUNTIME)
@Documented
@Inherited
@SpringBootConfiguration
@EnableAutoConfiguration  // 自动装配使用的注解
@ComponentScan(excludeFilters = { @Filter(type = FilterType.CUSTOM, classes = TypeExcludeFilter.class),
		@Filter(type = FilterType.CUSTOM, classes = AutoConfigurationExcludeFilter.class) })
public @interface SpringBootApplication {

	@AliasFor(annotation = EnableAutoConfiguration.class)
	Class<?>[] exclude() default {};


	@AliasFor(annotation = EnableAutoConfiguration.class)
	String[] excludeName() default {};


	@AliasFor(annotation = ComponentScan.class, attribute = "basePackages")
	String[] scanBasePackages() default {};


	@AliasFor(annotation = ComponentScan.class, attribute = "basePackageClasses")
	Class<?>[] scanBasePackageClasses() default {};


	@AliasFor(annotation = ComponentScan.class, attribute = "nameGenerator")
	Class<? extends BeanNameGenerator> nameGenerator() default BeanNameGenerator.class;

	@AliasFor(annotation = Configuration.class)
	boolean proxyBeanMethods() default true;

}

所以我们查看@EnableAutoConfiguration  自动装配使用的注解
@Target(ElementType.TYPE)
@Retention(RetentionPolicy.RUNTIME)
@Documented
@Inherited
@AutoConfigurationPackage
@Import(AutoConfigurationImportSelector.class)
public @interface EnableAutoConfiguration {

告诉我们自动装配的类是:AutoConfigurationImportSelector
    这个类中有一个方法
    protected List<String> getCandidateConfigurations(AnnotationMetadata metadata, AnnotationAttributes attributes) {
		List<String> configurations = SpringFactoriesLoader.loadFactoryNames(getSpringFactoriesLoaderFactoryClass(),
				getBeanClassLoader());// 自动装配加载第三方的类
		Assert.notEmpty(configurations, "No auto configuration classes found in META-INF/spring.factories. If you "
				+ "are using a custom packaging, make sure that file is correct.");
		return configurations;
	}
 而这个loadFactoryNames 会调用 loadSpringFactories  去读取配置信息

  	public static List<String> loadFactoryNames(Class<?> factoryType, @Nullable ClassLoader classLoader) {
		ClassLoader classLoaderToUse = classLoader;
		if (classLoaderToUse == null) {
			classLoaderToUse = SpringFactoriesLoader.class.getClassLoader();
		}
		String factoryTypeName = factoryType.getName();
		return loadSpringFactories(classLoaderToUse).getOrDefault(factoryTypeName, Collections.emptyList());
	}


在这个方法中 classLoader.getResources(FACTORIES_RESOURCE_LOCATION);   就是加载配置类信息
	private static Map<String, List<String>> loadSpringFactories(ClassLoader classLoader) {
		Map<String, List<String>> result = cache.get(classLoader);
		if (result != null) {
			return result;
		}

		result = new HashMap<>();
		try {
			Enumeration<URL> urls = classLoader.getResources(FACTORIES_RESOURCE_LOCATION);
       这个字符常量FACTORIES_RESOURCE_LOCATION 就是
 public static final String FACTORIES_RESOURCE_LOCATION = "META-INF/spring.factories";
此时springboot 就会去找这个文件   而这个文件里面标明了 当前第三方框架 自动装配的类 是哪个
 # Auto Configure
org.springframework.boot.autoconfigure.EnableAutoConfiguration=\
org.mybatis.spring.boot.autoconfigure.MybatisLanguageDriverAutoConfiguration,\
org.mybatis.spring.boot.autoconfigure.MybatisAutoConfiguration

所以 boot 就回去 自动加载这两个类 【约定第三方会将自己的配置类 类名写到 META-INF/spring.factories 文件中 】而在这个自动装配的类中 会读取 配置文件的信息 并且注入

三 SpringBoot整合 mybatis
3.1 整合
1 总pom中添加依赖
<?xml version="1.0" encoding="UTF-8"?>

<project xmlns="http://maven.apache.org/POM/4.0.0" xmlns:xsi="http://www.w3.org/2001/XMLSchema-instance"
  xsi:schemaLocation="http://maven.apache.org/POM/4.0.0 http://maven.apache.org/xsd/maven-4.0.0.xsd">
  <modelVersion>4.0.0</modelVersion>

  <parent>
    <groupId>org.springframework.boot</groupId>
    <artifactId>spring-boot-starter-parent</artifactId>
    <version>2.5.1</version>
  </parent>


  <groupId>com.aaa.haha</groupId>
  <artifactId>demo01</artifactId>
  <version>1.0-SNAPSHOT</version>
  <packaging>pom</packaging>


  <modules>
    <module>haha-admin</module>
    <module>haha-system</module>
    <module>haha-common</module>
  </modules>

  <properties>
    <mybatis.version>2.2.2</mybatis.version>
    <mysql.version>5.1.47</mysql.version>
    <druid.version>1.2.6</druid.version>
  </properties>

  <dependencyManagement>
       <dependencies>
         <dependency>
           <groupId>org.mybatis.spring.boot</groupId>
           <artifactId>mybatis-spring-boot-starter</artifactId>
           <version>${mybatis.version}</version>
         </dependency>

         <dependency>
           <groupId>mysql</groupId>
           <artifactId>mysql-connector-java</artifactId>
           <version>${mysql.version}</version>
         </dependency>

         <dependency>
           <groupId>com.alibaba</groupId>
           <artifactId>druid-spring-boot-starter</artifactId>
           <version>${druid.version}</version>
         </dependency>

       </dependencies>
  </dependencyManagement>

</project>

2 在需要使用的地方 引入 system中引入
<?xml version="1.0" encoding="UTF-8"?>

<project xmlns="http://maven.apache.org/POM/4.0.0" xmlns:xsi="http://www.w3.org/2001/XMLSchema-instance"
         xsi:schemaLocation="http://maven.apache.org/POM/4.0.0 http://maven.apache.org/xsd/maven-4.0.0.xsd">
    <parent>
        <artifactId>demo01</artifactId>
        <groupId>com.aaa.haha</groupId>
        <version>1.0-SNAPSHOT</version>
    </parent>
    <modelVersion>4.0.0</modelVersion>

    <artifactId>haha-system</artifactId>

    <dependencies>

        <dependency>
            <groupId>com.aaa.haha</groupId>
            <artifactId>haha-common</artifactId>
            <version>1.0-SNAPSHOT</version>
        </dependency>


        <dependency>
            <groupId>org.mybatis.spring.boot</groupId>
            <artifactId>mybatis-spring-boot-starter</artifactId>
        </dependency>

        <dependency>
            <groupId>mysql</groupId>
            <artifactId>mysql-connector-java</artifactId>
        </dependency>

        <dependency>
            <groupId>com.alibaba</groupId>
            <artifactId>druid-spring-boot-starter</artifactId>
        </dependency>

    </dependencies>
</project>
3 在配置文件中配置 信息
spring.datasource.type=com.alibaba.druid.pool.DruidDataSource
spring.datasource.url=jdbc:mysql://localhost:3306/test?useUnicode=true&characterEncoding=utf-8&useSSL=false&serverTimezone=UTC
spring.datasource.username=root
spring.datasource.password=123456
spring.datasource.driver-class-name=com.mysql.jdbc.Driver

mybatis.type-aliases-package=com.aaa.boot.pojo
mybatis.mapper-locations=classpath:mapper/*.xml
版权声明:本文内容由互联网用户自发贡献,该文观点仅代表作者本人。本站仅提供信息存储空间服务,不拥有所有权,不承担相关法律责任。如发现本站有涉嫌侵权/违法违规的内容, 请发送邮件至 举报,一经查实,本站将立刻删除。
文章由极客之音整理,本文链接:https://www.bmabk.com/index.php/post/118006.html

