
目录
webStorage
这不是vue团队开发的,不需要写在xx.vue当中,只需写在xx.html当中即可。
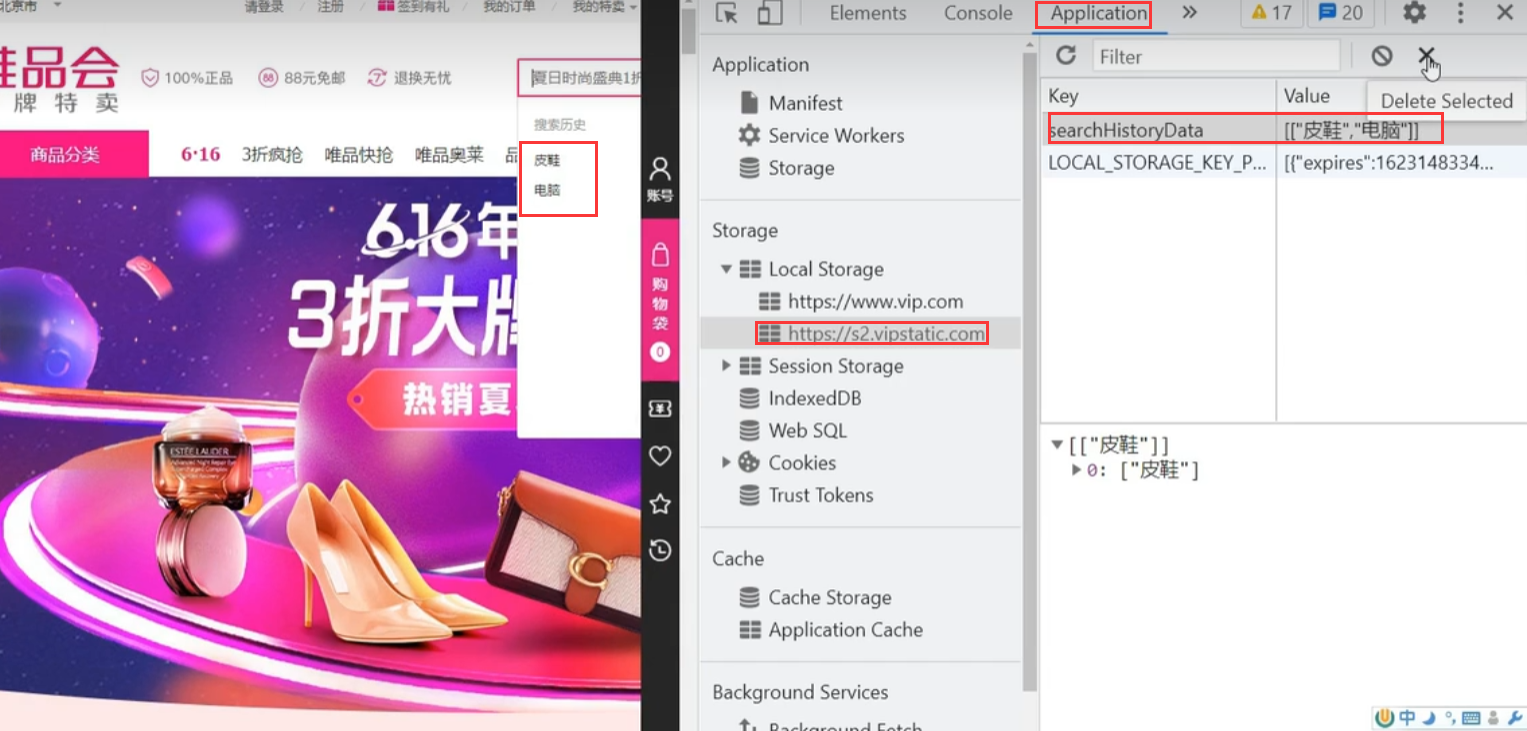
什么是浏览器本地存储,下面举一个例子:
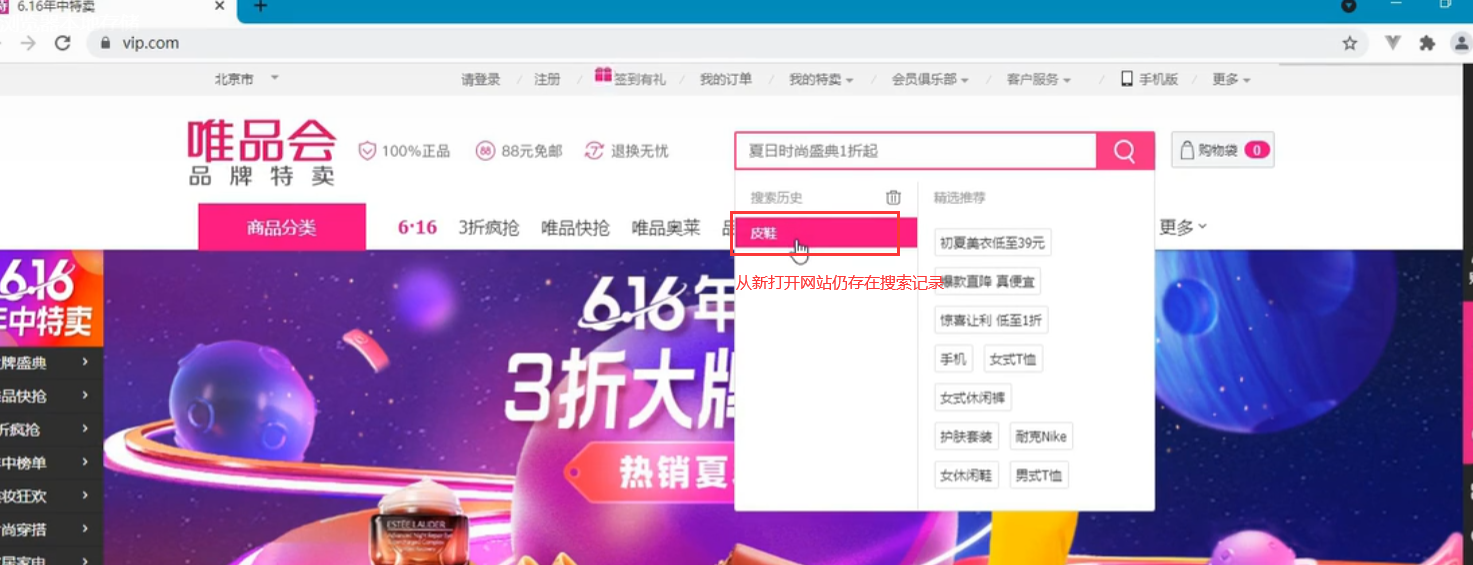

也就是说浏览器帮你本地缓存点东西
localStorage
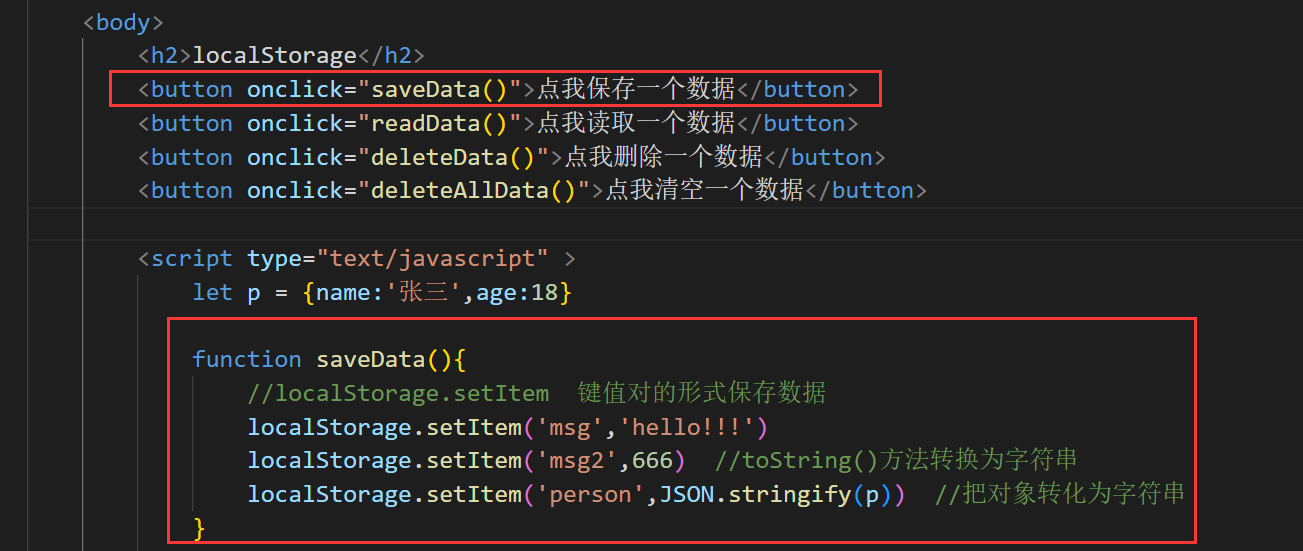
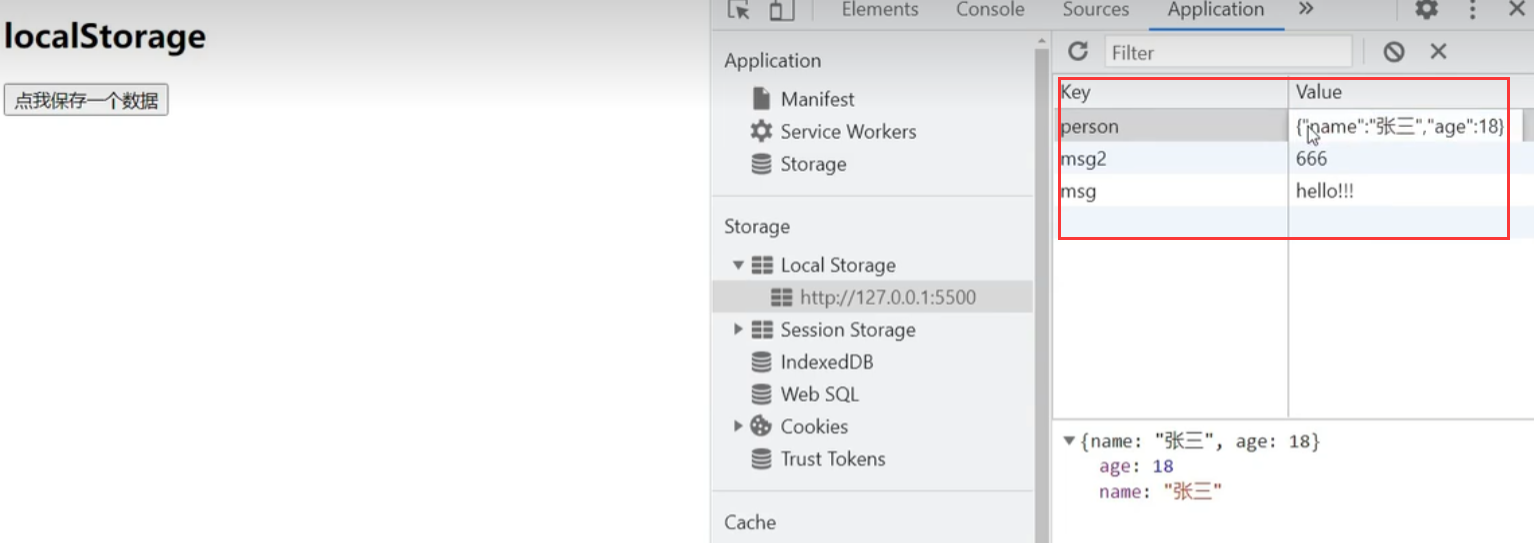
保存数据:
读取数据
删除和清空
完整代码:
<!DOCTYPE html>
<html>
<head>
<meta charset="UTF-8" />
<title>localStorage</title>
</head>
<body>
<h2>localStorage</h2>
<button onclick="saveData()">点我保存一个数据</button>
<button onclick="readData()">点我读取一个数据</button>
<button onclick="deleteData()">点我删除一个数据</button>
<button onclick="deleteAllData()">点我清空一个数据</button>
<script type="text/javascript" >
let p = {name:'张三',age:18}
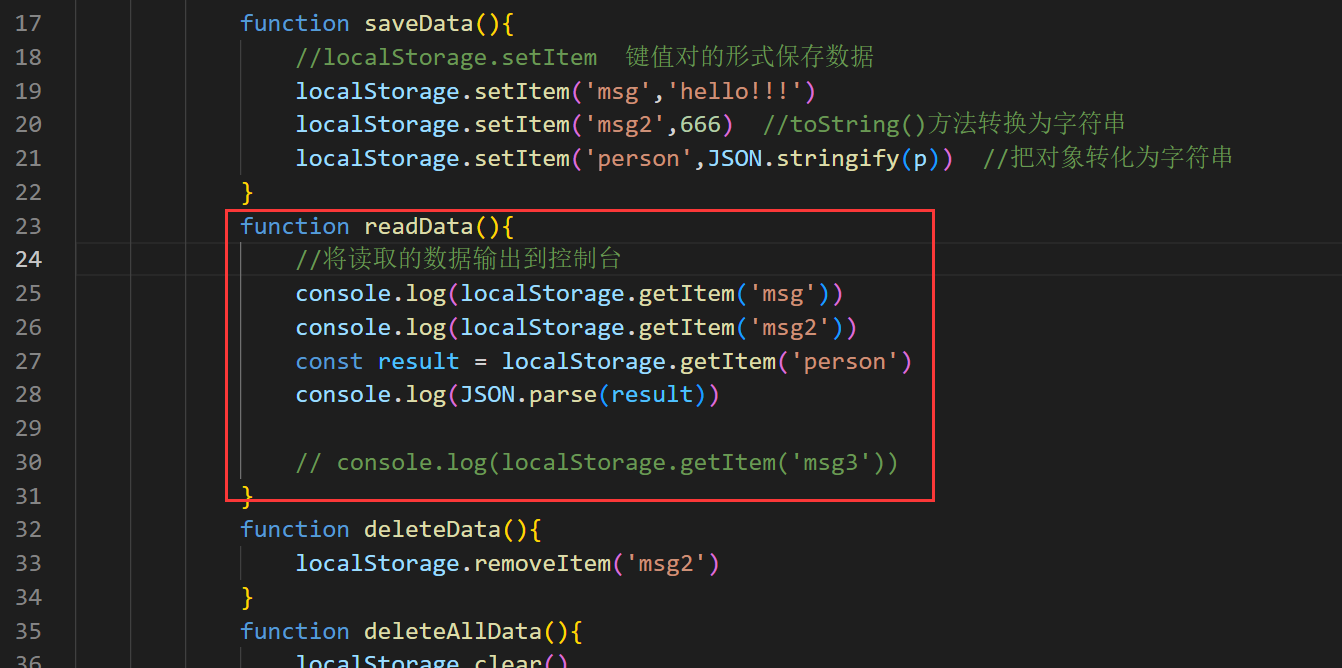
function saveData(){
//localStorage.setItem 键值对的形式保存数据
localStorage.setItem('msg','hello!!!')
localStorage.setItem('msg2',666) //toString()方法转换为字符串
localStorage.setItem('person',JSON.stringify(p)) //把对象转化为字符串
}
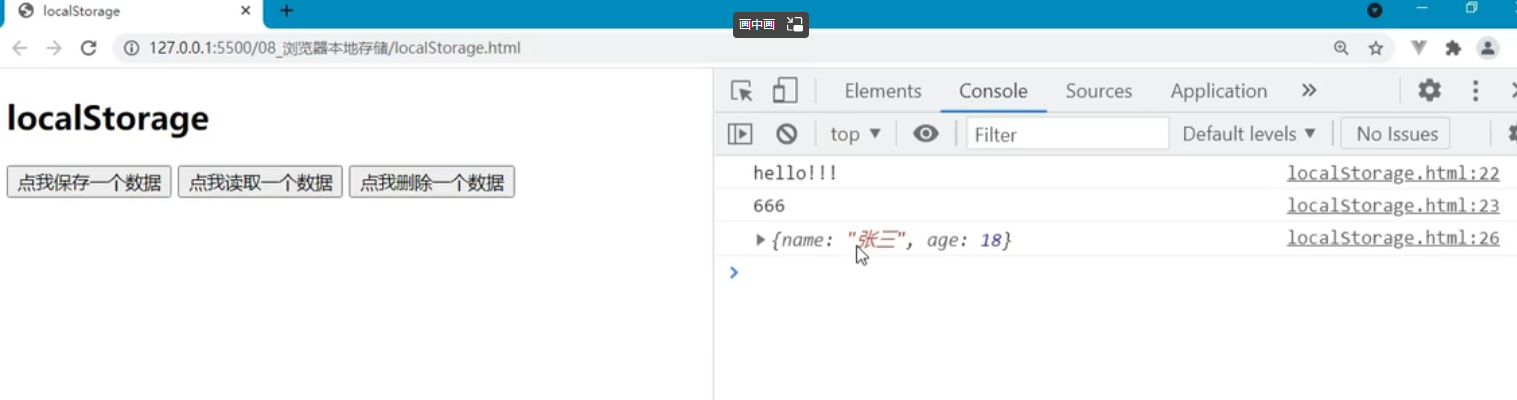
function readData(){
//将读取的数据输出到控制台
console.log(localStorage.getItem('msg'))
console.log(localStorage.getItem('msg2'))
const result = localStorage.getItem('person')
console.log(JSON.parse(result))
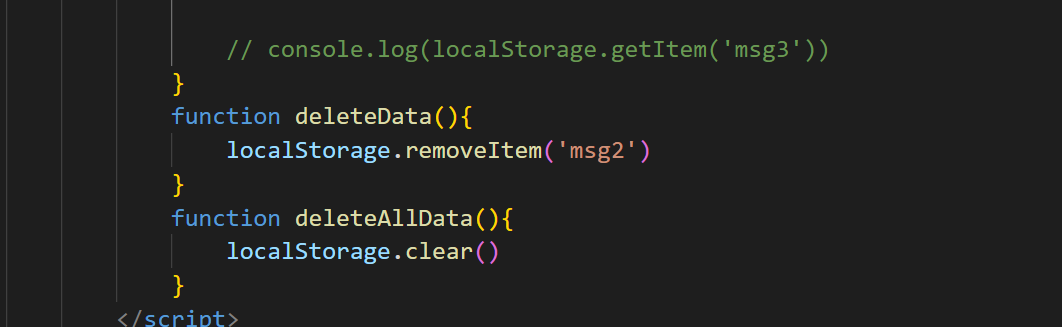
// console.log(localStorage.getItem('msg3'))
}
function deleteData(){
localStorage.removeItem('msg2')
}
function deleteAllData(){
localStorage.clear()
}
</script>
</body>
</html>localStorage最大的特点是几十把浏览器关闭掉它也不会消失,但用户他在浏览器设置里主动清空缓存也会消失。
sessionStorage
他所有的api和localStorage很像
完整代码:
<!DOCTYPE html>
<html>
	<head>
		<meta charset="UTF-8" />
		<title>sessionStorage</title>
	</head>
	<body>
		<h2>sessionStorage</h2>
		<button onclick="saveData()">点我保存一个数据</button>
		<button onclick="readData()">点我读取一个数据</button>
		<button onclick="deleteData()">点我删除一个数据</button>
		<button onclick="deleteAllData()">点我清空一个数据</button>

		<script type="text/javascript" >
			let p = {name:'张三',age:18}

			function saveData(){
				sessionStorage.setItem('msg','hello!!!')
				sessionStorage.setItem('msg2',666)
				sessionStorage.setItem('person',JSON.stringify(p))
			}
			function readData(){
				console.log(sessionStorage.getItem('msg'))
				console.log(sessionStorage.getItem('msg2'))

				const result = sessionStorage.getItem('person')
				console.log(JSON.parse(result))

				// console.log(sessionStorage.getItem('msg3'))
			}
			function deleteData(){
				sessionStorage.removeItem('msg2')
			}
			function deleteAllData(){
				sessionStorage.clear()
			}
		</script>
	</body>
</html>
会话存储的特点是浏览器一关就没有了。
webStorage
1. 存储内容大小一般支持5MB左右(不同浏览器可能还不一样)
2. 浏览器端通过 Window.sessionStorage 和 Window.localStorage 属性来实现本地存储机制。
3. 相关API:
1. “`xxxxxStorage.setItem(‘key’, ‘value’);“`
该方法接受一个键和值作为参数,会把键值对添加到存储中,如果键名存在,则更新其对应的值。
2. “`xxxxxStorage.getItem(‘person’);“`
该方法接受一个键名作为参数,返回键名对应的值。
3. “`xxxxxStorage.removeItem(‘key’);“`
该方法接受一个键名作为参数,并把该键名从存储中删除。
4. “` xxxxxStorage.clear()“`
该方法会清空存储中的所有数据。
4. 备注:
1. SessionStorage存储的内容会随着浏览器窗口关闭而消失。
2. LocalStorage存储的内容,需要手动清除才会消失。
3. “`xxxxxStorage.getItem(xxx)“`如果xxx对应的value获取不到,那么getItem的返回值是null。
4. “`JSON.parse(null)“`的结果依然是null。
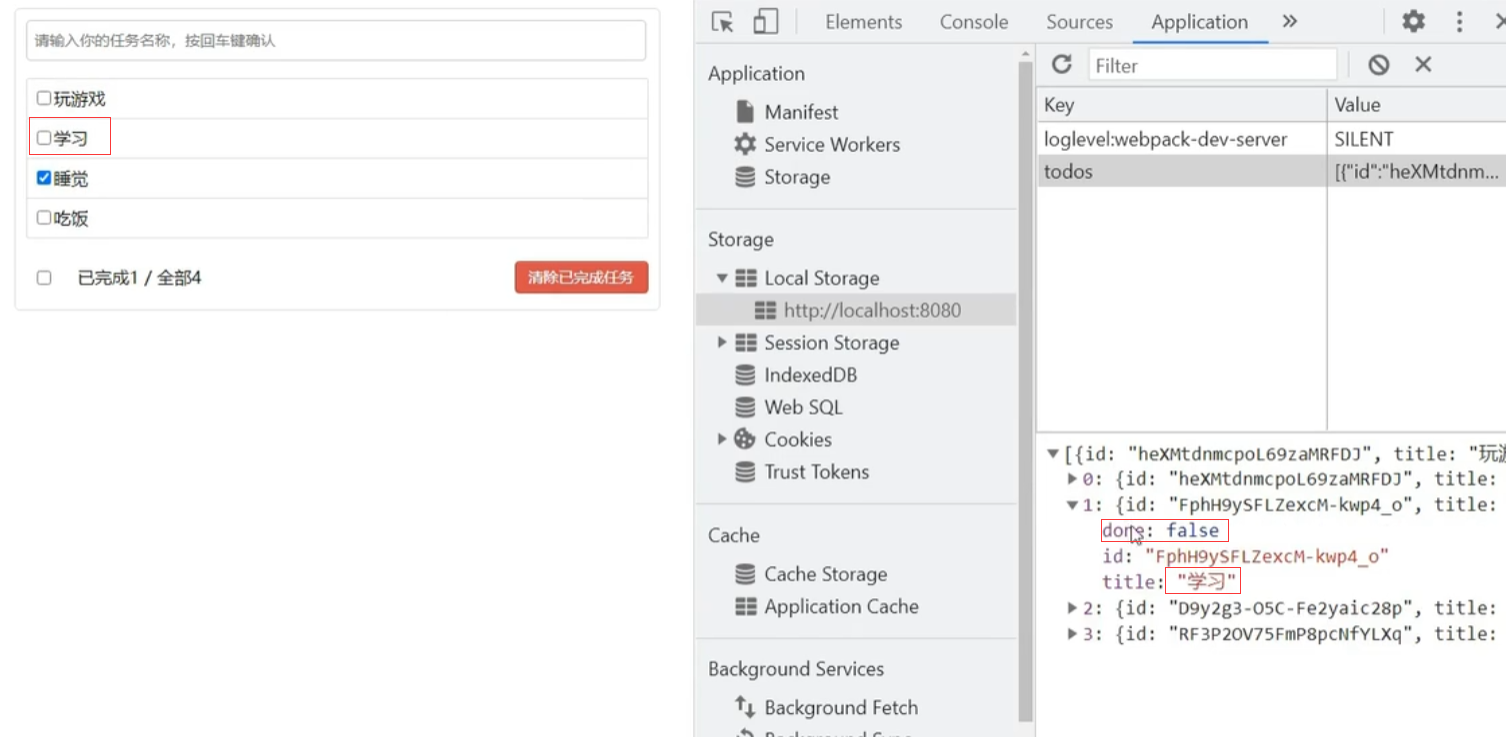
todolist案例中使用
App.vue当中初始化时读数据,添加todo时保存数据
<template>
<div id="root">
<div class="todo-container">
<div class="todo-wrap">
<MyHeader :addTodo="addTodo"/>
<MyList :todos="todos" :checkTodo="checkTodo" :deleteTodo="deleteTodo"/>
<MyFooter :todos="todos" :checkAllTodo="checkAllTodo" :clearAllTodo="clearAllTodo"/>
</div>
</div>
</div>
</template>
<script>
import MyHeader from './components/MyHeader'
import MyList from './components/MyList'
import MyFooter from './components/MyFooter.vue'
export default {
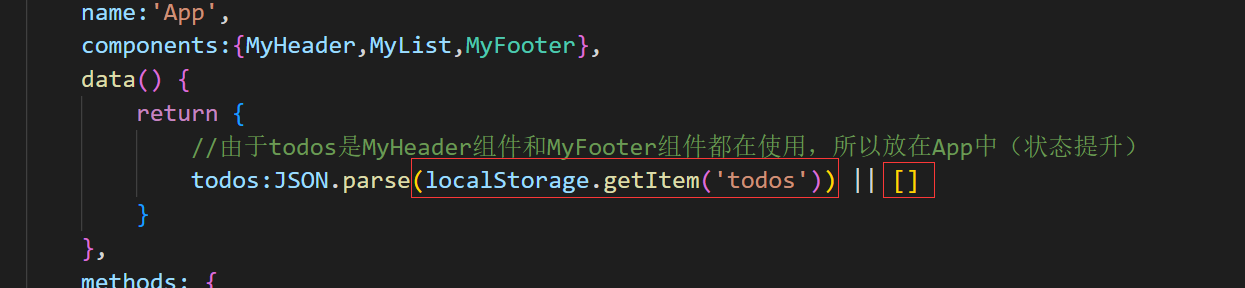
name:'App',
components:{MyHeader,MyList,MyFooter},
data() {
return {
//由于todos是MyHeader组件和MyFooter组件都在使用,所以放在App中(状态提升)
todos:JSON.parse(localStorage.getItem('todos')) || []
}
},
methods: {
//添加一个todo
addTodo(todoObj){
this.todos.unshift(todoObj)
},
//勾选or取消勾选一个todo
checkTodo(id){
this.todos.forEach((todo)=>{
if(todo.id === id) todo.done = !todo.done
})
},
//删除一个todo
deleteTodo(id){
this.todos = this.todos.filter( todo => todo.id !== id )
},
//全选or取消全选
checkAllTodo(done){
this.todos.forEach((todo)=>{
todo.done = done
})
},
//清除所有已经完成的todo
clearAllTodo(){
this.todos = this.todos.filter((todo)=>{
return !todo.done
})
}
},
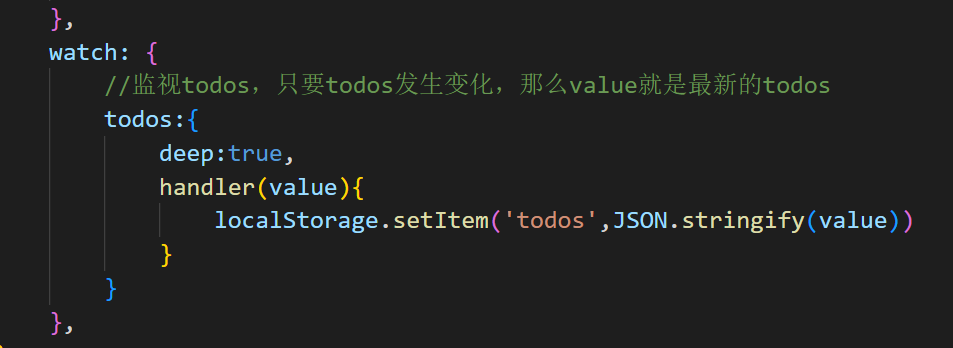
watch: {
//监视todos,只要todos发生变化,那么value就是最新的todos
todos:{
deep:true,
handler(value){
localStorage.setItem('todos',JSON.stringify(value))
}
}
},
}
</script>
<style>
/*base*/
body {
background: #fff;
}
.btn {
display: inline-block;
padding: 4px 12px;
margin-bottom: 0;
font-size: 14px;
line-height: 20px;
text-align: center;
vertical-align: middle;
cursor: pointer;
box-shadow: inset 0 1px 0 rgba(255, 255, 255, 0.2), 0 1px 2px rgba(0, 0, 0, 0.05);
border-radius: 4px;
}
.btn-danger {
color: #fff;
background-color: #da4f49;
border: 1px solid #bd362f;
}
.btn-danger:hover {
color: #fff;
background-color: #bd362f;
}
.btn:focus {
outline: none;
}
.todo-container {
width: 600px;
margin: 0 auto;
}
.todo-container .todo-wrap {
padding: 10px;
border: 1px solid #ddd;
border-radius: 5px;
}
</style>
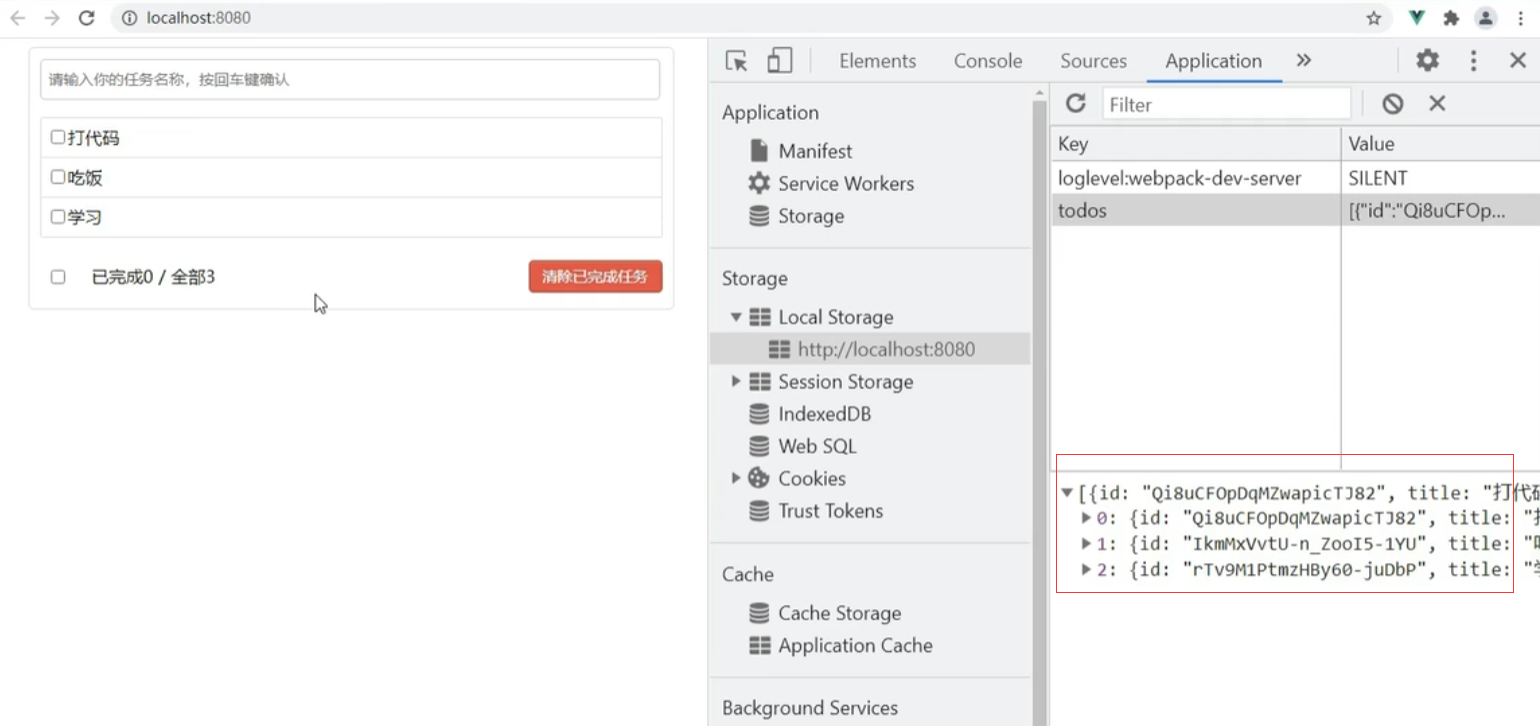
注意在初始化的时候,如果localStorage没有东西为null的时候(因为footer需要计算todos.length),需要写成如下形式(如果为空选择空数组)
监视的时候要深度监视,不止要监测数组是否变化,还要检测数组里边某一项的属性。
组件自定义事件
自定义事件就是区别于js里面的内置事件而存在,然而js里面的内置事件是给HTML元素用的,而自定义组件事件是给组件用的。
绑定
现在提出一个需求,点击按钮就将school里面的属性放在父组件APP当中。
App.vue
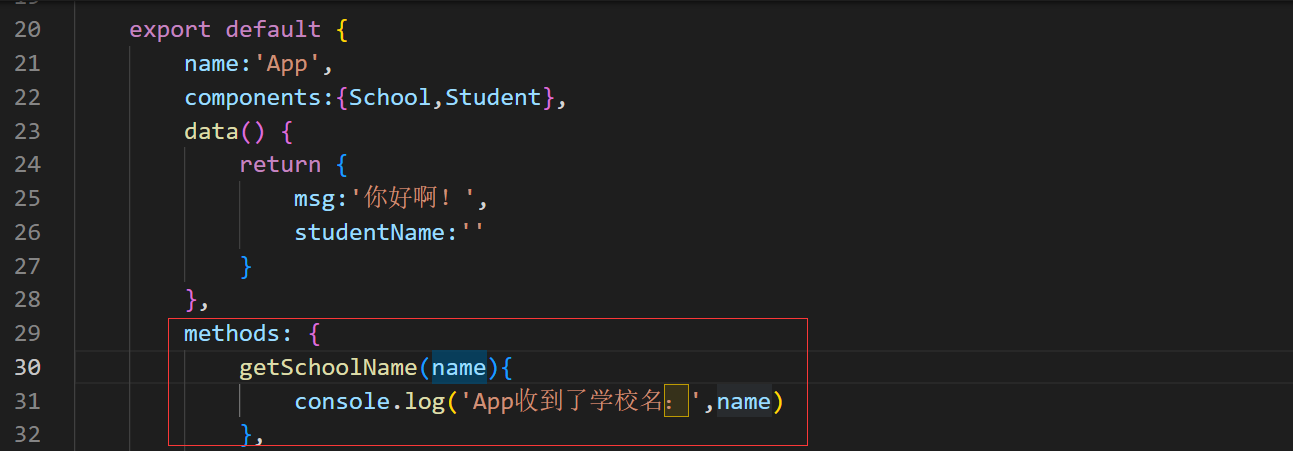
School.vue
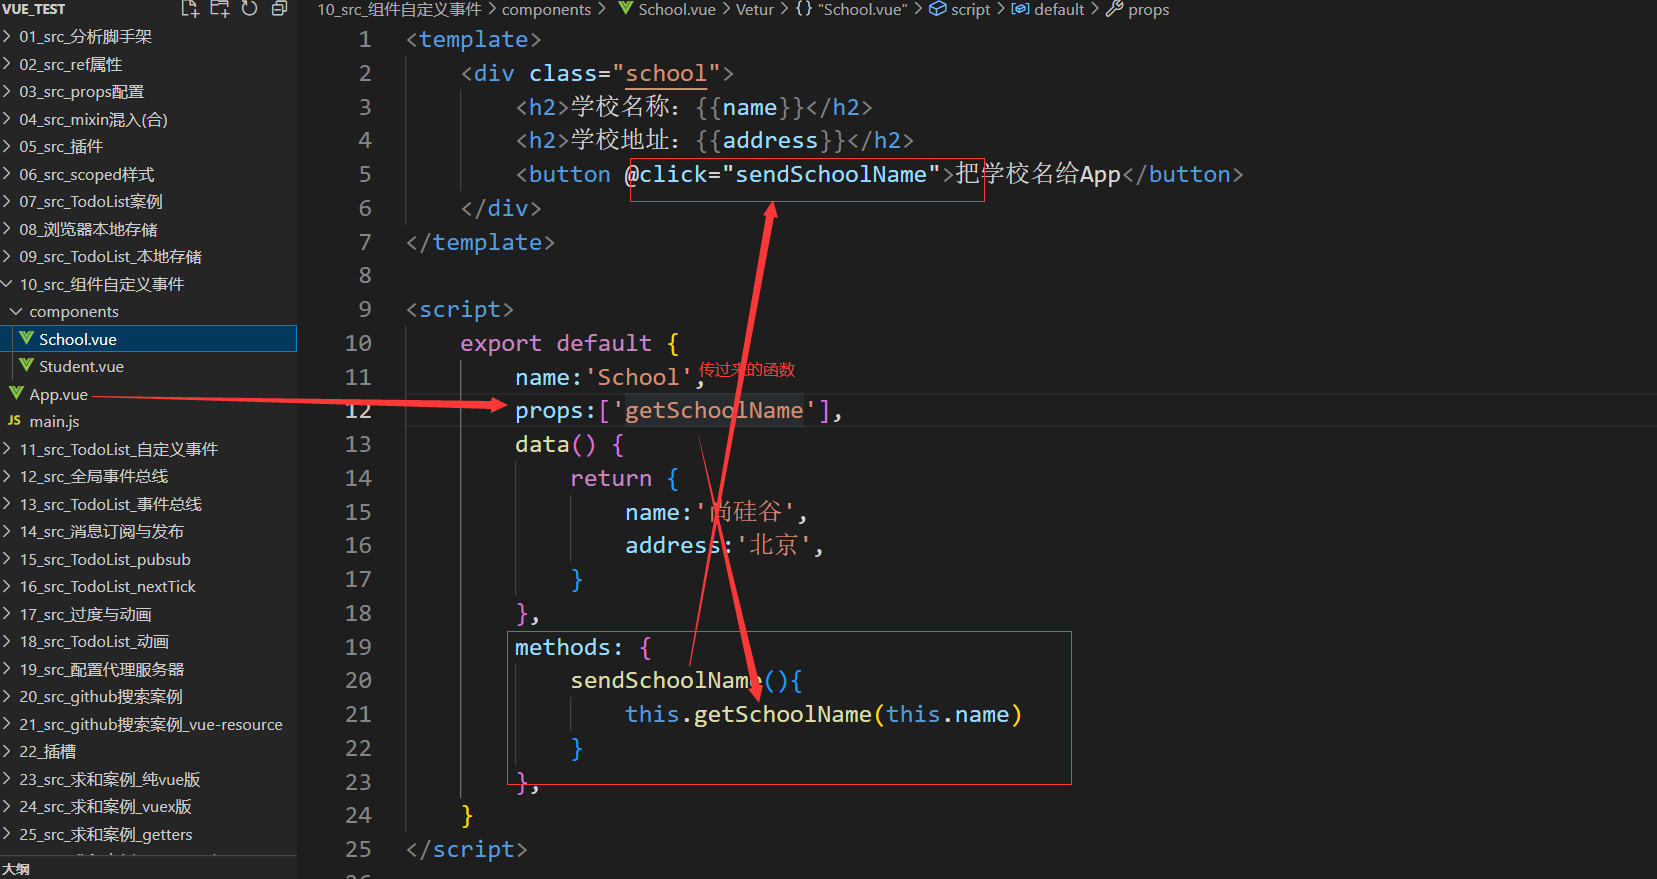
现在换成自定义组件的方式:

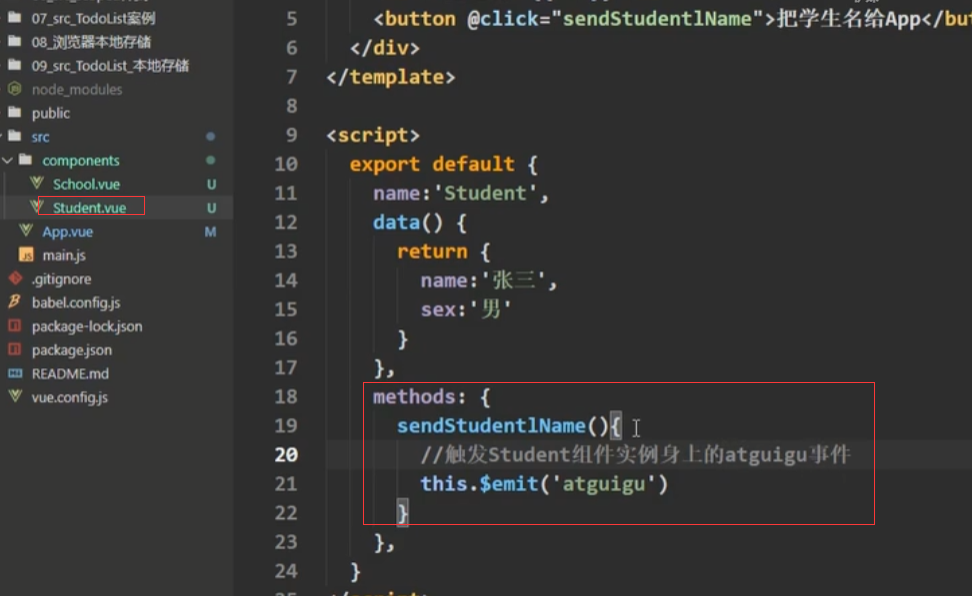
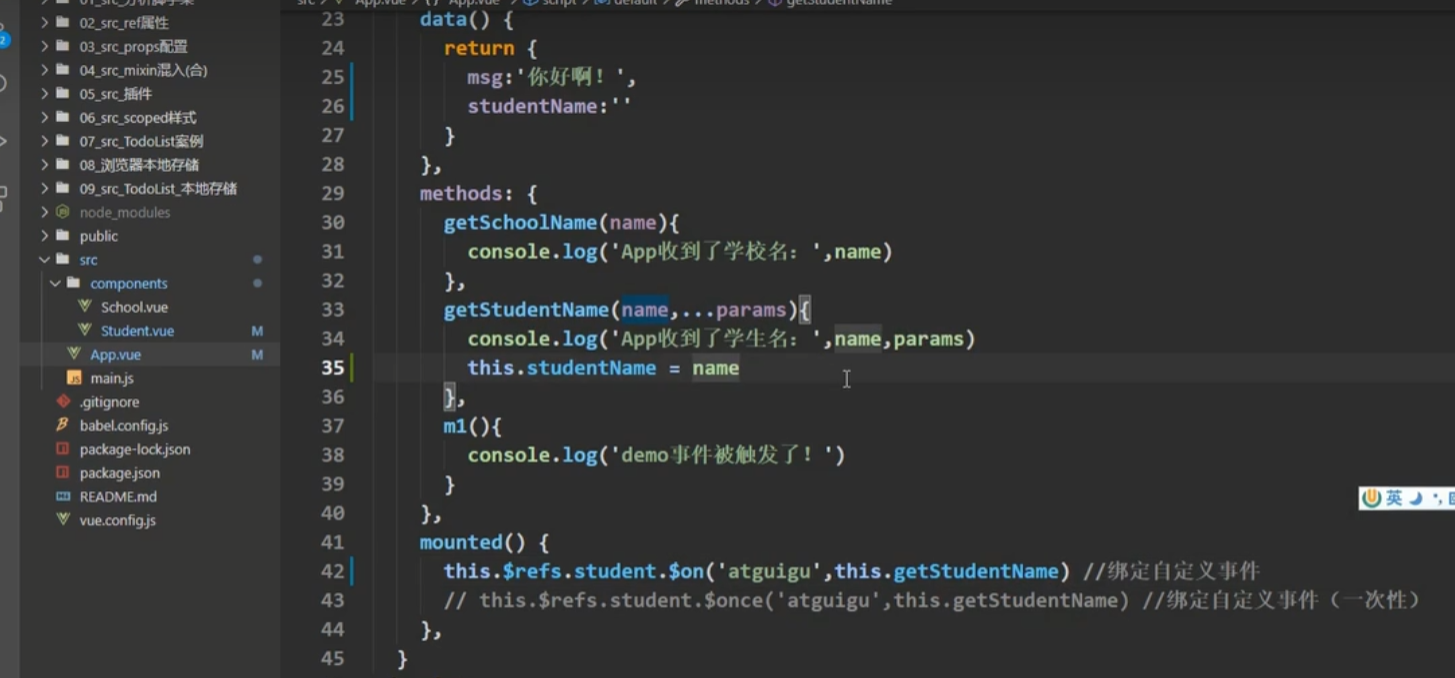
v-on在student的组件标签上,所以说是给student的组件对象vue component(VC)身上绑定了一个事件,事件名叫做atguigu,调用demo函数。给谁(Student)绑定的事件就找谁(Student的实例对象vc)触发。
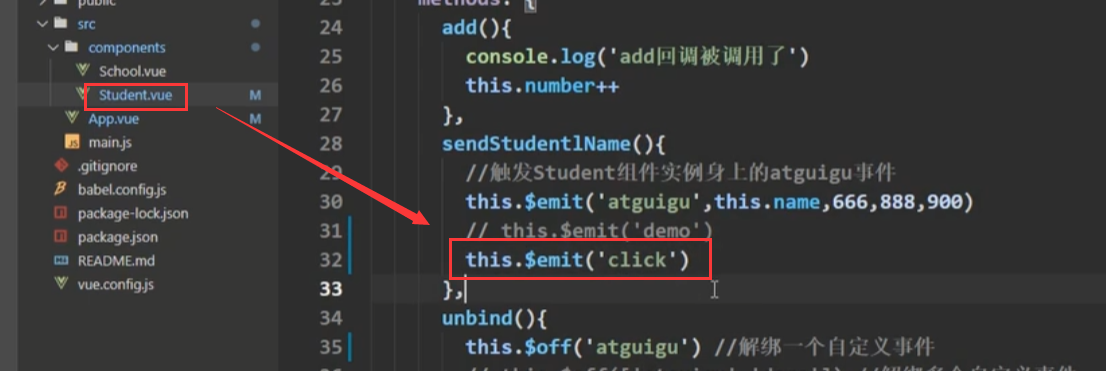
怎么去触发?借助$emit(),参数传入要触发的事件名atguigu。
还有一种方式

灵活性更强,可以延迟三秒触发
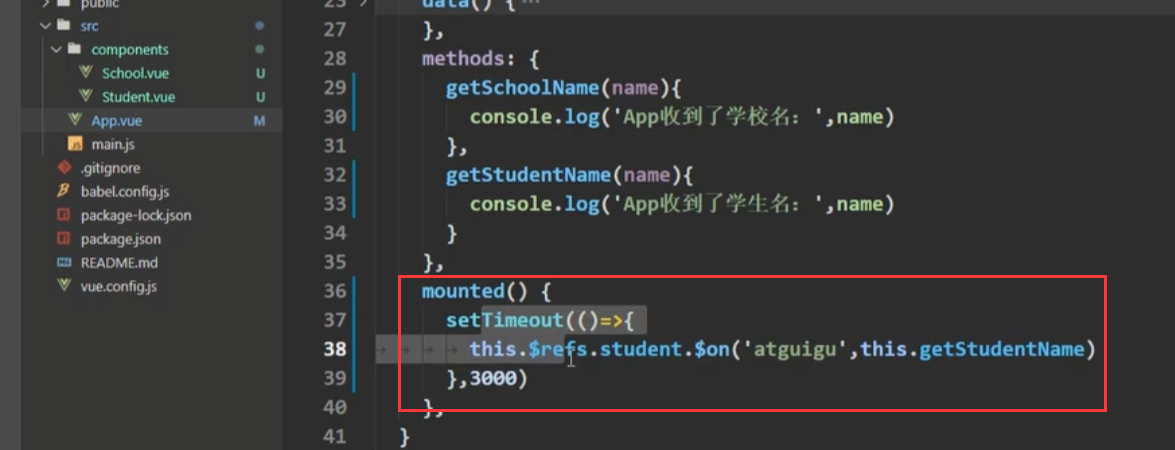
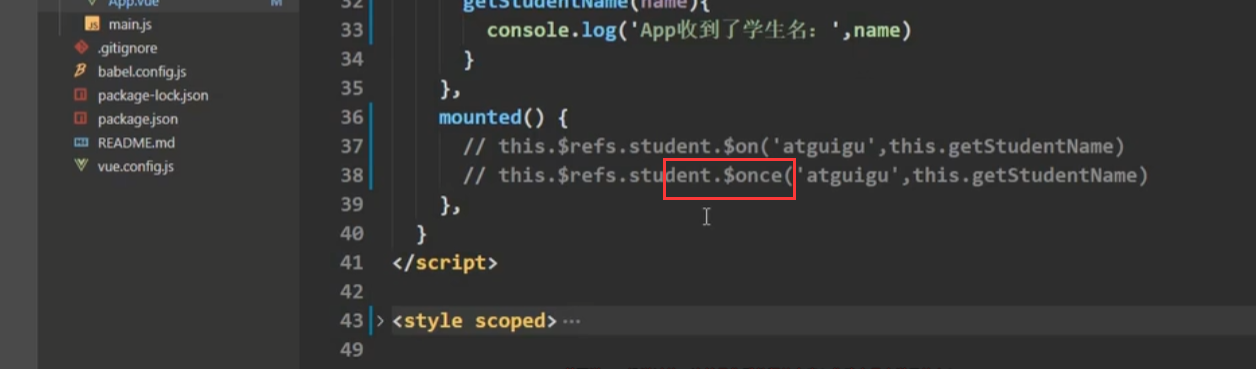
加上once表示只能触发一次(按钮只能点击一次)
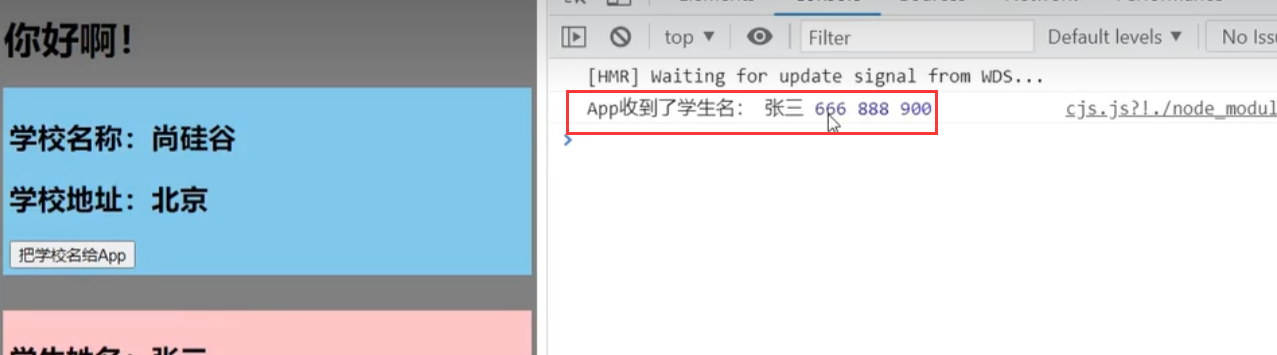
触发事件同时可以继续传数据接收数据
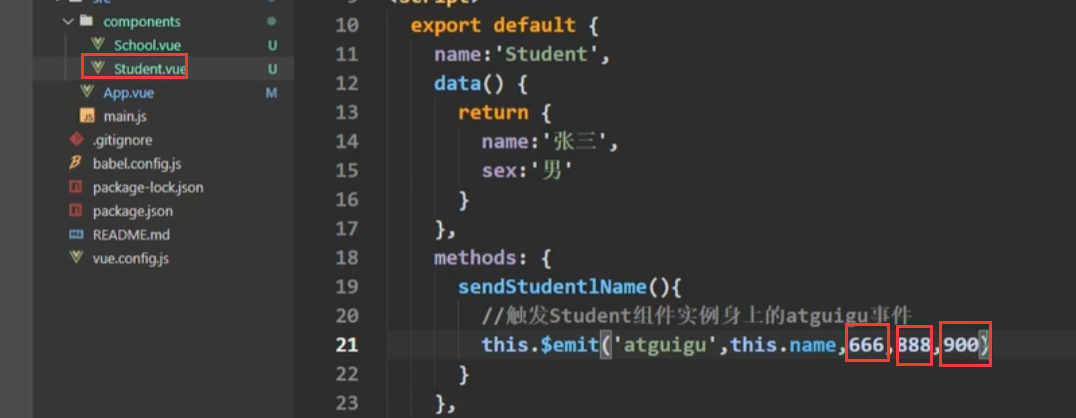
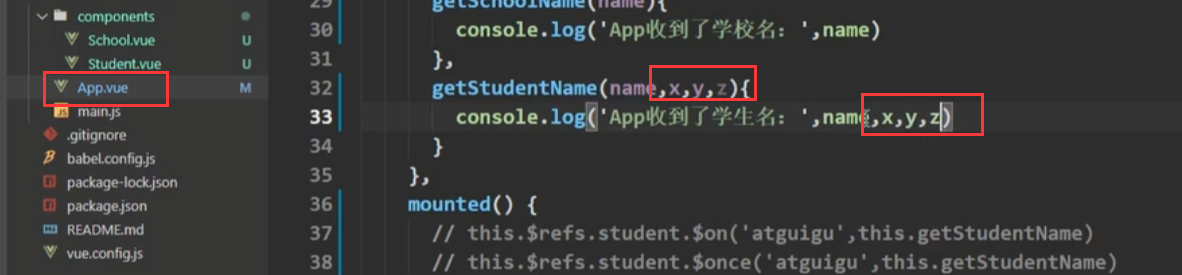
一般来说不用这么多形参去接收,一种方法是包装成对象传,另一种方法如下(ES6写法,a是数组)


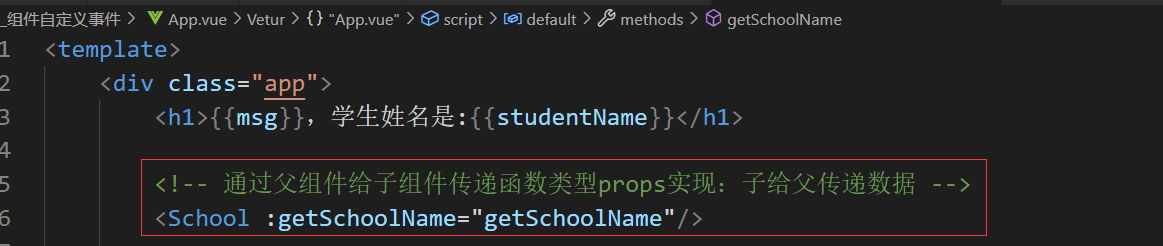
src/App.vue:
<template>
<div class="app">
<!-- 通过父组件给子组件传递函数类型的props实现子给父传递数据 -->
<School :getSchoolName="getSchoolName"/>
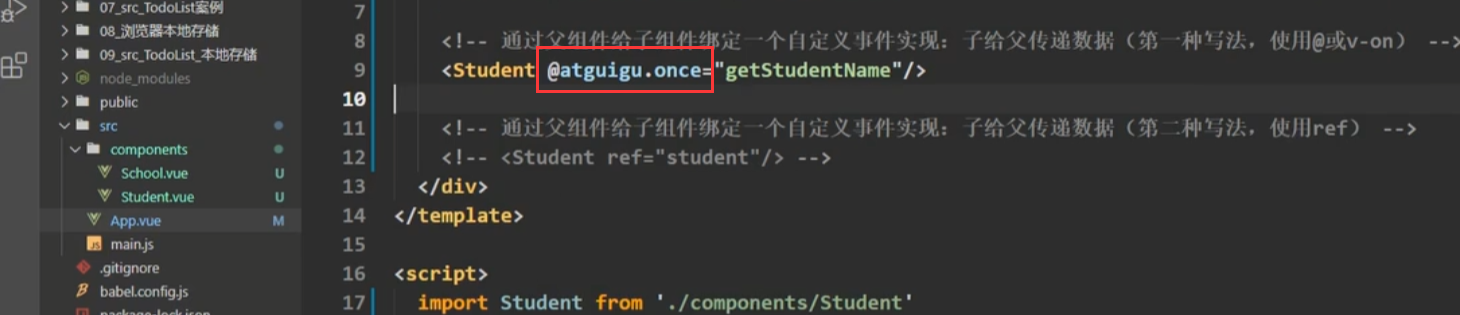
<!-- 通过父组件给子组件绑定一个自定义事件实现子给父传递数据(第一种写法,使用@或v-on) -->
<!-- <Student @zs="getStudentName"/> -->
<!-- 通过父组件给子组件绑定一个自定义事件实现子给父传递数据(第二种写法,使用ref) -->
<Student ref="student"/>
</div>
</template>
<script>
import Student from './components/Student.vue'
import School from './components/School.vue'
export default {
name:'App',
components: { Student,School },
methods:{
getSchoolName(name){
console.log("已收到学校的名称:"+name)
},
getStudentName(name){
console.log("已收到学生的姓名:"+name)
}
},
mounted(){
this.$refs.student.$on('jojo',this.getStudentName)
}
}
</script>
<style scoped>
.app{
background-color: gray;
padding: 5px;
}
</style>
src/components/Student.vue:
<template>
    <div class="student">
        <h2>学生姓名:{{name}}</h2>
        <h2>学生性别:{{sex}}</h2>
        <button @click="sendStudentName">点我传递学生姓名</button>
    </div>
</template>

<script>
    export default {
        name:'Student',
        data() {
            return {
                name:'zs',
				sex:'男'
            }
        },
        methods:{
            sendStudentName(){
                this.$emit('zs',this.name)
            }
        }
    }
</script>

<style scoped>
    .student{
        background-color: chartreuse;
        padding: 5px;
		margin-top: 30px;
    }
</style>
解绑
你给谁绑的自定义事件就给谁解绑去
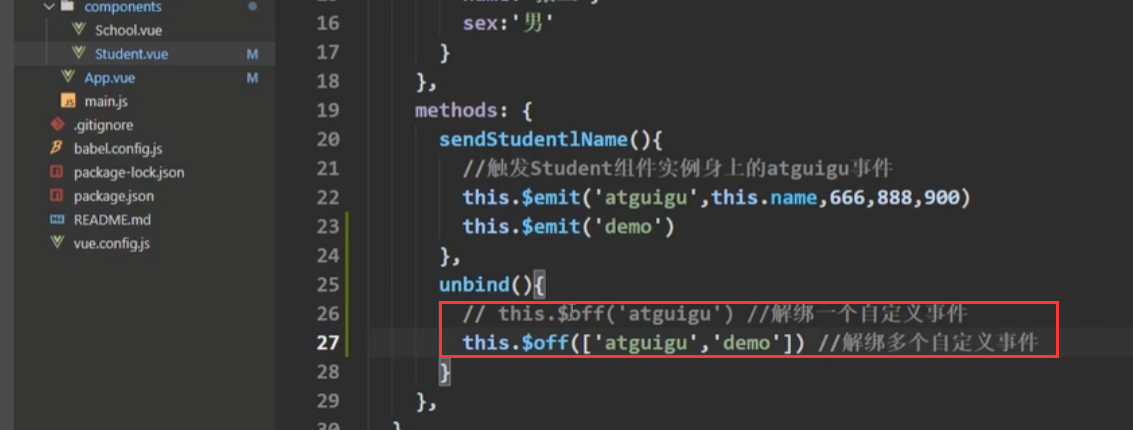
1.利用$off
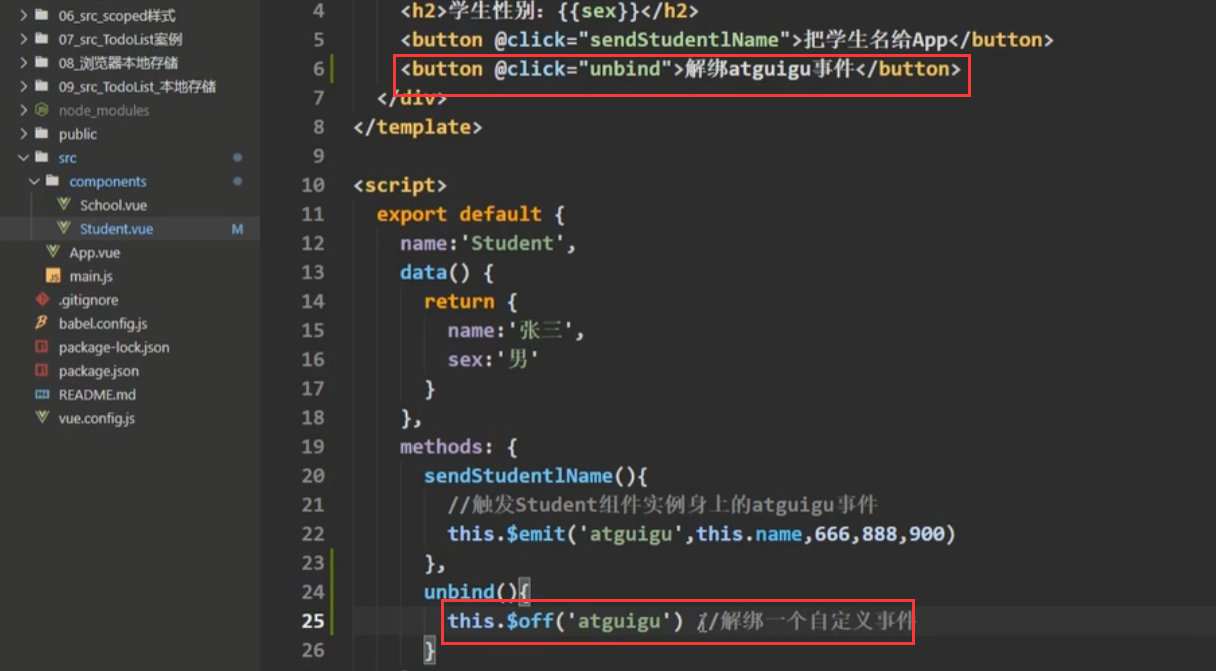
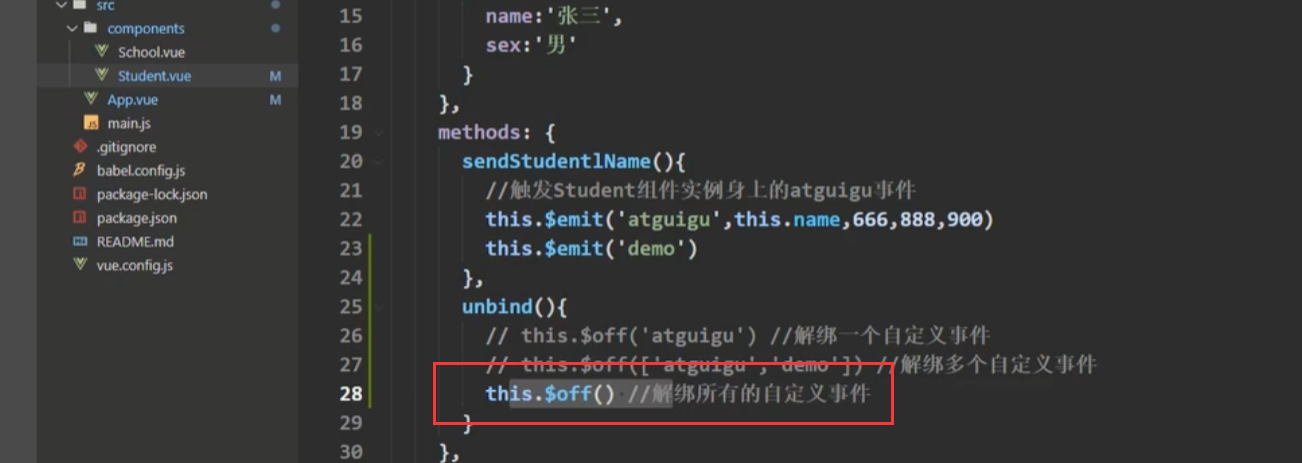
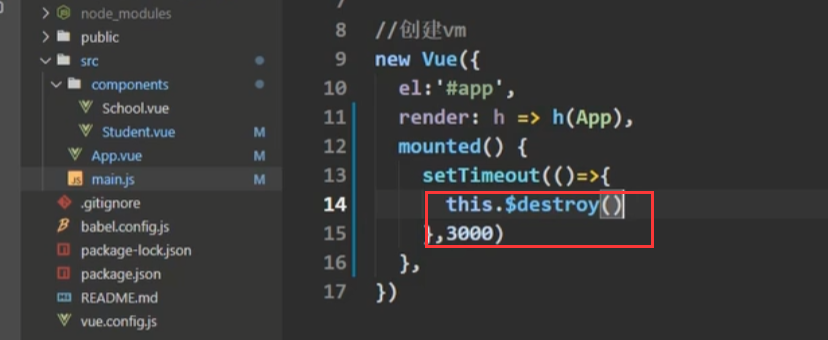
如果一个组件被销毁了,那么他身上的自定义事件也都不能用了(vc自我销毁)
vm自我销毁
src/App.vue:
<template>
    <div class="app">
        <Student @zs="getStudentName"/>
    </div>
</template>

<script>
    import Student from './components/Student.vue'

    export default {
        name:'App',
        components: { Student },
        methods:{
            getStudentName(name){
                console.log("已收到学生的姓名:"+name)
            }
        }
    }
</script>

<style scoped>
	.app{
		background-color: gray;
		padding: 5px;
	}
</style>
src/components/Student.vue:
<template>
    <div class="student">
        <h2>学生姓名:{{name}}</h2>
        <h2>学生性别:{{sex}}</h2>
        <button @click="sendStudentName">点我传递学生姓名</button>
        <button @click="unbind">解绑自定义事件</button>
    </div>
</template>

<script>
    export default {
        name:'Student',
        data() {
            return {
                name:'zs',
				sex:'男'
            }
        },
        methods:{
            sendStudentName(){
                this.$emit('zs',this.name)
            },
            unbind(){
                // 解绑一个自定义事件
                // this.$off('zs')
                // 解绑多个自定义事件
                // this.$off(['zs'])
                // 解绑所有自定义事件
                this.$off()
            }
        }
    }
</script>

<style scoped>
    .student{
        background-color: chartreuse;
        padding: 5px;
		margin-top: 30px;
    }
</style>
总结
谁触发了atguigu事件,那么这个事件当中的this就是谁。
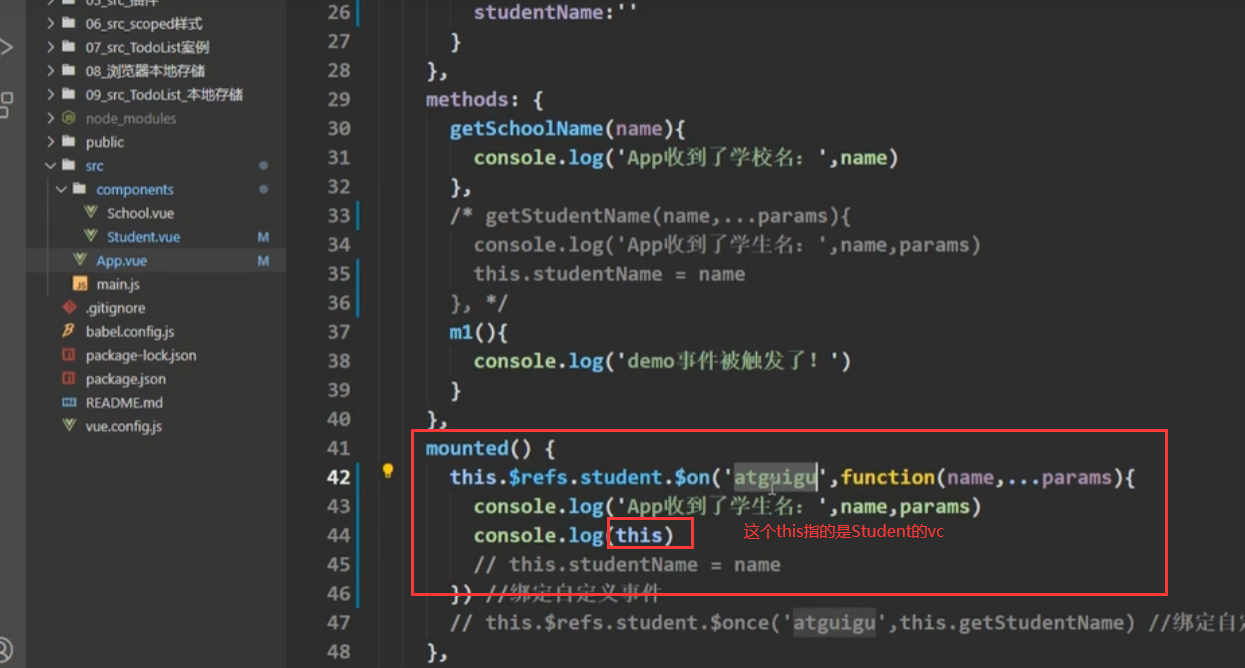
为啥这样写没问题
Vue之前给定了一个承诺,如果这个函数写在methods里面,并且用的是普通函数,那么给你一个承诺就是这个函数的this一定是APP的组件实例对象。最终的this是有所改变的。
组件上也可以绑定原生DOM事件,需要使用native修饰符
如果不加修饰符他会认为是自定义事件。
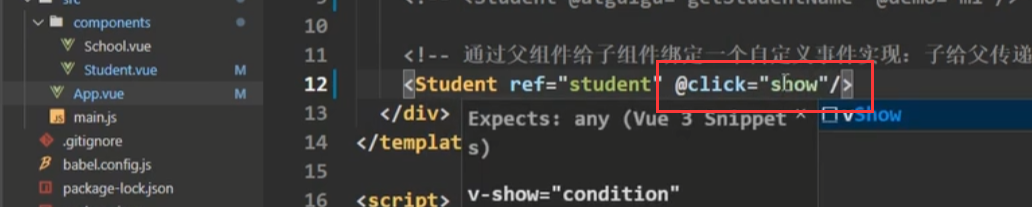
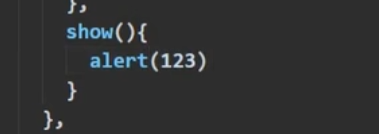
加上修饰符即可

组件的自定义事件
1. 一种组件间通信的方式,适用于:
<strong style=”color:red”>子组件 ===> 父组件</strong>
(在父组件中给子组件绑定事件)
2. 使用场景:A是父组件,B是子组件,B想给A传数据,那么就要在A中给B绑定自定义事件(<span style=”color:red”>事件的回调在A中</span>)。
3. 绑定自定义事件:
1. 第一种方式,在父组件中:“`<Demo @atguigu=”test”/>“` 或 “`<Demo v-on:atguigu=”test”/>“`
2. 第二种方式,在父组件中:
“`js
<Demo ref=”demo”/>
……
mounted(){
this.$refs.xxx.$on(‘atguigu’,this.test)
}
“`
3. 若想让自定义事件只能触发一次,可以使用“`once“`修饰符,或“`$once“`方法。
4. 触发自定义事件:“`this.$emit(‘atguigu’,数据)“`
5. 解绑自定义事件“`this.$off(‘atguigu’)“`
6. 组件上也可以绑定原生DOM事件,需要使用“`native“`修饰符。
7. 注意:通过“`this.$refs.xxx.$on(‘atguigu’,回调)“`绑定自定义事件时,回调<span style=”color:red”>要么配置在methods中</span>,<span style=”color:red”>要么用箭头函数</span>,否则this指向会出问题!
全局事件总线
可以实现任意组件之间的通信,APP和abcd组件结构如下所示,其中有一个粉色的X组件,它不属于任何一个组件,其中在a组件里面写一些代码,给x绑定自定义事件demo,则这个自定义事件的回调就留在了a里面。
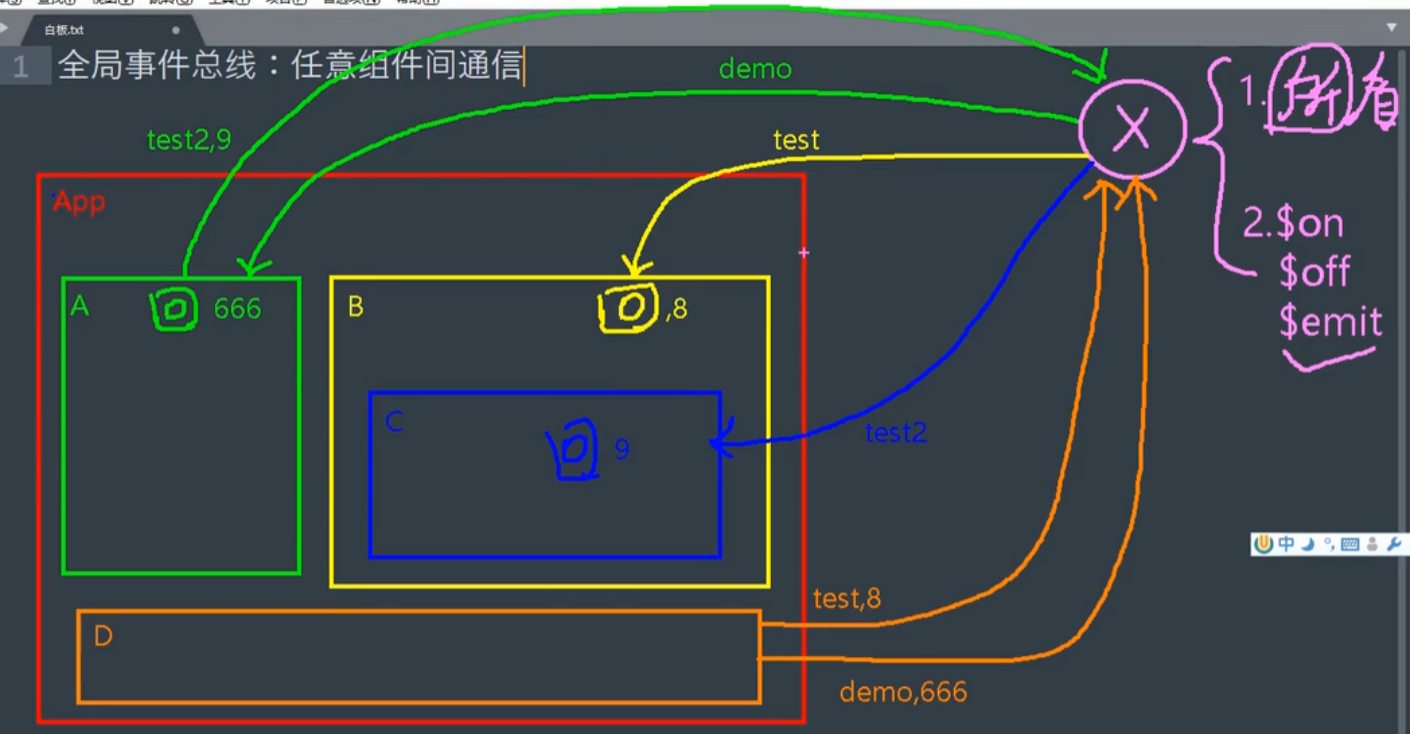
如果d组件想给a组件传递数据,在d组件里面写一些代码去触发x身上的demo自定义事件,并且在触发数据的同时再带点数据过去,例如666,X组件上的demo事件被触发了,Demo事件所对应的回调也被执行了。回调被执行了,则传递的数据666也以参数的形式来到a组件里了。
如果b组件想收到别人传过来的数据,在b组件里写一些代码来绑定x组件的自定义事件,比如说事件的名字叫做test,由于是在b组建里面给x组件绑定事件,所以Test所对应的回调就留在了b组件里面。如果d组件想给b组件传递数据,则只需要在d组件里面编写一些代码去触发x组建你的test事件,也可以携带参数。
如果c组件想收到数据,则可以在c组件里面写一些代码来,绑定x组件的自定义事件,比如叫做test2,则这个事件的回调函数也留在了c组件。如果a想给c传递一些数据,那么只需要在a组件里面编写一些代码来触发x组件当中的test2事件。
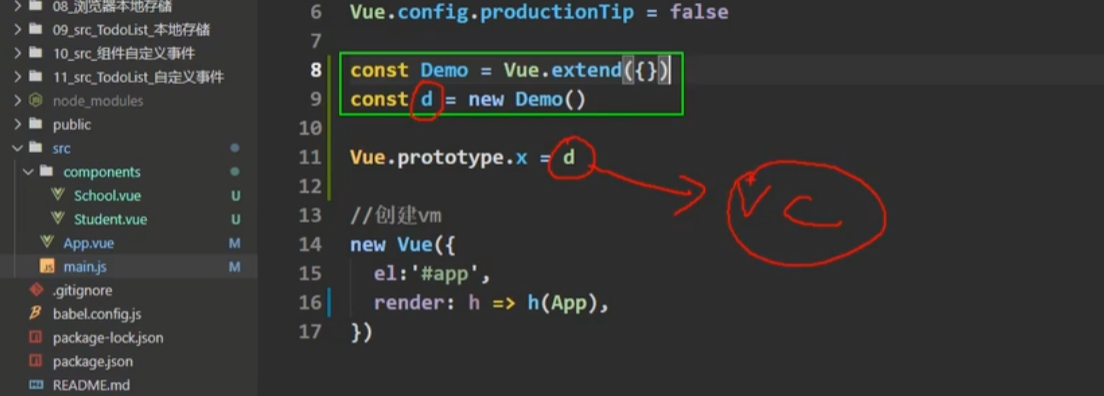
1. 所有的组件对象都必须能看见他
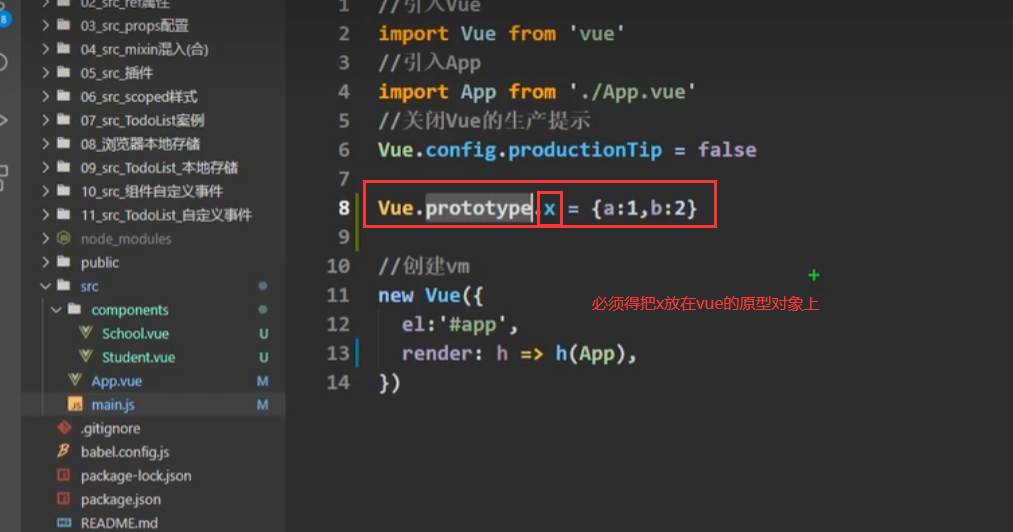
2. 这个对象必须能够使用$on、$emit和$off方法去绑定、触发和解绑事件
{a:1,b:2}只是一个普通的Object对象,他没有相应的绑定或者解绑方法,$on、$emit和$off方法都在vue的原型对象(Vue.prototype)上,原型对象的方法是给vm或者vc用的,所以要么写vm,要么写vc。
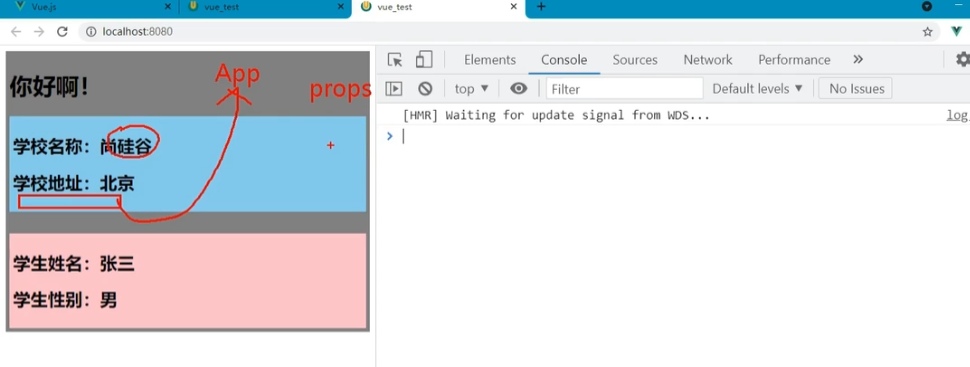
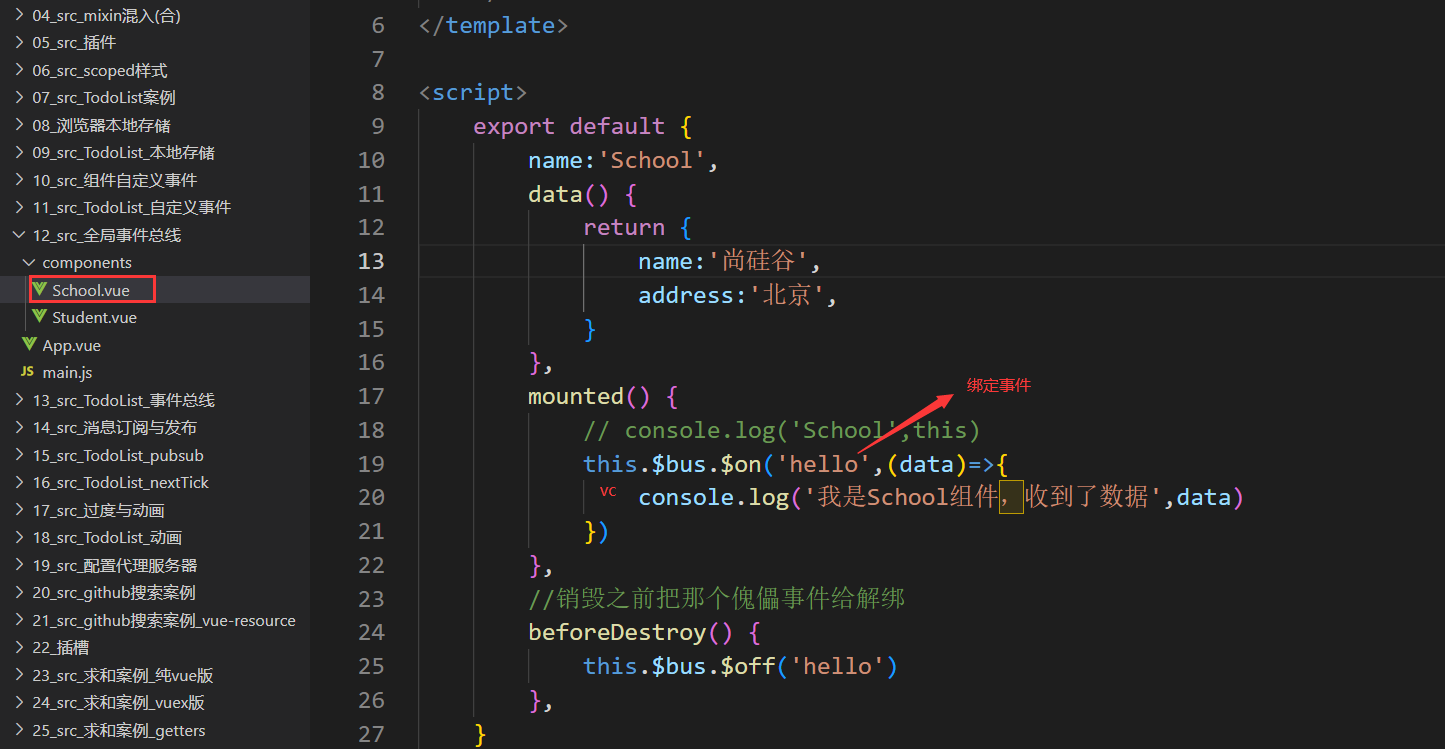
student给school传递姓名

School.vue
<template>
	<div class="school">
		<h2>学校名称:{{name}}</h2>
		<h2>学校地址:{{address}}</h2>
	</div>
</template>

<script>
	export default {
		name:'School',
		data() {
			return {
				name:'尚硅谷',
				address:'北京',
			}
		},
		mounted() {
			// console.log('School',this)
			this.$bus.$on('hello',(data)=>{
				console.log('我是School组件,收到了数据',data)
			})
		},
		//销毁之前把那个傀儡事件给解绑
		beforeDestroy() {
			this.$bus.$off('hello')
		},
	}
</script>

<style scoped>
	.school{
		background-color: skyblue;
		padding: 5px;
	}
</style>
student.vue
<template>
	<div class="student">
		<h2>学生姓名:{{name}}</h2>
		<h2>学生性别:{{sex}}</h2>
		<button @click="sendStudentName">把学生名给School组件</button>
	</div>
</template>

<script>
	export default {
		name:'Student',
		data() {
			return {
				name:'张三',
				sex:'男',
			}
		},
		mounted() {
			// console.log('Student',this.x)
		},
		methods: {
			sendStudentName(){
				this.$bus.$emit('hello',this.name)
			}
		},
	}
</script>

<style lang="less" scoped>
	.student{
		background-color: pink;
		padding: 5px;
		margin-top: 30px;
	}
</style>
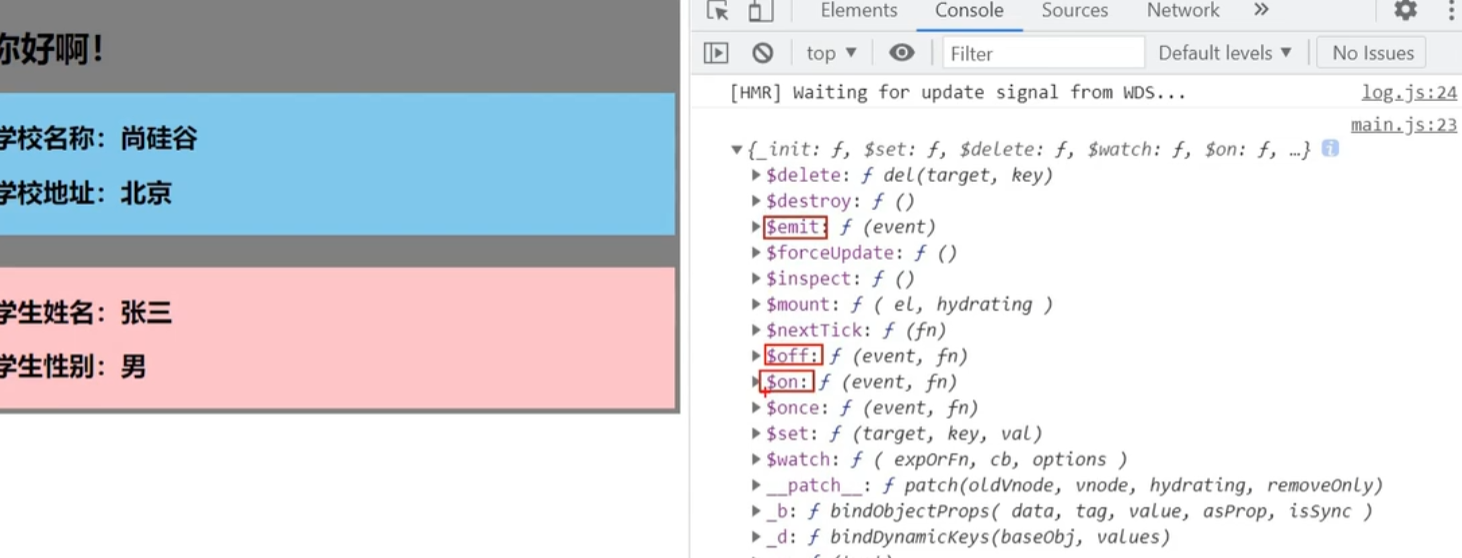
App.vue
<template>
	<div class="app">
		<h1>{{msg}}</h1>
		<School/>
		<Student/>
	</div>
</template>

<script>
	import Student from './components/Student'
	import School from './components/School'

	export default {
		name:'App',
		components:{School,Student},
		data() {
			return {
				msg:'你好啊!',
			}
		}
	}
</script>

<style scoped>
	.app{
		background-color: gray;
		padding: 5px;
	}
</style>
main.js
//引入Vue
import Vue from 'vue'
//引入App
import App from './App.vue'
//关闭Vue的生产提示
Vue.config.productionTip = false

//创建vm
new Vue({
	el:'#app',
	render: h => h(App),
	//借助这个钩子,此时还没有模板解析。无法通过vm中的data数据,methods方法
	beforeCreate() {
		//bus有总线的意思
		Vue.prototype.$bus = this //安装全局事件总线
	},
})
全局事件总线(GlobalEventBus)
1. 一种组件间通信的方式,适用于任意组件间通信。
2. 安装全局事件总线:
“`js
new Vue({
……
beforeCreate() {
Vue.prototype.$bus = this //安装全局事件总线,$bus就是当前应用的vm
},
……
})
“`
3. 使用事件总线:
1. 接收数据:A组件想接收数据,则在A组件中给$bus绑定自定义事件,事件的<span style=”color:red”>回调留在A组件自身。</span>
“`js
methods(){
demo(data){……}
}
……
mounted() {
this.$bus.$on(‘xxxx’,this.demo)
}
“`
2. 提供数据:“`this.$bus.$emit(‘xxxx’,数据)“`
4. 最好在beforeDestroy钩子中,用$off去解绑<span style=”color:red”>当前组件所用到的</span>事件。
消息发布与订阅
需要数据的人订阅消息,提供数据的人发送消息。
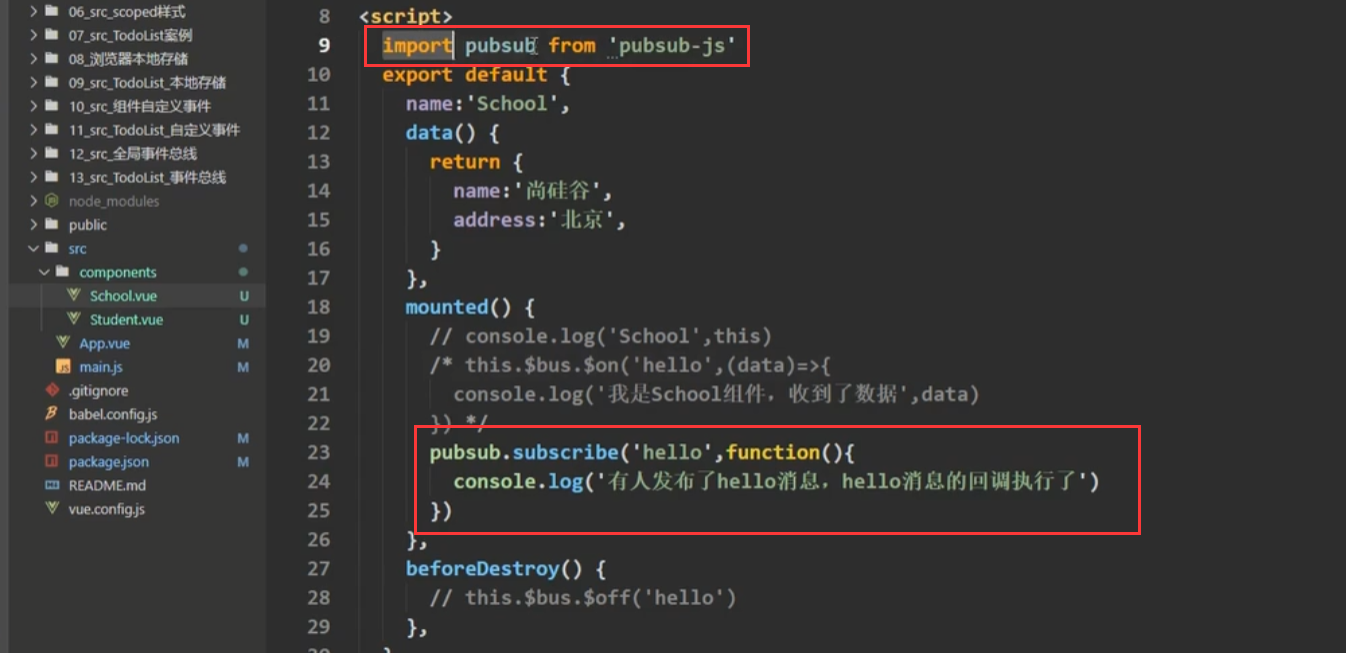
School当中订阅消息
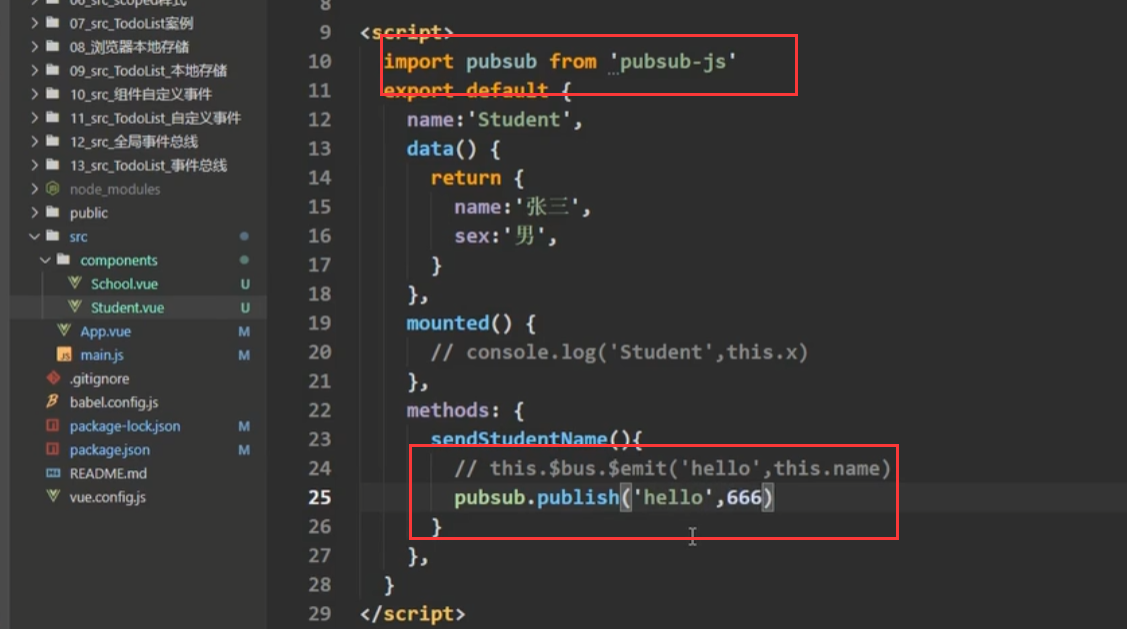
student发布消息
订阅消息中回调函数两个参数,一个是消息名,另一个是数据
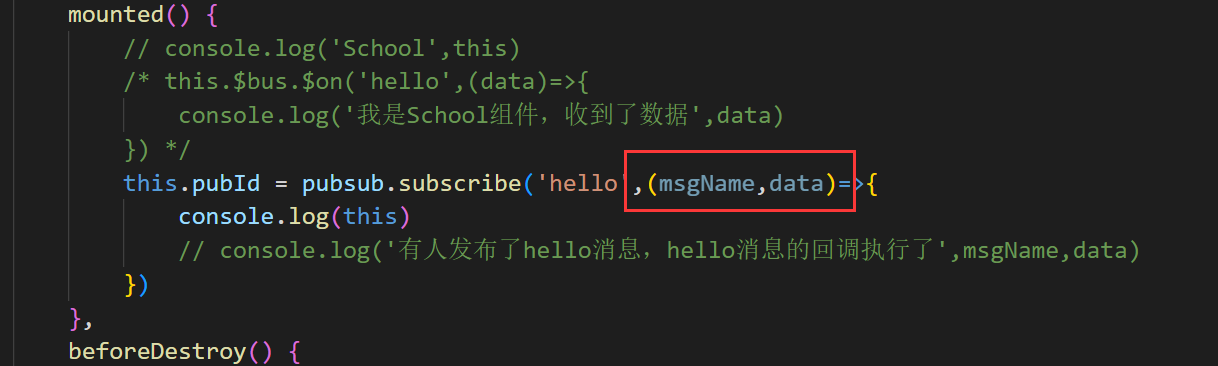

如果当前组件要被销毁就要取消订阅,通过id取消订阅,所以订阅的时候返回一个id并放在this里
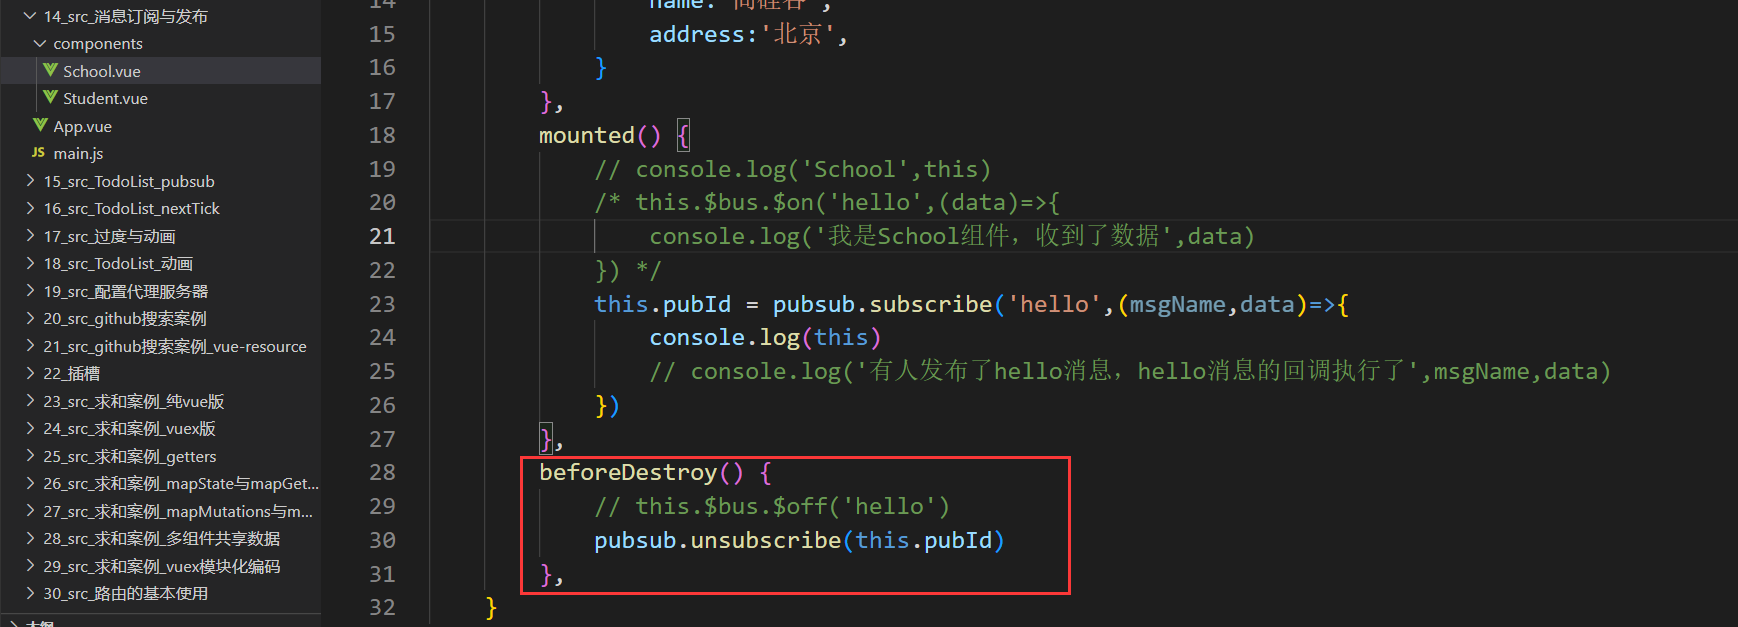
消息订阅与发布(pubsub)
1. 一种组件间通信的方式,适用于任意组件间通信。
2. 使用步骤:
- 1. 安装pubsub:“`npm i pubsub-js“`
- 2. 引入: “`import pubsub from ‘pubsub-js’“`
- 3. 接收数据:A组件想接收数据,则在A组件中订阅消息,订阅的回调留在A组件自身
methods(){ demo(data){......} } ...... mounted() { this.pid = pubsub.subscribe('xxx',this.demo) //订阅消息 }- 4. 提供数据:“`pubsub.publish(‘xxx’,数据)“`
- 5. 最好在beforeDestroy钩子中,用“`PubSub.unsubscribe(pid)“`去取消订阅。
nextTick
$nextTick(回调函数)可以将回调延迟到下次 DOM 更新循环之后执行
1. 语法:“`this.$nextTick(回调函数)“`
2. 作用:在下一次 DOM 更新结束后执行其指定的回调。
3. 什么时候用:当改变数据后,要基于更新后的新DOM进行某些操作时,要在nextTick所指定的回调函数中执行。
过渡与动画
Test.vue
<template>
	<div>
		<button @click="isShow = !isShow">显示/隐藏</button>
		<transition name="hello" appear>
			<h1 v-show="isShow">你好啊!</h1>
		</transition>
	</div>
</template>

<script>
	export default {
		name:'Test',
		data() {
			return {
				isShow:true
			}
		},
	}
</script>

<style scoped>
	h1{
		background-color: orange;
	}

	.hello-enter-active{
		animation: atguigu 0.5s linear;
	}

	.hello-leave-active{
		animation: atguigu 0.5s linear reverse;
	}

	@keyframes atguigu {
		from{
			transform: translateX(-100%);
		}
		to{
			transform: translateX(0px);
		}
	}
</style>
Test2.vue
<template>
	<div>
		<button @click="isShow = !isShow">显示/隐藏</button>
		<transition-group name="hello" appear>
			<h1 v-show="!isShow" key="1">你好啊!</h1>
			<h1 v-show="isShow" key="2">尚硅谷!</h1>
		</transition-group>
	</div>
</template>

<script>
	export default {
		name:'Test',
		data() {
			return {
				isShow:true
			}
		},
	}
</script>

<style scoped>
	h1{
		background-color: orange;
	}
	/* 进入的起点、离开的终点 */
	.hello-enter,.hello-leave-to{
		transform: translateX(-100%);
	}
	.hello-enter-active,.hello-leave-active{
		transition: 0.5s linear;
	}
	/* 进入的终点、离开的起点 */
	.hello-enter-to,.hello-leave{
		transform: translateX(0);
	}

</style>
Test3.vue
<template>
	<div>
		<button @click="isShow = !isShow">显示/隐藏</button>
		<transition-group
			appear
			name="animate__animated animate__bounce"
			enter-active-class="animate__swing"
			leave-active-class="animate__backOutUp"
		>
			<h1 v-show="!isShow" key="1">你好啊!</h1>
			<h1 v-show="isShow" key="2">尚硅谷!</h1>
		</transition-group>
	</div>
</template>

<script>
	import 'animate.css'
	export default {
		name:'Test',
		data() {
			return {
				isShow:true
			}
		},
	}
</script>

<style scoped>
	h1{
		background-color: orange;
	}


</style>
App.vue
<template>
	<div>
		<Test/>
		<Test2/>
		<Test3/>
	</div>
</template>

<script>
	import Test from './components/Test'
	import Test2 from './components/Test2'
	import Test3 from './components/Test3'

	export default {
		name:'App',
		components:{Test,Test2,Test3},
	}
</script>
main.js
//引入Vue
import Vue from 'vue'
//引入App
import App from './App.vue'
//关闭Vue的生产提示
Vue.config.productionTip = false

//创建vm
new Vue({
	el:'#app',
	render: h => h(App),
	beforeCreate() {
		Vue.prototype.$bus = this
	},
})
Vue封装的过度与动画
1. 作用:在插入、更新或移除 DOM元素时,在合适的时候给元素添加样式类名。
2. 图示:<img src=”https://img04.sogoucdn.com/app/a/100520146/5990c1dff7dc7a8fb3b34b4462bd0105″ style=”width:60%” />
3. 写法:
1. 准备好样式:
– 元素进入的样式:
1. v-enter:进入的起点
2. v-enter-active:进入过程中
3. v-enter-to:进入的终点
– 元素离开的样式:
1. v-leave:离开的起点
2. v-leave-active:离开过程中
3. v-leave-to:离开的终点
2. 使用“`<transition>“`包裹要过度的元素,并配置name属性:
vue
      <transition name="hello">

         <h1 v-show="isShow">你好啊!</h1>

      </transition>
3. 备注:若有多个元素需要过度,则需要使用:“`<transition-group>“`,且每个元素都要指定“`key“`值。
版权声明:本文内容由互联网用户自发贡献,该文观点仅代表作者本人。本站仅提供信息存储空间服务,不拥有所有权,不承担相关法律责任。如发现本站有涉嫌侵权/违法违规的内容, 请发送邮件至 举报,一经查实,本站将立刻删除。
文章由极客之音整理,本文链接:https://www.bmabk.com/index.php/post/99424.html

![Android Studio电脑上怎么下载-Android Studio下载和安装图文教程[超详细]](https://www.bmabk.com/wp-content/uploads/2022/05/post-loading-480x300.gif)