
目录
观察者模式的事件思想
观察者模式作为对象间 一对多 依赖关系的实现。在观察者模式中,被观察者相当于事件中的时间发布者,而观察者相当于事件中的监听者。因此可以说:观察者模式就是事件驱动机制的一种体现。
事件驱动
事件驱动一个常见的形式就是 发布-订阅 模式,在跨进程的通信间,我们常常使用 消息队列 来实现消息的发布订阅。目前主流的框架中,均采用消息的 发布-订阅 模式来进行大型分布式项目的解耦。使得数据生产方和发送方分离,同时 MQ 还能起到削峰的作用。同一进程内很多时候也需要这种事件驱动机制来进行解耦
使用事件机制
事件机制主要由三个部分组成:事件源、事件对象、监听器
-
事件源:事件发生的起源
-
事件对象:事件实体,事件对象会持有一个事件源
-
监听器:监听事件对象,对事件对象进行处理
Java 事件使用
Java 提供了关于事件相关的两个接口:
-
EventObject:事件对象,自定义事件需要继承该类
-
EventListener:事件监听器接口
由于事件源 Source 不需要实现任何接口,所以 Java 中没有给出相应的定义
一个利用 Java 原生实现事件的例子:
import java.util.EventObject;

/**
 * @Author: chenyang
 * @DateTime: 2022/9/21 10:08
 * @Description: 事件对象
 */
public class JavaEvent extends EventObject {

    private String msg;


    /**
     * Constructs a prototypical Event.
     *
     * @param source The object on which the Event initially occurred.
     * @throws IllegalArgumentException if source is null.
     */
    public JavaEvent(Object source, String msg) {
        super(source);
        this.msg = msg;
    }

    public String getMsg() {
        return msg;
    }
}
import com.yang.common.event.JavaEvent;
import java.util.EventListener;
/**
* @Author: chenyang
* @DateTime: 2022/9/21 10:09
* @Description: 事件监听者,按照 Java 规范应实现 EventListener 接口
*/
public class JavaListener implements EventListener {
public void handlerEvent(JavaEvent event){
System.out.println("Java Event msg : " + event.getMsg());
}
}import com.yang.common.event.JavaEvent;
import com.yang.common.listener.JavaListener;
import java.util.EventListener;
import java.util.HashSet;
/**
* @Author: chenyang
* @DateTime: 2022/9/21 10:12
* @Description: 事件源
*/
public class JavaSource {
private static HashSet<EventListener> set = new HashSet<>();
public void addListener(EventListener listener){
set.add(listener);
}
public void publishEvent(JavaEvent event){
for (EventListener listener : set) {
((JavaListener)listener).handlerEvent(event);
}
}
}public class Main {
public static void main(String[] args) {
JavaSource source = new JavaSource();
JavaListener listener = new JavaListener();
source.addListener(listener);
source.publishEvent(new JavaEvent(source, "SAY MY NAME !!!"));
}
}Spring 事件使用
Spring 提供了事件相关的接口和类,在 Spring 中可以通过实现接口来实现事件的 发布-订阅。Spring 的事件机制是以 Java 的事件机制为基础按需进行了扩展。
Spring 中与事件相关的定义如下:
-
ApplicationEvent:继承 ObjectEvent 类,事件源应该继承该类。
-
ApplicationListener:事件监听者,该类接受一个泛型,供 ApplicationEventPublisher 在发布事件时选择 EventListener。
-
ApplicationEventPublisher:封装发布事件的方法,通知所有在 Spring 中注册的该事件的监听者进行处理。
-
ApplicationEventPublisherAware:Spring 提供的 Aware 接口之一,实现该接口的 Bean 可以获取 ApplicationEventPublisher 并进行发布事件。
使用 Aware
一个利用 Spring 事件机制进行事件发布-订阅的例子:
import org.springframework.context.ApplicationEvent;

/**
 * @Author: chenyang
 * @DateTime: 2022/9/21 11:07
 * @Description: 事件对象
 */
public class SpringEventAware extends ApplicationEvent {

    private String msg;

    public SpringEventAware(Object source, String msg) {
        super(source);
        this.msg = msg;
    }

    public SpringEventAware(Object source) {
        super(source);
    }

    public String getMsg() {
        return msg;
    }
}
import com.yang.common.event.SpringEvent;
import org.springframework.context.ApplicationListener;
import org.springframework.stereotype.Component;
/**
* @Author: chenyang
* @DateTime: 2022/9/21 11:08
* @Description: 事件监听者,事件监听者实现ApplicationListener<E extends ApplicationEvent>, 交由 Spring 进行管理,无需自己进行监听器的注册与通知过程
*/
@Component
public class SpringListenerAware implements ApplicationListener<SpringEventAware> {
@Override
public void onApplicationEvent(SpringEventAware event) {
System.out.println("publish event, msg is : " + event.getMsg());
}
}import com.yang.common.event.SpringEvent;
import org.springframework.context.ApplicationEventPublisher;
import org.springframework.context.ApplicationEventPublisherAware;
import org.springframework.stereotype.Component;
/**
* @Author: chenyang
* @DateTime: 2022/9/21 11:09
* @Description: 事件源
*/
@Component
public class SpringPublishAware implements ApplicationEventPublisherAware {
private ApplicationEventPublisher applicationEventPublisher;
public void publishEvent(String msg){
applicationEventPublisher.publishEvent(new SpringEventAware(this, msg));
}
@Override
public void setApplicationEventPublisher(ApplicationEventPublisher applicationEventPublisher) {
this.applicationEventPublisher = applicationEventPublisher;
}
}@Autowired
private SpringPublishAware springPublishAware;
@Test
void contextLoads2() {
springPublishAware.publishEvent("通过 Spring 实现发布订阅");
}不使用 Aware
@Data
public class Task {
    private String name;
    private String address;
}


public class SpringEvent extends ApplicationEvent {
    private Task task;

    public SpringEvent(Task task) {
        super(task);
        this.task = task;
    }

    public Task getTask() {
        return task;
    }
}


@Component
public class SpringListener implements ApplicationListener<SpringEvent> {
    @Override
    public void onApplicationEvent(SpringEvent event) {
        Task task = event.getTask();
        System.err.println("事件接受任务");
        System.err.println(task);
        System.err.println("任务完成");
    }
}
@Autowired
private ApplicationEventPublisher publisher;
@Test
void contextLoads3() {
Task task = new Task();
task.setName("admin");
task.setAddress("unknown area");
SpringEvent event = new SpringEvent(task);
System.out.println("开始发布任务");
publisher.publishEvent(event);
System.out.println("发布任务完成");
} 以上代码中,可以看到。在 Spring 框架使用事件与在 Java 中使用时间机制其实并没有什么不同,均由 事件源、事件对象以及事件监听者组成。与 Java 原生提供的事件机制不同的是,Spring 中提供了 ApplicationEvent 类作为基类,开发者可以以此为基础定义自己的自定义事件。
在 Spring 中,继承自 ApplicationEvent 的事件对象的监听者,可以由 Spring 容器进行管理,并在发布时通过 ApplicationEventPublisher 进行发布。这就避免了我们自己实现监听者的注册和通知过程,免去了很多繁杂的过程,使得更专心于业务本身。
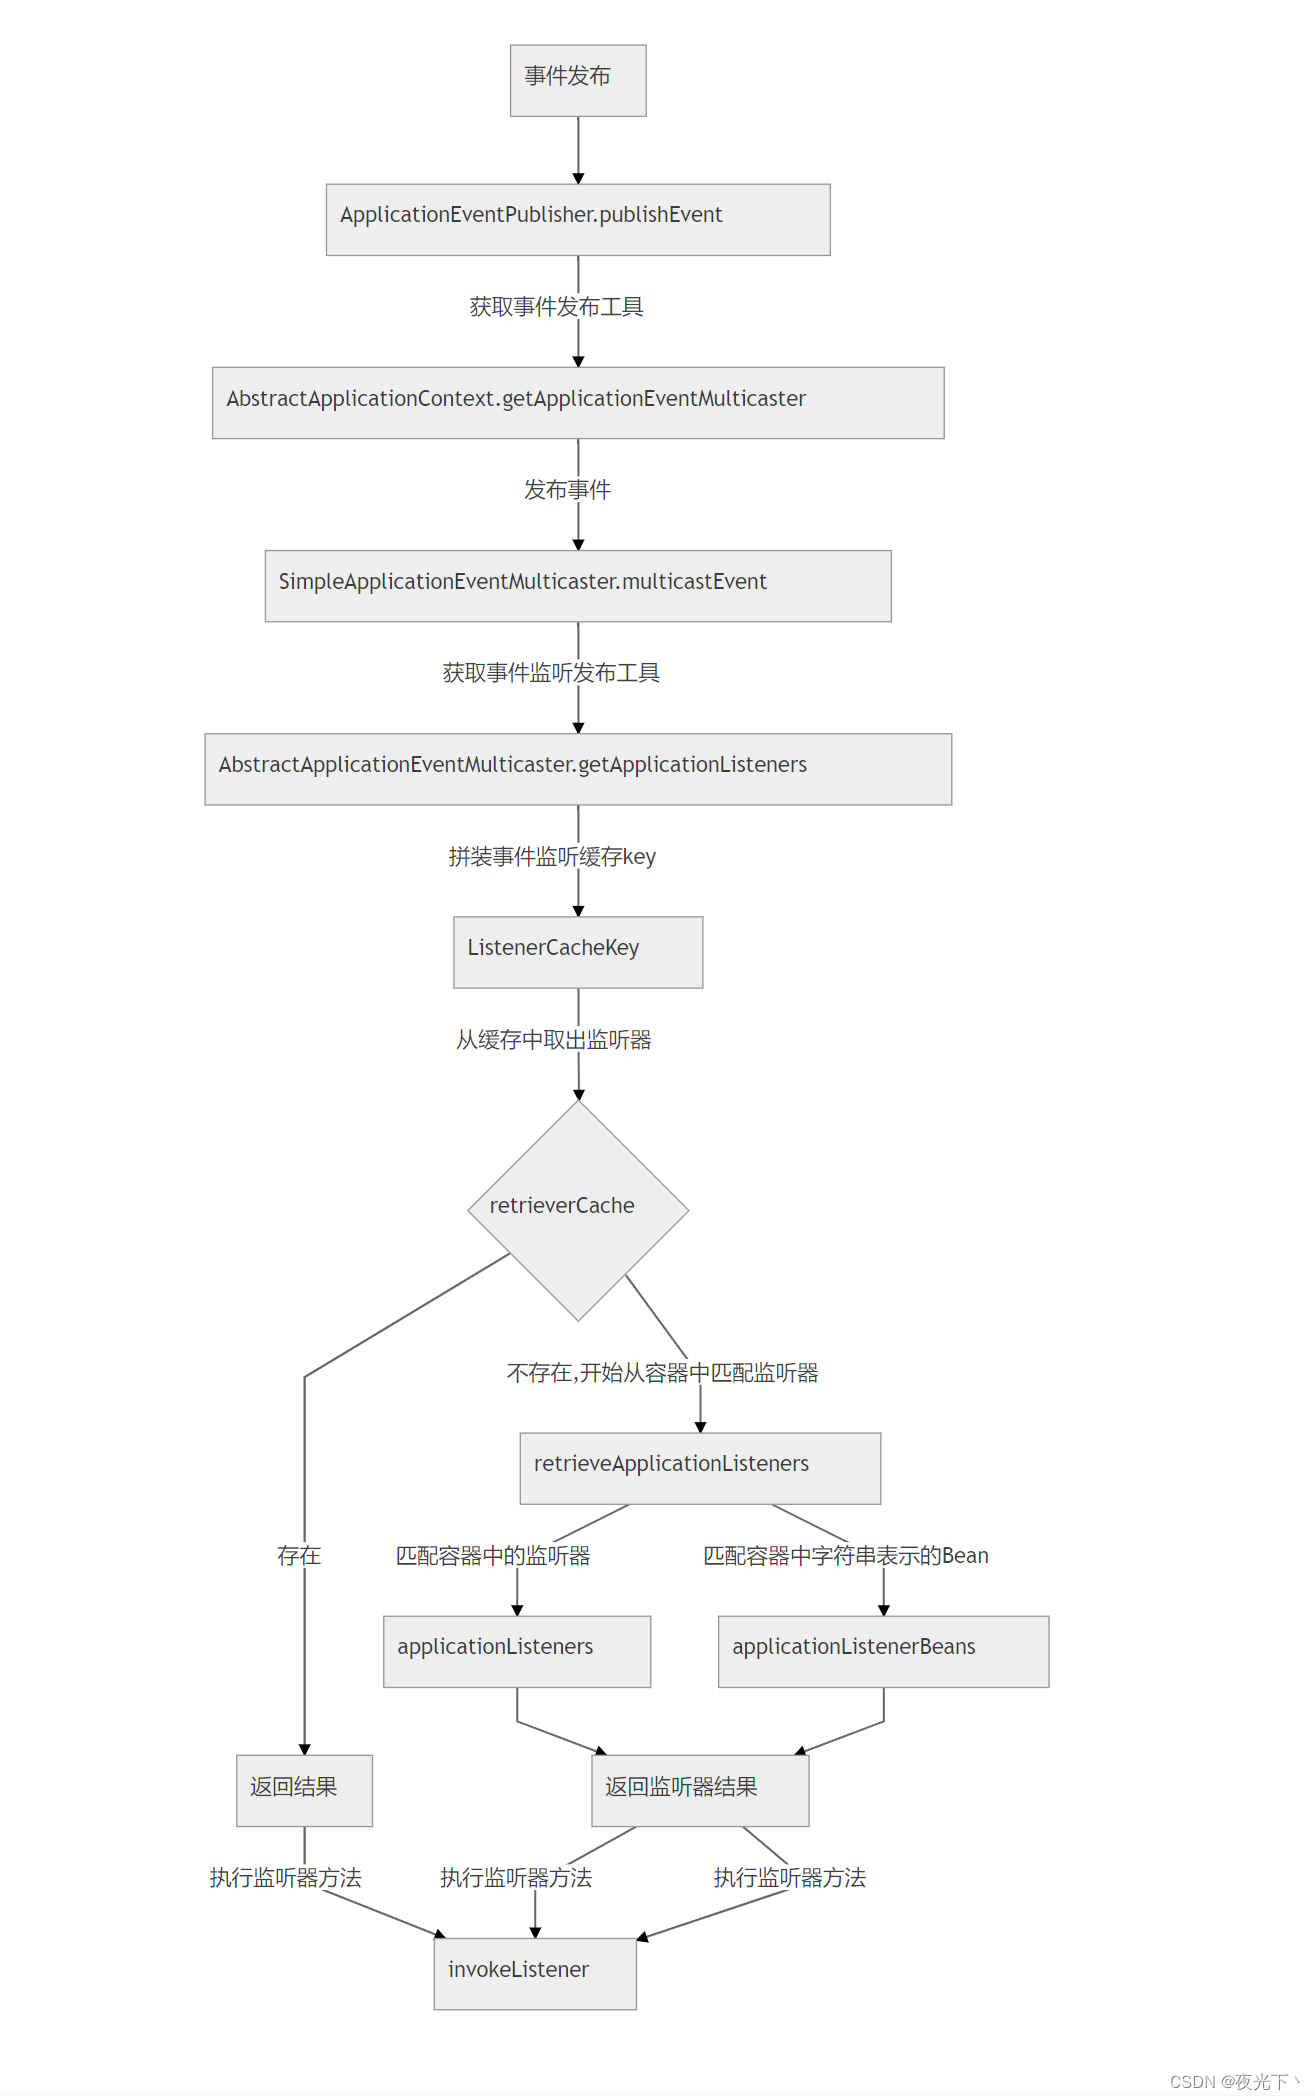
Spring 事件发布流程及源码解析
ApplicationEvent
/**
 * Class to be extended by all application events. Abstract as it
 * doesn't make sense for generic events to be published directly.
 *
 * @author Rod Johnson
 * @author Juergen Hoeller
 */
public abstract class ApplicationEvent extends EventObject {

    /** use serialVersionUID from Spring 1.2 for interoperability */
    private static final long serialVersionUID = 7099057708183571937L;

    /** System time when the event happened */
    private final long timestamp;


    /**
     * Create a new ApplicationEvent.
     * @param source the object on which the event initially occurred (never {@code null})
     */
    public ApplicationEvent(Object source) {
        super(source);
        this.timestamp = System.currentTimeMillis();
    }


    /**
     * Return the system time in milliseconds when the event happened.
     */
    public final long getTimestamp() {
        return this.timestamp;
    }
}
ApplicationEvent 继承了 JDK 中的事件对象 EventObject,在 Spring 中所有事件对象均应继承自 ApplicationEvent。在Spring基础上,其增加了事件发生时的时间戳属性以及序列化ID,并提供了通过事件源进行构建的构造方法。 Spring 中的 ApplicationEvent 设置成抽象类,由于一个单独的 ApplicationEvent 是没有任何语义的,所以需要根据不同场景进行扩展,在其之上为事件赋予意义。此类的说明中,作者也很好的说明了这一点。
ApplicationListener
JDK 中提供了 EventListener 接口,作为事件监听者标记。Spring 在 EventListener 接口的基础上,提供了 ApplicationListener 接口。该接口接收一个 ApplicationEvent 的子类,完成事件的监听流程。具体源代码如下:
/**
 * Interface to be implemented by application event listeners.
 * Based on the standard {@code java.util.EventListener} interface
 * for the Observer design pattern.
 *
 * <p>As of Spring 3.0, an ApplicationListener can generically declare the event type
 * that it is interested in. When registered with a Spring ApplicationContext, events
 * will be filtered accordingly, with the listener getting invoked for matching event
 * objects only.
 *
 * @author Rod Johnson
 * @author Juergen Hoeller
 * @param <E> the specific ApplicationEvent subclass to listen to
 * @see org.springframework.context.event.ApplicationEventMulticaster
 */
@FunctionalInterface
public interface ApplicationListener<E extends ApplicationEvent> extends EventListener {

    /**
     * Handle an application event.
     * @param event the event to respond to
     */
    void onApplicationEvent(E event);

}
该接口是一个函数型接口,提供了一个 onApplicationEvent(E extends Application) 方法定义,所有自行实现的监听者均需要实现该接口,并在该方法中进行事件的处理。
监听者注册
Spring 中,不需要我们手动进行监听器注册。ApplicationListener 对象一旦在 Spring 容器中被注册,Spring 会进行监听器的注册,实现事件的监听。
在介绍监听者注册流程之前,首先需要介绍介绍一下 org.springframework.context.event.ApplicationEventMulticaster,其主要定义了管理事件监听者,与发布事件到监听者的相关操作,若没有定义,Spring 容器将默认实例化 SimpleApplicationEventMulticaster 。
在 Spring 中,初始化容器时会调用 org.springframework.context.ConfigurableApplicationContext 接口中的 reFresh() 方法进行 Bean的加载,该方法会进行事件的监听注册。具体代码如下:
监听者注册的代码位于 org.springframework.context.supportAbstractApplicationContext 类的 refresh() 方法,如下:
@Override
public void refresh() throws BeansException, IllegalStateException {
   synchronized (this.startupShutdownMonitor) {
      StartupStep contextRefresh = this.applicationStartup.start("spring.context.refresh");

      // Prepare this context for refreshing.
      prepareRefresh();

      // Tell the subclass to refresh the internal bean factory.
      ConfigurableListableBeanFactory beanFactory = obtainFreshBeanFactory();

      // Prepare the bean factory for use in this context.
      prepareBeanFactory(beanFactory);

      try {
         // Allows post-processing of the bean factory in context subclasses.
         postProcessBeanFactory(beanFactory);

         StartupStep beanPostProcess = this.applicationStartup.start("spring.context.beans.post-process");
         // Invoke factory processors registered as beans in the context.
         invokeBeanFactoryPostProcessors(beanFactory);

         // Register bean processors that intercept bean creation.
         registerBeanPostProcessors(beanFactory);
         beanPostProcess.end();

         // Initialize message source for this context.
         initMessageSource();

         // Initialize event multicaster for this context.
         initApplicationEventMulticaster();

         // Initialize other special beans in specific context subclasses.
         onRefresh();

         // Check for listener beans and register them.
         registerListeners();

         // Instantiate all remaining (non-lazy-init) singletons.
         finishBeanFactoryInitialization(beanFactory);

         // Last step: publish corresponding event.
         finishRefresh();
      }

      catch (BeansException ex) {
         if (logger.isWarnEnabled()) {
            logger.warn("Exception encountered during context initialization - " +
                  "cancelling refresh attempt: " + ex);
         }

         // Destroy already created singletons to avoid dangling resources.
         destroyBeans();

         // Reset 'active' flag.
         cancelRefresh(ex);

         // Propagate exception to caller.
         throw ex;
      }

      finally {
         // Reset common introspection caches in Spring's core, since we
         // might not ever need metadata for singleton beans anymore...
         resetCommonCaches();
         contextRefresh.end();
      }
   }
}
在 refresh() 方法的代码中,注意以下两项:
-
调用
initApplicationEventMulticaster()方法初始化一个 ApplicationEventMulticaster,默认情况下初始化为 SimpleApplicationEventMulticaster。 -
调用
registerListeners()方法进行事件监听者的注册。该方法具体实现如下:
protected void initApplicationEventMulticaster() {
   ConfigurableListableBeanFactory beanFactory = getBeanFactory();
   if (beanFactory.containsLocalBean(APPLICATION_EVENT_MULTICASTER_BEAN_NAME)) {
      this.applicationEventMulticaster =
            beanFactory.getBean(APPLICATION_EVENT_MULTICASTER_BEAN_NAME, ApplicationEventMulticaster.class);
      if (logger.isTraceEnabled()) {
         logger.trace("Using ApplicationEventMulticaster [" + this.applicationEventMulticaster + "]");
      }
   }
   else {
      this.applicationEventMulticaster = new SimpleApplicationEventMulticaster(beanFactory);
      beanFactory.registerSingleton(APPLICATION_EVENT_MULTICASTER_BEAN_NAME, this.applicationEventMulticaster);
      if (logger.isTraceEnabled()) {
         logger.trace("No '" + APPLICATION_EVENT_MULTICASTER_BEAN_NAME + "' bean, using " +
               "[" + this.applicationEventMulticaster.getClass().getSimpleName() + "]");
      }
   }
}
protected void registerListeners() {
// Register statically specified listeners first.
for (ApplicationListener<?> listener : getApplicationListeners()) {
getApplicationEventMulticaster().addApplicationListener(listener);
}
// Do not initialize FactoryBeans here: We need to leave all regular beans
// uninitialized to let post-processors apply to them!
String[] listenerBeanNames = getBeanNamesForType(ApplicationListener.class, true, false);
for (String listenerBeanName : listenerBeanNames) {
getApplicationEventMulticaster().addApplicationListenerBean(listenerBeanName);
}
// Publish early application events now that we finally have a multicaster...
Set<ApplicationEvent> earlyEventsToProcess = this.earlyApplicationEvents;
this.earlyApplicationEvents = null;
if (!CollectionUtils.isEmpty(earlyEventsToProcess)) {
for (ApplicationEvent earlyEvent : earlyEventsToProcess) {
getApplicationEventMulticaster().multicastEvent(earlyEvent);
}
}
}由上文代码可见,注册监听者的过程主要可以分为以下三部分:
-
添加容器中指定的监听器,通常这部分添加的监听器由 Spring 控制;
-
从
BeanFactory中获取全部实现了 ApplicationListener 接口的 BeanNames,并把其推送给 ApplicationEventMulticaster -
若有需要立即执行的事件,直接执行这些事件的发布
以上三步就是 Spring 在初始化 Beans 时进行的事件监听者注册相关逻辑。在 Bean 加载过程中,就完成了事件的监听者注册,我们无需另外自行为自定义事件注册监听者。
ApplicationEventPublisher
在 Spring 中,发布一个自定义事件的过程可以由以下一行代码概括:
applicationEventPublisher.publishEvent(new SpringEvent(msg));
// applicationEventPublisher.publishEvent(new SpringEvent(this, msg));其中,applicationEventPublisher是通过 Spring 注入的 ApplicationEventPublisher 实例。在事件源中通过上述代码,便可以在 Spring 中发布一个自定义事件。使用其publishEvent方法发布任务后,代码进入了org.springframework.context.support.AbstractApplicationContext 逻辑内。
AbstractApplicationContext
整个事件发布逻辑都在这个类以及其子类中,其最终发布事件的方法是publishEvent(Object event, @Nullable ResolvableType eventType)。
protected void publishEvent(Object event, @Nullable ResolvableType eventType) {
   Assert.notNull(event, "Event must not be null");

   // 类型转换
   ApplicationEvent applicationEvent;
   if (event instanceof ApplicationEvent) {
      applicationEvent = (ApplicationEvent) event;
   }
   else {
      applicationEvent = new PayloadApplicationEvent<>(this, event);
      if (eventType == null) {
         eventType = ((PayloadApplicationEvent<?>) applicationEvent).getResolvableType();
      }
   }

   // 在早期事件,容器初始化时候使用,可以忽略
   if (this.earlyApplicationEvents != null) {
      this.earlyApplicationEvents.add(applicationEvent);
   }
   else {
       // 进行任务广播的主要逻辑
      getApplicationEventMulticaster().multicastEvent(applicationEvent, eventType);
   }

   // 方便使用父类进行发布事件,非重点
   if (this.parent != null) {
      if (this.parent instanceof AbstractApplicationContext) {
         ((AbstractApplicationContext) this.parent).publishEvent(event, eventType);
      }
      else {
         this.parent.publishEvent(event);
      }
   }
}
具体可以分为以下三步:
-
将事件分为
ApplicationEvent和PayloadApplicationEvent两部分。其中,我们在 Spring 中自定义的事件均为ApplicationEvent类型,PayloadApplicationEvent通常为 Spring 框架自身的事件; -
multicaster若还未加载,将其存入EarlyApplicationEvents队列,并在multicaster初始化成功后立即发布; -
同样发布事件到父级
ApplicationContext打法
以上三步便是发布一个事件的过程,由于我们发布的自定义事件通常在容器加载之后,且自定义事件均是 ApplicationEvent 过程,所以通常涉及到的仅是 getApplicationEventMulticaster().multicastEvent(applicationEvent, eventType) 这一行,这一行的内容分为两个部分:
-
getApplicationEventMulticaster():获得容器中的ApplicationEventMulticaster。此内容主要Spring用来辅助发布任务的工具类 -
ApplicationEventMulticaster.multicastEvent(applicationEvent, eventType):真正进行事件发布的内容。
ApplicationEventMulticaster
其为org.springframework.context.event.AbstractApplicationEventMulticaster实现类,主要为了辅助事件进行发布, 其内部发布任务主要核心逻辑在multicastEvent中。
@Override
public void multicastEvent(final ApplicationEvent event, @Nullable ResolvableType eventType) {
   ResolvableType type = (eventType != null ? eventType : resolveDefaultEventType(event));
   Executor executor = getTaskExecutor();
   for (ApplicationListener<?> listener : getApplicationListeners(event, type)) {
      if (executor != null) {
         executor.execute(() -> invokeListener(listener, event));
      }
      else {
         invokeListener(listener, event);
      }
   }
}
此处以 SimpleApplicationEventMulticaster 中的方法定义为例,作为默认注入的类型,通常我们在默认情况下的事件发布流程均遵循该实现。 从程序中可以看出,multicastEvent的主要逻辑可以分为三部分:
-
获取事件类型,主要用来获得Spring Event的实际类型。
resolveDefaultEventType(event)) -
getApplicationListeners(event, type)根据事件和事件类型去获得此事件和事件类型的监听器 -
遍历监听者集合,通过 multicaster 内持有的 Executor 进行通知,此处最后调用了 ApplicationListener 中的
onApplicationEvent方法,这一方法正是我们在自定义 ApplicationListener 时必须要覆写的方法。
AbstractApplicationEventMulticaster
获取监听器的主要逻辑在org.springframework.context.event.AbstractApplicationEventMulticaster中的getApplicationListeners(event, type)
protected Collection<ApplicationListener<?>> getApplicationListeners(
      ApplicationEvent event, ResolvableType eventType) {

   Object source = event.getSource();
   Class<?> sourceType = (source != null ? source.getClass() : null);
   ListenerCacheKey cacheKey = new ListenerCacheKey(eventType, sourceType);

   // Potential new retriever to populate
   CachedListenerRetriever newRetriever = null;

   // Quick check for existing entry on ConcurrentHashMap
   CachedListenerRetriever existingRetriever = this.retrieverCache.get(cacheKey);
   if (existingRetriever == null) {
      // Caching a new ListenerRetriever if possible
      if (this.beanClassLoader == null ||
            (ClassUtils.isCacheSafe(event.getClass(), this.beanClassLoader) &&
                  (sourceType == null || ClassUtils.isCacheSafe(sourceType, this.beanClassLoader)))) {
         newRetriever = new CachedListenerRetriever();
         existingRetriever = this.retrieverCache.putIfAbsent(cacheKey, newRetriever);
         if (existingRetriever != null) {
            newRetriever = null;  // no need to populate it in retrieveApplicationListeners
         }
      }
   }

   if (existingRetriever != null) {
      Collection<ApplicationListener<?>> result = existingRetriever.getApplicationListeners();
      if (result != null) {
         return result;
      }
      // If result is null, the existing retriever is not fully populated yet by another thread.
      // Proceed like caching wasn't possible for this current local attempt.
   }

   return retrieveApplicationListeners(eventType, sourceType, newRetriever);
}
大致流程: 通过时间类型和事件中的数据源类型,构建一个缓存key,先去缓存中获取有无此key对应的事件处理器。 如果不存在则构建一个新的ListenerRetriever,然后调用retrieveApplicationListeners方法获得监听的listener。
retrieveApplicationListeners
private Collection<ApplicationListener<?>> retrieveApplicationListeners(
      ResolvableType eventType, @Nullable Class<?> sourceType, @Nullable CachedListenerRetriever retriever) {

   List<ApplicationListener<?>> allListeners = new ArrayList<>();
   Set<ApplicationListener<?>> filteredListeners = (retriever != null ? new LinkedHashSet<>() : null);
   Set<String> filteredListenerBeans = (retriever != null ? new LinkedHashSet<>() : null);

   Set<ApplicationListener<?>> listeners;
   Set<String> listenerBeans;
   synchronized (this.defaultRetriever) {
      listeners = new LinkedHashSet<>(this.defaultRetriever.applicationListeners);
      listenerBeans = new LinkedHashSet<>(this.defaultRetriever.applicationListenerBeans);
   }

   // Add programmatically registered listeners, including ones coming
   // from ApplicationListenerDetector (singleton beans and inner beans).
   for (ApplicationListener<?> listener : listeners) {
      if (supportsEvent(listener, eventType, sourceType)) {
         if (retriever != null) {
            filteredListeners.add(listener);
         }
         allListeners.add(listener);
      }
   }

   // Add listeners by bean name, potentially overlapping with programmatically
   // registered listeners above - but here potentially with additional metadata.
   if (!listenerBeans.isEmpty()) {
      ConfigurableBeanFactory beanFactory = getBeanFactory();
      for (String listenerBeanName : listenerBeans) {
         try {
            if (supportsEvent(beanFactory, listenerBeanName, eventType)) {
               ApplicationListener<?> listener =
                     beanFactory.getBean(listenerBeanName, ApplicationListener.class);
               if (!allListeners.contains(listener) && supportsEvent(listener, eventType, sourceType)) {
                  if (retriever != null) {
                     if (beanFactory.isSingleton(listenerBeanName)) {
                        filteredListeners.add(listener);
                     }
                     else {
                        filteredListenerBeans.add(listenerBeanName);
                     }
                  }
                  allListeners.add(listener);
               }
            }
            else {
               // Remove non-matching listeners that originally came from
               // ApplicationListenerDetector, possibly ruled out by additional
               // BeanDefinition metadata (e.g. factory method generics) above.
               Object listener = beanFactory.getSingleton(listenerBeanName);
               if (retriever != null) {
                  filteredListeners.remove(listener);
               }
               allListeners.remove(listener);
            }
         }
         catch (NoSuchBeanDefinitionException ex) {
            // Singleton listener instance (without backing bean definition) disappeared -
            // probably in the middle of the destruction phase
         }
      }
   }

   AnnotationAwareOrderComparator.sort(allListeners);
   if (retriever != null) {
      if (filteredListenerBeans.isEmpty()) {
         retriever.applicationListeners = new LinkedHashSet<>(allListeners);
         retriever.applicationListenerBeans = filteredListenerBeans;
      }
      else {
         retriever.applicationListeners = filteredListeners;
         retriever.applicationListenerBeans = filteredListenerBeans;
      }
   }
   return allListeners;
}
在这个方法中主要进行的逻辑就很简单了。主要通过循环Listeners来进行监听匹配。而Listeners的来源主要为两部分:
listeners = new LinkedHashSet<>(this.defaultRetriever.applicationListeners);
listenerBeans = new LinkedHashSet<>(this.defaultRetriever.applicationListenerBeans);
一部分为容器中已经存在的监听器,一部分是监听器bean的字符串标识的名称。 applicationListenerBeans主要为了处理那些声明后还是还没有被添加进监听器集合中的bean。
事件发布的流程

版权声明:本文内容由互联网用户自发贡献,该文观点仅代表作者本人。本站仅提供信息存储空间服务,不拥有所有权,不承担相关法律责任。如发现本站有涉嫌侵权/违法违规的内容, 请发送邮件至 举报,一经查实,本站将立刻删除。
文章由极客之音整理,本文链接:https://www.bmabk.com/index.php/post/95896.html

