
文章目录
- 一、Spring框架是什么
- 二、Spring框架优点
- 三、Spring框架体系结构
- 四、Spring版本与下载
- 五、spirng框架之控制反转
- 六、spring框架之依赖注入
- 七、springIOC之实操
- 八、springAOP
- 8.1 AOP面向切面编程
- 8.2 AOP术语
- 8.3 Spring的AOP
- 九、spring整合mybatis
- 十、spring的事务
一、Spring框架是什么


spring是一个开源框架,Spring是于2003 年兴起的一个轻量级的Java 开发框架,由Rod Johnson 在其著作Expert One-On-One J2EE Development and Design中阐述的部分理念和原型衍生而来。它是为了解决企业应用开发的复杂性而创建的。框架的主要优势之一就是其分层架构,分层架构允许使用者选择使用哪一个组件,同时为 J2EE 应用程序开发提供集成的框架。Spring使用基本的JavaBean来完成以前只可能由EJB完成的事情。然而,Spring的用途不仅限于服务器端的开发。从简单性、可测试性和松耦合的角度而言,任何Java应用都可以从Spring中受益。Spring的核心是控制反转(IoC)和面向切面(AOP)。简单来说,Spring是一个分层的JavaSE/EE full-stack(一站式) 轻量级开源框架。
注意:
Spring-framework 必学
Spring Mvc 控制层 必学
SpringBoot 快速开发 必学
Spring-Security 权限管理(安全) 必学
Spring Cloud \ Spring Cloud Alibaba… 微服务框架 必学
Spring Data 持久层框架 选学
Spring全家桶~~~
Spring的主要作用就是为代码“解耦”,降低代码间的耦合度。就是让对象和对象(模块和模块)之间关系不是使用代码关联,而是通过配置来说明。即在Spring中说明对象(模块)的关系。
Spring根据代码的功能特点,使用Ioc降低业务对象之间耦合度。IoC使得主业务在相互调用过程中,不用再自己维护关系了,即不用再自己创建要使用的对象了。而是由Spring容器统一管理,自动“注入”,注入即赋值。而AOP使得系统级服务得到了最大复用,且不用再由程序员手工将系统级服务“混杂”到主业务逻辑中了,而是由Spring容器统一完成“织入”。

二、Spring框架优点
Spring 是一个框架,是一个半成品的软件。有 20个模块组成。它是一个容器管理对象,容器是装东西的,Spring 容器不装文本,数字。装的是对象。Spring 是存储对象的容器。
2.1.轻量级
Spring 框架使用的 jar 都比较小,一般在 1M 以下或者几百 kb。Spring 核心功能的所需的 jar 总共在 3M 左右。Spring 框架运行占用的资源少,运行效率高。不依赖其他 jar
2.2.针对接口编程,解耦合(面向接口编程)
Spring 提供了 Ioc 控制反转,由容器管理对象,对象的依赖关系。原来在程序代码中的对象创建方式,现在由容器完成。对象之间的依赖解耦合。
2.3.AOP 编程的支持
通过 Spring 提供的 AOP 功能,方便进行面向切面的编程,许多不容易用传统 OOP 实现的功能可以通过 AOP 轻松应付在Spring 中,开发人员可以从繁杂的事务管理代码中解脱出来,通过声明式方式灵活地进行事务的管理,提高开发效率和质量。
2.4.声明式事务的支持
只需要通过配置就可以完成对事务的管理,而无需手动编程。
SSM SSH 项目中事务管理 不需要人工处理 Spring声明式事务!
2.5.方便集成各种优秀框架
Spring 不排斥各种优秀的开源框架,相反 Spring 可以降低各种框架的使用难度,Spring提供了对各种优秀框(Struts,Hibernate、MyBatis)等的直接支持。简化框架的使用。Spring 像插线板一样,其他框架是插头,可以容易的组合到一起。需要使用哪个框架,就把这个插头放入插线板。不需要可以轻易的移除。
SSM 框架整合 Redis RabbitMQ Solr ES Quartz Kafka…
2.6.降低JavaEE API的使用难度
Spring对JavaEE开发中非常难用的一些API(JDBC、JavaMail、远程调用等),都提供了封装,使这些API应用难度大大降低。
三、Spring框架体系结构
Spring框架至今已集成了20多个模块,这些模块分布在以下模块中:
- 核心容器(Core Container)
- 数据访问/集成(Data Access/Integration)层
- Web层
- AOP(Aspect Oriented Programming)模块
- 植入(Instrumentation)模块
- 消息传输(Messaging)
- 测试(Test)模块
Spring体系结构如下图:

3.1.核心容器
Spring的核心容器是其他模块建立的基础,有Spring-core、Spring-beans、Spring-context、Spring-context-support和Spring-expression(String表达式语言)等模块组成。
- Spring-core模块:提供了框架的基本组成部分,包括控制反转(Inversion of Control,IOC)和依赖注入(Dependency Injection,DI)功能。
- Spring-beans模块:提供了BeanFactory,是工厂模式的一个经典实现,Spring将管理对象称为Bean。
- Spring-context模块:建立在Core和Beans模块的基础之上,提供一个框架式的对象访问方式,是访问定义和配置的任何对象的媒介。ApplicationContext接口是Context模块的焦点。
- Spring-context-support模块:支持整合第三方库到Spring应用程序上下文,特别是用于高速缓存(EhCache、JCache)和任务调度(CommonJ、Quartz)的支持。
- Spring-expression模块:提供了强大的表达式语言去支持运行时查询和操作对象图。这是对JSP2.1规范中规定的统一表达式语言(Unified EL)的扩展。该语言支持设置和获取属性值、属性分配、方法调用、访问数组、集合和索引器的内容、逻辑和算术运算、变量命名以及从Spring的IOC容器中以名称检索对象。它还支持列表投影、选择以及常用的列表聚合。
3.2.AOP和Instrumentation
- Spring-aop模块:提供了一个符合AOP要求的面向切面的编程实现,允许定义方法拦截器和切入点,将代码按照功能进行分离,以便干净地解耦。
- Spring-aspects模块:提供了与AspectJ的集成功能,AspectJ是一个功能强大且成熟的AOP框架。
- Spring-instrument模块:提供了类植入(Instrumentation)支持和类加载器的实现,可以在特定的应用服务器中使用。
3.3.消息
Spring4.0以后新增了消息(Spring-messaging)模块,该模块提供了对消息传递体系结构和协议的支持。
3.4.数据访问/集成
数据访问/集成层由JDBC、ORM、OXM、JMS和事务模块组成。
- Spring-jdbc模块:提供了一个JDBC的抽象层,消除了烦琐的JDBC编码和数据库厂商特有的错误代码解析。
- Spring-orm模块:为流行的对象关系映射(Object-Relational Mapping)API提供集成层,包括JPA和Hibernate。使用Spring-orm模块可以将这些O/R映射框架与Spring提供的所有其他功能结合使用,例如声明式事务管理功能。
- Spring-oxm模块:提供了一个支持对象/XML映射的抽象层实现,例如JAXB、Castor、JiBX和XStream。
- Spring-jms模块(Java Messaging Service):指Java消息传递服务,包含用于生产和使用消息的功能。自Spring4.1以后,提供了与Spring-messaging模块的集成。
- Spring-tx模块(事务模块):支持用于实现特殊接口和所有POJO(普通Java对象)类的编程和声明式事务管理。
3.5.Web
Web层由Spring-web、Spring-webmvc、Spring-websocket和Portlet模块组成。
- Spring-web模块:提供了基本的Web开发集成功能,例如多文件上传功能、使用Servlet监听器初始化一个IOC容器以及Web应用上下文。
- Spring-webmvc模块:也称为Web-Servlet模块,包含用于web应用程序的Spring MVC和REST Web Services实现。Spring MVC框架提供了领域模型代码和Web表单之间的清晰分离,并与Spring Framework的所有其他功能集成。
- Spring-websocket模块:Spring4.0以后新增的模块,它提供了WebSocket和SocketJS的实现。
Portlet模块:类似于Servlet模块的功能,提供了Portlet环境下的MVC实现。
3.6.测试
Spring-test模块支持使用JUnit或TestNG对Spring组件进行单元测试和集成测试。
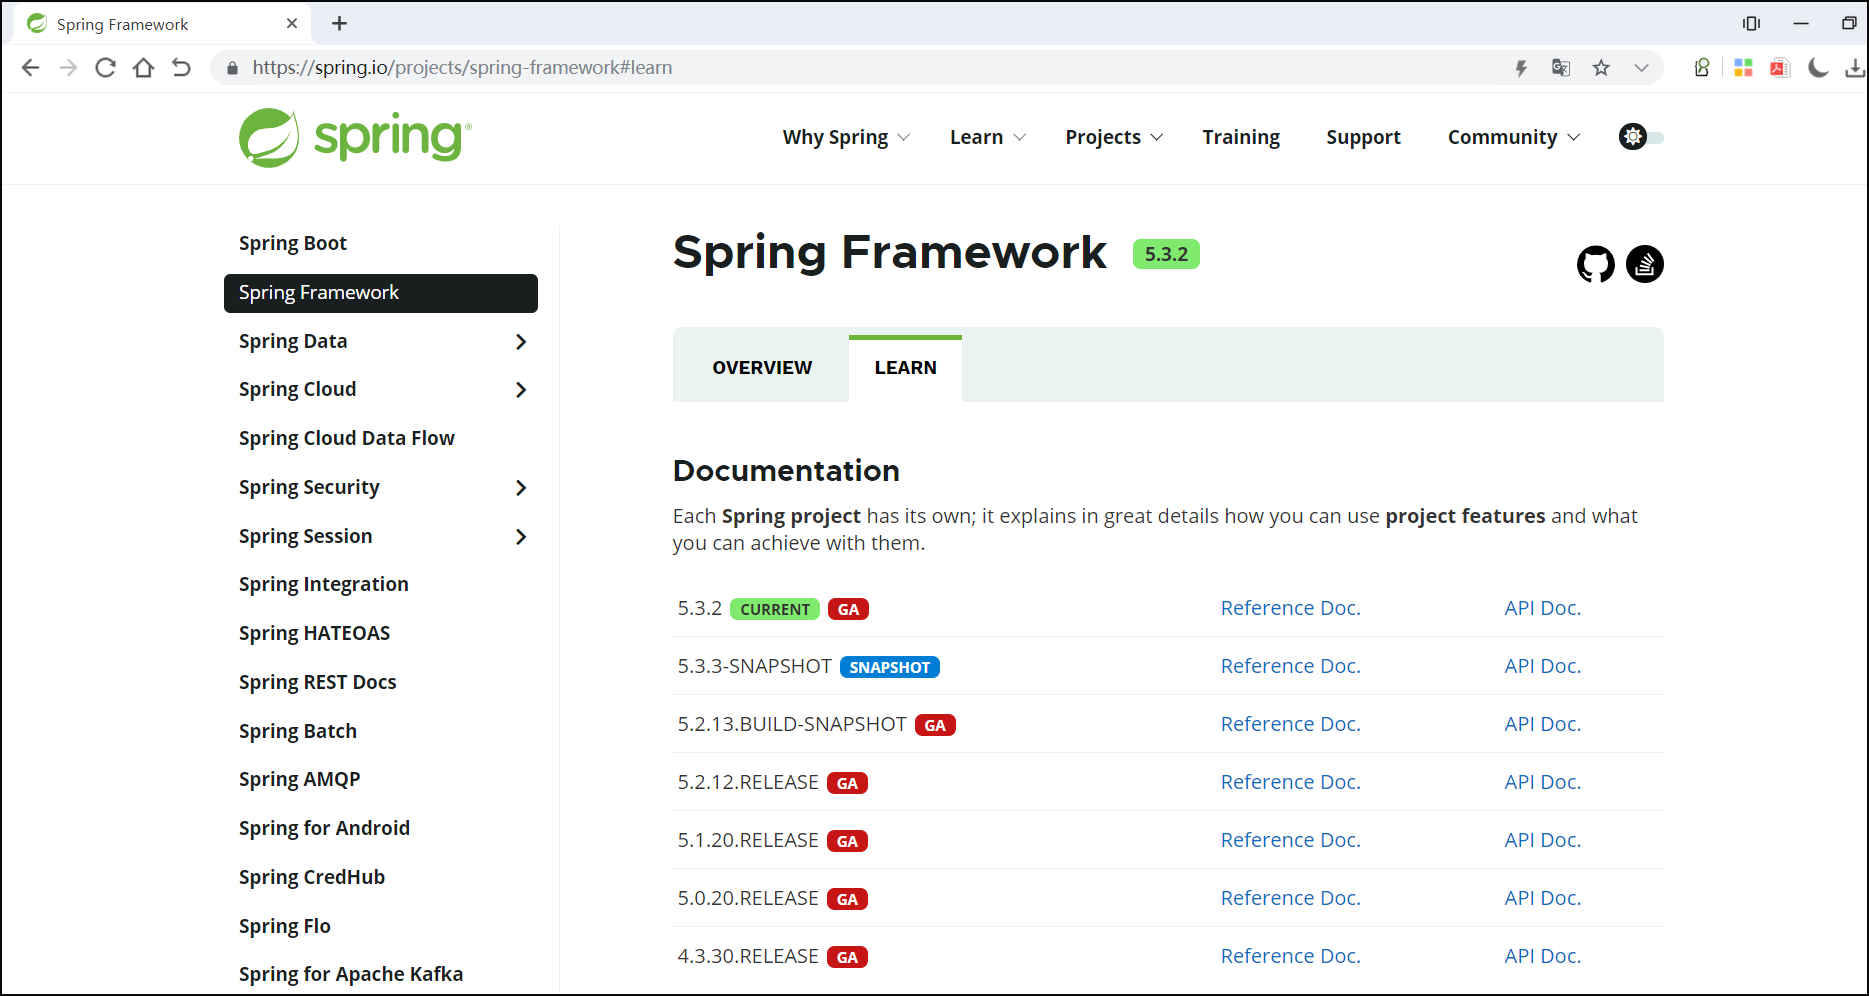
四、Spring版本与下载
4.1.Spring版本
地址:https://spring.io/projects/spring-framework#learn
4.2.下载地址
https://repo.spring.io/release/org/springframework/spring/

五、spirng框架之控制反转
5.1.耦合

Spring框架是 Java 平台的一个开源的全栈(Full-stack)应用程序框架和控制反转容器实现,一般被直接称为 Spring。该框架的一些核心功能理论上可用于任何 Java 应用,但 Spring 还为基于Java企业版平台构建的 Web 应用提供了大量的拓展支持。虽然 Spring 没有直接实现任何的编程模型,但它已经在 Java 社区中广为流行,基本上完全代替了企业级JavaBeans(EJB)模型 —— 维基百科
耦合,就是模块间关联的程度,每个模块之间的联系越多,也就是其耦合性越强,那么独立性也就越差了,所以我们在软件设计中,应该尽量做到低耦合,高内聚!
高内聚与低耦合是每个软件开发者追求的目标,那么内聚和耦合分别是什么意思呢?

内聚是从功能角度来度量模块内的联系,一个好的内聚模块应当恰好做一件事。它描述的是模块内的功能联系。
耦合是软件结构中各模块之间相互连接的一种度量,耦合强弱取决于模块间接口的复杂程度、进入或访问一个模块的点以及通过接口的数据。
生活中的例子:家里有一条串灯,上面有很多灯泡,如果灯坏了,你需要将整个灯带都换掉,这就是高耦合的表现,因为灯和灯带之间是紧密相连,不可分割的,但是如果灯泡可以随意拆卸,并不影响整个灯带,那么这就叫做低耦合!
代码中的例子:来看一个多态的调用,前提是B继承 A,引用了很多次
A a = new B();  // 父类引用 指向子类对象   里式替换原则
a.method();

A a = new C();  // 父类引用 指向子类对象   里式替换原则
a.method();

重新编译  Web源码---打包war--->编译class---->上线部署!
如果你想要把B变成C,就需要修改所有new B() 的地方为 new C() 这也就是高耦合
A a = BeanFactory().getBean(B名称);   // B名称 ---->可以写到配置文件中!!
a.method();
这个时候,我们只需要将B名称改为C,同时将配置文件中的B改为C就可以了.
5.2 分析耦合及改进
首先,我们简单的模拟一个对账户进行添加的操作,我们先采用我们以前常常使用的方式进行模拟,然后再给出改进方案,再引出今天要将的 Spring 框架,能帮助更好的理解这个框架!
5.2.1.以前的程序
首先,按照我们常规的方式先模拟,我们先将一套基本流程走下来
A:Dao 层
/**
 * 账户持久层接口
 */
public interface AccountDao {
    void addAccount();
}

/**
 * 账户持久层实现类
 */
public class AccountDaoImpl implements AccountDao {

    public void addAccount() {
        System.out.println("添加用户成功!");
    }
}
B:Service 层
/**
 * 账户业务层接口
 */
public interface AccountService {
    void addAccount();
}

/**
 * 账户业务层实现类
 */
public class AccountServiceImpl implements AccountService {

	private AccountDao accountDao = new AccountDaoImpl();

    public void addAccount() {
        accountDao.addAccount();
    }
}
C:调用
由于,我们创建的Maven工程并不是一个web工程,我们也只是为了简单模拟,所以在这里,创建了一个 Client 类,作为客户端,来测试我们的方法
public class Client {
    public static void main(String[] args) {
		AccountService  as = new AccountServiceImpl();
		as.addAccount();
    }
}
运行的结果,就是在屏幕上输出一个添加用户成功的字样
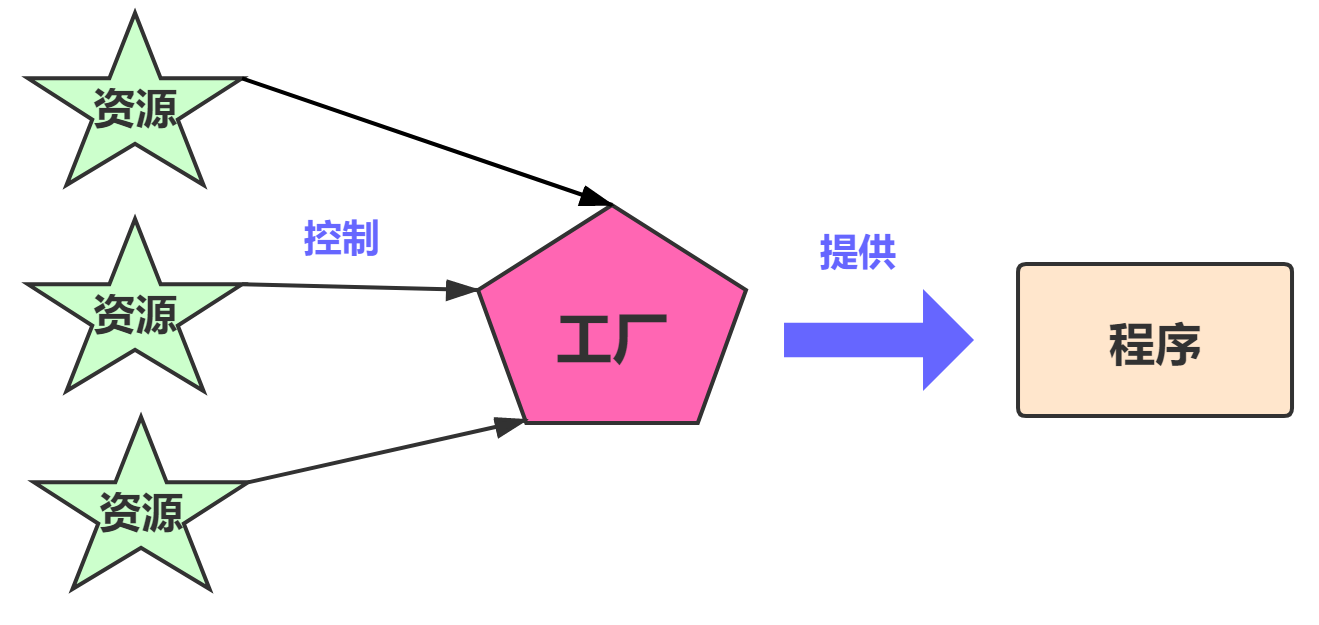
D:分析:new 的问题
上面的这段代码,应该是比较简单也容易想到的一种实现方式了,但是它的耦合性却是很高的,其中这两句代码,就是造成耦合性高的根由,因为业务层(service)调用持久层(dao),这个时候业务层将很大的依赖于持久层的接口(AccountDao)和实现类(AccountDaoImpl)
private AccountDao accountDao = new AccountDaoImpl();
AccountService as = new AccountServiceImpl();
这种通过 new 对象的方式,使得不同类之间的依赖性大大增强,其中一个类的问题,就会直接导致出现全局的问题,如果我们将被调用的方法进行错误的修改,或者说删掉某一个类,执行的结果就是:

在编译期就出现了错误,而我们作为一个开发者,我们应该努力让程序在编译期不依赖,而运行时才可以有一些必要的依赖(依赖是不可能完全消除的)所以,我们应该想办法进行解耦,要解耦就要使调用者和被调用者之间没有什么直接的联系,那么工厂模式就可以帮助我们很好的解决这个问题. 应该大家在 JavaWeb 或者 JavaSE的学习中,或多或少是有接触过工厂这个设计模式的,而工厂模式,我们简单提一下,工厂就是在调用者和被调用者之间起一个连接枢纽的作用,调用者和被调用者都只与工厂进行联系,从而减少了两者之间直接的依赖(如果有一些迷茫的朋友,可以了解一下这种设计模式)
传统模式:

工厂模式:
5.2.2.工厂模式改进
项目目录:
A:BeanFactory
具体怎么实现呢?在这里可以将 serivice 和 dao 均配置到配置文件中去(xml/properties),通过一个类读取配置文件中的内容,并使用反射技术创建对象,然后存起来,完成这个操作的类就是我们的工厂!
注:在这里我们使用了 properties ,主要是为了实现方便,xml还涉及到解析的一些代码,相对麻烦一些,不过我们下面要说的 Spring 就是使用了 xml做配置文件
- bean.properties:先写好配置文件,将 service 和 dao 以 key=value 的格式配置好
# 模拟的Spring的配置文件 key=value
dao=com.haidi8.dao.impl.AccountMysqlDaoImpl
service=com.haidi8.service.impl.AccountServiceImpl
- BeanFactory
/**
 * 对象工厂:实例化对象,并管理对象的依赖关系!!!
 */
public class BeansFactory {
    /**
     * Map中的对象是单例的!!
     */
    static Map<String, Object> beans=new HashMap<String, Object>();

    static {
        try {
            InputStream inputStream = BeansFactory.class.getClassLoader().getResourceAsStream("beans.properties");
            Properties properties=new Properties();
            properties.load(inputStream);

            String daoClassName=properties.getProperty("dao"); // com.bruce.dao.impl.AccountOracleDaoImpl
            Class dalClass=Class.forName(daoClassName);
            //调用无参数的构造方法创建对象
            Object daoObject = dalClass.newInstance();
            beans.put("dao",daoObject);
            System.out.println("dao对象创建完毕....");

            String serviceClassName=properties.getProperty("service"); // com.bruce.service.impl.AccountServiceImpl
            Class serviceClass=Class.forName(serviceClassName);
            //调用无参数的构造方法创建对象
            Object serviceObject = serviceClass.newInstance();
            beans.put("service",serviceObject);
            System.out.println("Map中对象集合1:"+beans);
            System.out.println("service对象创建完毕....");

            //把dao层对象注入到业务逻辑层中
            Field[] declaredFields = serviceClass.getDeclaredFields();
            for (Field declaredField : declaredFields) {
                Class<?> type = declaredField.getType();
                if(type== AccountDao.class){
                    //反射的方式给属性赋值
                    declaredField.setAccessible(true);
                    declaredField.set(serviceObject,daoObject);
                }
            }

        } catch (Exception e) {
            e.printStackTrace();
        }
    }

    /**
     * 获取对象
     * @param objectName
     * @return
     */
    public static Object getBean(String objectName){
        if(beans.containsKey(objectName)){
            return beans.get(objectName);
        }
        return null;
    }
}
简单的解释一下这部分代码(当然还没写完):首先就是要将配置文件中的内容读入,这里通过类加载器的方式操作,读入一个流文件,然后从中读取键值对,由于只需要执一次,所以放在静态代码块中,又因为 properties 对象在后面的方法中还要用,所以写在成员的位置.
接着在 BeanFactory 中继续编写一个 getBean 方法其中有两句核心代码的意义就是:
通过方法参数中传入的字符串,找到对应的全类名路径,实际上也就是通过刚才获取到的配置内容,通过key 找到 value值

下一句就是通过 Class 的加载方法加载这个类,实例化后返回
public static Object getBean(String beanName){
    Object bean = null;

    try {
        //根据key获取value
        String beanPath = properties.getProperty(beanName);
        bean = Class.forName(beanPath).newInstance();
    }catch (Exception e){
        e.printStackTrace();
    }
    return bean;
}
B:测试代码:
    @Test
    public void test1(){
        AccountService accountService1= (AccountService) BeansFactory.getBean("service");
        AccountService accountService2= (AccountService) BeansFactory.getBean("service");
        System.out.println(accountService1==accountService2);

        int count = accountService1.addAccount(new Account("张三", 3000.0));
        System.out.println(count>0?"新增成功":"新增失败");
    }
C:执行效果:
当我们按照同样的操作,删除掉被调用的 dao 的实现类,可以看到,这时候编译期错误已经消失了,而报出来的只是一个运行时异常,这样就解决了前面所思考的问题!

我们应该努力让程序在编译期不依赖,而运行时才可以有一些必要的依赖(依赖是不可能完全消除的)
5.2.3.小总结
为什么使用工厂模式替代了 new 的方式?
打个比方,在你的程序中,如果一段时间后,你发现在你 new 的这个对象中存在着bug或者不合理的地方,或者说你甚至想换一个持久层的框架,这种情况下,没办法,只能修改源码了,然后重新编译,部署,但是如果你使用工厂模式,你只需要重新将想修改的类,单独写好,编译后放到文件中去,只需要修改一下配置文件就可以了
【new 对象依赖的是具体事物,而不 new 则是依赖抽象事物】
依赖具体事物,这个很好理解,你依赖的是一个具体的,实实在在内容,它与你系相关,所以有什么问题,都是连环的,可能为了某个点,我们需要修改 N 个地方,绝望
依赖抽象事物,你所调用的并不是一个直接就可以触手可及的东西,是一个抽象的概念,所以不存在上面那种情况下的连环反应
5.2.4.再分析问题
到这里,似乎还不错,不过我们的程序还能够继续优化! 来分析一下:
首先在测试中,多打印几次,工厂所创建出的对象,我们写个for循环打印下
for(int i = 0; i < 4; i++){
	AccountService as = (AccountService)BeanFactory.getBean("accountService");
	System.out.println(as);
}
看下结果:特别显眼的四次输出,我们的问题也就出来了,我所创建的4个对象是不同的,也就是说,每一次调用,都会实例化一个新的对象,这也叫做多例

这有什么问题吗?
①:多次创建对象的代价就是消耗性能,导致效率会低一些
②:相比较单例,jvm会回收较多的垃圾
③:获取速度比单例慢,因为单例除了第一次,其后都是从缓存中获取
所以,我们要试着将它改成单例的,单例从表现上来看,我们查询到的对象都应该是一个
5.2.5.多例->单例之再改进
A:分析:
前面我们每一次调用都要将类进行 newInstance(),也就是实例化,想要不再创建新的对象,只需要将我们第一次创建的对象,在创建后就存到一个集合(容器)中,由于我们有查询的需求所以在 Map 和 List 中选择了 Map
B:代码:
简单解读一下:
-
首先在成员位置定义一个 Map,称作beans,至于实例化就不说了
-
通过 keys 方法,取出所有的 配置中所有的key,然后进行遍历出每一个key
-
通过每个 key 从配置中取出对应的 value 在这里就是对应类的全类名
-
将每个取出的 value,使用反射创建出对象 obj
-
将 key 与 obj 存入Map容器
-
在 getBean 方法中只需要从 Map中取就可以了
public class BeanFactory {
    //定义一个Properties对象
    private static Properties properties;
    //定义Map,作为存放对象的容器
    private static Map<String, Object> beans;

    //使用静态代码块为Properties对象赋值
    static {
        try {
            //实例化对象
            properties = new Properties();
            //获取properties文件的流对象
            InputStream in = BeanFactory.class.getClassLoader().getResourceAsStream("bean.properties");
            properties.load(in);
            //实例化容器
            beans = new HashMap<String, Object>();
            //取出所有key
            Enumeration keys = properties.keys();
            //遍历枚举
            while (keys.hasMoreElements()) {
                String key = keys.nextElement().toString();
                //根据获取到的key获取对应value
                String beanPath = properties.getProperty(key);
                //反射创对象
                Object obj = Class.forName(beanPath).newInstance();
                beans.put(key, obj);
            }

        } catch (Exception e) {
            throw new ExceptionInInitializerError("初始化properties失败");
        }
    }

    public static Object getBean(String beanName) {
        return beans.get(beanName);
    }
}
C:执行效果:

测试结果已经变成了单例的
D:单例的劣势:
单例一个很明显的问题,就是在并发情况下,可能会出现线程安全问题
因为由于单例情况下,对象只会被实例化一次,这也就说,所有请求都会共享一个 bean 实例,若一个请求改变了对象的状态,同时对象又处理别的请求,之前的请求造成的对象状态改变,可能会影响在操作时,对别的请求做了错误的处理
举个简单的例子帮助理解:
public class AccountDaoImpl implements AccountDao {
	//定义一个类成员
    private int i = 1;

    public void addAccount() {
        System.out.println("添加用户成功!");
        System.out.println(i);
        i++;
    }
}
测试中依旧是哪个循环,不过这次执行一下 addAccount() 方法

通过测试可以看到,单例的情况下,我在dao实现类中 添加了一个类成员 i,然后在方法中对其进行累加并输出操作,每一个值都会被修改,这就出现了我们担心的问题
但是回顾我们从前的编程习惯,似乎我们从未在 service 或 dao 中书写过 类成员,并在方法中对其进行操作,我们一般都是在方法内定义,而这种习惯,也保证了我们现在不会出现这样的问题
将变量定义到方法内
public class AccountDaoImpl implements AccountDao {
    public void addAccount() {
        int i = 1;
        System.out.println("添加用户成功!");
        System.out.println(i);
        i++;
    }
}
测试一下

好了这样就没有问题了!
讲这么多,就是为了配合 Spring 的学习,前面我们使用工厂模式对传统的程序进行了改造,程序不再与众多资源等直接联系,而是通过工厂进行提供分配,这种被动接受获取对象的方式就是控制反转,也是它的核心之一,现在就可以开始进入正题了
5.3 IOC控制反转
控制反转(IoC,Inversion of Control),是一个概念,是一种思想。指将传统上由程序代码直接操控的对象调用权交给容器,通过容器来实现对象的装配和管理。控制反转就是对对象控制权的转移,从程序代码本身反转到了外部容器。通过容器实现对象的创建,属性赋值,依赖的管理。
IoC 是一个概念,是一种思想,其实现方式多种多样。当前比较流行的实现方式是依赖注入。应用广泛。
依赖:classA 类中含有 classB 的实例,在 classA 中调用 classB 的方法完成功能,即 classA对 classB 有依赖。
Ioc 的实现:
依赖注入:DI(Dependency Injection),程序代码不做定位查询,这些工作由容器自行完成。依赖注入 DI 是指程序运行过程中,若需要调用另一个对象协助时,无须在代码中创建被调用者,而是依赖于外部容器,由外部容器创建后传递给程序。
Spring 的依赖注入对调用者与被调用者几乎没有任何要求,完全支持对象之间依赖关系
的管理。
Spring 框架使用依赖注入(DI)实现 IoC。
Spring 容器是一个超级大工厂,负责创建、管理所有的 Java 对象,这些 Java 对象被称为 Bean。Spring 容器管理着容器中 Bean 之间的依赖关系,Spring 使用“依赖注入”的方式。来管理 Bean 之间的依赖关系。使用 IoC 实现对象之间的解耦和。
5.3.1 第一个入门程序
现在我们就正式开始进入到 Spring 框架的学习中去,而在这部分,并不是说做增删改查,而是通过 Spring 解决依赖的问题,这也就是我们上面众多铺垫内容的原因
由于我们使用的是 maven 创建出一个普通的 java 工程就可以了,不需要创建 java web工程,当然如果不是使用 maven的朋友可以去官网下载jar包 将需要的 bean context core spel log4j 等放到lib中
A:Maven 导入坐标
<dependencies>
     <dependency>
            <groupId>org.springframework</groupId>
            <artifactId>spring-context</artifactId>
            <version>5.3.2</version>
        </dependency>
</dependencies>
B:添加配置文件bean.xml
- 引入头部文件
<?xml version="1.0" encoding="UTF-8"?>
<beans xmlns="http://www.springframework.org/schema/beans"
       xmlns:xsi="http://www.w3.org/2001/XMLSchema-instance"
       xsi:schemaLocation="http://www.springframework.org/schema/beans
        http://www.springframework.org/schema/beans/spring-beans.xsd">
</beans>
bean.xml
- 使用spring管理对象创建 (在beans标签中添加 bean标签)
- 也就是说在配置文件中,对service和dao进行配置
- id:对象的唯一标识
- class:指定要创建的对象的全限定类名
<!--把对象的创建交给spring来管理-->
<bean id="accountService" class="cn.ideal.service.impl.AccountServiceImpl"></bean>
<bean id="accountDao" class="cn.ideal.dao.impl.AccountDaoImpl"></bean>
C:测试代码
为什么用这些,等运行后说,先让程序跑起来
public class Client {
    public static void main(String[] args) {
        //获取核心容器
        ApplicationContext ac = new ClassPathXmlApplicationContext("bean.xml");
        //根据id后去Bean对象,下面两种方式都可以
        AccountService as = (AccountService)ac.getBean("accountService");
        AccountDao ad = ac.getBean("accountDao", AccountDao.class);
        System.out.println(as);
        System.out.println(ad);
    }
}
D:执行效果
程序运行起来是没有问题的,到这里一个入门例程就跑起来了

5.4 ApplicationContext
首先我们来分析一下在调用时的一些内容,测试时,第一个内容,就是获取核心容器,通过了一个 ApplicationContext 进行接收,那么它是什么呢?
A:与 BeanFactory 的区别
首先看一下这个图

可以看到 BeanFactory 才是 Spring 管理 Bean 的顶级接口,它提供了实例化对象和取出对象的功能,但是由于BeanFactory的简单与一些局限性,有时候并不是很适合于大型企业级的开发,因此,Spring提供了一个新的内容也就是 ApplicationContext:它是一个更加高级的容器,并且功能更加分丰富!
在使用时最明显的一个区别就是:两者创建对象的时间点不一样!
ApplicationContext:单例对象适用采用此接口
- 构建核心容器时,创建对象时采用立即加载的方式。即:只要一读取完配置文件马上就创建配置文件中配置的对象
BeanFactory:多例对象适合
- 构建核心容器时,创建对象时采用延迟加载的方式。即:什么时候根据id获取对象,什么时候才真正的创建对象
下面是使用 BeanFactory 进行测试的代码,不过有一些方法已经过时了,给大家参考使用,可以使用打断点的方式进行测试
Resource resource = new ClassPathResource("bean.xml");
BeanFactory factory = new XmlBeanFactory(resource);
AccountService as  = (AccountService)factory.getBean("accountService");
System.out.println(as);
5.4.1 ApplicationContext三个实现类
查看 ApplicationContext 的实现类我们要说的就是红框中的几个

ClassPathXmlApplicationContext:可以加载类路径下的配置文件,当然配置文件必须在类路径下(用的更多)
FileSystemXmlApplicationContext:可以加载磁盘任意路径下的配置文件(有磁盘访问权限)
AnnotationConfigApplicationContext:读取注解创建容器
我们由于这篇文章中并没有说注解的问题,所以我们先只看前两个
ApplicationContext ac = new ClassPathXmlApplicationContext("bean.xml");
ApplicationContext ac = new FileSystemXmlApplicationContext("D:\\bean.xml");
5.4.2 bean标签以及一些小细节
配置文件中的bean标签,它的作用是配置对象,方便 spring进行创建,介绍一下其中的常用属性:
- id:对象的唯一标识
- class:指定要创建的对象的全限定类名
- scope:指定对象的作用范围
- singleton:单例的(默认)
- prototype:多例的
- request:WEB 项目中,Spring 创建 Bean 对象,将对象存入到 request 域中
- session:WEB 项目中,Spring 创建 Bean 的对象,将对象存入到 session 域中
- global session:WEB 项目中, Portlet 环境使用,若没有 Portlet 环境那么globalSession 相当于 session
- init-method:指定类中的初始化方法名称
- destroy-method:指定类中销毁方法名称
在Spring 中默认是单例的,这也就是我们在前面的自定义工厂过程中所做的,在Spring中还需要说明,补充一下:
作用范围:
单例对象:在一个应用中只会有一个对象的实例,它的作用范围就是整个引用
多例对象:每一次访问调用对象,会重新创建对象的实例
生命周期:
单例对象:创建容器时出生,容器在则活着,销毁容器时死亡
多例对象:使用对象时出生,堆在在则或者,当对象长时间不使用,被垃圾回收回收时死亡
5.4.3 实例化Bean的三种方式
①:使用默认无参构造函数
根据默认无参构造函数来创建类对象,若没有无参构造函数,则会创建失败
<bean id="accountService" class="cn.ideal.service.impl.AccountServiceImpl"></bean>
在某些情况下,例如我们想要使用一些别人封装好的方法,很有可能存在于jar包中,并且都是 一些字节码文件,我们是没有修改的权利了,那这时候我们想要使用还可以使用下面两种方法!
②:Spring 实例工厂
使用普通工厂中的方法创建对象,存入Spring
- id:指定实例工厂中 bean 的 id
- class:实例工厂的全限定类名
- factory-method:指定实例工厂中创建对象的方法
模拟一个实例工厂,创建业务层实现类,这种情况下,必须先有工厂实例对象,才能调用方法
public class InstanceFactory {
	public AccountService createAccountService(){
		return new AccountServiceImpl();
	}
}
<bean id="instancFactory" class="cn.ideal.factory.InstanceFactory"></bean>
<bean id="accountService"factory-bean="instancFactory"factory-method="createAccountService"></bean>
③:Spring 静态工厂
使用工厂中的静态方法创建对象
- id:指定 bean id
- class:静态工厂的全限定类名
- factory-method:指定生产对象的静态方法
public class StaticFactory {
	public static IAccountService createAccountService(){
		return new AccountServiceImpl();
	}
}
<bean id="accountService"class="cn.ideal.factory.StaticFactory"
 factory-method="createAccountService"></bean>
六、spring框架之依赖注入
6.1 前言
控制反转(IoC)是一种思想,而依赖注入(Dependency Injection)则是实现这种思想的方法
其实泛概念上两者是接近的,可以简单的理解为一个概念的不同角度描述
我们前面写程序的时候,通过控制反转,使得 Spring 可以创建对象,这样减低了耦合性,但是每个类或模块之间的依赖是不可能完全消失的,而这种依赖关系,我们可以完全交给 spring 来维护。
6.2 注入分类
bean 实例在调用无参构造器创建对象后,就要对 bean 对象的属性进行初始化。初始化是由容器自动完成的,称为注入。
根据注入方式的不同,常用的有两类:set 注入、构造注入。
6.2.1 set 注入(掌握)
set 注入也叫设值注入是指,通过 setter 方法传入被调用者的实例。这种注入方式简单、直观,因而在 Spring 的依赖注入中大量使用。
A、简单类型
public class School {

    private String name;
    private String address;

    public void setName(String name) {
        this.name = name;
    }

    public void setAddress(String address) {
        this.address = address;
    }

    @Override
    public String toString() {
        return "School{" +
                "name='" + name + '\'' +
                ", address='" + address + '\'' +
                '}';
    }
}
B、beans.xml
<?xml version="1.0" encoding="UTF-8"?>
<beans xmlns="http://www.springframework.org/schema/beans"
       xmlns:xsi="http://www.w3.org/2001/XMLSchema-instance"
       xsi:schemaLocation="http://www.springframework.org/schema/beans http://www.springframework.org/schema/beans/spring-beans.xsd">

    <!--声明student对象
        注入:就是赋值的意思
        简单类型: spring中规定java的基本数据类型和String都是简单类型。
        di:给属性赋值
        1. set注入(设值注入) :spring调用类的set方法, 你可以在set方法中完成属性赋值
         1)简单类型的set注入
            <bean id="xx" class="yyy">
               <property name="属性名字" value="此属性的值"/>
               一个property只能给一个属性赋值
               <property....>
            </bean>
    -->
    <bean id="myStudent" class="com.ba01.Student" >
        <property name="name" value="李四lisi" /><!--setName("李四")-->
        <property name="age" value="22" /><!--setAge(21)-->
        <property name="email" value="lisi@qq.com" /><!--setEmail("lisi@qq.com")-->
    </bean>

</beans>
C、beans.xml
   @Test
    public void test01(){
       System.out.println("=====test01========");
       String config="ba01/applicationContext.xml";
       ApplicationContext ac = new ClassPathXmlApplicationContext(config);

       //从容器中获取Student对象
       Student myStudent =  (Student) ac.getBean("myStudent");
       System.out.println("student对象="+myStudent);
   }
创建 java.util.Date 并设置初始的日期时间:
Spring 配置文件:
 <bean id="mydate" class="java.util.Date">
     <property name="time" value="8364297429" /><!--setTime(8364297429)-->
 </bean>
测试方法:
   @Test
    public void test01(){
       System.out.println("=====test01========");
       String config="ba01/applicationContext.xml";
       ApplicationContext ac = new ClassPathXmlApplicationContext(config);

       //从容器中获取Student对象
       Student myStudent =  (Student) ac.getBean("myStudent");
       System.out.println("student对象="+myStudent);


       Date myDate = (Date) ac.getBean("mydate");
       System.out.println("myDate="+myDate);

   }
B、引用类型
当指定 bean 的某属性值为另一 bean 的实例时,通过 ref 指定它们间的引用关系。ref的值必须为某 bean 的 id 值。
public class School {

    private String name;
    private String address;

    public void setName(String name) {
        this.name = name;
    }

    public void setAddress(String address) {
        this.address = address;
    }

    @Override
    public String toString() {
        return "School{" +
                "name='" + name + '\'' +
                ", address='" + address + '\'' +
                '}';
    }
}
public class Student {

    private String name;
    private int age;

    //声明一个引用类型
    private School school;


    public Student() {
        System.out.println("spring会调用类的无参数构造方法创建对象");
    }

    // 包名.类名.方法名称
    public void setName(String name) {
        System.out.println("setName:"+name);
        this.name = name;
    }

    public void setAge(int age) {
        System.out.println("setAge:"+age);
        this.age = age;
    }

    public void setSchool(School school) {
        System.out.println("setSchool:"+school);
        this.school = school;
    }

    public String getName() {
        return name;
    }

    public int getAge() {
        return age;
    }

    @Override
    public String toString() {
        return "Student{" +
                "name='" + name + '\'' +
                ", age=" + age +
                ", school=" + school +
                '}';
    }
}
<?xml version="1.0" encoding="UTF-8"?>
<beans xmlns="http://www.springframework.org/schema/beans"
       xmlns:xsi="http://www.w3.org/2001/XMLSchema-instance"
       xsi:schemaLocation="http://www.springframework.org/schema/beans http://www.springframework.org/schema/beans/spring-beans.xsd">

    <!--声明student对象
        注入:就是赋值的意思
        简单类型: spring中规定java的基本数据类型和String都是简单类型。
        di:给属性赋值
        1. set注入(设值注入) :spring调用类的set方法, 你可以在set方法中完成属性赋值
         1)简单类型的set注入
            <bean id="xx" class="yyy">
               <property name="属性名字" value="此属性的值"/>
               一个property只能给一个属性赋值
               <property....>
            </bean>

         2) 引用类型的set注入 : spring调用类的set方法
           <bean id="xxx" class="yyy">
              <property name="属性名称" ref="bean的id(对象的名称)" />
           </bean>
    -->
    <bean id="myStudent" class="com.ba02.Student" >
        <property name="name" value="李四" />
        <property name="age" value="26" />
        <!--引用类型-->
        <property name="school" ref="mySchool" /><!--setSchool(mySchool)-->
    </bean>

    <!--声明School对象-->
    <bean id="mySchool" class="com.ba02.School">
        <property name="name" value="北京大学"/>
        <property name="address" value="北京的海淀区" />
    </bean>
</beans>
测试方法:
 @Test
  public void test01(){
     System.out.println("=====test01========");
     String config="ba02/applicationContext.xml";
     ApplicationContext ac = new ClassPathXmlApplicationContext(config);

     //从容器中获取Student对象
     Student myStudent =  (Student) ac.getBean("myStudent");
     System.out.println("student对象="+myStudent);
 }
6.2.2 构造注入(理解)
构造注入是指,在构造调用者实例的同时,完成被调用者的实例化。即,使用构造器设
置依赖关系。
举例 1:
    /**
     * 创建有参数构造方法
     */
    public Student(String myname,int myage, School mySchool){
        System.out.println("=====Student有参数构造方法======");
        //属性赋值
        this.name  = myname;
        this.age  = myage;
        this.school = mySchool;

    }
spring配置文件
<?xml version="1.0" encoding="UTF-8"?>
<beans xmlns="http://www.springframework.org/schema/beans"
       xmlns:xsi="http://www.w3.org/2001/XMLSchema-instance"
       xsi:schemaLocation="http://www.springframework.org/schema/beans http://www.springframework.org/schema/beans/spring-beans.xsd">

    <!--声明student对象
        注入:就是赋值的意思
        简单类型: spring中规定java的基本数据类型和String都是简单类型。
        di:给属性赋值
        1. set注入(设值注入) :spring调用类的set方法, 你可以在set方法中完成属性赋值
         1)简单类型的set注入
            <bean id="xx" class="yyy">
               <property name="属性名字" value="此属性的值"/>
               一个property只能给一个属性赋值
               <property....>
            </bean>

         2) 引用类型的set注入 : spring调用类的set方法
           <bean id="xxx" class="yyy">
              <property name="属性名称" ref="bean的id(对象的名称)" />
           </bean>

        2.构造注入:spring调用类有参数构造方法,在创建对象的同时,在构造方法中给属性赋值。
          构造注入使用 <constructor-arg> 标签
          <constructor-arg> 标签:一个<constructor-arg>表示构造方法一个参数。
          <constructor-arg> 标签属性:
             name:表示构造方法的形参名
             index:表示构造方法的参数的位置,参数从左往右位置是 0 , 1 ,2的顺序
             value:构造方法的形参类型是简单类型的,使用value
             ref:构造方法的形参类型是引用类型的,使用ref
    -->


    <!--使用name属性实现构造注入-->
    <bean id="myStudent" class="com.ba03.Student" >
        <constructor-arg name="myage" value="20" />
        <constructor-arg name="mySchool" ref="myXueXiao" />
        <constructor-arg name="myname" value="周良"/>
    </bean>

    <!--使用index属性-->
    <bean id="myStudent2" class="com.ba03.Student">
        <constructor-arg index="1" value="22" />
        <constructor-arg index="0" value="李四" />
        <constructor-arg index="2" ref="myXueXiao" />
    </bean>

    <!--省略index-->
    <bean id="myStudent3" class="com.ba03.Student">
        <constructor-arg  value="张强强" />
        <constructor-arg  value="22" />
        <constructor-arg  ref="myXueXiao" />
    </bean>

    <!--声明School对象-->
    <bean id="myXueXiao" class="com.ba03.School">
        <property name="name" value="清华大学"/>
        <property name="address" value="北京的海淀区" />
    </bean>

</beans>
标签中用于指定参数的属性有:
➢ name:指定参数名称。
➢ index:指明该参数对应着构造器的第几个参数,从 0 开始。不过,该属性不要也行,
但要注意,若参数类型相同,或之间有包含关系,则需要保证赋值顺序要与构造器中的参数顺序一致。
举例 2:
使用构造注入创建一个系统类 File 对象
<!--创建File,使用构造注入-->
<bean id="myfile" class="java.io.File">
    <constructor-arg name="parent" value="D:\course\JavaProjects\spring-course\ch01-hello-spring" />
    <constructor-arg name="child" value="readme.txt" />
</bean>
   @Test
    public void test01(){
       System.out.println("=====test01========");
       String config="ba03/applicationContext.xml";
       ApplicationContext ac = new ClassPathXmlApplicationContext(config);

       //从容器中获取Student对象
       Student myStudent =  (Student) ac.getBean("myStudent");
       System.out.println("student对象="+myStudent);

       File myFile = (File) ac.getBean("myfile");
       System.out.println("myFile=="+myFile.getName());

   }
**
   @Test
    public void test01(){
       System.out.println("=====test01========");
       String config="ba03/applicationContext.xml";
       ApplicationContext ac = new ClassPathXmlApplicationContext(config);

       //从容器中获取Student对象
       Student myStudent =  (Student) ac.getBean("myStudent");
       System.out.println("student对象="+myStudent);

       File myFile = (File) ac.getBean("myfile");
       System.out.println("myFile=="+myFile.getName());

   }
6.2.3 引用类型属性自动注入
对于引用类型属性的注入,也可不在配置文件中显示的注入。可以通过为<bean/>标签
设置 autowire 属性值,为引用类型属性进行隐式自动注入(默认是不自动注入引用类型属
性)。根据自动注入判断标准的不同,可以分为两种:
byName:根据名称自动注入
byType: 根据类型自动注入
6.2.3.1 byName 方式自动注入
当配置文件中被调用者 bean 的 id 值与代码中调用者 bean 类的属性名相同时,可使用byName 方式,让容器自动将被调用者 bean 注入给调用者 bean。容器是通过调用者的 bean类的属性名与配置文件的被调用者 bean 的 id 进行比较而实现自动注入的。
举例:
public class School {

    private String name;
    private String address;

    public void setName(String name) {
        this.name = name;
    }

    public void setAddress(String address) {
        this.address = address;
    }

    @Override
    public String toString() {
        return "School{" +
                "name='" + name + '\'' +
                ", address='" + address + '\'' +
                '}';
    }
}
public class Student {

    private String name;
    private int age;

    //声明一个引用类型
    private School school;


    public Student() {
        //System.out.println("spring会调用类的无参数构造方法创建对象");
    }

    public void setName(String name) {
        //System.out.println("setName:"+name);
        this.name = name;
    }

    public void setAge(int age) {
        //System.out.println("setAge:"+age);
        this.age = age;
    }

    public void setSchool(School school) {
        System.out.println("setSchool:"+school);
        this.school = school;
    }

    public String getName() {
        return name;
    }

    public int getAge() {
        return age;
    }

    @Override
    public String toString() {
        return "Student{" +
                "name='" + name + '\'' +
                ", age=" + age +
                ", school=" + school +
                '}';
    }
}
Spring配置文件:
<?xml version="1.0" encoding="UTF-8"?>
<beans xmlns="http://www.springframework.org/schema/beans"
       xmlns:xsi="http://www.w3.org/2001/XMLSchema-instance"
       xsi:schemaLocation="http://www.springframework.org/schema/beans http://www.springframework.org/schema/beans/spring-beans.xsd">


    <!--
            引用类型的自动注入: spring框架根据某些规则可以给引用类型赋值。·不用你在给引用类型赋值了
       使用的规则常用的是byName, byType.
       1.byName(按名称注入) : java类中引用类型的属性名和spring容器中(配置文件)<bean>的id名称一样,
                              且数据类型是一致的,这样的容器中的bean,spring能够赋值给引用类型。
         语法:
         <bean id="xx" class="yyy" autowire="byName">
            简单类型属性赋值
         </bean>

       2.byType(按类型注入) : java类中引用类型的数据类型和spring容器中(配置文件)<bean>的class属性
                              是同源关系的,这样的bean能够赋值给引用类型
         同源就是一类的意思:
          1.java类中引用类型的数据类型和bean的class的值是一样的。
          2.java类中引用类型的数据类型和bean的class的值父子类关系的。
          3.java类中引用类型的数据类型和bean的class的值接口和实现类关系的
         语法:
         <bean id="xx" class="yyy" autowire="byType">
            简单类型属性赋值
         </bean>
    -->
    <!--byName-->
    <bean id="myStudent" class="com.ba04.Student"  autowire="byName">
        <property name="name" value="李四" />
        <property name="age" value="26" />
        <!--引用类型-->
        <!--<property name="school" ref="mySchool" />-->
    </bean>

    <!--声明School对象-->
    <bean id="school" class="com.ba04.School">
        <property name="name" value="清华大学"/>
        <property name="address" value="北京的海淀区" />
    </bean>


</beans>
   @Test
    public void test01(){
       String config="ba04/applicationContext.xml";
       ApplicationContext ac = new ClassPathXmlApplicationContext(config);

       //从容器中获取Student对象
       Student myStudent =  (Student) ac.getBean("myStudent");
       System.out.println("student对象="+myStudent);
   }
6.2.3.2 byType 方式自动注入
使用 byType 方式自动注入,要求:配置文件中被调用者 bean 的 class 属性指定的类,
要与代码中调用者 bean 类的某引用类型属性类型同源。即要么相同,要么有 is-a 关系(子类,或是实现类)。但这样的同源的被调用 bean 只能有一个。多于一个,容器就不知该匹配
哪一个了。
举例:
public class School {

    private String name;
    private String address;

    public void setName(String name) {
        this.name = name;
    }

    public void setAddress(String address) {
        this.address = address;
    }

    @Override
    public String toString() {
        return "School{" +
                "name='" + name + '\'' +
                ", address='" + address + '\'' +
                '}';
    }
}
public class Student {

    private String name;
    private int age;

    //声明一个引用类型
    private School school;
    private School school2;


    public Student() {
        //System.out.println("spring会调用类的无参数构造方法创建对象");
    }

    public void setName(String name) {
        //System.out.println("setName:"+name);
        this.name = name;
    }

    public void setAge(int age) {
        //System.out.println("setAge:"+age);
        this.age = age;
    }

    public void setSchool(School school) {
        System.out.println("setSchool:"+school);
        this.school = school;
    }

    public void setSchool2(School school2) {
        System.out.println("setSchool2222222:"+school);
        this.school2 = school2;
    }

    public String getName() {
        return name;
    }

    public int getAge() {
        return age;
    }

    @Override
    public String toString() {
        return "Student{" +
                "name='" + name + '\'' +
                ", age=" + age +
                ", school=" + school +
                ", school2=" + school2 +
                '}';
    }
}
// 子类
public class PrimarySchool extends  School {
}
Spring配置文件:
<?xml version="1.0" encoding="UTF-8"?>
<beans xmlns="http://www.springframework.org/schema/beans"
       xmlns:xsi="http://www.w3.org/2001/XMLSchema-instance"
       xsi:schemaLocation="http://www.springframework.org/schema/beans http://www.springframework.org/schema/beans/spring-beans.xsd">


    <!--
            引用类型的自动注入: spring框架根据某些规则可以给引用类型赋值。·不用你在给引用类型赋值了
       使用的规则常用的是byName, byType.
       1.byName(按名称注入) : java类中引用类型的属性名和spring容器中(配置文件)<bean>的id名称一样,
                              且数据类型是一致的,这样的容器中的bean,spring能够赋值给引用类型。
         语法:
         <bean id="xx" class="yyy" autowire="byName">
            简单类型属性赋值
         </bean>

       2.byType(按类型注入) : java类中引用类型的数据类型和spring容器中(配置文件)<bean>的class属性
                              是同源关系的,这样的bean能够赋值给引用类型
         同源就是一类的意思:
          1.java类中引用类型的数据类型和bean的class的值是一样的。
          2.java类中引用类型的数据类型和bean的class的值父子类关系的。
          3.java类中引用类型的数据类型和bean的class的值接口和实现类关系的
         语法:
         <bean id="xx" class="yyy" autowire="byType">
            简单类型属性赋值
         </bean>

         注意:在byType中, 在xml配置文件中声明bean只能有一个符合条件的,
              多余一个是错误的
    -->
    <!--byType-->
    <bean id="myStudent" class="com.ba05.Student"  autowire="byType">
        <property name="name" value="张飒" />
        <property name="age" value="26" />
        <!--引用类型-->
        <!--<property name="school" ref="mySchool" />-->
    </bean>

    <!--声明School对象-->
    <bean id="mySchool" class="com.ba05.School">
        <property name="name" value="人民大学"/>
        <property name="address" value="北京的海淀区" />
    </bean>

    <!--声明School的子类-->
    <!--<bean id="primarySchool" class="com.ba05.PrimarySchool">
        <property name="name" value="北京小学" />
        <property name="address" value="北京的大兴区" />
    </bean>-->
</beans>
测试:
 @Test
  public void test01(){
     String config="ba05/applicationContext.xml";
     ApplicationContext ac = new ClassPathXmlApplicationContext(config);

     //从容器中获取Student对象
     Student myStudent =  (Student) ac.getBean("myStudent");
     System.out.println("student对象="+myStudent);
 }
6.2.3.3 为应用指定多个 Spring 配置文件
在实际应用里,随着应用规模的增加,系统中 Bean 数量也大量增加,导致配置文件变
得非常庞大、臃肿。为了避免这种情况的产生,提高配置文件的可读性与可维护性,可以将Spring 配置文件分解成多个配置文件。
包含关系的配置文件:
多个配置文件中有一个总文件,总配置文件将各其它子文件通过<import/>引入。在 Java代码中只需要使用总配置文件对容器进行初始化即可。
举例:
public class School {

    private String name;
    private String address;

    public void setName(String name) {
        this.name = name;
    }

    public void setAddress(String address) {
        this.address = address;
    }

    @Override
    public String toString() {
        return "School{" +
                "name='" + name + '\'' +
                ", address='" + address + '\'' +
                '}';
    }
}
public class Student {

    private String name;
    private int age;

    //声明一个引用类型
    private School school;


    public Student() {
        //System.out.println("spring会调用类的无参数构造方法创建对象");
    }

    public void setName(String name) {
        //System.out.println("setName:"+name);
        this.name = name;
    }

    public void setAge(int age) {
        //System.out.println("setAge:"+age);
        this.age = age;
    }

    public void setSchool(School school) {
        System.out.println("setSchool:"+school);
        this.school = school;
    }


    public String getName() {
        return name;
    }


    @Override
    public String toString() {
        return "Student{" +
                "name='" + name + '\'' +
                ", age=" + age +
                ", school=" + school +
                '}';
    }
}
spring-school.xml
<?xml version="1.0" encoding="UTF-8"?>
<beans xmlns="http://www.springframework.org/schema/beans"
       xmlns:xsi="http://www.w3.org/2001/XMLSchema-instance"
       xsi:schemaLocation="http://www.springframework.org/schema/beans http://www.springframework.org/schema/beans/spring-beans.xsd">


    <!--School模块所有bean的声明, School模块的配置文件-->
    <!--声明School对象-->
    <bean id="mySchool" class="com.ba06.School">
        <property name="name" value="航空大学"/>
        <property name="address" value="北京的海淀区" />
    </bean>

</beans>
spring-student.xml
<?xml version="1.0" encoding="UTF-8"?>
<beans xmlns="http://www.springframework.org/schema/beans"
       xmlns:xsi="http://www.w3.org/2001/XMLSchema-instance"
       xsi:schemaLocation="http://www.springframework.org/schema/beans http://www.springframework.org/schema/beans/spring-beans.xsd">


    <!--
      student模块所有bean的声明
    -->
    <!--byType-->
    <bean id="myStudent" class="com.ba06.Student"  autowire="byType">
        <property name="name" value="张飒" />
        <property name="age" value="30" />
        <!--引用类型-->
        <!--<property name="school" ref="mySchool" />-->
    </bean>

</beans>
total.xml
<?xml version="1.0" encoding="UTF-8"?>
<beans xmlns="http://www.springframework.org/schema/beans"
       xmlns:xsi="http://www.w3.org/2001/XMLSchema-instance"
       xsi:schemaLocation="http://www.springframework.org/schema/beans http://www.springframework.org/schema/beans/spring-beans.xsd">

    <!--
         包含关系的配置文件:
         spring-total表示主配置文件 : 包含其他的配置文件的,主配置文件一般是不定义对象的。
         语法:<import resource="其他配置文件的路径" />
         关键字:"classpath:" 表示类路径(class文件所在的目录),
               在spring的配置文件中要指定其他文件的位置, 需要使用classpath,告诉spring到哪去加载读取文件。
    -->

    <!--加载的是文件列表-->
    <!--
    <import resource="classpath:ba06/spring-school.xml" />
    <import resource="classpath:ba06/spring-student.xml" />
    -->

    <!--
       在包含关系的配置文件中,可以通配符(*:表示任意字符)
       注意: 主的配置文件名称不能包含在通配符的范围内(不能叫做spring-total.xml)
    -->
    <import resource="classpath:ba06/spring-*.xml" />
</beans>
测试:
@Test
 public void test01(){
   //加载的是总的文件
    String config= "ba06/total.xml";
    ApplicationContext ac = new ClassPathXmlApplicationContext(config);

    //从容器中获取Student对象
    Student myStudent =  (Student) ac.getBean("myStudent");
    System.out.println("student对象="+myStudent);
}
6.2.3.4 注入集合属性
为了演示这些方式,我们在成员中将常见的一些集合都写出来,然后补充其 set 方法
private String[] strs;
private List<String> list;
private Set<String> set;
private Map<String,String> map;
private Properties props;
在配置中也是很简单的,只需要按照下列格式写标签就可以了,可以自己测试一下
<bean id="accountService" class="cn.ideal.service.impl.AccountServiceImpl">
	<property name="strs">
		<array>
            <value>张三</value>
            <value>李四</value>
            <value>王五</value>
        </array>
    </property>

    <property name="list">
        <list>
            <value>张三</value>
            <value>李四</value>
            <value>王五</value>
        </list>
    </property>

    <property name="set">
        <set>
            <value>张三</value>
            <value>李四</value>
            <value>王五</value>
        </set>
    </property>

    <property name="map">
        <map>
            <entry key="name" value="张三"></entry>
            <entry key="age" value="21"></entry>
        </map>
    </property>

    <property name="props">
        <props>
            <prop key="name">张三</prop>
            <prop key="age">21</prop>
        </props>
    </property>
 </bean>
6.3 基于注解的 DI
对于 DI 使用注解,将不再需要在 Spring 配置文件中声明 bean 实例。Spring 中使用注解,需要在原有 Spring 运行环境基础上再做一些改变。
需要在 Spring 配置文件中配置组件扫描器,用于在指定的基本包中扫描注解。
<?xml version="1.0" encoding="UTF-8"?>
<beans xmlns="http://www.springframework.org/schema/beans"
       xmlns:xsi="http://www.w3.org/2001/XMLSchema-instance"
       xmlns:context="http://www.springframework.org/schema/context"
       xsi:schemaLocation="http://www.springframework.org/schema/beans
       http://www.springframework.org/schema/beans/spring-beans.xsd
       http://www.springframework.org/schema/context
       https://www.springframework.org/schema/context/spring-context.xsd">

    <!--声明组件扫描器(component-scan),组件就是java对象
        base-package:指定注解在你的项目中的包名。
        component-scan工作方式: spring会扫描遍历base-package指定的包,
           把包中和子包中的所有类,找到类中的注解,按照注解的功能创建对象,或给属性赋值。

       加入了component-scan标签,配置文件的变化:
        1.加入一个新的约束文件spring-context.xsd
        2.给这个新的约束文件起个命名空间的名称
    -->
    <context:component-scan base-package="com.ba02" />

</beans>
指定多个包的三种方式:
- 使用多个 context:component-scan 指定不同的包路径
<context:component-scan base-package="com.ba02" />
<context:component-scan base-package="com.ba03" />
- 指定 base-package 的值使用分隔符
分隔符可以使用逗号(,)分号(;)还可以使用空格,不建议使用空格。
逗号分隔:
<context:component-scan base-package="com.ba02,com.ba03" />
分号分隔:
<context:component-scan base-package="com.ba02;com.ba03" />
- base-package 是指定到父包名
base-package 的值表是基本包,容器启动会扫描包及其子包中的注解,当然也会扫描到子包下级的子包。所以 base-package 可以指定一个父包就可以。
<context:component-scan base-package="com.bruce" />
或者最顶级的父包
<context:component-scan base-package="com" />
但不建议使用顶级的父包,扫描的路径比较多,导致容器启动时间变慢。指定到目标包和合适的。也就是注解所在包全路径。
6.3.1 定义 Bean 的注解@Component(掌握)
需要在类上使用注解@Component,该注解的 value 属性用于指定该 bean 的 id 值。

另外,Spring 还提供了 3 个创建对象的注解:
➢ @Repository 用于对 DAO 实现类进行注解
➢ @Service 用于对 Service 实现类进行注解
➢ @Controller 用于对 Controller 实现类进行注解
这三个注解与@Component 都可以创建对象,但这三个注解还有其他的含义,@Service
创建业务层对象,业务层对象可以加入事务功能,@Controller 注解创建的对象可以作为处
理器接收用户的请求。
@Repository,@Service,@Controller 是对@Component 注解的细化,标注不同层的对
象。即持久层对象,业务层对象,控制层对象。
@Component 不指定 value 属性,bean 的 id 是类名的首字母小写。


6.3.2 简单类型属性注入@Value(掌握)
需要在属性上使用注解@Value,该注解的 value 属性用于指定要注入的值。使用该注解完成属性注入时,类中无需 setter。当然,若属性有 setter,则也可将其加
到 setter 上。
举例:

6.3.3 byType 自动注入@Autowired(掌握)
需要在引用属性上使用注解@Autowired,该注解默认使用按类型自动装配 Bean 的方式。
使用该注解完成属性注入时,类中无需 setter。当然,若属性有 setter,则也可将其加到 setter 上。
举例:


6.3.4 byName 自动注入@Autowired 与@Qualifier(掌握)
需要在引用属性上联合使用注解@Autowired 与@Qualifier。@Qualifier 的 value 属性用于指定要匹配的 Bean 的 id 值。类中无需 set 方法,也可加到 set 方法上。
举例:

@Autowired 还有一个属性 required,默认值为 true,表示当匹配失败后,会终止程序运行。若将其值设置为 false,则匹配失败,将被忽略,未匹配的属性值为 null。

6.3.5 JDK 注解@Resource 自动注入(掌握)
Spring提供了对 jdk中@Resource注解的支持。@Resource 注解既可以按名称匹配Bean,也可以按类型匹配 Bean。默认是按名称注入。使用该注解,要求 JDK 必须是 6 及以上版本。
@Resource 可在属性上,也可在 set 方法上。
6.3.5.1 byType 注入引用类型属性
@Resource 注解若不带任何参数,采用默认按名称的方式注入,按名称不能注入 bean,则会按照类型进行 Bean 的匹配注入。
举例:

6.3.5.2 byName 注入引用类型属性
@Resource 注解指定其 name 属性,则 name 的值即为按照名称进行匹配的 Bean 的 id。

6.4.注解与XML的对比
注解优点是:
- 方便
- 直观
- 高效(代码少,没有配置文件的书写那么复杂)。
注解缺点是:
- 以硬编码的方式写入到 Java 代码中,修改是需要重新编译代码的。
XML 方式优点是:
- 配置和代码是分离的
- 在 xml 中做修改,无需编译代码,只需重启服务器即可将新的配置加载。
xml 的缺点是:
- 编写麻烦,效率低,大型项目过于复杂。
6.5 要点:
加载配置文件的方式:


获取类对象的另一种方式:

spring框架体系:

springbean的作用域:

七、springIOC之实操
7.1 引言
前面花大量内容,重点学习了 Spring入门 的一些思想,以及简单的学习了 IOC基础 以及基于XML的配置方式和注解方式。下面就来完成一个对单表进行 CURD 的案例,加深IOC的理解。
7.2 准备代码与环境
7.2.1 添加必要的依赖
- spring-context
- mysql-connector-java
- c3p0(数据库连接池)
- commons-dbutils(简化JDBC的工具)
- junit (单元自测)
说明:由于我这里创建的是一个Maven项目,所以在这里修改 pom.xml 添加一些必要的依赖坐标就可以。如果创建时没有使用依赖的朋友,去下载我们所需要的 jar 包导入就可以了
<dependencies>
        <dependency>
            <groupId>org.springframework</groupId>
            <artifactId>spring-context</artifactId>
            <version>5.0.2.RELEASE</version>
        </dependency>

        <dependency>
            <groupId>mysql</groupId>
            <artifactId>mysql-connector-java</artifactId>
            <version>5.1.6</version>
        </dependency>

        <dependency>
            <groupId>c3p0</groupId>
            <artifactId>c3p0</artifactId>
            <version>0.9.1.2</version>
        </dependency>

        <dependency>
            <groupId>commons-dbutils</groupId>
            <artifactId>commons-dbutils</artifactId>
            <version>1.4</version>
        </dependency>

        <dependency>
            <groupId>junit</groupId>
            <artifactId>junit</artifactId>
            <version>4.12</version>
            <scope>test</scope>
        </dependency>
</dependencies>
7.2.2 创建账户表以及实体
A:创建 Account 表
-- ----------------------------
-- Table structure for account
-- ----------------------------
CREATE TABLE `account`  (
  `id` int(11) NOT NULL AUTO_INCREMENT,
  `name` varchar(32),
  `balance` float,
  PRIMARY KEY (`id`)
)
B.创建 Account 类
没什么好说的,对应着我们的表创出实体
public class Account implements Serializable {
    private  Integer id;
    private String name;
    private Float balance;
    ......补充 get set toString 方法
7.2.3 创建Service以及Dao
A:AccountService 接口
public interface AccountService {

    void add(Account account);

    void delete(Integer accpuntId);

    void update(Account account);

    List<Account> findAll();

    Account findById(Integer accountId);
}
B:AccountServiceImpl 实现类
public class AccountServiceImpl implements AccountService {

    private AccountDao accountDao;

    public void setAccountDao(AccountDao accountDao) {
        this.accountDao = accountDao;
    }

    public void add(Account account) {
        accountDao.addAccount(account);
    }

    public void delete(Integer accpuntId) {
        accountDao.deleteAccount(accpuntId);
    }

    public void update(Account account) {
        accountDao.updateAccount(account);
    }

    public List<Account> findAll() {
        return accountDao.findAllAccount();
    }

    public Account findById(Integer accountId) {
        return accountDao.findAccountById(accountId);
    }
}
C:AccountDao 接口
public interface AccountDao {

    void addAccount(Account account);

    void deleteAccount(Integer accountId);

    void updateAccount(Account account);

    List<Account> findAllAccount();

    Account findAccountById(Integer accountId);
}
D:AccountDaoImpl 实现类
由于今天要完成的是一个增删改查的操作,所以我们引入了 DBUtils 这样一个操作数据库的工具,它的作用就是封装代码,达到简化 JDBC 操作的目的,由于以后整合 SSM 框架的时候,持久层的事情就可以交给 MyBatis 来做,而今天我们重点还是讲解 Spring 中的知识,所以这部分会用就可以了,重点看 XML 与 注解 两种配置方式
用到的内容基本讲解:
QueryRunner提供对 sql 语句进行操作的 API (insert delete update)ResultSetHander接口,定义了查询后,如何封装结果集(仅提供了我们用到的)
BeanHander:将结果集中第第一条记录封装到指定的 JavaBean 中
BeanListHandler:将结果集中的所有记录封装到指定的 JavaBean 中,并且将每一个 JavaBean封装到 List 中去
public class AccountDaoImpl implements AccountDao {


    private QueryRunner runner;

    public void setRunner(QueryRunner runner) {
        this.runner = runner;
    }

    public void addAccount(Account account) {
        try {
            runner.update("insert into account(name,balance)values(?,?)", account.getName(), account.getBalance());
        } catch (Exception e) {
            throw new RuntimeException(e);
        }
    }


    public void updateAccount(Account account) {
        try {
            runner.update("update account set name=?,balance=? where id=?", account.getName(), account.getBalance(), account.getId());
        } catch (Exception e) {
            throw new RuntimeException(e);
        }
    }

    public void deleteAccount(Integer accountId) {
        try {
            runner.update("delete from account where id=?", accountId);
        } catch (Exception e) {
            throw new RuntimeException(e);
        }
    }

    public List<Account> findAllAccount() {
        try {
            return runner.query("select * from account", new BeanListHandler<Account>(Account.class));
        } catch (Exception e) {
            throw new RuntimeException(e);
        }
    }

    public Account findAccountById(Integer accountId) {
        try {
            return runner.query("select * from account where id = ? ", new BeanHandler<Account>(Account.class), accountId);
        } catch (Exception e) {
            throw new RuntimeException(e);
        }
    }
}
7.3 XML配置方式
在这里有两基本的方式,一是通过构造函数注入,另一种就是通过Set注入,实际上所做的就是,使用类的构造函数或者Set给成员变量进行赋值,但特别的是,这里是通过配置,使用 Spring 框架进行注入首先就是头部的依赖信息,顺便提一句,当然我们可以去官网查找贴过来.

先把针对上面功能的具体配置代码贴出来
<?xml version="1.0" encoding="UTF-8"?>
<beans xmlns="http://www.springframework.org/schema/beans"
       xmlns:xsi="http://www.w3.org/2001/XMLSchema-instance"
       xsi:schemaLocation="http://www.springframework.org/schema/beans
       http://www.springframework.org/schema/beans/spring-beans.xsd">

    <!--配置Service-->
    <bean id="accountService" class="cn.ideal.service.impl.AccountServiceImpl">
        <property name="accountDao" ref="accountDao"></property>
    </bean>

    <!--配置Dao-->
    <bean id="accountDao" class="cn.ideal.dao.impl.AccountDaoImpl">
        <property name="runner" ref="runner"></property>
    </bean>

    <!--配置 QueryRunner-->
    <bean id="runner" class="org.apache.commons.dbutils.QueryRunner">
        <!--注入数据源-->
        <constructor-arg name="ds" ref="dataSource"></constructor-arg>
    </bean>

    <!--配置数据源-->
    <bean id="dataSource" class="com.mchange.v2.c3p0.ComboPooledDataSource">
        <property name="driverClass" value="com.mysql.jdbc.Driver"></property>
        <property name="jdbcUrl" value="jdbc:mysql://localhost:3306/ideal_spring"></property>
        <property name="user" value="root"></property>
        <property name="password" value="root99"></property>

    </bean>
</beans>
7.3.1 Set方式
顾名思义,就是通过去找你给出对应的 Set 方法,然后对成员变量进行赋值,先看下类中的代码
public class AccountServiceImpl implements AccountService {
	//成员
    private AccountDao accountDao;
	//Set方法
    public void setAccountDao(AccountDao accountDao) {
        this.accountDao = accountDao;
    }

    ...... 下面是增删改查的方法
}
这是 bean.xml 中的配置
<!--配置Service-->
<bean id="accountService" class="cn.ideal.service.impl.AccountServiceImpl">
    <property name="accountDao" ref="accountDao"></property>
</bean>
然后 property 配置的过程中,有一些属性需要说一下
- name:与成员变量名无关,与set方法后的名称有关,例如 setAccountDao() 获取到的就是accountDao,并且已经小写了开头
- value:这里可以写基本数据类型和 String
- ref:这里可以引入另一个bean,帮助我们给其他类型赋值 (例如这里就通过 ref 引入了下面 id 值为accountDao的 bean)
当然,以后可能会见到一种方式就是 使用 p名称空间注入数据 (本质还是set)
头部中需要修改引入这一句
xmlns:p=“http://www.springframework.org/schema/p”
7.3.2 构造函数方式
下面就是使用构造函数的一种方式,这一种的前提就是:类中必须提供一个和参数列表相对应的构造函数
由于我们选择的是 DBUtils 这样一个工具,而它为我们提供了两种构造函数,即带参和无参,所以我们可以在其中注入数据源,也可以使得每一条语句都独立事务
还有一点需要说明的就是:我们下面的数据源使用了 c3p0 这只是一种选择方式,并不是一定的,是因为使用 DBUtils 的时候需要手动传递一个 Connection 对象!
<!--配置 QueryRunner-->
<bean id="runner" class="org.apache.commons.dbutils.QueryRunner">
    <!--注入数据源-->
    <constructor-arg name="ds" ref="dataSource"></constructor-arg>
</bean>
来说一下所涉及到的标签:
- constructor-arg(放在 bean 标签内) 再说一说其中的一些属性值
- 给谁赋值:
index:指定参数在构造函数参数列表的索引位置
type:指定参数在构造函数中的数据类型
name:指定参数在构造函数中的名称(更常用) - 赋什么值:
value:这里可以写基本数据类型和 String
ref:这里可以引入另一个bean,帮助我们给其他类型赋值
7.3.3 测试代码
public class AccountServiceTest {

    private ApplicationContext ac = new ClassPathXmlApplicationContext("bean.xml");
    private AccountService as = ac.getBean("accountService", AccountService.class);

    @Test
    public void testAdd(){
        Account account = new Account();
        account.setName("jack");
        account.setBalance(1000f);
        as.add(account);
    }

    @Test
    public void testUpdate(){
        Account account = as.findById(4);
        account.setName("杰克");
        account.setBalance(1500f);
        as.update(account);
    }

    @Test
    public void testFindAll(){
        List<Account> list = as.findAll();
        for(Account account : list) {
            System.out.println(account);
        }
    }

    @Test
    public void testDelete(){
        as.delete(4);
    }
}
7.4 注解配置方式
bean
@Data
@NoArgsConstructor
@AllArgsConstructor
public class Account {

    private Integer id;
    private String username;
    private String password;
    private Double money;
    private String createtime;
}
dao
public interface AccountDao {

    int add(Account account);

    int deleteById(Integer id);

    List<Account> findList();

    int updateById(Account account);
}
//@Component
@Repository //效果和@Component一样的,唯一区别标识一下这个类是持久层的类!
public class AccountDaoImpl implements AccountDao {

    //属性
    @Resource
    QueryRunner queryRunner=null;

    public AccountDaoImpl(QueryRunner queryRunner) {
        this.queryRunner = queryRunner;
    }

    @Override
    public int add(Account account) {
        try {
            return queryRunner.update("insert into tb_account values (null,?,?,?,?)",
                    account.getUsername(),account.getPassword(),account.getMoney(),account.getCreatetime());
        } catch (SQLException e) {
            e.printStackTrace();
        }
        return 0;
    }

    @Override
    public int deleteById(Integer id) {
        try {
            return queryRunner.update("delete from tb_account where id=?",id);
        } catch (SQLException e) {
            e.printStackTrace();
        }
        return 0;
    }

    @Override
    public List<Account> findList() {
        try {
            return queryRunner.query("select * from tb_account",new BeanListHandler<Account>(Account.class));
        } catch (SQLException e) {
            e.printStackTrace();
        }
        return null;
    }

    @Override
    public int updateById(Account account) {
        try {
            return queryRunner.update("update tb_account set username=?,password=?,money=? where id=?",
                    account.getUsername(),account.getPassword(),account.getMoney(),account.getId());
        } catch (SQLException e) {
            e.printStackTrace();
        }
        return 0;
    }
}
service
public interface AccountService {

    int add(Account account);

    int deleteById(Integer id);

    List<Account> findList();

    int updateById(Account account);
}
//@Component
@Service // 一般用于业务层
public class AccountServiceImpl implements AccountService {

    @Resource
    AccountDao accountDao;

    public void setAccountDao(AccountDao accountDao) {
        this.accountDao = accountDao;
    }

    @Override
    public int add(Account account) {
        return accountDao.add(account);
    }

    @Override
    public int deleteById(Integer id) {
        return accountDao.deleteById(id);
    }

    @Override
    public List<Account> findList() {
        return accountDao.findList();
    }

    @Override
    public int updateById(Account account) {
        return accountDao.updateById(account);
    }
}
config
/**
 * 数据库相关配置
 */
public class JdbcConfig {

    @Value("${jdbc.driverClassName}")
    private String driverClassName;

    @Value("${jdbc.url}")
    private String url;

    @Value("${jdbc.username}")
    private String username;

    @Value("${jdbc.password}")
    private String password;

    /**
     * 配置德鲁伊数据源
     * 创建一个DruidDataSource对象,名字为dataSource,放入SpringIOC容器中
     * @return
     */
    @Bean(name = "dataSource")
    public DruidDataSource createDataSource(){
        DruidDataSource dataSource=new DruidDataSource();
        dataSource.setDriverClassName(driverClassName);
        dataSource.setUsername(username);
        dataSource.setPassword(password);
        dataSource.setUrl(url);
        return dataSource;
    }

    /**
     * QueryRunner对象
     * @param druidDataSource
     * @return
     */
    @Bean
    public QueryRunner createQueryRunner(@Qualifier("dataSource") DruidDataSource druidDataSource){
        QueryRunner queryRunner=new QueryRunner(druidDataSource);
        return queryRunner;
    }
}
/**
 * 配置类
 */
@Configuration
@PropertySource(value = "classpath:db.properties",encoding = "UTF-8")
@ComponentScan(value = "com.haidi8") //扫描包
@Import(JdbcConfig.class)
public class SpringConfig {
}
utils
public class DateUilts {

    public static String now(){
        SimpleDateFormat simpleDateFormat=new SimpleDateFormat("YYYY-MM-dd HH:mm:ss");
        return simpleDateFormat.format(new Date());
    }
}
/**
 * 封装返回值
 */
@Data
@NoArgsConstructor
@AllArgsConstructor
public class Results {
    private int code;
    private String msg;
    private Object data;
}
controller
/**
 * 控制层
 */
@WebServlet("/AccountServlet.do")
public class AccountServlet extends HttpServlet {

    //调用业务逻辑层
    //@Autowired
    AccountService accountService;

    @Override
    public void init(ServletConfig config) throws ServletException {
        //启动Spring框架(加载配置类,因为xml文件删除啦!)
        ApplicationContext context = new AnnotationConfigApplicationContext(SpringConfig.class);
        //从Spring容器中获取业务逻辑层对象,根据类型找对象
        accountService = context.getBean(AccountService.class);
    }

    @Override
    protected void service(HttpServletRequest req, HttpServletResponse resp) throws ServletException, IOException {
        req.setCharacterEncoding("UTF-8");
        resp.setContentType("application/json;charset=utf-8");
        String action = req.getParameter("action");

        Results results=null;
        if("list".equals(action)){
            //查询所有
            List<Account> accounts = accountService.findList();
            results=new Results(200,"请求成功",accounts);
        }else if("delete".equals(action)){
            //根据ID删除
            String id = req.getParameter("id");
            int count = accountService.deleteById(Integer.valueOf(id));
            if(count>0){
                results=new Results(200,"请求成功",null);
            }else{
                results=new Results(500,"请求失败",null);
            }
        }else if ("update".equals(action)){
            //更新
            String id = req.getParameter("id");
            String username = req.getParameter("username");
            String password = req.getParameter("password");
            String money = req.getParameter("money");
            Account account=new Account(Integer.valueOf(id),username,password,Double.valueOf(money), DateUilts.now());
            int count = accountService.updateById(account);
            if(count>0){
                results=new Results(200,"请求成功",null);
            }else{
                results=new Results(500,"请求失败",null);
            }
        }else if("add".equals(action)){
            //新增
            String username = req.getParameter("username");
            String password = req.getParameter("password");
            String money = req.getParameter("money");
            Account account=new Account(null,username,password,Double.valueOf(money), DateUilts.now());
            int count = accountService.add(account);
            if(count>0){
                results=new Results(200,"请求成功",null);
            }else{
                results=new Results(500,"请求失败",null);
            }
        }
        //把results转JSON
        resp.getWriter().write(JSON.toJSONString(results));
    }


}
db.properties
jdbc.driverClassName=com.mysql.cj.jdbc.Driver
jdbc.username=root
jdbc.password=123456
jdbc.url=jdbc:mysql://127.0.0.1:3306/springdb2022?useUnicode=true&characterEncoding=utf-8&serverTimezone=Asia/Shanghai
7.5 XML和注解的对比与选择
7.5.1 优缺点
一般来说,我们两种配置方式都是有人使用的,不过我个人更习惯使用注解的方式
XML:
- 类之间的松耦合关系,扩展性强,利于更换修改
- 对象之间的关系清晰明了
注解:
- 简化配置,并且使用起来也容易,效率会高一些
- 在类中就能找对配置,清晰明了
- 类型安全
7.5.2 两者对比
| XML配置 | 注解配置 | |
|---|---|---|
| 创建对象 | <bean id="" class=""> |
@Controller @Service @Repository@Component |
| 指定名称 | 通过 id 或者 name 值指定 | @Controller(“指定的名称”) |
| 注入数据象 | <property name="" ref=""> |
@Autowired @Qualifier @Resource @Value |
| 作用范围 | <bean id="" class="" scope> |
@Scope |
| 生命周期 | <bean id="" class="" init-method="" destroy-method=""/> |
@PostConstruct @PreDestroy |
7.6 补充新注解
为什么要补充新注解呢? 在我们使用注解时,在书写代码时,简化了很多,但是我们在 bean.xml 文件中 仍然需要 开启扫描、 进行配置QueryRunner 以及 数据源,如何彻底摆脱 xml 配置全面使用注解呢?
这也就是我们将要补充的几个新注解,作用就是让我们全面使用注解进行开发
7.6.1 配置类注解
@Configuration
- 指定当前类是 spring 的一个配置类,相当于 XML中的 bean.xml 文件
- 获取容器时需要使用下列形式
private ApplicationContext ac = new AnnotationConfigApplicationContext(SpringConfiguration.class);
依旧使用上方的 CURD 的案例代码进行修改,首先与cn同级创建了一个名为 config 的包,然后编写一个名为 SpringConfiguration 的类,当然实际上这两个名字无所谓的,添加注解
@Configuration
public class SpringConfiguration {
}
7.6.2 指定扫描包注解
@ComponentScan
@Configuration 相当于已经帮我们把 bean.xml 文件创立好了,按照我们往常的步骤,应该指定扫描的包了,这也就是我们这个注解的作用
- 指定 spring 在初始化容器时要扫描的包,在 XML 中相当于:
<!--开启扫描-->
<context:component-scan base-package="cn.ideal"></context:component-scan>
- 其中 basePackages 用于指定扫描的包,和这个注解中value属性的作用是一致的
具体使用:
@Configuration
@ComponentScan("cn.ideal")
public class SpringConfiguration {
}
7.6.3 创建对象
@Bean
写好了配置类,以及指定了扫描的包,下面该做的就是配置 QueryRunner 以及数据源了,在 XML 中我们会通过书写 bean 标签来配置,而 Spring 为我们提供了 @Bean 这个注解来替代原来的标签
- 将注解写在方法上(只能是方法),也就是代表用这个方法创建一个对象,然后放到 Spring 的容器中去
- 通过 name 属性 给这个方法指定名称,也就是我们 XML 中 bean 的 id
具体使用:
7.6.4 配置 properties文件
@PropertySource
上面在创建数据源的时候,都是直接把配置信息写死了,如果想要使用 properties 进行内容的配置,在这时候就需要,使用 @PropertySource 这个注解
- 用于加载 .properties 文件中的配置
- value [] 指定 properties 文件位置,在类路径下,就需要加上 classpath
7.6.5 导入其他配置类
@Import
这样看来一个 JdbcConfig 就基本写好了,我们在其中配置了 QueryRunner 对象,以及数据源,这个时候,实际上我们原先的 bean.xml 就可以删掉了,但是我们虽然写好了 JdbcConfig 但是如何将两个配置文件联系起来呢?这也就是这个注解的作用。
@Configuration
@ComponentScan("cn.ideal")
@Import(JdbcConfig.class)
@PropertySource("classpath:jdbcConfig.properties")
public class SpringConfiguration {
}
7.7 注解获取容器
修改获取容器的方式后,就可以进行测试了
private ApplicationContext ac = new AnnotationConfigApplicationContext(SpringConfiguration.class);
private AccountService as = ac.getBean("accountService", AccountService.class);
7.8 Spring单元测试改进
由于我们需要通过上面测试中两行代获取到容器,为了不每一次都写这两行代码,所以我们在前面将其定义在了成员位置,但是有没有办法可以省掉这个步骤呢?
也就是说,我们想要程序自动创建容器,但是原来的 junit 很显然是实现不了的,因为它并不会知道我们是否使用了 spring ,不过 junit 提供了一个注解让我们替换它的运行器,转而由 spring 提供
首先需要导入 jar 包 或者说导入依赖坐标
<dependency>
	<groupId>org.springframework</groupId>
	<artifactId>spring-test</artifactId>
	<version>5.0.2.RELEASE</version>
</dependency>
使用 @RunWith 注解替换原有运行器 然后使用 @ContextConfiguration 指定 spring 配置文件的位置,然后使用 @Autowired 给变量注入数据
@RunWith(SpringJUnit4ClassRunner.class)
@ContextConfiguration(classes = SpringConfiguration.class)
public class AccountServiceTest {

    @Autowired
    private AccountService as;
}
八、springAOP
8.1 AOP面向切面编程
8.1.1 AOP介绍
OOP(Object Oriented Programming ) 面向对象编程,万物皆对象
AOP(Aspect Oriented Programming),即面向切面编程,可以说是OOP(Object Oriented Programming,面向对象编程)的补充和完善。OOP引入封装、继承、多态等概念来建立一种对象层次结构,用于模拟公共行为的一个集合。不过OOP允许开发者定义纵向的关系,但并不适合定义横向的关系,例如日志功能。日志代码往往横向地散布在所有对象层次中,而与它对应的对象的核心功能毫无关系对于其他类型的代码,如安全性、异常处理和透明的持续性也都是如此,这种散布在各处的无关的代码被称为横切(cross cutting),在OOP设计中,它导致了大量代码的重复,而不利于各个模块的重用。
AOP技术恰恰相反,它利用一种称为”横切”的技术,剖解开封装的对象内部,并将那些影响了多个类的公共行为封装到一个可重用模块,并将其命名为”***“,即***切面****。所谓”切面”,简单说就是那些与业务无关,却为业务模块所共同调用的逻辑或责任封装起来,便于减少系统的重复代码,降低模块之间的耦合度,并有利于未来的可操作性和可维护性。
使用”横切”技术,AOP把软件系统分为两个部分:核心关注点和横切关注点。业务处理的主要流程是核心关注点,与之关系不大的部分是横切关注点。横切关注点的一个特点是,他们经常发生在核心关注点的多处,而各处基本相似,比如权限认证、日志打印、事务处理。AOP的作用在于分离系统中的各种关注点,将核心关注点和横切关注点分离开来。


8.1.1 AOP图解
AOP编程底层代理设计模式!Spring框架底层使用的代理设计模式来完成AOP!


假如没有aop,在做日志处理的时候,我们会在每个方法中添加日志处理,比如

单一职责!
但大多数的日子处理代码是相同的,为了实现代码复用,我们可能把日志处理抽离成一个新的方法。但是这样我们仍然必须手动插入这些方法。

但这样两个方法就是强耦合的,假如此时我们不需要这个功能了,或者想换成其他功能,那么就必须一个个修改。
通过动态代理,可以在指定位置执行对应流程。这样就可以将一些横向的功能抽离出来形成一个独立的模块,然后在指定位置插入这些功能。这样的思想,被称为**面向切面编程,亦即AOP。

8.2 AOP术语
1.target:目标类,需要被代理的类。例如:UserServiceImpl
2.Joinpoint(连接点):所谓连接点是指那些可能被拦截到的方法。例如:所有的方法
3.PointCut 切入点:*已经被增强的连接点*。例如:addUser()
4.advice 通知/增强,增强代码。例如:after、before
5. Weaving(织入):是指把增强advice应用到目标对象target来创建新的代理对象proxy的过程.
6.proxy 代理类:通知+切入点(由动态代理自动生成的类)
7. Aspect(切面): 是切入点pointcut和通知advice的结合
8. 引介(Introduction)
引介是一种特殊的增强,它为类添加一些属性和方法。这样,即使一个业务类原本没有实现某个接口,通过AOP的引介功能,我们可以动态地为该业务类添加接口的实现逻辑,让业务类成为这个接口的实现类。
具体可以根据下面这张图来理解:

8.3 Spring的AOP
8.3.1 Spring AOP基于xml
8.3.1.1 项目准备
– 项目名: spring-03-aop
– 导入jar包:
pom文件添加
<?xml version="1.0" encoding="UTF-8"?>
<project xmlns="http://maven.apache.org/POM/4.0.0"
         xmlns:xsi="http://www.w3.org/2001/XMLSchema-instance"
         xsi:schemaLocation="http://maven.apache.org/POM/4.0.0 http://maven.apache.org/xsd/maven-4.0.0.xsd">
    <parent>
        <artifactId>haidi8_spring</artifactId>
        <groupId>com.haidi8.spring</groupId>
        <version>1.0-SNAPSHOT</version>
    </parent>
    <modelVersion>4.0.0</modelVersion>

    <artifactId>springaop_v1.0</artifactId>

    <dependencies>
        <!--Lombok依赖-->
        <dependency>
            <groupId>org.projectlombok</groupId>
            <artifactId>lombok</artifactId>
            <version>1.16.18</version>
            <scope>provided</scope>
        </dependency>

        <!-- Junit单元测试 -->
        <dependency>
            <groupId>junit</groupId>
            <artifactId>junit</artifactId>
            <version>4.12</version>
        </dependency>

        <dependency>
            <groupId>org.springframework</groupId>
            <artifactId>spring-context</artifactId>
            <version>5.3.2</version>
        </dependency>

        <dependency>
            <groupId>org.springframework</groupId>
            <artifactId>spring-test</artifactId>
            <version>5.3.2</version>
        </dependency>

        <dependency>
            <groupId>org.springframework</groupId>
            <artifactId>spring-aspects</artifactId>
            <version>5.3.2</version>
        </dependency>

    </dependencies>

    <build>
        <plugins>
            <!--maven jdk1.8编译插件-->
            <plugin>
                <groupId>org.apache.maven.plugins</groupId>
                <artifactId>maven-compiler-plugin</artifactId>
                <version>3.5.1</version>
                <configuration>
                    <source>1.8</source>
                    <target>1.8</target>
                </configuration>
            </plugin>
        </plugins>
    </build>
</project>
8.3.1.2 准备操作对象
操作对象Order和User:
@Data
@NoArgsConstructor
@AllArgsConstructor
public class Order {

    private int id;
    private String title;
}


@Data
@NoArgsConstructor
@AllArgsConstructor
public class User {

    private String username;
    private int age;
}
先创建UserService接口和OrderService接口:
public interface UserService {

	// 添加 user
	public void addUser(User user);

	// 删除 user
	public void deleteUser(int uid);
}


public interface OrderService {

    int addOrdder(Order o);
}
实现类OrderServiceImpl和UserServiceImpl
/**
 * 目标类
 */
public class UserServiceImpl implements UserService {

    @Override
    public int add(User u) {
        System.out.println("正在新增user:"+u);
        return 250;
    }

    @Override
    public User findUser(int id) {
        User s=new User("小花",111);
        System.out.println("查询对象:"+s);
        return s;
    }


}

/**
 * 目标类
 */
public class OrderServiceImpl implements OrderService {
    @Override
    public int addOrdder(Order o) {
        System.out.println("新增订单:"+o);
        //System.out.println(100/0);
        return 1;
    }
}
8.3.1.3 增强类
/**
 * 增强类 通知类
 */
public class Transction {

    /**
     * 01-前置通知,在目标方法之前调用!
     * JoinPoint类:封装了目标类中目标方法信息
     */
    public void opentTx(JoinPoint joinPoint){
        String name = joinPoint.getSignature().getName(); //目标方法的方法名字
        String typeName = joinPoint.getSignature().getDeclaringTypeName(); //目标方法的方法名字
        Class aClass = joinPoint.getSignature().getDeclaringType();
        Object[] args = joinPoint.getArgs(); //方法参数
        int modifiers = joinPoint.getSignature().getModifiers();//方法访问修饰符
        System.out.println("####-------前置通知:事务开启------------");
//        System.out.println("####目标方法的方法名字:"+name);
//        System.out.println("####目标方法的所在类全类名:"+typeName);
//        System.out.println("####目标方法的方法所在类class:"+aClass.getName());
//        System.out.println("####目标方法的方法参数:"+ Arrays.toString(args));
//        System.out.println("####目标方法的方法修饰符:"+modifiers);
    }

    /**
     * 02-返回通知:在目标方法调用结束返回的时候调用
     * (如果目标方法有异常,返回通知不执行)
     */
    public void commitTx(JoinPoint joinPoint,Object result){
        System.out.println("####返回通知:事务提交,目标方法返回值:"+result);
    }

    /**
     * 03-异常通知:目标方法有异常,那么执行异常通知!
     */
    public void exMethod(JoinPoint joinPoint,RuntimeException ex){
        System.out.println("####异常通知:程序异常啦,异常类型:"+ex.toString());
    }

    /**
     * 04-最终通知:无论目标方法是否有异常,那么都会执行,类似 try-->catch-->finally
     */
    public void finalMethod(JoinPoint joinPoint){
        System.out.println("####最终通知:释放资源");
    }

    /**
     * 05-环绕通知:是其余4种通知的一个综合版本
     */
    public Object aroundMethod(ProceedingJoinPoint joinPoint){
        Object result=null;
        try {
            if("addOrdder".equals(joinPoint.getSignature().getName())){
                result=8848;
            }else{
                System.out.println("环绕通知-前置---");
                //调用目标方法
                result=joinPoint.proceed();
            }
            System.out.println("环绕通知-返回---result:"+result);
        }catch (Throwable e) {
            e.printStackTrace();
            System.out.println("环绕通知-异常啦---:"+e.toString());
        } finally {
            System.out.println("环绕通知-释放资源---");
        }
        return result;
    }
}
8.3.1.4 织入目标对象(xml)
在applicationContext-aop.xml 中配置
注意:添加了 aop命名空间
<?xml version="1.0" encoding="UTF-8"?>
<beans xmlns="http://www.springframework.org/schema/beans"
       xmlns:xsi="http://www.w3.org/2001/XMLSchema-instance" xmlns:aop="http://www.springframework.org/schema/aop"
       xsi:schemaLocation="http://www.springframework.org/schema/beans http://www.springframework.org/schema/beans/spring-beans.xsd http://www.springframework.org/schema/aop https://www.springframework.org/schema/aop/spring-aop.xsd">

    <!--1.目标类对象-->
    <bean class="com.haidi8.service.impl.OrderServiceImpl"></bean>
    <bean class="com.haidi8.service.impl.UserServiceImpl"></bean>

    <!--2.增强类(通知类)-->
    <bean id="tx" class="com.haidi8.tx.Transction"></bean>
    <!--3.配置AOP(配置规则)-->

    <aop:config>
        <!--切入点表达式(哪一个类中哪一个方法需要增强  expression=""  方法定位):-->
        <aop:pointcut id="p1" expression="execution(public int com.haidi8.service.impl.*.*(..))"/>
        <!--哪一个是增强-->
        <aop:aspect ref="tx">
            <!--如何增强-->
            <!--前置通知-->
                        <aop:before method="opentTx" pointcut-ref="p1"/>
            <!--异常通知-->
                        <aop:after-throwing method="exMethod" pointcut-ref="p1" throwing="ex"/>
            <!--最终通知-->
                        <aop:after method="finalMethod" pointcut-ref="p1"/>
            <!--返回通知-->
                        <aop:after-returning method="commitTx" pointcut-ref="p1" returning="result"/>
            <!--环绕通知-->
            <aop:around method="aroundMethod" pointcut-ref="p1"></aop:around>
        </aop:aspect>
    </aop:config>
    <!--强制使用CGLIB代理-->
    <aop:aspectj-autoproxy proxy-target-class="true"></aop:aspectj-autoproxy>
</beans>

8.3.1.5 测试
public class TestSpring {
    @Test
    public void test1(){
        ClassPathXmlApplicationContext context = new ClassPathXmlApplicationContext("beans.xml");

        // us是底层通过JDK动态代理生成的代理类对象
        UserService us = context.getBean(UserService.class);
        OrderService os = context.getBean(OrderService.class);

        int count = us.add(new User("admin", 111));
        System.out.println(count>0?"新增成功":"新增失败");

        System.out.println("----------------------------------");

        int count1 = os.addOrdder(new Order(111, "笔记本"));
        System.out.println(count1>0?"新增成功":"新增失败");

        //System.out.println("----------------------------------");

        //  User user = us.findUser(1);
        //  System.out.println("查询结果:"+user);
    }
}
8.3.2 Spring中AOP基于注解
在使用@Aspect之前,首先必须保证所使用的Java是 5.0 以上版本,否则无法使用注解技术.
Spring 在处理@Aspect注解表达式时,需要将Spring的asm模块添加到类路径中,asm是轻量级的字节码处理框架,因为Java的反射机制无法获取入参名,Spring利用asm处理@Aspect中所描述的方法入参名.
此外,Spring采用AspectJ提供的@Aspect注解类库及相应的解析类库,需要在pom.xml文件中添加aspectj.weaver和aspectj.tools类包的依赖.
User和Order实体类:
@Data
@NoArgsConstructor
@AllArgsConstructor
public class Order {

    private int id;
    private String title;
}


@Data
@NoArgsConstructor
@AllArgsConstructor
public class User {

    private String username;
    private int age;
}
UserService和OrderService接口:
public interface OrderService {

    int addOrdder(Order o);
}


public interface UserService {

    int add(User u);

    User findUser(int id);
}
UserService和OrderService接口实现类:
@Service
public class OrderServiceImpl implements OrderService {
    @Override
    public int addOrdder(Order o) {
        System.out.println("新增订单:"+o);
        //System.out.println(100/0);
        return 1;
    }
}


/**
 * 目标类
 */
@Service
public class UserServiceImpl implements UserService {

    @Override
    public int add(User u) {
        System.out.println("正在新增user:"+u);
        return 250;
    }

    @Override
    public User findUser(int id) {
        User s=new User("小花",111);
        System.out.println("查询对象:"+s);
        return s;
    }


}
增强类:
/**
 * 增强类 通知类
 */
@Component
@Aspect  //增强类
public class Transction {
    /**
     * 定义切入点表达式
     */
    @Pointcut(value ="execution(* com.haid8.aop.service.impl.*.*(..))" )
    public void pointcut(){
    }

    /**
     * 01-前置通知,在目标方法之前调用!
     * JoinPoint类:封装了目标类中目标方法信息
     */
    @Before(value = "Transction.pointcut()")
    public void opentTx(JoinPoint joinPoint){
        String name = joinPoint.getSignature().getName(); //目标方法的方法名字
        String typeName = joinPoint.getSignature().getDeclaringTypeName(); //目标方法的方法名字
        Class aClass = joinPoint.getSignature().getDeclaringType();
        Object[] args = joinPoint.getArgs(); //方法参数
        int modifiers = joinPoint.getSignature().getModifiers();//方法访问修饰符
        System.out.println("####-------前置通知:事务开启------------");
        System.out.println("####目标方法的方法名字:"+name);
        System.out.println("####目标方法的所在类全类名:"+typeName);
        System.out.println("####目标方法的方法所在类class:"+aClass.getName());
        System.out.println("####目标方法的方法参数:"+ Arrays.toString(args));
        System.out.println("####目标方法的方法修饰符:"+modifiers);
    }

    /**
     * 02-返回通知:在目标方法调用结束返回的时候调用
     * (如果目标方法有异常,返回通知不执行)
     */

    @AfterReturning(value = "Transction.pointcut()",returning = "result")
    public void commitTx(JoinPoint joinPoint,Object result){
        System.out.println("####返回通知:事务提交,目标方法返回值:"+result);
    }
    /**
     * 03-异常通知:目标方法有异常,那么执行异常通知!
     */
    @AfterThrowing(value = "Transction.pointcut()",throwing = "ex")
    public void exMethod(JoinPoint joinPoint,RuntimeException ex){
        System.out.println("####异常通知:程序异常啦,异常类型:"+ex.toString());
    }

    /**
     * 04-最终通知:无论目标方法是否有异常,那么都会执行,类似 try-->catch-->finally
     */
    @After(value = "Transction.pointcut()")
    public void finalMethod(JoinPoint joinPoint){
        System.out.println("####最终通知:释放资源");
    }

    /**
     * 05-环绕通知:是其余4种通知的一个综合版本
     */
    @Around(value = "execution(* com.haid8.aop.service.impl.OrderServiceImpl.addOrdder(..))")
    public Object aroundMethod(ProceedingJoinPoint joinPoint){
        Object result=null;
        try {
            System.out.println("环绕通知-前置---");
            //调用目标方法
            result=joinPoint.proceed();
            System.out.println("环绕通知-返回---result:"+result);
        }catch (Throwable e) {
            e.printStackTrace();
            System.out.println("环绕通知-异常啦---:"+e.toString());
        } finally {
            System.out.println("环绕通知-释放资源---");
        }
        return result;
    }
}
配置类:
@Configuration
@ComponentScan(value = "com.haid8.aop")
@EnableAspectJAutoProxy(proxyTargetClass=false)
public class SpringConfig {
}
8.3.3 SpringAop通知细节-多切面及排序
8.3.3.1 Spring之AOP多切面通知方法的运行顺序
指定切面的优先级
-
在同一个连接点上应用不止一个切面时,除非明确指定,否则它们的优先级是不确定的。
-
切面的优先级可以通过实现Ordered接口或利用@Order注解指定。
-
实现
Ordered接口,getOrder()方法的返回值越小,优先级越高。 -
若使用@Order注解,序号出现在注解中

@Order:注解@Order不能决定Spring容器加载Bean的顺序,只能决定执行顺序!
Order注解修饰方法
public class Cat {

    String name;

    public String getName() {
        return name;
    }

    public void setName(String name) {
        this.name = name;
    }

    public Cat(){

    }

    public Cat(String name){
        this.name=name;
        System.out.println(name);
    }

    @Override
    public String toString() {
        return "Cat{" +
                "name='" + name + '\'' +
                '}';
    }
}
@Configuration
public class CatConfig {

    @Bean
    @Order(3)
    public Cat cat1(){
        return new Cat("cat1()");
    }


    @Bean
    @Order(1)
    public Cat cat2(){
        return new Cat("cat2()");
    }

    @Bean
    @Order(4)
    public Cat cat3(){
        return new Cat("cat3()");
    }

    @Bean
    public Cat Cat4(List<Cat> cats){
        System.out.println(cats);
        for (Cat cat : cats) {
            System.out.println("--->"+cat);
        }
        return cats.get(0);
    }

}

8.3.4 Spring Aop通知执行顺序
8.3.4.1.Spring基于XML的通知执行顺序
8.3.4.1.1.XML文件配置说明
图片来源:《Java EE企业级应用开发教程》

8.3.4.1.2.各种通知说明
配置前置通知:在切入点方法执行之前执行
配置后置通知(返回通知):在切入点方法正常执行之后执行。它和异常通知永远只能执行一个
配置异常通知:在切入点方法执行产生异常之后执行。它和后置通知永远只能执行一个
配置最终通知:无论切入点方法是否正常执行,它都会在其后面执行
配置环绕通知:可以在代码中手动控制增强方法何时执行
注意:后置(返回通知)通知和最终通知的区别:后置通知时在方法成功执行后会执行的,如果出现异常就不执行。而最终通知时无论是否出现异常都会执行的,感觉类似于finally
8.3.4.1.3.在配置同一个切入点且不出现异常时的执行顺序

注意,椭圆中顺序不固定,具体顺序与配置文件的申明顺序有关
结论:XML配置AOP,通知的执行顺序和Spring版本无关。和通知的声明顺序有关,只能确定前置通知一定在目标方法之前!
8.3.4.1.4.情况一
<!--3.2.配置通知-->
 <aop:aspect ref="tx">
     <!--前置通知-->
     <aop:before method="openTx" pointcut-ref="pointcut"/>
     <!--环绕通知-->
     <aop:around method="aroundAdvice" pointcut-ref="pointcut"/>
     <!--后置通知(返回通知)-->
     <aop:after-returning method="CommitTx" pointcut-ref="pointcut" returning="value"/>
     <!--最终通知-->
     <aop:after method="finnallyMethod" pointcut-ref="pointcut"/>
     <!--异常通知-->
     <aop:after-throwing method="Rollback" pointcut-ref="pointcut" throwing="ex"/>
 </aop:aspect>
顺序:

8.3.4.1.2.情况二
<!--3.2.配置通知-->
 <aop:aspect ref="tx">
     <!--环绕通知-->
     <aop:around method="aroundAdvice" pointcut-ref="pointcut"/>
     <!--前置通知-->
     <aop:before method="openTx" pointcut-ref="pointcut"/>
     <!--后置通知(返回通知)-->
     <aop:after-returning method="CommitTx" pointcut-ref="pointcut" returning="value"/>
     <!--最终通知-->
     <aop:after method="finnallyMethod" pointcut-ref="pointcut"/>
     <!--异常通知-->
     <aop:after-throwing method="Rollback" pointcut-ref="pointcut" throwing="ex"/>
 </aop:aspect>
顺序:

结论一:前置通知和环绕通知的顺序和申明顺序有关,申明在前的先执行
8.3.4.1.3.情况三
<aop:aspect ref="tx">
    <!--环绕通知-->
    <aop:around method="aroundAdvice" pointcut-ref="pointcut"/>
    <!--前置通知-->
    <!--<aop:before method="openTx" pointcut-ref="pointcut"/>-->
    <!--后置通知(返回通知)-->
    <aop:after-returning method="CommitTx" pointcut-ref="pointcut" returning="value"/>
    <!--最终通知-->
    <aop:after method="finnallyMethod" pointcut-ref="pointcut"/>
    <!--异常通知-->
    <aop:after-throwing method="Rollback" pointcut-ref="pointcut" throwing="ex"/>
</aop:aspect>
顺序:
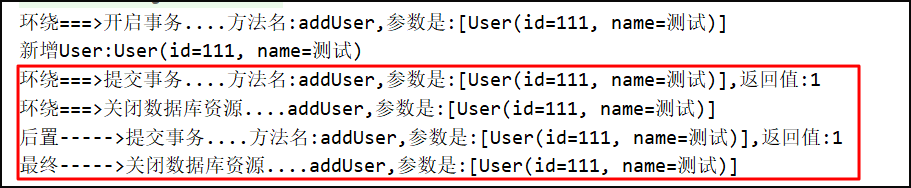
8.3.4.1.4.情况四
<aop:aspect ref="tx">
    <!--环绕通知-->
    <aop:around method="aroundAdvice" pointcut-ref="pointcut"/>
    <!--前置通知-->
    <!--<aop:before method="openTx" pointcut-ref="pointcut"/>-->
    <!--最终通知-->
    <aop:after method="finnallyMethod" pointcut-ref="pointcut"/>
    <!--后置通知(返回通知)-->
    <aop:after-returning method="CommitTx" pointcut-ref="pointcut" returning="value"/>
    <!--异常通知-->
    <aop:after-throwing method="Rollback" pointcut-ref="pointcut" throwing="ex"/>
</aop:aspect>
顺序:

8.3.4.1.5.小结
结论:Spring基于XML的申明式通知的执行顺序与配置文件中的申明顺序有关
8.3.4.2.Spring基于注解的通知执行顺序

我们在网上查找关于SpringAop执行顺序的的资料,大多数时候,你会查到如下的答案:
8.3.4.2.1.正常情况

8.3.4.2.2.异常情况

上述测试结果是在Spring的5.2.6.RELEASE版本下进行测试,换成5.2.7.RELEASE版本测试结果就不同了!
8.3.4.2.3.探究顺序错误的真相
于是去官网搜索文档,不得不说Spring由于过于庞大,官网的文档已经到了冗杂的地步,不过最终还是找到了:
https://docs.spring.io/spring-framework/docs/5.2.9.RELEASE/spring-framework-reference/core.html#aop-ataspectj-advice-ordering

As of Spring Framework 5.2.7, advice methods defined in the same @Aspect class that need to run at the same join point are assigned precedence based on their advice type in the following order, from highest to lowest precedence: @Around, @Before, @After, @AfterReturning, @AfterThrowing.
翻译重点:
从Spring5.2.7开始,在相同@Aspect类中,通知方法将根据其类型按照从高到低的优先级进行执行:@Around,@Before ,@AfterReturning, @After,@AfterThrowing。
8.3.4.2.4.结论
经过上面的资料文档查阅,我能给出的结论是:
从Spring5.2.7开始,Spring AOP不再严格按照AspectJ定义的规则来执行advice,而是根据其类型按照从高到低的优先级进行执行:
没有异常:@Around,@Before ,@AfterReturning, @After
有异常:@Around,@Before , @AfterThrowing @After
8.3.5 注意事项:
AOP表达式:

AOP七大术语:

AOP注解版异常情况:

AOP正常情况:

AOP 5种通知类型:


九、spring整合mybatis
pom文件:
<?xml version="1.0" encoding="UTF-8"?>
<project xmlns="http://maven.apache.org/POM/4.0.0"
         xmlns:xsi="http://www.w3.org/2001/XMLSchema-instance"
         xsi:schemaLocation="http://maven.apache.org/POM/4.0.0 http://maven.apache.org/xsd/maven-4.0.0.xsd">
    <parent>
        <artifactId>haidi8_spring</artifactId>
        <groupId>com.haidi8.spring</groupId>
        <version>1.0-SNAPSHOT</version>
    </parent>
    <modelVersion>4.0.0</modelVersion>

    <artifactId>spring_mybatis_v1.0</artifactId>

    <properties>
        <project.build.sourceEncoding>UTF-8</project.build.sourceEncoding>
        <maven.compiler.source>1.8</maven.compiler.source>
        <maven.compiler.target>1.8</maven.compiler.target>
    </properties>

    <dependencies>

        <dependency>
            <groupId>junit</groupId>
            <artifactId>junit</artifactId>
            <version>4.12</version>
            <scope>test</scope>
        </dependency>

        <!--Lombok依赖-->
        <dependency>
            <groupId>org.projectlombok</groupId>
            <artifactId>lombok</artifactId>
            <version>1.16.18</version>
            <scope>provided</scope>
        </dependency>

        <dependency>
            <groupId>com.alibaba</groupId>
            <artifactId>druid</artifactId>
            <version>1.1.6</version>
        </dependency>

        <dependency>
            <groupId>mysql</groupId>
            <artifactId>mysql-connector-java</artifactId>
            <version>8.0.25</version>
        </dependency>

        <dependency>
            <groupId>org.springframework</groupId>
            <artifactId>spring-context</artifactId>
            <version>5.3.2</version>
        </dependency>

        <dependency>
            <groupId>org.springframework</groupId>
            <artifactId>spring-test</artifactId>
            <version>5.3.2</version>
        </dependency>

        <!-- myBatis -->
        <dependency>
            <groupId>org.mybatis</groupId>
            <artifactId>mybatis</artifactId>
            <version>3.4.5</version>
        </dependency>

        <!--Spring和MyBatis整合包专用包-->
        <dependency>
            <groupId>org.mybatis</groupId>
            <artifactId>mybatis-spring</artifactId>
            <version>1.3.0</version>
        </dependency>

        <!--MyBatis和Spring整合 需要导入依赖-->
        <dependency>
            <groupId>org.springframework</groupId>
            <artifactId>spring-jdbc</artifactId>
            <version>5.3.2</version>
        </dependency>

        <dependency>
            <groupId>log4j</groupId>
            <artifactId>log4j</artifactId>
            <version>1.2.14</version>
        </dependency>

        <!-- https://mvnrepository.com/artifact/org.slf4j/slf4j-api -->
        <dependency>
            <groupId>org.slf4j</groupId>
            <artifactId>slf4j-api</artifactId>
            <version>1.7.22</version>
        </dependency>

        <!-- https://mvnrepository.com/artifact/org.slf4j/slf4j-log4j12 -->
        <dependency>
            <groupId>org.slf4j</groupId>
            <artifactId>slf4j-log4j12</artifactId>
            <version>1.7.22</version>
        </dependency>

    </dependencies>

    <build>
        <finalName>AccountWeb2022</finalName>
        <pluginManagement><!-- lock down plugins versions to avoid using Maven defaults (may be moved to parent pom) -->
            <plugins>
                <plugin>
                    <artifactId>maven-clean-plugin</artifactId>
                    <version>3.1.0</version>
                </plugin>
                <!-- see http://maven.apache.org/ref/current/maven-core/default-bindings.html#Plugin_bindings_for_war_packaging -->
                <plugin>
                    <artifactId>maven-resources-plugin</artifactId>
                    <version>3.0.2</version>
                </plugin>
                <plugin>
                    <artifactId>maven-compiler-plugin</artifactId>
                    <version>3.8.0</version>
                </plugin>
                <plugin>
                    <artifactId>maven-surefire-plugin</artifactId>
                    <version>2.22.1</version>
                </plugin>
                <plugin>
                    <artifactId>maven-war-plugin</artifactId>
                    <version>3.2.2</version>
                </plugin>
                <plugin>
                    <artifactId>maven-install-plugin</artifactId>
                    <version>2.5.2</version>
                </plugin>
                <plugin>
                    <artifactId>maven-deploy-plugin</artifactId>
                    <version>2.8.2</version>
                </plugin>
            </plugins>
        </pluginManagement>

        <resources>
            <!-- mapper.xml文件在java目录下 -->
            <resource>
                <directory>src/main/java</directory>
                <includes>
                    <!--指定src下的内容编译-->
                    <include>**/*.xml</include>
                </includes>
            </resource>
            <resource>
                <directory>src/main/resources</directory>
                <includes>
                    <include>**/*</include>
                </includes>
            </resource>
        </resources>

    </build>


</project>
项目目录结构:
[外链图片转存失败,源站可能有防盗链机制,建议将图片保存下来直接上传(img-NKToQEm7-1665139494994)(C:\Users\administrater\AppData\Roaming\Typora\typora-user-images\image-20221007154039322.png)]
准备数据库:
DROP TABLE IF EXISTS `tb_account`;
CREATE TABLE `tb_account` (
  `id` int NOT NULL AUTO_INCREMENT,
  `uname` varchar(255) COLLATE utf8_bin DEFAULT NULL,
  `money` double DEFAULT NULL,
  PRIMARY KEY (`id`)
) ENGINE=InnoDB AUTO_INCREMENT=3 DEFAULT CHARSET=utf8mb3 COLLATE=utf8_bin;

-- ----------------------------
-- Records of tb_account
-- ----------------------------
INSERT INTO `tb_account` VALUES ('1', 'test1', '4000');
INSERT INTO `tb_account` VALUES ('2', 'test2', '1000');
准备实体类:
@Data
@AllArgsConstructor
@NoArgsConstructor
public class Account {
    private int id;
    private String username;
    private Double money;
}
准备mapper层:
public interface AccountMapper {

    /**
     * 修改数据中人钱数
     * @param uname
     * @param money
     * @return
     */
    int updateMoney(@Param("uname") String uname,
                    @Param("money") Double money);
}
mapper接口xml文件:
<?xml version="1.0" encoding="UTF-8"?>
<!DOCTYPE mapper
        PUBLIC "-//mybatis.org//DTD Mapper 3.0//EN"
        "http://mybatis.org/dtd/mybatis-3-mapper.dtd">
<mapper namespace="com.bruce.mapper.AccountMapper">

    <update id="updateMoney">
        update tb_account set money=money+#{money} where uname=#{uname}
    </update>

</mapper>
service层:
public interface AccountService {

    /**
     * 修改数据中人钱数
     * @param uname
     * @param money
     * @return
     */
    int updateMoney( String uname,Double money);


    /**
     * 转账
     * @param fromName
     * @param toName
     * @param money
     * @return
     */
    int zhuanzhuang(String fromName,String toName,Double money);
}


@Service
public class AccountServiceImpl implements AccountService {

    @Autowired(required = true)
    AccountMapper accountMapper=null;

    @Override
    public int updateMoney(String uname, Double money) {
        return accountMapper.updateMoney(uname,money);
    }

    /**
     * 问题:如果保证这个方法在同一个事务中进行!
     * @param fromName
     * @param toName
     * @param money
     * @return
     */
    @Override
    public int zhuanzhuang(String fromName, String toName, Double money) {
        //钱转出去
        int count1 = accountMapper.updateMoney(fromName, money * (-1));
        System.out.println(count1>0?"钱转出去成功":"钱转出去失败");

        System.out.println(100/0);
        //钱增加
        int count2= accountMapper.updateMoney(toName,money);
        System.out.println(count1>0?"钱转收取成功":"钱转收取失败");
        return count1+count2;
    }
}
db.properties:
jdbc.driverClassName=com.mysql.cj.jdbc.Driver
jdbc.username=root
jdbc.password=123456
jdbc.url=jdbc:mysql://127.0.0.1:3306/account2022?useUnicode=true&characterEncoding=utf-8&serverTimezone=Asia/Shanghai
log4j.properties:
# log4J日志框架的配置文件 文件名字不能改
# DEBUG 表示日志的级别  调试
# Console 日志打印在控制台
log4j.rootLogger=DEBUG, Console
log4j.appender.Console=org.apache.log4j.ConsoleAppender
log4j.appender.Console.layout=org.apache.log4j.PatternLayout
log4j.appender.Console.layout.ConversionPattern=%d [%t] %-5p [%c] - %m%n

# 哪些日志需要打印
log4j.logger.java.sql.ResultSet=DEBUG
log4j.logger.org.apache=DEBUG
log4j.logger.java.sql.Connection=DEBUG
log4j.logger.java.sql.Statement=DEBUG
log4j.logger.java.sql.PreparedStatement=DEBUG
spring.xml:
<?xml version="1.0" encoding="UTF-8"?>
<beans xmlns="http://www.springframework.org/schema/beans"
       xmlns:xsi="http://www.w3.org/2001/XMLSchema-instance"
       xmlns:context="http://www.springframework.org/schema/context"
       xsi:schemaLocation="http://www.springframework.org/schema/beans http://www.springframework.org/schema/beans/spring-beans.xsd http://www.springframework.org/schema/context https://www.springframework.org/schema/context/spring-context.xsd">

    <!--扫描业务逻辑层-->
    <context:component-scan base-package="com.haidi8.accountsytemv2.service"/>

    <context:property-placeholder location="classpath:db.properties" file-encoding="UTF-8"/>

    <bean id="ds" class="com.alibaba.druid.pool.DruidDataSource">
        <property name="username" value="${jdbc.username}"></property>
        <property name="password" value="${jdbc.password}"></property>
        <property name="url" value="${jdbc.url}"></property>
        <property name="driverClassName" value="${jdbc.driverClassName}"></property>
    </bean>

    <!--Spring整合MyBatis-->
    <!--MyBatis依赖 3.4.5   mybatis-spring 1.3.0-->
    <!--配置sqlSessionFactory Spring管理给自动MyBatis用-->
    <bean id="sqlSessionFactory" class="org.mybatis.spring.SqlSessionFactoryBean">
        <!--数据源-->
        <property name="dataSource" ref="ds"/>
        <!--配置mapper.xml文件路径-->
        <!-- <property name="mapperLocations" value="classpath:mappers/*.xml"/>-->
        <!--统一实体类配置实体类别名  实体Account account(不区分大小写) -->
        <property name="typeAliasesPackage" value="com.bruce.pojo"/>
    </bean>

    <!--spring框架给Mapper层生成对象  sqlsession.getMapper(AccountMapper.class);-->
    <bean class="org.mybatis.spring.mapper.MapperScannerConfigurer">
        <!--Spring 框架会自动通过动态代理模式(反射) 生成对象-->
        <property name="basePackage" value="com.bruce.mapper"/>
    </bean>

</beans>
十、spring的事务
10.1 事务(Transaction)介绍
事务(Transaction),一般是指要做的或所做的事情。在计算机术语中是指访问并可能更新数据库中各种数据项的一个程序执行单元(unit)。
大象装进冰箱:
1.开门
2.装大象
3.关门
这里我们以取钱的例子来讲解:比如你去ATM机取1000块钱,大体有两个步骤:第一步输入密码金额,银行卡扣掉1000元钱;第二步从ATM出1000元钱。这两个步骤必须是要么都执行要么都不执行。如果银行卡扣除了1000块但是ATM出钱失败的话,你将会损失1000元;如果银行卡扣钱失败但是ATM却出了1000块,那么银行将损失1000元。
如何保证这两个步骤不会出现一个出现异常了,而另一个执行成功呢?事务就是用来解决这样的问题。事务是一系列的动作,它们综合在一起才是一个完整的工作单元,这些动作必须全部完成,如果有一个失败的话,那么事务就会回滚到最开始的状态,仿佛什么都没发生过一样。 在企业级应用程序开发中,事务管理是必不可少的技术,用来确保数据的完整性和一致性。
10.2 事务的四个特性(ACID)
①、原子性(Atomicity):事务是一个原子操作,由一系列动作组成。事务的原子性确保动作要么全部完成,要么完全不起作用。
②、一致性(Consistency):一旦事务完成(不管成功还是失败),系统必须确保它所建模的业务处于一致的状态,而不会是部分完成部分失败。在现实中的数据不应该被破坏。
③、隔离性(Isolation):可能有许多事务会同时处理相同的数据,因此每个事务都应该与其他事务隔离开来,防止数据损坏。

④、持久性(Durability):一旦事务完成,无论发生什么系统错误,它的结果都不应该受到影响,这样就能从任何系统崩溃中恢复过来。通常情况下,事务的结果被写到持久化存储器中。
10.3 Spring 事务管理的核心接口
首先我们创建一个Java工程,然后导入 Spring 核心事务包
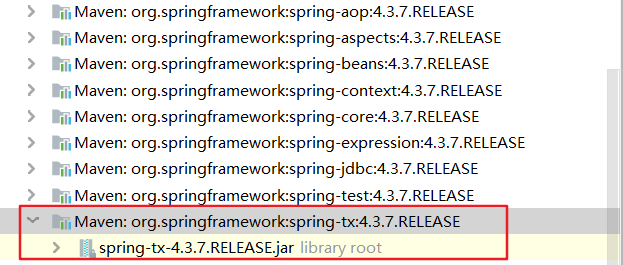 我们打开Spring的核心事务包,查看如下类:org.springframework.transaction,以下三个类是Spring中事务的顶级接口!
上面所示的三个类文件便是Spring的事务管理接口。如下图所示:下面我们分别对这三个接口进行简单的介绍

10.4 基本事务属性的定义
上面讲到的事务管理器接口PlatformTransactionManager通过getTransaction(TransactionDefinition definition)方法来得到事务,这个方法里面的参数是TransactionDefinition类,这个类就定义了一些基本的事务属性。
那么什么是事务属性呢?事务属性可以理解成事务的一些基本配置,描述了事务策略如何应用到方法上。事务属性包含了5个方面,如图所示:

TransactionDefinition 接口方法如下:

10.4.1.传播行为(面试题)
传播行为:当事务方法被另一个事务方法调用时,必须指定事务应该如何传播。
Spring 定义了如下七中传播行为,这里以A业务和B业务之间如何传播事务为例说明:
B包容A
①、PROPAGATION_REQUIRED :required , 必须。默认值,A如果有事务,B将使用该事务;如果A没有事务,B将创建一个新的事务。
②、PROPAGATION_SUPPORTS:supports ,支持。A如果有事务,B将使用该事务;如果A没有事务,B将以非事务执行。
③、PROPAGATION_MANDATORY:mandatory ,强制。A如果有事务,B将使用该事务;如果A没有事务,B将抛异常。
④、PROPAGATION_REQUIRES_NEW :requires_new,必须新的。如果A有事务,将A的事务挂起,B创建一个新的事务;如果A没有事务,B创建一个新的事务。
⑤、PROPAGATION_NOT_SUPPORTED :not_supported ,不支持。如果A有事务,将A的事务挂起,B将以非事务执行;如果A没有事务,B将以非事务执行。
⑥、PROPAGATION_NEVER :never,从不。如果A有事务,B将抛异常;如果A没有事务,B将以非事务执行。
⑦、PROPAGATION_NESTED :nested ,嵌套。如果A当前存在事务,则在嵌套事务内执行。如果当前没有事务,则执行与PROPAGATION_REQUIRED类似的操作。
10.4.2.隔离级别
隔离级别:定义了一个事务可能受其他并发事务影响的程度。
并发事务引起的问题:
在典型的应用程序中,多个事务并发运行,经常会操作相同的数据来完成各自的任务。并发虽然是必须的,但可能会导致以下的问题。
①、脏读(Dirty reads)——脏读发生在一个事务读取了另一个事务改写但尚未提交的数据时。如果改写在稍后被回滚了,那么第一个事务获取的数据就是无效的。
②、不可重复读(Nonrepeatable read)——不可重复读发生在一个事务执行相同的查询两次或两次以上,但是每次都得到不同的数据时。这通常是因为另一个并发事务在两次查询期间进行了更新。
③、幻读(Phantom read)——幻读与不可重复读类似。它发生在一个事务(T1)读取了几行数据,接着另一个并发事务(T2)插入了一些数据时。在随后的查询中,第一个事务(T1)就会发现多了一些原本不存在的记录。
注意:不可重复读重点是修改,而幻读重点是新增或删除。
在 Spring 事务管理中,为我们定义了如下的隔离级别:
①、ISOLATION_DEFAULT:使用后端数据库默认的隔离级别(不同的数据隔离级别不同)
②、ISOLATION_READ_UNCOMMITTED:最低的隔离级别,允许读取尚未提交的数据变更,可能会导致脏读、幻读或不可重复读
③、ISOLATION_READ_COMMITTED(Oracle):允许读取并发事务已经提交的数据,可以阻止脏读,但是幻读或不可重复读仍有可能发生
④、ISOLATION_REPEATABLE_READ(mysql):对同一字段的多次读取结果都是一致的,除非数据是被本身事务自己所修改,可以阻止脏读和不可重复读,但幻读仍有可能发生
⑤、ISOLATION_SERIALIZABLE:最高的隔离级别,完全服从ACID的隔离级别,确保阻止脏读、不可重复读以及幻读,也是最慢的事务隔离级别,因为它通常是通过完全锁定事务相关的数据库表来实现的。
上面定义的隔离级别,在 Spring 的 TransactionDefinition.class 中也分别用常量 -1,0,1,2,4,8表示。比如 ISOLATION_DEFAULT 的定义:
/**
 * Use the default isolation level of the underlying datastore.
 * All other levels correspond to the JDBC isolation levels.
 * @see java.sql.Connection
 */
int ISOLATION_DEFAULT = -1;
10.4.3.只读
这是事务的第三个特性,是否为只读事务。如果事务只对后端的数据库进行该操作,数据库可以利用事务的只读特性来进行一些特定的优化。通过将事务设置为只读,你就可以给数据库一个机会,让它应用它认为合适的优化措施。
Spring会管理事务,但是查询一般都设置成只读事务,性能会高!
10.4.4.事务超时
为了使应用程序很好地运行,事务不能运行太长的时间。因为事务可能涉及对后端数据库的锁定,所以长时间的事务会不必要的占用数据库资源。事务超时就是事务的一个定时器,在特定时间内事务如果没有执行完毕,那么就会自动回滚,而不是一直等待其结束。
10.4.5.回滚规则
事务五边形的最后一个方面是一组规则,这些规则定义了哪些异常会导致事务回滚而哪些不会。默认情况下,事务只有遇到运行期异常时才会回滚,而在遇到检查型异常时不会回滚(这一行为与EJB的回滚行为是一致的) 。但是你可以声明事务在遇到特定的检查型异常时像遇到运行期异常那样回滚。同样,你还可以声明事务遇到特定的异常不回滚,即使这些异常是运行期异常。
可以指定何种类型的异常西是否需要回滚撤销!!
10.5 转账案例(不用事务实现转账)
我们还是以转账为实例。不用事务看如何实现转账。在数据库中有如下表 account ,内容如下:
CREATE TABLE `ar_account` (
  `id` INT(10) UNSIGNED NOT NULL AUTO_INCREMENT,
  `username` VARCHAR(20) NOT NULL,
  `money` DECIMAL(10,2) DEFAULT NULL,
  PRIMARY KEY (`id`)
) ENGINE=INNODB AUTO_INCREMENT=3 DEFAULT CHARSET=utf8;

/*Data for the table `ar_account` */

INSERT  INTO `ar_account`(`id`,`username`,`money`) VALUES (1,'cat','1000.00');
INSERT  INTO `ar_account`(`id`,`username`,`money`) VALUES (2,'Tom','1000.00');
创建Mapper接口:
/**
 * @author bruceliu
 * @create 2019-09-22 23:49
 * @description
 */
public interface AccountMapper {

    /**
     * 加钱方法
     *
     * @param id
     * @param money
     */
    void increaseMoney(@Param("id") Integer id, @Param("money") Double money);

    /**
     * 减钱方法
     *
     * @param id
     * @param money
     */
    void decreaseMoney(@Param("id") Integer id, @Param("money") Double money);
}
创建XML文件:
<?xml version="1.0" encoding="UTF-8"?>
<!DOCTYPE mapper
        PUBLIC "-//mybatis.org//DTD Mapper 3.0//EN"
        "http://mybatis.org/dtd/mybatis-3-mapper.dtd">
<mapper namespace="com.ssm.mapper.AccountMapper">

    <select id="increaseMoney">
        update ar_account set money=money+#{money} where id=#{id}
    </select>

    <select id="decreaseMoney">
        update ar_account set money=money-#{money} where id=#{id}
    </select>

</mapper>
创建Service接口:
/**
 * @author bruceliu
 * @create 2019-09-22 23:53
 * @description
 */
public interface AccountService {

    // 转账业务
    void transfer(Integer from, Integer to, Double money);
}
创建Service接口实现层:
/**
 * @author bruceliu
 * @create 2019-09-22 23:54
 * @description
 */
@Service
public class AccountServiceImpl implements AccountService {

    @Autowired
    AccountMapper accountMapper;

    @Override
    public void transfer(Integer from, Integer to, Double money) {
        accountMapper.decreaseMoney(from, money);
        accountMapper.increaseMoney(to, money);
    }
}
测试类:
/**
 * @author bruceliu
 * @create 2019-09-17 11:58
 * @description 启动Spring框架测试
 */
@RunWith(SpringJUnit4ClassRunner.class)
@ContextConfiguration("classpath:applicationContext.xml")
public class TestSpring {

    @Resource
    AccountService accountService;

    @Test
    public void test1(){
        accountService.transfer(1, 2, 100.0);
    }
}
查看数据库表 account
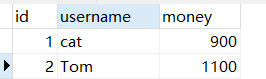
上面的结果和我们想的一样,Tom 账户 money 减少了1000块。而 Marry 账户金额增加了1000块。
这时候问题来了,比如在 Tom 账户 money 减少了1000块正常。而 Marry 账户金额增加时发生了异常,实际应用中比如断电(这里我们人为构造除数不能为0的异常),如下:
 @Override
    public void transfer(Integer from, Integer to, Double money) {
        accountMapper.decreaseMoney(from, money);
        System.out.println(100/0);
        accountMapper.increaseMoney(to, money);
    }
那么这时候我们执行测试程序,很显然会报错,那么数据库是什么情况呢?
java.lang.ArithmeticException: / by zero

	at com.ssm.service.impl.AccountServiceImpl.transfer(AccountServiceImpl.java:22)
	at com.ssm.test.TestSpring.test1(TestSpring.java:25)
	at sun.reflect.NativeMethodAccessorImpl.invoke0(Native Method)
	at sun.reflect.NativeMethodAccessorImpl.invoke(NativeMethodAccessorImpl.java:62)
	at sun.reflect.DelegatingMethodAccessorImpl.invoke(DelegatingMethodAccessorImpl.java:43)
	at java.lang.reflect.Method.invoke(Method.java:497)
	at org.junit.runners.model.FrameworkMethod$1.runReflectiveCall(FrameworkMethod.java:50)
	at org.junit.internal.runners.model.ReflectiveCallable.run(ReflectiveCallable.java:12)
	at org.junit.runners.model.FrameworkMethod.invokeExplosively(FrameworkMethod.java:47)
	at org.junit.internal.runners.statements.InvokeMethod.evaluate(InvokeMethod.java:17)
	at org.springframework.test.context.junit4.statements.RunBeforeTestMethodCallbacks.evaluate(RunBeforeTestMethodCallbacks.java:75)
	at org.springframework.test.context.junit4.statements.RunAfterTestMethodCallbacks.evaluate(RunAfterTestMethodCallbacks.java:86)
	at org.springframework.test.context.junit4.statements.SpringRepeat.evaluate(SpringRepeat.java:84)
	at org.junit.runners.ParentRunner.runLeaf(ParentRunner.java:325)
	at org.springframework.test.context.junit4.SpringJUnit4ClassRunner.runChild(SpringJUnit4ClassRunner.java:252)
	at org.springframework.test.context.junit4.SpringJUnit4ClassRunner.runChild(SpringJUnit4ClassRunner.java:94)
	at org.junit.runners.ParentRunner$3.run(ParentRunner.java:290)
	at org.junit.runners.ParentRunner$1.schedule(ParentRunner.java:71)
	at org.junit.runners.ParentRunner.runChildren(ParentRunner.java:288)
	at org.junit.runners.ParentRunner.access$000(ParentRunner.java:58)
	at org.junit.runners.ParentRunner$2.evaluate(ParentRunner.java:268)
数据库account :

我们发现,程序执行报错了,但是数据库 Tom 账户金额依然减少了 1000 块,但是 Marry 账户的金额却没有增加。这在实际应用中肯定是不允许的,那么如何解决呢?
10.6 声明式事务处理实现转账(基于AOP的 xml 配置)
10.6.1.TransactionManager
在不同平台,操作事务的代码各不相同,因此spring提供了一个 TransactionManager 接口:
DateSourceTransactionManager 用于 JDBC 的事务管理
<bean id="transactionManager" class="org.springframework.jdbc.datasource.DataSourceTransactionManager">
     <property name="dataSource" ref="ds"/>
</bean>
HibernateTransactionManager 用于 Hibernate 的事务管理
JpaTransactionManager 用于 Jpa 的事务管理

10.6.2.添加tx命名空间
事务基础组件,对 DAO 的支持
修改 applicationContext.xml
<?xml version="1.0" encoding="UTF-8"?>
<beans xmlns:xsi="http://www.w3.org/2001/XMLSchema-instance"
	xmlns="http://www.springframework.org/schema/beans" xmlns:context="http://www.springframework.org/schema/context"
	xmlns:aop="http://www.springframework.org/schema/aop" xmlns:tx="http://www.springframework.org/schema/tx"
	xmlns:p="http://www.springframework.org/schema/p"
	xsi:schemaLocation="http://www.springframework.org/schema/beans
http://www.springframework.org/schema/beans/spring-beans-4.2.xsd
http://www.springframework.org/schema/context
http://www.springframework.org/schema/context/spring-context-4.2.xsd
http://www.springframework.org/schema/aop
http://www.springframework.org/schema/aop/spring-aop-4.2.xsd
http://www.springframework.org/schema/tx
http://www.springframework.org/schema/tx/spring-tx-4.2.xsd">


</beans>
10.6.3.添加事务相关配置
修改applicationContext.xml
<!-- 配置事务:
       Spring事务配置有2种方案:
          1.使用XML来配置声明式事务!
          2.使用注解来配置声明式事务!(推荐)
    -->

    <!--事务平台管理器 Spring框架管理事务,有一个核心的接口:PlatformTransactionManager 这个接口有很多实现类,其中有一个专门是JDBC事务管理的类:DataSourceTransactionManager-->
    <!--如果是MyBatis框架,那么事务管理器:DataSourceTransactionManager-->
    <bean id="transactionManager" class="org.springframework.jdbc.datasource.DataSourceTransactionManager">
        <property name="dataSource" ref="ds"/>
    </bean>

    <!--将事务织入到目标方法之上-->
    <tx:advice id="advice"  transaction-manager="transactionManager">
        <!--指定事务管理器-->
        <tx:attributes>

            <!--转账方法需要事务  propagation="REQUIRED" 默认值! 必须在事务中进行,有事务那么就是使用,没有就创建
                isolation="DEFAULT" 数据库的四大隔离级别,如果不配置就是默认
                Mysql默认隔离级别:REPEATABLE_READ

                timeout="-1" 事务超时机制,没有超时  timeout="3" 目标方法3秒之后超时,自动回滚!

                no-rollback-for="java.lang.ArithmeticException" 配置具体的某一个异常 不回滚  默认是所有的异常都回滚!
            -->
            <tx:method name="transferMoney" propagation="REQUIRED" isolation="DEFAULT" timeout="30"/>
            <tx:method name="add*" propagation="REQUIRED" isolation="REPEATABLE_READ"/>
            <tx:method name="insert*" propagation="REQUIRED" isolation="REPEATABLE_READ"/>
            <tx:method name="update*" propagation="REQUIRED" isolation="REPEATABLE_READ"/>
            <tx:method name="del*" propagation="REQUIRED" isolation="REPEATABLE_READ"/>

            <!--查询的话,不需要在事务中进行 查询配置只读事务read-only="true"-->
            <tx:method name="find*" propagation="NOT_SUPPORTED" read-only="true" isolation="REPEATABLE_READ"/>
            <tx:method name="search*" propagation="NOT_SUPPORTED" read-only="true" isolation="REPEATABLE_READ"/>

            <!--propagation="SUPPORTS" 可有可无-->
            <tx:method name="*" propagation="SUPPORTS" read-only="true" isolation="REPEATABLE_READ"/>

        </tx:attributes>
    </tx:advice>

    <!--配置切面-->
    <aop:config>
        <aop:pointcut id="pointcut" expression="execution(* com.ssm.service.impl.*.*(..))"/>
        <aop:advisor advice-ref="advice" pointcut-ref="pointcut"/>
    </aop:config>
另一个xml配置案例:
<?xml version="1.0" encoding="UTF-8"?>
<beans xmlns="http://www.springframework.org/schema/beans"
       xmlns:xsi="http://www.w3.org/2001/XMLSchema-instance"
       xmlns:context="http://www.springframework.org/schema/context" xmlns:tx="http://www.springframework.org/schema/tx"
       xmlns:aop="http://www.springframework.org/schema/aop"
       xsi:schemaLocation="http://www.springframework.org/schema/beans http://www.springframework.org/schema/beans/spring-beans.xsd http://www.springframework.org/schema/context https://www.springframework.org/schema/context/spring-context.xsd http://www.springframework.org/schema/tx http://www.springframework.org/schema/tx/spring-tx.xsd http://www.springframework.org/schema/aop https://www.springframework.org/schema/aop/spring-aop.xsd">

    <!--扫描业务逻辑层-->
    <context:component-scan base-package="com.bruce.service"/>

    <context:property-placeholder location="classpath:db.properties" file-encoding="UTF-8"/>

    <bean id="ds" class="com.alibaba.druid.pool.DruidDataSource">
        <property name="username" value="${jdbc.username}"></property>
        <property name="password" value="${jdbc.password}"></property>
        <property name="url" value="${jdbc.url}"></property>
        <property name="driverClassName" value="${jdbc.driverClassName}"></property>
    </bean>

    <!--Spring整合MyBatis-->
    <!--MyBatis依赖 3.4.5   mybatis-spring 1.3.0-->
    <!--配置sqlSessionFactory Spring管理给自动MyBatis用-->
    <bean id="sqlSessionFactory" class="org.mybatis.spring.SqlSessionFactoryBean">
        <!--数据源-->
        <property name="dataSource" ref="ds"/>
        <!--配置mapper.xml文件路径-->
         <!-- <property name="mapperLocations" value="classpath:mappers/*.xml"/>-->
        <!--统一实体类配置实体类别名  实体Account account(不区分大小写) -->
        <property name="typeAliasesPackage" value="com.bruce.pojo"/>
    </bean>

    <!--spring框架给Mapper层生成对象  sqlsession.getMapper(AccountMapper.class);-->
    <bean class="org.mybatis.spring.mapper.MapperScannerConfigurer">
        <!--Spring 框架会自动通过动态代理模式(反射) 生成对象-->
        <property name="basePackage" value="com.bruce.mapper"/>
    </bean>

    <!--事务管理器:MyBatis平台事务管理器-->
    <bean id="transactionManager" class="org.springframework.jdbc.datasource.DataSourceTransactionManager">
        <property name="dataSource" ref="ds"/>
    </bean>

    <!--Spring框架事务管理AOP实现底层代理设计模式  将事务织入到目标方法之上  tx:adivce是设置事务的相关的属性和描述-->
    <tx:advice transaction-manager="transactionManager" id="advice">
        <tx:attributes>
            <!--哪些方法需要事务管理 事务的属性配置-->
            <!--
               事务的属性配置(如果不配置有默认值)

               1.事务的隔离级别(可以使用Spring框架跳转Mysql隔离级别) isolation="DEFAULT" isolation:事务隔离级别定义;默认为“DEFAULT”
               2.read-only:事务只读设置,默认为false,表示不是只读! 如果查询可以把查询配置为只读事务,Mysql数据库会针对查询的SQL进行适当优化,提供查询性能!
               3.timeout:事务超时时间设置,单位为秒,默认-1,表示事务超时将依赖于底层事务系统;如果某个方法执行超时自动回滚!
               4.回滚规则:
                 rollback-for:需要触发回滚的异常定义,可定义多个,以“,”分割,默认任何RuntimeException都将导致事务回滚,而任何Checked Exception将不导致事务回滚;
                 no-rollback-for:不被触发进行回滚的 Exception(s);可定义多个,以“,”分割;
                 例如:no-rollback-for="java.lang.ArithmeticException" 如果出现算数异常,不要回滚! no-rollback-for="java.lang.ArithmeticException,java.lang.NullPointerException"
               5.传播行为:一个事务方法调用另外一个事务方法,另外事务方法的事务如何表现?
            -->
            <tx:method name="zhuanzhuang" isolation="DEFAULT" read-only="false" timeout="-1" rollback-for="java.lang.RuntimeException"/>
            <tx:method name="find*" read-only="true"/>
        </tx:attributes>
    </tx:advice>

    <!--配置切面   aop:config面向切面编程的切点,选择对应的方法进行切入-->
    <aop:config>
        <aop:pointcut id="pc" expression="execution(* com.bruce.service.impl.AccountServiceImpl.*(..))"/>
        <aop:advisor advice-ref="advice" pointcut-ref="pc"/>
    </aop:config>

</beans>
配置介绍:
tx:advice 是用于配置事务相关信息, transaction-manager属性是引入对应类型的事务管理;
jdbc/mybatias : DataSourceTransactionManagerhibernate: HibernateTransactionManager
JPA:JPATransactionManager
tx:attributes 此标签所配置的是 哪些方法可以作为事务方法(为后面切点进行补充)
tx:method 标签设置具体要添加事务的方法和其他属性
name 是必须的,表示与事务属性关联的方法名(业务方法名),对切入点进行细化。通配符*可以用来指定一批关联到相同的事务属性的方法。如:‘get*’、‘handle*’、’on*Event’等等.
propagation 不是必须的 ,默认值是REQUIRED 表示事务传播行为, 包括REQUIRED,SUPPORTS,MANDATORY,REQUIRES_NEW,NOT_SUPPORTED,NEVER,NESTED
isolation 不是必须的 默认值DEFAULT
timeout 不是必须的 默认值-1(永不超时) 表示事务超时的时间(以秒为单位)
read-only 不是必须的 默认值false不是只读的 表示事务是否只读?
rollback-for 不是必须的 表示将被触发进行回滚的 Exception(s);以逗号分开。 如:‘com.itqf.MyBusinessException,ServletException’
no-rollback-for 不是必须的 表示不被触发进行回滚的 Exception(s);以逗号分开。 如:‘com.foo.MyBusinessException,ServletException’
aop:config标签 设置事务的切点,配置参与事务的类和对应的方法.

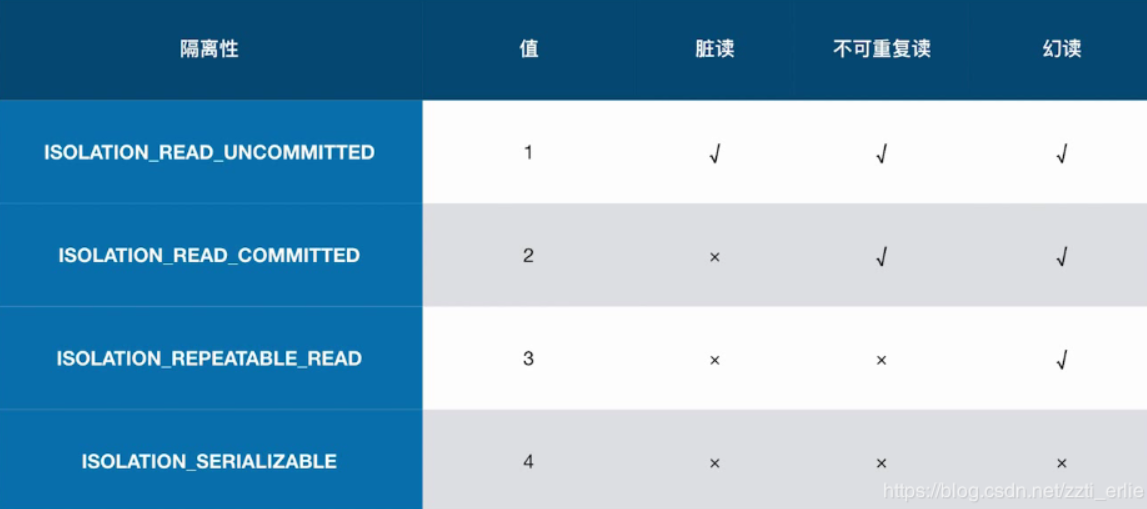
注意:
aop:config和tx:advice 但是两者并不冲突, aop:config面向切面编程的切点,选择对应的方法进行切入,而tx:adivce是设置事务的相关的属性和描述,换句话说,aop:config选择了对应的切入点,tx:advice是在这些切入点上根据 method name属性再次进行筛选!!!
10.7 配置声明事务(基于AOP的 注解 配置)
除了基于XML的事务配置,Spring还提供了基于注解的事务配置,即通过@Transactional对需要事务增强的Bean接口,实现类或者方法进行标注,在容器中配置基于注解的事务增强驱动,即可启用注解的方式声明事务!
10.7.1.使用@Transactional注解
顺着原来的思路,使用@Transactional对基于aop/tx命名空间的事务配置进行改造!
修改service类添加@Transactional注解
//对业务类进行事务增强的标注
 /**
    * 转账方法
    * @param fromName
    * @param toName
    * @param money
    * @return
    */
   @Transactional(propagation= Propagation.REQUIRED,isolation = Isolation.DEFAULT,readOnly = false,timeout = -1,rollbackFor = Exception.class)
   @Override
   public int transferMoney(String fromName, String toName, Double money) {
       int count1 = accountMapper.OutMoney(fromName, money);
       int i=100/0;
       int count2 = accountMapper.InMoney(toName, money);
       return count1+count2;
   }
因为注解本身具有一组默认的事务属性,所以往往只要在需要事务的业务类中添加一个@Transactional注解,就完成了业务类事务属性的配置!
当然,注解只能提供元数据,它本身并不能完成事务切面织入的功能.因此,还需要在Spring的配置中通过一行配置’通知’Spring容器对标注@Transactional注解的Bean进行加工处理!
配置:
<!-- 平台事务管理器 -->
<bean id="transactionManager"
	class="org.springframework.jdbc.datasource.DataSourceTransactionManager">
	<property name="dataSource" ref="dataSource" />
</bean>

<!--对标注@Transactional注解的Bean进行加工处理,以织入事物管理切面 -->
<tx:annotation-driven transaction-manager="transactionManager" />
在默认情况, <tx:annotation-driven /> 中transaction-manager属性会自动使用名为 “transactionManager” 的事务管理器.所以,如果用户将事务管理器的id定义为 transactionManager , 则可以进一步将①处的配置简化为 <tx:annotation-driven />.
使用以上测试用例即可使用以上测试用例即可
完成配置文件:
<?xml version="1.0" encoding="UTF-8"?>
<beans xmlns="http://www.springframework.org/schema/beans"
       xmlns:xsi="http://www.w3.org/2001/XMLSchema-instance"
       xmlns:context="http://www.springframework.org/schema/context"
       xmlns:tx="http://www.springframework.org/schema/tx"
       xmlns:aop="http://www.springframework.org/schema/aop"
       xsi:schemaLocation="http://www.springframework.org/schema/beans
       http://www.springframework.org/schema/beans/spring-beans.xsd
       http://www.springframework.org/schema/context
       https://www.springframework.org/schema/context/spring-context.xsd
       http://www.springframework.org/schema/tx
       http://www.springframework.org/schema/tx/spring-tx.xsd
       http://www.springframework.org/schema/aop
       https://www.springframework.org/schema/aop/spring-aop.xsd">

    <!--扫描业务逻辑层-->
    <context:component-scan base-package="com.bruce.service"/>

    <context:property-placeholder location="classpath:db.properties" file-encoding="UTF-8"/>

    <bean id="ds" class="com.alibaba.druid.pool.DruidDataSource">
        <property name="username" value="${jdbc.username}"></property>
        <property name="password" value="${jdbc.password}"></property>
        <property name="url" value="${jdbc.url}"></property>
        <property name="driverClassName" value="${jdbc.driverClassName}"></property>
    </bean>

    <!--Spring整合MyBatis-->
    <!--MyBatis依赖 3.4.5   mybatis-spring 1.3.0-->
    <!--配置sqlSessionFactory Spring管理给自动MyBatis用-->
    <bean id="sqlSessionFactory" class="org.mybatis.spring.SqlSessionFactoryBean">
        <!--数据源-->
        <property name="dataSource" ref="ds"/>
        <!--配置mapper.xml文件路径-->
         <!-- <property name="mapperLocations" value="classpath:mappers/*.xml"/>-->
        <!--统一实体类配置实体类别名  实体Account account(不区分大小写) -->
        <property name="typeAliasesPackage" value="com.bruce.pojo"/>
    </bean>

    <!--spring框架给Mapper层生成对象  sqlsession.getMapper(AccountMapper.class);-->
    <bean class="org.mybatis.spring.mapper.MapperScannerConfigurer">
        <!--Spring 框架会自动通过动态代理模式(反射) 生成对象-->
        <property name="basePackage" value="com.bruce.mapper"/>
    </bean>

    <!--事务管理器:MyBatis平台事务管理器-->
    <bean id="transactionManager" class="org.springframework.jdbc.datasource.DataSourceTransactionManager">
        <property name="dataSource" ref="ds"/>
    </bean>

    <!--开启注解事务配置-->
    <tx:annotation-driven transaction-manager="transactionManager"/>

</beans>
10.7.2 @Transactional其他方面介绍
- 关于@Transactional的属性
基于@Transactional注解的配置和基于xml的配置一样,它拥有一组普适性很强的默认事务属性,往往可以直接使用默认的属性.
  - 事务传播行为: PROPAGATION_REQUIRED.
  - 事务隔离级别: ISOLATION_DEFAULT.
  - 读写事务属性:读/写事务.
  - 超时时间:依赖于底层的事务系统默认值
  - 回滚设置:任何运行期异常引发回滚,任何检查型异常不会引发回滚.
默认值可能适应大部分情况,但是我们依然可以可以自己设定属性,具体属性表如下:

- 在方法使用注解
方法出添加注解会覆盖类定义处的注解,如果有写方法需要使用特殊的事务属性,则可以在类注解的基础上提供方法注解,如下:
@Transactional(propagation= Propagation.NOT_SUPPORTED,readOnly = true)
public class AccountServiceImpl implements AccountService {

    @Autowired
    AccountMapper accountMapper;

    @Transactional(propagation= Propagation.REQUIRED,isolation = Isolation.DEFAULT,readOnly = false,timeout = -1,rollbackFor = Exception.class)
    @Override
    public int addAccount(Account account) {
        return accountMapper.addAccount(account);
    }

    /**
     * 转账方法
     * @param fromName
     * @param toName
     * @param money
     * @return
     */
    @Transactional(propagation= Propagation.REQUIRED,isolation = Isolation.DEFAULT,readOnly = false,timeout = -1,rollbackFor = Exception.class)
    @Override
    public int transferMoney(String fromName, String toName, Double money) {
        int count1 = accountMapper.OutMoney(fromName, money);
        int i=100/0;
        /*try {
            Thread.sleep(6000);
        } catch (InterruptedException e) {
            e.printStackTrace();
        } finally {
        }*/
        int count2 = accountMapper.InMoney(toName, money);
        return count1+count2;
    }
}
10.8 注意:
事务常见API:

平台事务管理器常见实现类:

事务传播行为:


事务传播级别图解:
INSTED:

ropagation-REQUIRED

REQUIRES_NEW
 spring事务注解:

版权声明:本文内容由互联网用户自发贡献,该文观点仅代表作者本人。本站仅提供信息存储空间服务,不拥有所有权,不承担相关法律责任。如发现本站有涉嫌侵权/违法违规的内容, 请发送邮件至 举报,一经查实,本站将立刻删除。
文章由极客之音整理,本文链接:https://www.bmabk.com/index.php/post/94160.html

