
ROS Noetic Ninjemys ROS LTS安装问题、记录与解决办法
官方中文安装指导文档:http://wiki.ros.org/cn/noetic/Installation/Ubuntu
官方英文安装指导文档:http://wiki.ros.org/noetic/Installation/Ubuntu
清华大学开源软件镜像站:https://mirror.tuna.tsinghua.edu.cn/help/AOSP/
一、安装Unbuntu 20.04
(一)虚拟机安装
1. VMware 安装
2. Virtual 安装
(二)实体机安装
1. Ubuntu 20.04 单系统
2. Ubuntu 20.04 与 Windows 10双系统
二、安装ROS Noetic命令解读
官方中文参考文档中给的安装步骤有5步(配置Ubuntu软件仓库、设置sources.list、设置密钥、开始安装、设置环境),如下图所示,下面分别对这5个安装步骤进行详细解释和说明。


(一)配置Ubuntu软件仓库
详见Ubuntu软件指南:https://help.ubuntu.com/community/Repositories/Ubuntu
这里主要设置自己Ubuntu下的软件安装来源,可直接在Software & Updates的GUI中进行设置。
(二)设置sources.list
指令:
(三)设置密钥
(四)开始安装
(五)设置环境
三、安装ROS Noetic
(一)执行安装命令(sudo apt install ros-noetic-desktop-fill)出现错误
问题:E: 有未能满足的依赖关系。请尝试不指明软件包的名字来运行“apt –fix-broken install”(也可以指定一个解决办法)
办法:终端输入 sudo apt-get -f install
(二)sudo rosdep init 出现Website may be down

解决办法:
- 浏览器访问:https://raw.githubusercontent.com/ros/rosdistro/master/rosdep/sources.list.d/20-default.list
打开后可以看到如下内容
# os-specific listings first
yaml https://raw.githubusercontent.com/ros/rosdistro/master/rosdep/osx-homebrew.yaml osx

# generic
yaml https://raw.githubusercontent.com/ros/rosdistro/master/rosdep/base.yaml
yaml https://raw.githubusercontent.com/ros/rosdistro/master/rosdep/python.yaml
yaml https://raw.githubusercontent.com/ros/rosdistro/master/rosdep/ruby.yaml
gbpdistro https://raw.githubusercontent.com/ros/rosdistro/master/releases/fuerte.yaml fuerte

# newer distributions (Groovy, Hydro, ...) must not be listed anymore, they are being fetched from the rosdistro index.yaml instead
sudo rosdep init命令的作用就是将上述yaml代码得到内容写进在我们Ubuntu系统的“~/etc/ros/rosdep/sources.list.d/20-default.list”文件中。因此可以自己创建相应的文件,从而绕过sudo rosdep init,直接执行rosdep update。执行命令如下
sudo mkdir -p /etc/ros/rosdep/sources.list.d  # 创建相应的文件
sudo gedit /etc/ros/rosdep/sources.list.d/20-default.list  # 创建20-default.list,将上述ymal代码复制进来保存并推出即可执行rosdep update
(三)rosdep update 出错
解决办法参考:
CSDN博文1:https://blog.csdn.net/leida_wt/article/details/115120940
CSDN博文2:https://blog.csdn.net/lemonxiaoxiao/article/details/119454855
在终端执行
sudo gedit /etc/ros/rosdep/sources.list.d/20-default.list
执行完毕,在打开的文件中重新输入一下ymal代码
# os-specific listings first
yaml https://ghproxy.com/https://raw.githubusercontent.com/ros/rosdistro/master/rosdep/osx-homebrew.yaml osx

# generic
yaml https://ghproxy.com/https://raw.githubusercontent.com/ros/rosdistro/master/rosdep/base.yaml
yaml https://ghproxy.com/https://raw.githubusercontent.com/ros/rosdistro/master/rosdep/python.yaml
yaml https://ghproxy.com/https://raw.githubusercontent.com/ros/rosdistro/master/rosdep/ruby.yaml
gbpdistro https://ghproxy.com/https://raw.githubusercontent.com/ros/rosdistro/master/releases/fuerte.yaml fuerte

# newer distributions (Groovy, Hydro, ...) must not be listed anymore, they are being fetched from the rosdistro index.yaml instead
保存并关闭
在终端中继续执行
sudo gedit /usr/lib/python3/dist-packages/rosdistro/__init__.py
执行完毕,在打开的文件找到DEFAULT_INDEX_URL,并按照如下代码进行修改
DEFAULT_INDEX_URL = 'https://ghproxy.com/https://raw.githubusercontent.com/ros/rosdistro/master/index-v4.yaml'
然后执行rosdep update。执行不成功请多执行几遍rosdep update,或者换个时间、换成手机热点,一般都会成功。可能会出现的问题

参考:CSDN博文3:https://blog.csdn.net/c417469898/article/details/106360595
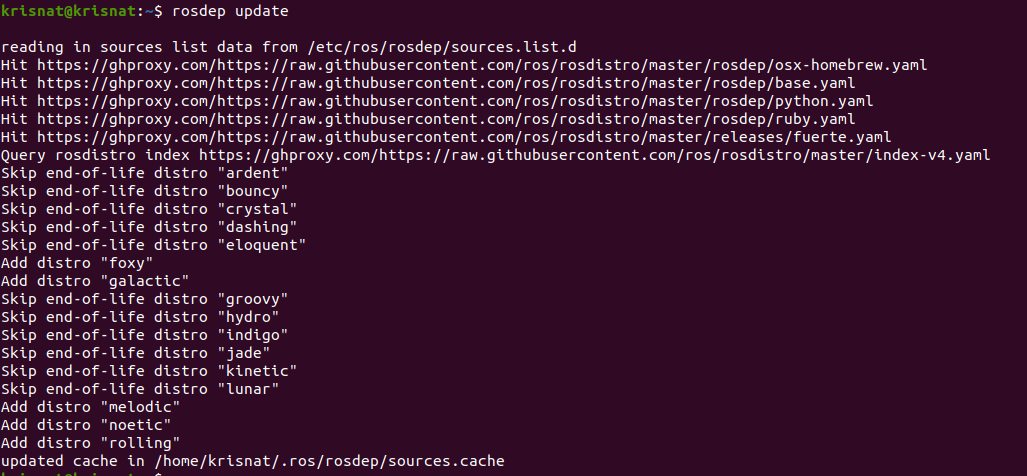
出现一下结果过则表示rosdep update成功
版权声明:本文内容由互联网用户自发贡献,该文观点仅代表作者本人。本站仅提供信息存储空间服务,不拥有所有权,不承担相关法律责任。如发现本站有涉嫌侵权/违法违规的内容, 请发送邮件至 举报,一经查实,本站将立刻删除。
文章由极客之音整理,本文链接:https://www.bmabk.com/index.php/post/74521.html

