
文章目录
前言
对于正常的程序的运行中往往都是通过单线程运行(cpu先执行然后进行io,io等待期间cpu不做任何事情然后以此类推运行下去)。
对于io的执行(比如读取内存、磁盘、网络它的过程中是不需要cpu参与的)。
通过单线程运行整体时间会有所浪费,那么通过多线程(Thread)并发的方式去执行(cpu先执行,遇到io切换到另一个task进行执行,当io完成通知cpu进行下一步操作),不过其原理上是通过一个cpu进行运行的。
现在我们电脑中大都是多核cpu,所以我们可以通过多个cpu实现多条线程的方式进行运算,我们称为多cpu并行,简称:多进程(Process)。
在如今的大数据时代,很多程序的运行都可以用很多的机器并行来进行运算(多个机器上都有一个cpu,一个cpu有多核,可以执行多线程、多进程运算,我们称为多机器并行)而实现该集群操作的有hadoop/hive/spark。
这些操作我们都统称为并发编程。
那么python对于并发编程有三种方式多线程Thread、多进程Process,多协程Coroutine。
我们做一下总结:
- 多线程:threading,利用cpu和io同时执行的原理,当io等待时不会等待,而是切换到另一个task进行执行
- 多进程:multiprocessing,利用多核cpu的能力实现多条线程的方式运行,达到
并行的操作。 - 异步IO:asyncio,在单线程利用CPU和IO同时执行的原理,实现函数异步执行。
对于asyncio多协程操作将分成另一篇文章进行讲解。
异步IO链接:https://blog.csdn.net/weixin_45859193/article/details/119930305
为了防止并发编程冲突访问、简化操作,python还提供了以下内置类:
- 使用Lock对资源加锁,防止冲突访问
- 使用Queue实现不同线程/进程之间的数据通信,实现生产者-消费者模式
- 使用线程池Pool/进程池Pool,简化线程/进程的任务提交、等待结束、获取结果
- 使用subprocess启动外部程序的进程,并进行输入输出交互
一、多线程实现并发编程
1.多线程的使用
对于多线程的使用,我们本次通过爬取微博热门标题的方式,来比较一下多线程的速度。
concurrency.py如下:
import requests
import threading
import time


class WeiboHot:
    url = "https://weibo.com/a/aj/transform/loadingmoreunlogin?ajwvr=6&category=0&page={}&lefnav=0&cursor=&__rnd={}"

    def __init__(self):
        self.urls = []
        self.get_url()

    def get_url(self):
        for page in range(1, 30):
            millis = int(round(time.time() * 1000) + 6 * page)
            url = self.url.format(page, millis)
            self.urls.append(url)

    def craw(self, url):
        r = requests.get(url)
        print(url, len(r.text))

    def single_thread(self):
        for url in self.urls:
            self.craw(url)

    def multi_thread(self):
        threads = []
        for url in self.urls:
        	# 存放任务
            threads.append(threading.Thread(target=self.craw, args=(url,)))

        for thread in threads:
        	# 执行
            thread.start()
        for thread in threads:
        	# 结束
            thread.join()


if __name__ == '__main__':
    wb = WeiboHot()
    start_single = time.time()
    wb.single_thread()
    end_single = time.time()
    start_multi = time.time()
    wb.multi_thread()
    end_multi = time.time()
    print("单线程执行", end_single - start_single, "秒")
    print("多线程执行", end_multi - start_multi, "秒")
执行代码如下:


可以看到对于单线程执行爬虫而言,通过page的参数知道请求是按照顺序依次执行的,而对于多线程而言是不分顺序的,谁先完成谁打印,且多线程的效率已经超出单线程的10倍,并且遍历越多倍速越大。
2.多线程数据通信queue
在某些需求的情况下,如果我们需要通过将获取到的数据进行保存,且获取、保存都需要用到多线程操作,两者需要结合(当获取到一定数据的时候切换到保存操作然后保存到一定数据的时候又切换回去,以此类推)起来的时候,我们就需要用到多线程数据通信queue(队列),我们称其为生产消费者模式。
初始化代码如下:
import requests
import threading
import time
import bs4
import json
import queue
import random
from requests.exceptions import MissingSchema


class WeiboHot:
    url = "https://weibo.com/a/aj/transform/loadingmoreunlogin?ajwvr=6&category=0&page={}&lefnav=0&cursor=&__rnd={}"

    def __init__(self):
        self.urls = []
        self.bool_craw, self.bool_parse = True, True
        self.get_url()

    def get_url(self):
        for page in range(1, 30):
            millis = int(round(time.time() * 1000) + 6 * page)
            url = self.url.format(page, millis)
            self.urls.append(url)
        self.urls.append(None)
这里我们在init方法中中初始化参数(urls为爬取链接,bool_craw、bool_parse 为后面通过生产消费者模式完毕时终止),通过get_url函数将请求url赋值给了self.urls,最后又添加了None(用于停止生产者模式)。
继续往下看生产者模式代码如下:
def craw(self, url):
    r = requests.get(url)
    data = json.loads(r.text)
    soup = bs4.BeautifulSoup(data['data'], "html.parser")
    links = soup.find_all("a", class_="a_topic")
    return [(link["href"], link.get_text()) for link in links]

def do_craw(self, url_queue: queue.Queue, html_queue: queue.Queue):
   while self.bool_craw:
       try:
           url = url_queue.get()
           html = self.craw(url)
           html_queue.put(html)
           print(threading.current_thread().name)
           time.sleep(random.randint(1, 2))
       except MissingSchema as e:
           html_queue.put(None)
           self.bool_craw = False
对于queue队列,其特点为先进先出,那么do_craw函数通过获取请求url的形式并解析成数据后,进行了put操作(进栈),此时延迟1、2秒(等待消费者模式进行保存操作)。
当请求url到最后为None时会抛出(MissingSchema异常,然后我们将None推进栈中,等消费者函数到最后时就会停止)。
消费者模式实现代码如下:
def do_parse(self, html_queue: queue.Queue, fout):
    while self.bool_parse:
        results = html_queue.get()
        if not results:
            self.bool_parse = False
            return
        for result in results:
            fout.write(str(result) + "\n")
        print(threading.current_thread().name)
        time.sleep(random.randint(1, 2))
这里do_parse函数会去获取html_queue的数据,然后将获取到的数据保存起来(当数据为None时循环结束),最后等待1、2秒(等待生产者函数进行解析数据操作)。
全部代码:
import requests
import threading
import time
import bs4
import json
import queue
import random
from requests.exceptions import MissingSchema


class WeiboHot:
    url = "https://weibo.com/a/aj/transform/loadingmoreunlogin?ajwvr=6&category=0&page={}&lefnav=0&cursor=&__rnd={}"

    def __init__(self):
        self.urls = []
        self.bool_craw, self.bool_parse = True, True
        self.get_url()

    def get_url(self):
        for page in range(1, 30):
            millis = int(round(time.time() * 1000) + 6 * page)
            url = self.url.format(page, millis)
            self.urls.append(url)
        self.urls.append(None)

    def craw(self, url):
        r = requests.get(url)
        data = json.loads(r.text)
        soup = bs4.BeautifulSoup(data['data'], "html.parser")
        links = soup.find_all("a", class_="a_topic")
        return [(link["href"], link.get_text()) for link in links]


    def do_craw(self, url_queue: queue.Queue, html_queue: queue.Queue):
        while self.bool_craw:
            try:
                url = url_queue.get()
                html = self.craw(url)
                html_queue.put(html)
                print(threading.current_thread().name)
                time.sleep(random.randint(1, 2))
            except MissingSchema as e:
                html_queue.put(None)
                self.bool_craw = False

    def do_parse(self, html_queue: queue.Queue, fout):
        while self.bool_parse:
            results = html_queue.get()
            if not results:
                self.bool_parse = False
                return
            for result in results:
                fout.write(str(result) + "\n")
            print(threading.current_thread().name)
            time.sleep(random.randint(1, 2))


if __name__ == '__main__':
    url_queue = queue.Queue()
    html_queue = queue.Queue()
    wb = WeiboHot()
    for url in wb.urls:
        # 请求路由
        url_queue.put(url)
    # 生产者线程
    for idx in range(3):
        t = threading.Thread(target=wb.do_craw, args=(url_queue, html_queue), name=f"craw{idx}")
        t.start()
    # 保存到txt文件,utf-8编码
    fout = open("02.data.txt", "w", encoding="utf-8")
    # 消费者线程
    for idx in range(2):
        t = threading.Thread(target=wb.do_parse, args=(html_queue, fout), name=f"results{idx}")
        t.start()
运行代码后如下:

可以看到两两数据在互相调用,通过队列的特性完成了生产消费者模式。
3.线程安全问题之Lock
对于多线程而言执行的速度非常的快,那么在我们编写程序的逻辑中,往往就可能出现一些奇怪的问题。
比如我们拿取钱来说,如果有一个人账号里有1000块钱,然后他想取走600元,但是他同时登录了两个账号去取600元,如果我们是以多线程的模式去处理的话,他很有可能在我们第一次扣费操作还没结束后,第二次取钱还是能进入到扣费操作,结果导致那人取到了1200元,账户余额变成-200元。
代码如下:
import threading
import time


class Account:
    def __init__(self):
        self.balance = 1000


def draw(account, amount):
    if account.balance >= amount:
        time.sleep(0.1)
        account.balance -= amount
        print(threading.current_thread().name, "取钱成功", "余额", account.balance)
    else:
        print(threading.current_thread().name, "余额不足")


if __name__ == '__main__':
    account = Account()
    ta = threading.Thread(target=draw, args=(account, 600), name="ta")
    tb = threading.Thread(target=draw, args=(account, 600), name="tb")

    ta.start()
    tb.start()
可以看到这里我们添加了一个sleep来模拟io的阻塞,导致后面的线程进入最后返回结果打印:
ta 取钱成功 余额 400
tb 取钱成功 余额 -200
这是不可取的,所以多线程中有个Lock就帮助我们解决了这个问题。
import threading
import time

lock = threading.Lock()


class Account:
    def __init__(self):
        self.balance = 1000


def draw(account, amount):
    with lock:
        if account.balance >= amount:
            time.sleep(0.1)
            account.balance -= amount
            print(threading.current_thread().name, "取钱成功", "余额", account.balance)
        else:
            print(threading.current_thread().name, "余额不足")


if __name__ == '__main__':
    account = Account()
    ta = threading.Thread(target=draw, args=(account, 600), name="ta")
    tb = threading.Thread(target=draw, args=(account, 600), name="tb")

    ta.start()
    tb.start()
打印
ta 取钱成功 余额 400
tb 余额不足
对于Lock而言,由于前面的线程还没执行完毕后,遇到io阻塞切换到了下一个线程,此时上一个线程还未执行完毕,当前的Lock是不会执行的,会等到上一个结束为止才会开始执行。
4.线程池的用法
前面我们用到的都是通过一次一次的分配线程使用,而其实还有一个更加方便、安全、灵活的线程池,对于线程池而言由系统分配资源、并且当线程执行结束后,会返回到线程池中,无需重新开辟新的线程,等到需要使用线程使又可以调用。
所以线程池(ThreadPoolExecutor)的好处我们总结一下:
- 提升性能:大大减去了新建、终止线程的开销,重用了线程资源;
- 安全方面:有效规避系统因创建线程过多,导致系统负荷过大响应变慢等问题;
- 场景方面:更加的灵活且适合处理突发性大量请求或大量线程完成任务
- 代码方面:使用线程池的语法比自己创建线程更加简洁
那么对于线程池的使用方法有两种形式我们来一一展示吧。
代码如下:
from concurrent.futures import ThreadPoolExecutor, as_completed
import requests
from bs4 import BeautifulSoup

urls = [
    f"https://www.cnblogs.com/sitehome/p/{uid}"
    for uid in range(1, 30)
]

def craw(url):
    r = requests.get(url)

    soup = BeautifulSoup(r.text, "html.parser")

    links = soup.find_all("a", class_="post-item-title")
    return [(link['href'], link.get_text()) for link in links]

# 第一种方法
with ThreadPoolExecutor() as pool:
    # map参数需要函数+列表参数
    htmls = pool.map(craw, urls)
    for url, html in zip(urls, htmls):
        print(url, html)
这是第一种方式,通过map函数将函数对象和列表参数传入即可实现。
运行如下:

通过打印url可以看到通过线程池中的map函数程序是按顺序执行的。
那么第二种实现方式如下:
from concurrent.futures import ThreadPoolExecutor, as_completed
import requests
from bs4 import BeautifulSoup

urls = [
    f"https://www.cnblogs.com/sitehome/p/{uid}"
    for uid in range(1, 30)
]


def craw(url):
    r = requests.get(url)

    soup = BeautifulSoup(r.text, "html.parser")

    links = soup.find_all("a", class_="post-item-title")
    return [(link['href'], link.get_text()) for link in links]

# # 第二种方法
with ThreadPoolExecutor() as pool:
    futures = {}

    for url in urls:
        # 任务
        future = pool.submit(craw, url)
        # 以任务对象为键,url为值
        futures[future] = url
    # 打印
    for future, url in futures.items():
        print(url, future.result())

print("------" * 15, "通过as_completed方法打印", "------" * 15)
# 第三种方法
with ThreadPoolExecutor() as pool:
    for future in as_completed(futures):
        url = futures[future]
        print(url, future.result())
运行如下:

可以看到通过submit函数所需要的是函数对象和一个参数,相对于map函数而言会更灵活点,且通过返回的参数可以发现submit函数也是依次按顺序执行的。
而as_completed函数需要传入一个字典,且通过遍历获取到每一个线程的任务对象(是一个可迭代对象),并且通过返回参数可以看出as_completed函数不是按照顺序依次执行的。
为了在能更好的在项目中加以使用,我们以python中flask框架为例,实现一个服务加速的示例。
首先安装flask
pip install flask
我们先正常情况下写代码访问路由时的速度(这里通过time.sleep()模拟io阻塞),我们通过postman进行测试。
示例如下:
import flask
import json
import time
from concurrent.futures import ThreadPoolExecutor

app = flask.Flask(__name__)
pool = ThreadPoolExecutor()


def read_file():
    time.sleep(0.1)
    return "file result"


def read_db():
    time.sleep(0.2)
    return "db result"


def read_api():
    time.sleep(0.3)
    return "api result"


@app.route("/")
def index():
    result_file = read_file()
    result_db = read_db()
    result_api = read_api()

    return json.dumps({
        "result_file": result_file,
        "result_db": result_db,
        "result_api": result_api,
    })


if __name__ == "__main__":
    app.run()
此时我们通过postman访问根目录如下:

可以看到此时加载+访问根目录用了607ms,那么我们现在修改原先代码使用多线程的方式(这里我们就直接用线程池)实现。
修改后的示例如下:
import flask
import json
import time
from concurrent.futures import ThreadPoolExecutor

app = flask.Flask(__name__)
pool = ThreadPoolExecutor()


def read_file():
    time.sleep(0.1)
    return "file result"


def read_db():
    time.sleep(0.2)
    return "db result"


def read_api():
    time.sleep(0.3)
    return "api result"


@app.route("/")
def index():
    result_file = pool.submit(read_file)
    result_db = pool.submit(read_db)
    result_api = pool.submit(read_api)

    return json.dumps({
        "result_file": result_file.result(),
        "result_db": result_db.result(),
        "result_api": result_api.result(),
    })


if __name__ == "__main__":
    app.run()
此时我们重启flask框架,重新访问根目录。
使用postman查看如下:

可以看到此时加载+访问根目录用了312ms,将近快了之前的一半了。
二、多进程实现并发编程
1.CPU、IO密集型计算
在了解前面的多线程操作后,我们知道了该方法的强大之处,对于多线程的优势,就是当CPU在等待IO时且当前CPU占有率仍然很低的情况下,我们就可以利用IO阻塞的情况执行下一个task以此类推,我们称为IO密集型计算(例如:文件处理程序、网络爬虫程序、读写数据库程序等请求操作…)。
不过对于某些场合它并不适用,比如当一个程序io阻塞在很短的时间就完成了,而cpu需要进行大量的计算和处理,此时使用多线程的效率可能还会低于单线程操作,我们称之为CPU密集型计算(例如:压缩解压缩、加密解密、正则表达式搜索等…)。
对于CPU密集型计算我们可以使用多进程的方式,不过在此之前我们先讲一下python语言中的GIL。
2.全局解释锁GIL
全局解释器锁(Global Interpreter Lock ,缩写GIL)
是python语言解释器用于同步线程的一种机制,它使得任何时刻仅有一个线程在执行。
即便在多核心处理器上,使用GIL的解释器也只允许同一时间执行一个线程。
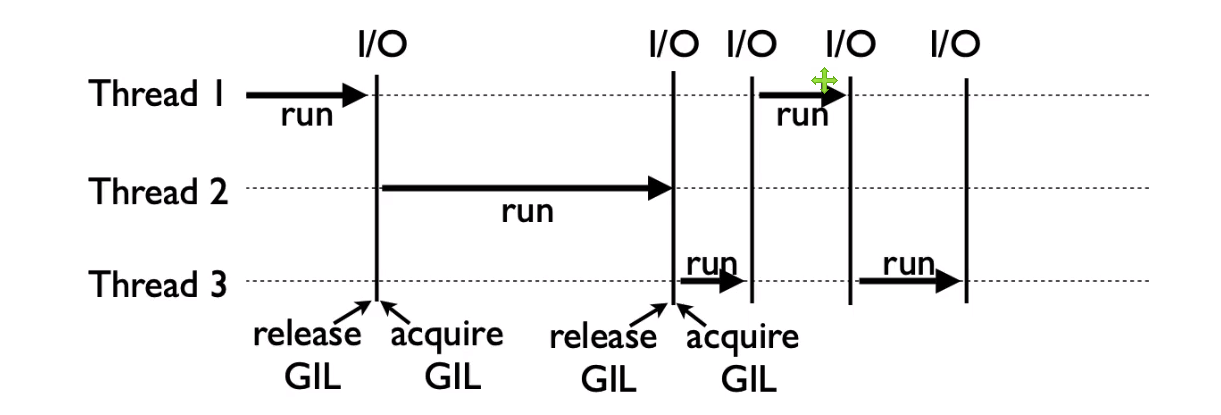
可以看到当一个线程执行的时候使用了一个GIL,而当线程遇到IO阻塞后则会进行释放GIL(作用:保证同一时刻保证只有一个线程在运行)。
所以由于GIL的存在,即使电脑有多核CPU单个时刻也只能使用1个。
而GIL为什么存在呢?为了解决多线程之间数据完整性和状态同步的问题,虽然在并发时会导致效率下降,但是GIL简化了python对共享资源的管理。
那么通过上面图片我们可知,要想规避GIL带来的效率限制,我们完全可以使用上述讲到的多线程操作(IO期间,线程会释放GIL,实现CPU和IO并行)实现大幅度提升速度。
所以当多线程用于CPU密集型计算时,只会更加拖慢速度(多核CPU单个时刻也只能使用1个)。
那么为了应对GIL的问题,多进程机制实现并行计算和多核CPU优势也解决了CPU密集型计算操作。
3.多进程的使用
在python中对于多进程的引用和多线程非常类似,下面我们就通过判断一个数是否为素数来模拟一个CPU密集型计算,在经过比较来证实我们的说法吧。
示例如下:
import math
import time
import threading
import multiprocessing

PRIMES = [112272535095293] * 100


# 判断是否为素数
def is_prime(n):
    if n < 2:
        return False
    if n == 2:
        return True
    if n % 2 == 0:
        return False
    sqrt_n = int(math.floor(math.sqrt(n)))
    for i in range(3, sqrt_n + 1, 2):
        if n % i == 0:
            return False
    return True


# 单线程模式
def single_thread():
    for number in PRIMES:
        is_prime(number)


# 多线程模式
def multi_thread():
    threads = []
    for number in PRIMES:
        threads.append(threading.Thread(target=is_prime, args=(number,)))
    for thread in threads:
        thread.start()
    for thread in threads:
        thread.join()


# 多进程模式
def multi_process():
    threads = []
    for number in PRIMES:
        threads.append(multiprocessing.Process(target=is_prime, args=(number,)))
    for thread in threads:
        thread.start()
    for thread in threads:
        thread.join()


if __name__ == '__main__':
    start = time.time()
    single_thread()
    end = time.time()
    print("single_thread, cost:", end - start, "seconds")

    start = time.time()
    multi_thread()
    end = time.time()
    print("multi_thread, cost:", end - start, "seconds")

    start = time.time()
    multi_process()
    end = time.time()
    print("multi_process, cost:", end - start, "seconds")
控制台打印
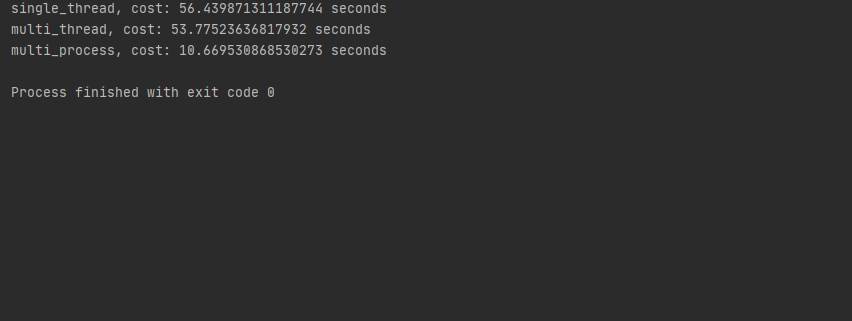
可以看到当CPU密集型计算时,通过多线程和单线程执行没什么区别,而通过多进程计算,整整提高了5倍的效率。
我们通过使用线程、进程池的方式在调用一下,看看结果是不是一样。
代码如下:
import math
from concurrent.futures import ThreadPoolExecutor, ProcessPoolExecutor
import time

PRIMES = [112272535095293] * 100


def is_prime(n):
    if n < 2:
        return False
    if n == 2:
        return True
    if n % 2 == 0:
        return False
    sqrt_n = int(math.floor(math.sqrt(n)))
    for i in range(3, sqrt_n + 1, 2):
        if n % i == 0:
            return False
    return True


def single_thread():
    for number in PRIMES:
        is_prime(number)


def multi_thread():
    with ThreadPoolExecutor() as pool:
        pool.map(is_prime, PRIMES)


def multi_process():
    with ProcessPoolExecutor() as pool:
        pool.map(is_prime, PRIMES)


if __name__ == "__main__":
    start = time.time()
    single_thread()
    end = time.time()
    print("single_thread, cost:", end - start, "seconds")

    start = time.time()
    multi_thread()
    end = time.time()
    print("multi_thread, cost:", end - start, "seconds")

    start = time.time()
    multi_process()
    end = time.time()
    print("multi_process, cost:", end - start, "seconds")
控制台打印

可以发现这一次因为开辟多个线程后效率更加的慢,甚至比单线程还慢了,而对于开启多个进程后,效率更快了。
那么我们在通过一个示例来演示多进程在一个web框架(这里用flask框架)中是如何使用的。
示例如下:
import flask
from concurrent.futures import ProcessPoolExecutor
import math
import json

app = flask.Flask(__name__)


def is_prime(n):
    if n < 2:
        return False
    if n == 2:
        return True
    if n % 2 == 0:
        return False
    sqrt_n = int(math.floor(math.sqrt(n)))
    for i in range(3, sqrt_n + 1, 2):
        if n % i == 0:
            return False
    return True


@app.route("/is_prime/<numbers>")
def api_is_prime(numbers):
    number_list = [int(x) for x in numbers.split(",")]
    results = process_pool.map(is_prime, number_list)
    return json.dumps(dict(zip(number_list, results)))


if __name__ == "__main__":
    process_pool = ProcessPoolExecutor()
    app.run()
对于多进程而言,其必须写在__ main __方法中,不然会报错。
此时访问http://127.0.0.1:5000/is_prime/1,2,3,4,5如下:

附:subprocess模块的使用
对于subprocess模块的功能可以启动电脑任意程序听歌、解压缩、自动下载等等…
本身该模块用于电脑管理,我们可以通过subprocess模块开启动电脑的子进程
subprocess模块定义:
- 允许生成新的进程
- 连接它们的输入、输出、错误管道
- 可以获取返回码
那么我们就通过例子来使用subprocess模块吧。
示例如下:
import subprocess

proc = subprocess.Popen(
    ["start", "./113112.mp4"],
    shell=True
)

proc.communicate()
这是一个打开某个文件的操作,运行后即可打开该文件。
版权声明:本文内容由互联网用户自发贡献,该文观点仅代表作者本人。本站仅提供信息存储空间服务,不拥有所有权,不承担相关法律责任。如发现本站有涉嫌侵权/违法违规的内容, 请发送邮件至 举报,一经查实,本站将立刻删除。
文章由极客之音整理,本文链接:https://www.bmabk.com/index.php/post/66841.html

