
‘
 一、什么是RESTFUL接口?
1、REST 表述性状态转移(Representational State TransferT)
REST 是面向资源的,强调描述应用程序的事物和名词 表述性( Representational ): REST 资源实际上可以用各种形式来进行表述,包括 XML 、 JSON ( JavaScript Object Notation )甚至HTML—— 最适合资源使用者的任意形式;
状态( State ):当使用 REST 的时候,我们更关注资源的状态而不是对资源采取的行为;
转移( Transfer ): REST 涉及到转移资源数据,它以某种表述性形式从一个应用转移到另一个应用。
简单来讲:REST 就是将资源的状态以最适合客户端或服务端的形式从服务器端转移到客户端(或者反过来)
表述是 REST 中很重要的一个方面。它是关于客户端和服务器端针对某一资源是如何通信的。任何给定的资源都几乎可以用任意的形式来进行表述。如果资源的使用者愿意使用 JSON ,那么资源就可以用 JSON 格式来表述。如果使用者喜欢尖括号,那相同的资源可以用 XML 来进行表述。同时,如果用户在浏览器中查看资源的话,可能更愿意以 HTML 的方式来展现(或者 PDF 、 Excel 及其他便于人类阅读的格式)。资源没有变化 —— 只是它的表述方式变化了。
对于大多数客户端来说,用 JSON 和 XML 来进行表述就足够了。
2、RESTFUL
- RESTFUL是一种架构的规范与约束、原则,符合这种规范的架构就是RESTful架构。
- RESTFUL风格的接口针对资源的添加,删除,修改和列表查询进行设计
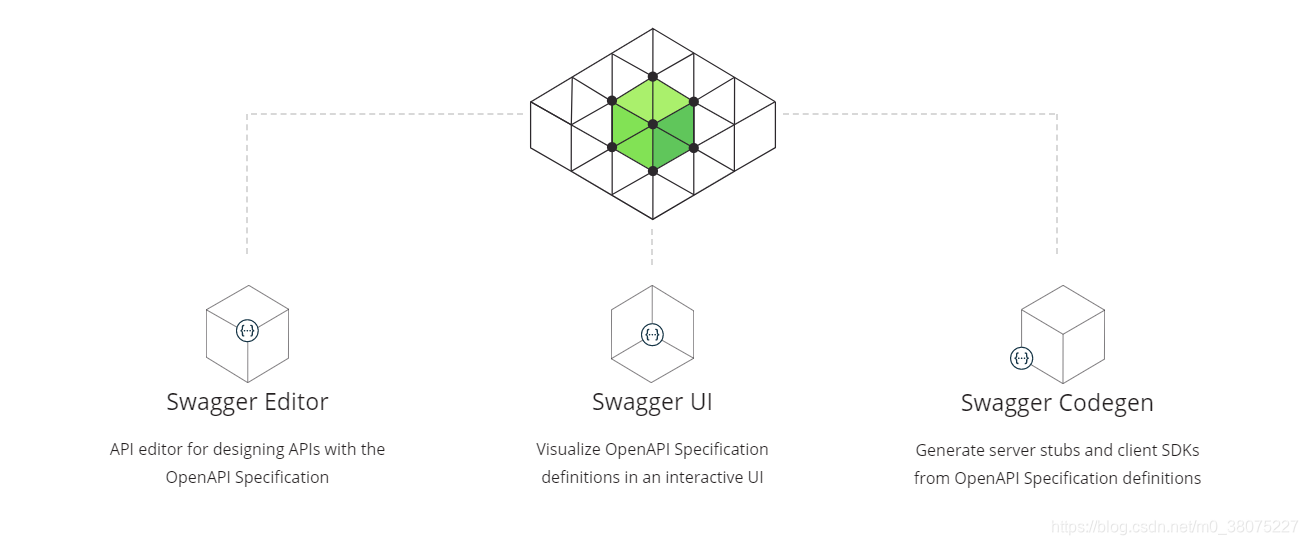
二、Swagger2
是一款RESTFUL接口的、基于YAML、JSON语言的文档在线自动生成、代码自动生成的工具
传统API文档基本上都是手写的,手写API文档的缺点:
- 当接口文档需要更新时,需要重新发给前端人员,交流不及时
- 接口文档繁杂,不易管理
- 无法在线测试接口,需要借助其他工具
而Swagger2可以解决上述问题,通过在线文档的形式,解决前后端接口对接的时延和误差,加快后端开发人员的接口开发及测试速度
三、Swagger2的常用api
|
注解 |
使用 |
示例 |
描述 |
|
@Api |
用于类 |
@Api(value = “ClientController”,description = “客户端模块前端控制器”,tags = {“client”,”controller”})@RestController@RequestMapping(“/client”)public class ClientController { |
对当前类的描述说明,value:标识当前类,decriptioni:描述,tags:当前类的标签 |
|
@ApiOperation |
用于方法 |
@ApiOperation(value = “添加客户端”, notes = “添加客户端”, response = Client.class, responseContainer = “Item”, produces = “application/json”)@PostMappingpublic R addClient(@RequestBody Client client){this.clientService.save(client);。。。。} |
表示一个http的请求 |
|
@ApiImplicitParam |
用于方法 |
@ApiOperation(value = “获取客户端信息”, notes = “获取客户端信息”, response = Client.class, responseContainer = “Item”, produces = “application/json”)@ApiImplicitParams({@ApiImplicitParam(name = “id”, value = “客户端id”, required = true, dataType = “Long”, paramType = “path”)})@GetMapping(“/{id}”)public R getClientById(@PathVariable Integer id){ |
单独说明一个参数,name:参数名;value:参数的具体意义,作用;required : 参数是否必填;dataType:数据类型;paramType:参数来源类型【path/query/body/header/form】; |
|
@ApiImplicitParams |
用于方法 |
@ApiOperation(value = “获取客户端信息”, notes = “获取客户端信息”, response = Client.class, responseContainer = “Item”, produces = “application/json”)@ApiImplicitParams({@ApiImplicitParam(name = “id”, value = “客户端id”, required = true, dataType = “Long”, paramType = “path”)})@GetMapping(“/{id}”)public R getClientById(@PathVariable Integer id){ |
用于包含多个@ApiImplicitParam |
|
@ApiModel |
用于类 |
@ApiModel(value = “Client”,description = “客户端实体”)public class Client implements Serializable {。。。。 |
表示对类进行说明(用于将类作为参数) |
|
@ApiModelProperty |
用于方法,字段 |
@ApiModelProperty(value = “客户端id”,dataType = “Integer”,name = “id”,required = true)@TableId(value = “id”, type = IdType.AUTO)private Integer id; |
表示对modle属性的说明 |
|
@ApiResponse |
用于方法 |
表示操作返回的可能结果 |
|
|
@ApiResponses |
用于方法 |
用于包含多个@ApiResponse |
|
|
@ApiParam |
用于方法 |
用于参数字段说明 |
四、整合swagger
第一步:加依赖
在spring-cloud-parent里面加入swagger的依赖
 <!--swagger 依赖-->
        <dependency>
            <groupId>io.springfox</groupId>
            <artifactId>springfox-swagger2</artifactId>
            <version>${swagger.version}</version>
        </dependency>

        <!--一个无依赖的HTML、JS和CSS集合,可以为Swagger兼容API动态生成优雅文档。-->
        <dependency>
            <groupId>io.springfox</groupId>
            <artifactId>springfox-swagger-ui</artifactId>
            <version>${swagger.version}</version>
        </dependency>
在当前项目引入父工程:
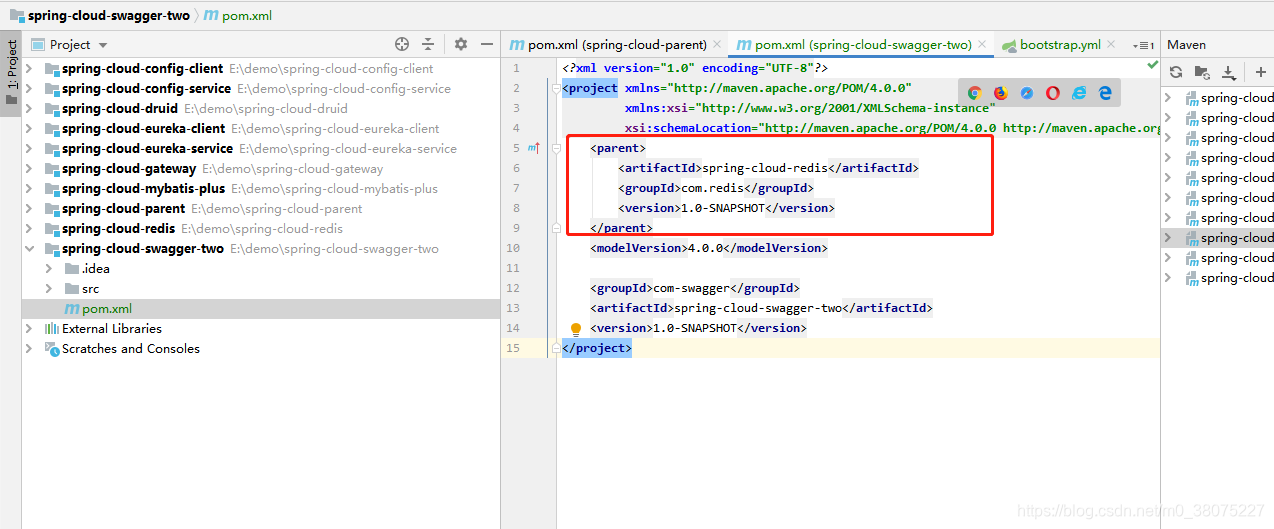
   <parent>
        <artifactId>spring-cloud-redis</artifactId>
        <groupId>com.redis</groupId>
        <version>1.0-SNAPSHOT</version>
    </parent>
第二步,加配置
在工程下新建Swagger2配置类Swagger2Config.java
package com.swagger.config;

import org.springframework.context.annotation.Bean;
import org.springframework.context.annotation.Configuration;
import org.springframework.web.context.request.async.DeferredResult;
import springfox.documentation.builders.ApiInfoBuilder;
import springfox.documentation.builders.PathSelectors;
import springfox.documentation.builders.RequestHandlerSelectors;
import springfox.documentation.service.ApiInfo;
import springfox.documentation.spi.DocumentationType;
import springfox.documentation.spring.web.plugins.Docket;
import springfox.documentation.swagger2.annotations.EnableSwagger2;

/**
 * @类名 Swagger2Config
 * @描述 swagger配置
 * @版本 1.0
 * @创建人 XuKang
 * @创建时间 2021/6/24 11:42
 **/
@EnableSwagger2 //开启swagger
@Configuration
public class Swagger2Config {
    @Bean
    public Docket createRestApi() {
        return new Docket(DocumentationType.SWAGGER_2)
                .genericModelSubstitutes(DeferredResult.class)
                .useDefaultResponseMessages(false)
                .forCodeGeneration(true)
                .apiInfo(apiInfo()) // 增加api相关信息
                .pathMapping("/")// base,最终调用接口后会和paths拼接在一起
                .select() // 通过select函数可控制选择哪些接口允许暴露给swagger展示
                .apis(RequestHandlerSelectors.basePackage("com.swagger.controller")) //指定扫描包进行接口展示限制
                .paths(PathSelectors.any())
                .build();
    }
    private ApiInfo apiInfo() {
        return new ApiInfoBuilder() //
                .title("springboot利用swagger构建api文档") //标题
                .description("简单优雅的restfun风格") //描述
                .termsOfServiceUrl("https://github.com/springfox/springfox-demos") //服务条款网址
                .version("1.0") //
                .build();
    }
}
第三步,加注解
实体加上注解类,如下
package com.redis.pojo;

import com.baomidou.mybatisplus.annotation.*;
import io.swagger.annotations.ApiModel;
import io.swagger.annotations.ApiModelProperty;
import lombok.Data;
import lombok.EqualsAndHashCode;
import lombok.experimental.Accessors;

import java.io.Serializable;
import java.time.LocalDateTime;

/**
 * <p>
 *
 * </p>
 *
 * @author Mybatis Plus
 * @since 2021-06-21
 */
@Data
@EqualsAndHashCode(callSuper = false)
@Accessors(chain = true)
@ApiModel(value="Client", description="Client对象")
@TableName("client")
public class Client implements Serializable {

    private static final long serialVersionUID = 1L;

    @ApiModelProperty(value = "客户端id",dataType = "Integer",name = "id",required = true)
    @TableId(value = "id", type = IdType.AUTO)
    private Integer id;

    @ApiModelProperty(value = "客户端名称",dataType = "String ",name = "clientName",required = true)
    @TableField("client_name")
    private String clientName;

    @ApiModelProperty(value = "客户端路径",dataType = "String ",name = "clientPath",required = false)
    @TableField("client_path")
    private String clientPath;

    @ApiModelProperty(value = "逻辑删除标志",dataType = "String ",name = "delFlag",required = false)
    @TableField("del_flag")
    @TableLogic
    private Integer delFlag;

    @ApiModelProperty(value = "创建时间",dataType = "LocalDateTime  ",name = "createTime",required = false)
    @TableField("create_time")
    private LocalDateTime createTime;

    @ApiModelProperty(value = "最后更新时间",dataType = "LocalDateTime  ",name = "updateTime",required = false)
    @TableField("update_time")
    private LocalDateTime updateTime;


}
controller加上注解如下:
package com.swagger.controller;

import cn.hutool.core.util.ObjectUtil;
import cn.hutool.json.JSONUtil;
import com.baomidou.mybatisplus.extension.api.R;
import com.baomidou.mybatisplus.extension.plugins.pagination.Page;
import com.swagger.pojo.Client;
import com.swagger.service.ClientService;
import io.swagger.annotations.Api;
import io.swagger.annotations.ApiImplicitParam;
import io.swagger.annotations.ApiImplicitParams;
import io.swagger.annotations.ApiOperation;
import org.springframework.beans.factory.annotation.Autowired;
import org.springframework.web.bind.annotation.*;

/**
 * <p>
 *  前端控制器
 * </p>
 *
 * @author Mybatis Plus
 * @since 2021-06-21
 */
@RestController
@RequestMapping("/client")
@Api(value = "ClientController",description = "客户端模块前端控制器",tags = {"client"})
public class ClientController {
    @Autowired
    private ClientService clientService;
    //引入redis操作工具
    /**
     * 新增client
     * @param client client对象
     * @return
     */
    @PostMapping("addClient")
    @ApiOperation(value = "添加客户端", notes = "添加客户端", response = R.class, responseContainer = "Item", produces = "application/json")
    @ApiImplicitParams({
            @ApiImplicitParam(name = "client", value = "客户端实体", required = true, dataType = "Client", paramType = "body"),
    })
    public R addClient(@RequestBody Client client){
        boolean bl = this.clientService.save(client);
        if(bl){
            return R.ok(Boolean.TRUE);
        }
       return R.failed("插入数据失败");
    }
    /**
     * 根据id获取client
     * @param id client的id
     * @return
     */
    @ApiOperation(value = "获取客户端信息", notes = "获取客户端信息", response = Client.class, responseContainer = "Item", produces = "application/json")
    @ApiImplicitParams({
            @ApiImplicitParam(name = "id", value = "客户端id", required = true, dataType = "Long", paramType = "path")
    })
    @GetMapping("/{id}")
    public R getClientById(@PathVariable Integer id){
        return R.ok(this.clientService.getById(id));
    }
    /**
     * 根据id删除client
     * @param id client的id
     * @return
     */
    @DeleteMapping("/{id}")
    @ApiOperation(value = "删除客户端信息", notes = "删除客户端信息", response = Client.class, responseContainer = "Item", produces = "application/json")
    @ApiImplicitParams({
            @ApiImplicitParam(name = "id", value = "客户端id", required = true, dataType = "Long", paramType = "path")
    })
    public R removeClient(@PathVariable Integer id){
        boolean bl = this.clientService.removeById(id);
        if (bl){
            return R.ok(Boolean.TRUE);
        }
        return R.failed("删除数据失败");
    }

    @ApiOperation(value = "获取客户端分页列表", notes = "获取客户端分页列表", response = Client.class, responseContainer = "Item", produces = "application/json")
    @ApiImplicitParams({
            @ApiImplicitParam(name = "current", value = "当前页码", required = true, dataType = "long", paramType = "query"),
            @ApiImplicitParam(name = "size", value = "当前页最大显示条数", required = true, dataType = "long", paramType = "query"),
            @ApiImplicitParam(name = "client", value = "客户端对象", required = true, dataType = "Client", paramType = "query")
    })
    @GetMapping("/page")
    public R getClientPage(){
        Page<Client> page= new Page(1,2);
        return R.ok(this.clientService.page(page));
    }

}
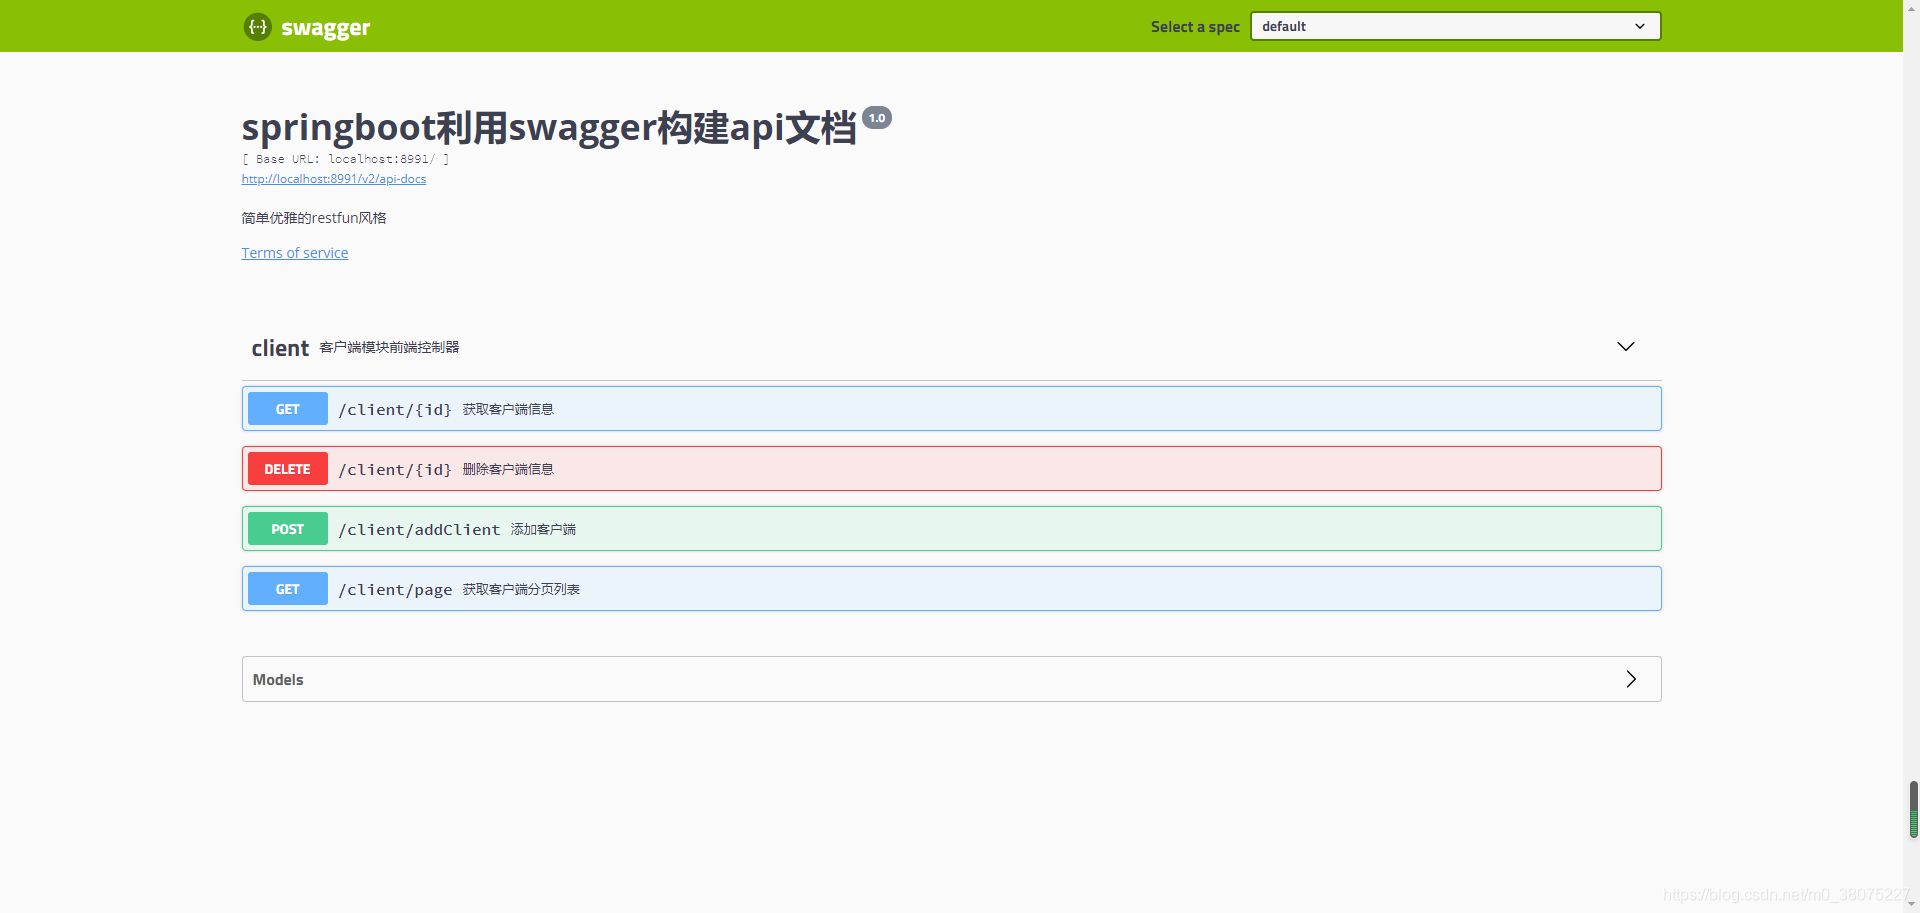
第四步:启动服务,从client的端口进入查看接口文档页面:
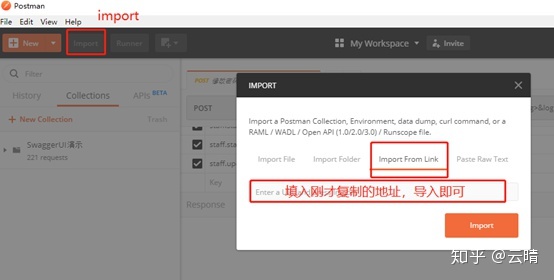
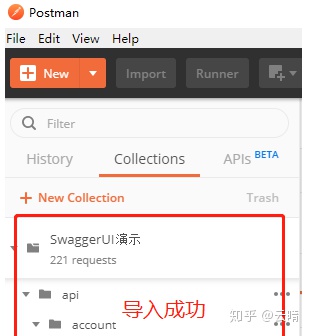
五、把Swagger2的API接口导入Postman
1、访问http://localhost:8080/swagger-ui.html 文档的首页,复制下面这个地址

2.打开postman–>import–>import Form Link
六、总结
1、Swagger2是一款RESTFUL接口的、基于YAML、JSON语言的文档在线自动生成、代码自动生成的工具 2、SpringBoot整合Swagger需引入springfox-swagger2 依赖 3、Swagger2通过嵌入式的各种注解为接口生成API文档,并展现到HTML页面,且可以通过HTML页面进行接口调试
七、资源地址
‘
版权声明:本文内容由互联网用户自发贡献,该文观点仅代表作者本人。本站仅提供信息存储空间服务,不拥有所有权,不承担相关法律责任。如发现本站有涉嫌侵权/违法违规的内容, 请发送邮件至 举报,一经查实,本站将立刻删除。
文章由极客之音整理,本文链接:https://www.bmabk.com/index.php/post/4496.html

