
生产环境中一般不可能将用户上传的文件存放在单机,绝大多数情况下会搭建文件服务器集群,确保文件的互相备份和高可用。上一篇博客已经对 FastDFS 分布式文件系统进行了介绍,这里不再赘述。由于我个人笔记本电脑性能有限,因此本篇博客将使用 2 台虚拟机搭建 FastDFS 集群,实现 2 台机器之间文件的实时同步备份和高可用,然后在上一篇博客的 Demo 代码基础上,不需要更改任何代码,只需要更改一下配置文件即可实现对 FastDFS 集群的操作。
为什么需要使用 2 台虚拟机搭建 FastDFS 集群,单台虚拟机不能搭建吗?
为了能够使我们的 IDEA 代码访问和操作 FastDFS 集群,我们仍然得使用 Docker 的 Host 模式的网络。单台虚拟机采用 Host 网络可以搭建 FastDFS 集群,但是没法实现集群之间的文件同步功能。因为单台服务器上 FastDFS 部署的 Storage 集群无法部署相同的组,对于 Storage 集群来说,只有相同的组才可以实现文件同步,不同的组是用来扩展文件存储的,不会进行文件同步。
FastDFS 集群的部署非常简单,闲话少说,立即开干。在本篇博客的最后,会提供打包后的配置文件下载。
一、集群搭建
我采用了 3 台虚拟机(都已经安装好了 Docker 和 DockerCompose),具体分工如下:
| IP 地址 | 服务器功能 |
|---|---|
| 192.168.136.128 | 部署 FastDFS 包含 Tracker、Storage(镜像中自带 nginx) |
| 192.168.136.129 | 部署 FastDFS 包含 Tracker、Storage(镜像中自带 nginx) |
| 192.168.136.130 | 部署 nginx 用来负载均衡,转发到 2 个 Storage 中的 nginx |
我们先对 192.168.136.128 进行操作,操作完成后,将文件复制到 129 服务器即可。
在 128 服务器上创建数据存储目录,配置文件存放目录,以及 Storage 内部的 nginx 所使用的配置文件:
mkdir -p /root/fastdfs/conf
mkdir -p /root/fastdfs/storage
mkdir -p /root/fastdfs/tracker
创建好之后,目录结构如下所示(相关配置文件在博客最后会提供下载)


先列出 docker-compose.yml 的内容:
version: '3.5'
services:
  tracker:
    image: delron/fastdfs
    container_name: tracker
    restart: always
    network_mode: "host"
    volumes:
      - /root/fastdfs/tracker:/var/fdfs
      - /root/fastdfs/conf:/etc/fdfs
    command: tracker
  storage:
    image: delron/fastdfs
    container_name: storage
    restart: always
    network_mode: "host"
    volumes:
      - /root/fastdfs/storage:/var/fdfs
      - /root/fastdfs/conf:/etc/fdfs
      - /root/fastdfs/nginx.conf:/usr/local/nginx/conf/nginx.conf
    command: storage
然后进入 conf 文件夹,我们针对 3 个配置文件,配置好 tracker_server 就可以了,其它的配置文件不需要动。
3 个配置文件的名称是:client.conf 、mod_fastdfs.conf 、storage.conf ,需要配置的内容如下:
tracker_server=192.168.136.128:22122
tracker_server=192.168.136.129:22122
OK,就这么简单,128 服务器已经搞定了。
然后把 root 目录下的 fastdfs 文件夹递归复制到 129 服务器的 root 目录下就可以了。
# 递归复制我们创建好的 fastdfs 文件夹,到 129 的 root 目录下即可
scp -r /root/fastdfs root@192.168.136.129:/root/
# 按照提示输入用户名和密码,即可完成复制
然后在 130 服务器上部署 nginx ,用来转发 128 和 129 上的 Storage 容器中的 nginx
# 在 root 目录下创建一个 nginx 文件夹
mkdir -p /root/nginx
创建并编写 nginx.conf 配置文件,内容如下:
worker_processes  1;

events {
    worker_connections  1024;
}

http {
    include       mime.types;
    default_type  application/octet-stream;

    sendfile        on;
    keepalive_timeout  65;

    upstream storage-cluster {
        server 192.168.136.128:8888;
        server 192.168.136.129:8888;
    }

    server {
        listen       9999;
        server_name  localhost;

        location / {
            proxy_pass http://storage-cluster;
        }

        error_page   500 502 503 504  /50x.html;
        location = /50x.html {
            root html;
        }
    }
}
创建并编写一个 docker-compose.yml 文件,内容如下:
version: '3.5'
services:
  nginx:
    restart: always
    container_name: nginx
    restart: always
    image: nginx
    network_mode: "host"
    volumes:
      - /root/nginx/nginx.conf:/etc/nginx/nginx.conf
OK,到此为止,准备工作已经完毕,分别在以下 3 个地方,运行命令启动容器即可。
| IP地址 | docker-compose.yml 所在目录 | 运行命令启动容器 |
|---|---|---|
| 192.168.136.128 | /root/fastdfs | docker-compose up -d |
| 192.168.136.129 | /root/fastdfs | docker-compose up -d |
| 192.168.136.130 | /root/nginx | docker-compose up -d |
为了查看 FastDFS 的运行状态,虽然进入一个容器,比如我们进入 128 服务器的 tracker 容器中运行命令查看
# 进入 tracker 容器中
docker exec -it tracker bash
# 运行以下命令查看 FastDFS 的集群状态
/usr/bin/fdfs_monitor /etc/fdfs/storage.conf
展示内容如下:
connect_timeout=30, network_timeout=60, tracker_server_count=2, anti_steal_token=0, anti_steal_secret_key length=0, use_connection_pool=0, g_connection_pool_max_idle_time=3600s, use_storage_id=0, storage server id count: 0

server_count=2, server_index=0

tracker server is 192.168.136.128:22122

group count: 1

Group 1:
group name = group1
disk total space = 39196 MB
disk free space = 29359 MB
trunk free space = 0 MB
storage server count = 2
active server count = 2
storage server port = 23000
storage HTTP port = 8888
store path count = 1
subdir count per path = 256
current write server index = 0
current trunk file id = 0

	Storage 1:
		id = 192.168.136.128
		ip_addr = 192.168.136.128 (localhost)  ACTIVE
		http domain =
		version = 5.11
		join time = 2023-09-04 15:26:37
		up time = 2023-09-05 13:03:07
		total storage = 39196 MB
		free storage = 29359 MB
		upload priority = 10
		store_path_count = 1
		subdir_count_per_path = 256
		storage_port = 23000
		storage_http_port = 8888
		current_write_path = 0
		source storage id =
		if_trunk_server = 0
		connection.alloc_count = 256
		connection.current_count = 1
		connection.max_count = 1
		total_upload_count = 1
		success_upload_count = 1
		total_append_count = 0
		success_append_count = 0
		total_modify_count = 0
		success_modify_count = 0
		total_truncate_count = 0
		success_truncate_count = 0
		total_set_meta_count = 0
		success_set_meta_count = 0
		total_delete_count = 1
		success_delete_count = 1
		total_download_count = 1
		success_download_count = 1
		total_get_meta_count = 0
		success_get_meta_count = 0
		total_create_link_count = 0
		success_create_link_count = 0
		total_delete_link_count = 0
		success_delete_link_count = 0
		total_upload_bytes = 278650
		success_upload_bytes = 278650
		total_append_bytes = 0
		success_append_bytes = 0
		total_modify_bytes = 0
		success_modify_bytes = 0
		stotal_download_bytes = 278650
		success_download_bytes = 278650
		total_sync_in_bytes = 0
		success_sync_in_bytes = 0
		total_sync_out_bytes = 0
		success_sync_out_bytes = 0
		total_file_open_count = 2
		success_file_open_count = 2
		total_file_read_count = 2
		success_file_read_count = 2
		total_file_write_count = 2
		success_file_write_count = 2
		last_heart_beat_time = 2023-09-05 14:04:19
		last_source_update = 2023-09-04 15:34:29
		last_sync_update = 1970-01-01 00:00:00
		last_synced_timestamp = 1970-01-01 00:00:00
	Storage 2:
		id = 192.168.136.129
		ip_addr = 192.168.136.129 (localhost)  ACTIVE
		http domain =
		version = 5.11
		join time = 2023-09-04 15:29:37
		up time = 2023-09-05 13:03:10
		total storage = 39196 MB
		free storage = 31973 MB
		upload priority = 10
		store_path_count = 1
		subdir_count_per_path = 256
		storage_port = 23000
		storage_http_port = 8888
		current_write_path = 0
		source storage id = 192.168.136.128
		if_trunk_server = 0
		connection.alloc_count = 256
		connection.current_count = 1
		connection.max_count = 1
		total_upload_count = 0
		success_upload_count = 0
		total_append_count = 0
		success_append_count = 0
		total_modify_count = 0
		success_modify_count = 0
		total_truncate_count = 0
		success_truncate_count = 0
		total_set_meta_count = 0
		success_set_meta_count = 0
		total_delete_count = 0
		success_delete_count = 0
		total_download_count = 0
		success_download_count = 0
		total_get_meta_count = 0
		success_get_meta_count = 0
		total_create_link_count = 0
		success_create_link_count = 0
		total_delete_link_count = 0
		success_delete_link_count = 0
		total_upload_bytes = 0
		success_upload_bytes = 0
		total_append_bytes = 0
		success_append_bytes = 0
		total_modify_bytes = 0
		success_modify_bytes = 0
		stotal_download_bytes = 0
		success_download_bytes = 0
		total_sync_in_bytes = 278650
		success_sync_in_bytes = 278650
		total_sync_out_bytes = 0
		success_sync_out_bytes = 0
		total_file_open_count = 1
		success_file_open_count = 1
		total_file_read_count = 0
		success_file_read_count = 0
		total_file_write_count = 2
		success_file_write_count = 2
		last_heart_beat_time = 2023-09-05 14:04:11
		last_source_update = 1970-01-01 00:00:00
		last_sync_update = 2023-09-04 15:34:38
		last_synced_timestamp = 1970-01-01 00:00:00 (never synced)
上面的信息非常多,关键的信息为:
- Storage1 和 Storage2 属于同一个组 Group1
- 两个 Storage 的服务器 ip 地址和运行状态(ACTIVE)
到此为止,FastDFS 集群已经搭建完毕,下面就让我们使用上篇博客的 Demo 连接操作一下
二、操作集群
上一篇博客的 Demo 代码不需要任何更改,只需要更改一下 application.yml 配置文件即可
server:
  port: 8090

knife4j:
  # 是否启用增强版功能
  enable: true
  # 如果是生产环境,将此设置为 true,然后就能够禁用了 knife4j 的页面
  production: false

fdfs:
  # 获取文件的时间(这里配置 2000 毫秒)
  so-timeout: 2000
  # 连接超时的时间(这里配置为 1000 毫秒)
  connect-timeout: 1000
  # 如果上传的是图片,可以让服务器生成缩略图,配置缩略图尺寸
  #thumb-image:
  #  width: 200
  #  height: 200
  # TrackerList 路由服务器,如果搭建了集群,可以配置多个
  tracker-list:
    - 192.168.136.128:22122
    - 192.168.136.129:22122
  # 直接访问文件的 nginx 的地址,
  # 建议后面以斜线(/)结尾,方便进行文件的地址拼接
  web-server-url: http://192.168.136.130:9999/

Spring:
  servlet:
    multipart:
      # 单个文件上传大小限制
      max-file-size: 100MB
      # 如果同时上传多个文件,上传的总大小限制
      max-request-size: 100MB
在 tracker-list 中配置 2 个 Tracker Server 的地址,将 web-server-url 配置更改为 130 上部署的 nginx 地址
运行 SpringBoot 程序,测试上传文件、下载文件、删除文件接口,都没有问题。这里仍然以上传图片文件为例:

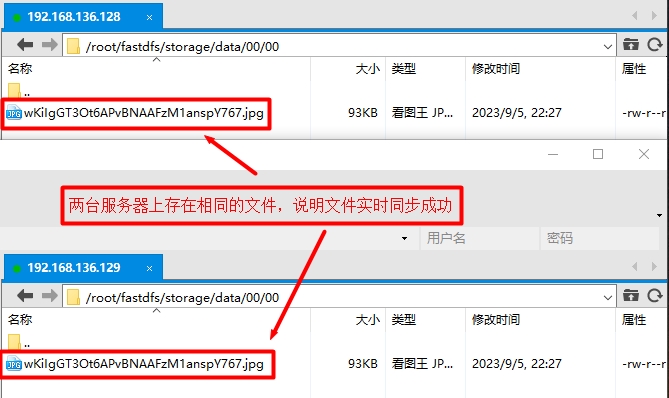
我们上传成功了一张图片文件,通过以下地址都可以访问,说明 2 台 FastDFS 服务器文件已经实时同步一致了。
| 图片 url 地址 | url 所属服务器 |
|---|---|
http://192.168.136.130:9999/group1/M00/00/00/wKiIgGT3Ot6APvBNAAFzM1anspY767.jpg |
130 上的 nginx |
http://192.168.136.128:8888/group1/M00/00/00/wKiIgGT3Ot6APvBNAAFzM1anspY767.jpg |
128 上的 nginx |
http://192.168.136.129:8888/group1/M00/00/00/wKiIgGT3Ot6APvBNAAFzM1anspY767.jpg |
129 上的 nginx |
我们这里就通过 130 上的 nginx 查看效果吧,Ctrl + F5 多刷新几次,会轮询请求 128 和 129 的 Storage 存储的图片

通过 xftp 连接 128 和 129 查看 Storage 数据目录,找到对应的路径 00 目录下的 00 目录,就可以看到文件已经同步一致:
OK,有关 FastDFS 集群的部署和连接操作已经介绍完毕,非常简单实用。
相关目录和配置文件打包的下载地址为:https://files.cnblogs.com/files/blogs/699532/fastdfs_cluster_deploy.zip
版权声明:本文内容由互联网用户自发贡献,该文观点仅代表作者本人。本站仅提供信息存储空间服务,不拥有所有权,不承担相关法律责任。如发现本站有涉嫌侵权/违法违规的内容, 请发送邮件至 举报,一经查实,本站将立刻删除。
文章由极客之音整理,本文链接:https://www.bmabk.com/index.php/post/191082.html

