
前言:
写接口肯定是绕不开数据库连接,无论 mysql、redis、es都有涉及到,本博客讨论 mysql 的基础连接配置,多数据库配置在引入 dynamic 整合多 mysql 数据源。
1.声明依赖
<!-- mysql 驱动库 -->
<dependency>
    <groupId>mysql</groupId>
    <artifactId>mysql-connector-java</artifactId>
</dependency>

<!-- mybatis-plus 依赖 -->
<dependency>
    <groupId>com.baomidou</groupId>
    <artifactId>mybatis-plus-boot-starter</artifactId>
    <version>3.0.5</version>
</dependency>
tips:
mysql-connector-java 并没有指定版本,所以我挺好奇用的是啥版本,
默认版本查看方式:按 ctrl 然后单击 pom 文件相关依赖声明行,可以查看。
2.配置数据库连接源
在配置文件中添加数据库连接信息(建议使用yml配置文件)
spring:
  datasource:
    url: jdbc:mysql://ip:port/db?useUnicode=true&characterEncoding=utf-8&useSSL=false&zeroDateTimeBehavior=convertToNull&serverTimezone=Asia/Shanghai
    driver-class-name: com.mysql.jdbc.Driver
    username: user
    password: pwd
3.创建测试信息
先创建一个数据表 web_info,表结构如下
id             主键,自增
host           网站域名
web_name       网站名称
插入第一条数据 :1 www.baidu.com 百度
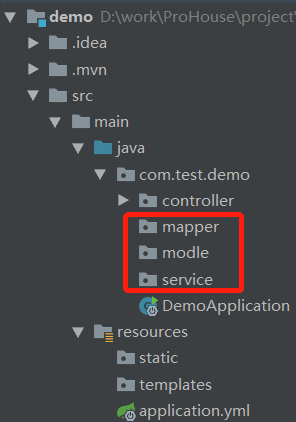
工程里面创建三个包,
一般约定 modle 放数据表实例,mapper 放查询接口,service 放操作逻辑,如下:
4.在 modle 包下面创建数据表的实体类
package com.test.demo.modle;

import com.baomidou.mybatisplus.annotation.IdType;
import com.baomidou.mybatisplus.annotation.TableField;
import com.baomidou.mybatisplus.annotation.TableId;
import com.baomidou.mybatisplus.annotation.TableName;
import lombok.Data;

@Data
@TableName(value = "web_info")
public class WebInfo {

    @TableId(value = "id", type = IdType.AUTO)
    private int id;

    private String host;

    //表字段 web_name 映射到 webName 字段
    @TableField(value = "web_name")
    private String webName;
}
5.在 mapper 包下面创建数据表的查询接口,一般没有特殊查询就话就是一个空方法
package com.test.demo.mapper;

import com.baomidou.mybatisplus.core.mapper.BaseMapper;
import com.test.demo.modle.WebInfo;
import org.apache.ibatis.annotations.Mapper;
import org.springframework.stereotype.Repository;

@Repository
@Mapper
public interface WebInfoMapper extends BaseMapper<WebInfo> {
	@Select("select * from  web_info where  id > #{id}")
    List<WebInfo> selectList(@Param(value = "id") String id);
}
tips:
@Mapper 不能少,这个标明本接口在启动 springboot 时会被扫描到,要不然会提示找不到相关 mapper。
6.在 service 包下面创建数据表的查询逻辑实现
package com.test.demo.service;

import com.baomidou.mybatisplus.core.conditions.query.QueryWrapper;
import com.test.demo.mapper.WebInfoMapper;
import com.test.demo.modle.WebInfo;
import org.springframework.beans.factory.annotation.Autowired;
import org.springframework.stereotype.Service;

import java.util.List;

@Service
public class WebInfoService{

    @Autowired
    private WebInfoMapper webInfoMapper;

    // 简单查询
    public Object getById(Integer id) {
        return webInfoMapper.selectList(id);
    }
}
7. 在controller 包写一个测试接口
package com.test.demo.controller;
import com.test.demo.service.WebInfoHandle;
import lombok.Data;
import org.springframework.beans.factory.annotation.Autowired;
import org.springframework.boot.context.properties.ConfigurationProperties;
import org.springframework.web.bind.annotation.GetMapping;
import org.springframework.web.bind.annotation.RestController;
@RestController
public class TestController {
@Autowired
private WebInfoService webInfoService;
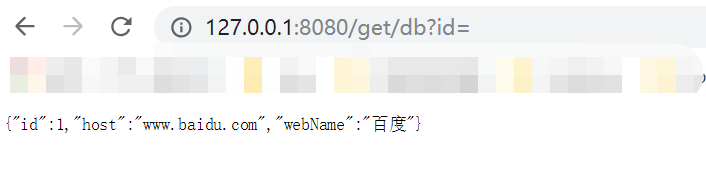
@GetMapping(path = "/get/db")
public Object get(@RequestParam(value = "id", required = false, defaultValue = "1") Integer tableId) {
return webInfoService.getById(tableId);
}
}
8.启动测试一下
9.分页查询
注:以下是整合 mybaits-plus 自带的分页查询;PageHlper 是另一个非常优秀的分页查询插件,对代码侵入比较小。
- 首先建一个 config 的包,用于存放 springboot 的配置类;在包里面创建类对mybatis-plus 进行配置
package com.test.demo.config;

import com.baomidou.mybatisplus.extension.plugins.PaginationInterceptor;
import org.mybatis.spring.annotation.MapperScan;
import org.springframework.context.annotation.Bean;
import org.springframework.context.annotation.Configuration;

@Configuration
@MapperScan("com.test.demo.mapper")
public class MyBatisPlusConfig {

    @Bean
    public PaginationInterceptor paginationInterceptor() {
        return new PaginationInterceptor();
    }
}
tips: @MapperScan 不能少,其值标明这个配置对哪些 mapper 生效,这时候可以把步骤5的 @Mapper 注解去掉了
- 在 WebInfoService 里面增加一个翻页的查询方法
package com.test.demo.service;

import com.baomidou.mybatisplus.core.conditions.query.QueryWrapper;
import com.baomidou.mybatisplus.core.metadata.IPage;
import com.baomidou.mybatisplus.extension.plugins.pagination.Page;
import com.test.demo.mapper.WebInfoMapper;
import com.test.demo.modle.WebInfo;
import org.springframework.beans.factory.annotation.Autowired;
import org.springframework.stereotype.Service;

import java.util.Map;

@Service
public class WebInfoService {

    @Autowired
    private WebInfoMapper webInfoMapper;

    // 简单查询
    public WebInfo getById(Integer id) {
        return webInfoMapper.selectById(id);
    }

    // 分页查询
    public IPage<Map<String, Object>> getManyGtId(int id, int pageNum, int pageSize) {
        QueryWrapper<WebInfo> queryWrapper = new QueryWrapper<>();
        queryWrapper.lambda().gt(WebInfo::getId, id);
        Page<WebInfo> page = new Page<>(pageNum, pageSize);
        IPage<Map<String, Object>> iPage = webInfoMapper.selectMapsPage(page, queryWrapper);
        System.out.println(iPage);
        return iPage;
    }

}
- TestController 增加测试方法
package com.test.demo.controller;

import com.test.demo.service.WebInfoHandle;
import lombok.Data;
import org.springframework.beans.factory.annotation.Autowired;
import org.springframework.boot.context.properties.ConfigurationProperties;
import org.springframework.web.bind.annotation.GetMapping;
import org.springframework.web.bind.annotation.RestController;

@RestController
public class TestController {

    @Autowired
    private WebInfoService webInfoService;

    @GetMapping(path = "/get/db")
    public Object get(@RequestParam(value = "id", required = false, defaultValue = "1") Integer tableId,
                      @RequestParam(value = "page", required = false, defaultValue = "1") Integer pageNum,
                      @RequestParam(value = "size", required = false, defaultValue = "10") Integer pageSize) {

        return webInfoService.getManyGtId(tableId, pageNum, pageSize);
    }

}
- 测试
浏览器输入:http://127.0.0.1:8080/get/db?id=0&page=2&size=10
返回样例数据如下:
{
	"records": [{
		"host": "news.qq.com",
		"id": 11,
		"web_name": "腾讯新闻"
	}, {
		"host": "www.qq.com",
		"id": 12,
		"web_name": "腾讯网"
	}, {
		"host": "tech.qq.com",
		"id": 13,
		"web_name": "腾讯科技"
	}],
	"total": 13,
	"size": 10,
	"current": 2,
	"pages": 2
}
10.End
版权声明:本文内容由互联网用户自发贡献,该文观点仅代表作者本人。本站仅提供信息存储空间服务,不拥有所有权,不承担相关法律责任。如发现本站有涉嫌侵权/违法违规的内容, 请发送邮件至 举报,一经查实,本站将立刻删除。
文章由极客之家整理,本文链接:https://www.bmabk.com/index.php/post/16566.html

