
Freemarker模板
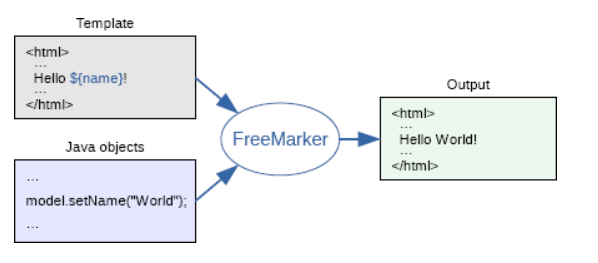
可以看到,Freemarker 可以将模版和数据渲染成 HTML
Freemarker 模版后缀为 .ftl(FreeMarker Template Language)。FTL 是一种简单的、专用的语言,它不是像 Java 那样成熟的编程语言。在模板中,你可以专注于如何展现数据, 而在模板之外可以专注于要展示什么数据
导入 Freemarker模板
建立Spring Boot 工程,导入web依赖和Freemarker依赖
<dependency>
    <groupId>org.springframework.boot</groupId>
    <artifactId>spring-boot-starter-freemarker</artifactId>
</dependency>
<dependency>
    <groupId>org.springframework.boot</groupId>
    <artifactId>spring-boot-starter-web</artifactId>
</dependency>
Freemarker自动化配置
org.springframework.boot.autoconfigure.freemarker.FreeMarkerAutoConfiguration 类中,可以看到关于 Freemarker 的自动化配置:
@Configuration(proxyBeanMethods = false)
@ConditionalOnClass({ freemarker.template.Configuration.class, FreeMarkerConfigurationFactory.class })
@EnableConfigurationProperties(FreeMarkerProperties.class)
@Import({ FreeMarkerServletWebConfiguration.class, FreeMarkerReactiveWebConfiguration.class,
		FreeMarkerNonWebConfiguration.class })
public class FreeMarkerAutoConfiguration {
从这里可以看出,当 classpath 下存在 freemarker.template.Configuration 以及 FreeMarkerConfigurationFactory 时,配置才会生效,也就是说当我们引入了 Freemarker 之后,配置就会生效。但是这里的自动化配置只做了模板位置检查,其他配置则是在导入的 FreeMarkerServletWebConfiguration 配置中完成的。那么我们再来看看 FreeMarkerServletWebConfiguration 类,部分源码如下:
@Configuration(proxyBeanMethods = false)
@ConditionalOnWebApplication(type = ConditionalOnWebApplication.Type.SERVLET)
@ConditionalOnClass({ Servlet.class, FreeMarkerConfigurer.class })
@AutoConfigureAfter(WebMvcAutoConfiguration.class)
class FreeMarkerServletWebConfiguration extends AbstractFreeMarkerConfiguration {

	protected FreeMarkerServletWebConfiguration(FreeMarkerProperties properties) {
		super(properties);
	}

	@Bean
	@ConditionalOnMissingBean(FreeMarkerConfig.class)
	FreeMarkerConfigurer freeMarkerConfigurer() {
		FreeMarkerConfigurer configurer = new FreeMarkerConfigurer();
		applyProperties(configurer);
		return configurer;
	}

	@Bean
	freemarker.template.Configuration freeMarkerConfiguration(FreeMarkerConfig configurer) {
		return configurer.getConfiguration();
	}

	@Bean
	@ConditionalOnMissingBean(name = "freeMarkerViewResolver")
	@ConditionalOnProperty(name = "spring.freemarker.enabled", matchIfMissing = true)
	FreeMarkerViewResolver freeMarkerViewResolver() {
		FreeMarkerViewResolver resolver = new FreeMarkerViewResolver();
		getProperties().applyToMvcViewResolver(resolver);
		return resolver;
	}

	@Bean
	@ConditionalOnEnabledResourceChain
	@ConditionalOnMissingFilterBean(ResourceUrlEncodingFilter.class)
	FilterRegistrationBean<ResourceUrlEncodingFilter> resourceUrlEncodingFilter() {
		FilterRegistrationBean<ResourceUrlEncodingFilter> registration = new FilterRegistrationBean<>(
				new ResourceUrlEncodingFilter());
		registration.setDispatcherTypes(DispatcherType.REQUEST, DispatcherType.ERROR);
		return registration;
	}

}
- @ConditionalOnWebApplication 表示当前配置在 web 环境下才会生效
- @ConditionalOnClass 表示当前配置在存在 Servlet 和 FreeMarkerConfigurer 时才会生效
- @AutoConfigureAfter 表示当前自动化配置在 WebMvcAutoConfiguration 之后完成
- 代码中,主要提供了 FreeMarkerConfigurer 和FreeMarkerViewResolver
- FreeMarkerConfigurer 是 Freemarker 的一些基本配置,例如 templateLoaderPath、defaultEncoding 等
- FreeMarkerViewResolver 则是视图解析器的基本配置,包含了viewClass、suffix、allowRequestOverride、allowSessionOverride 等属性
另外还有一点,在这个类的构造方法中,注入了 FreeMarkerProperties:
@ConfigurationProperties(prefix = "spring.freemarker")
public class FreeMarkerProperties extends AbstractTemplateViewResolverProperties {

	public static final String DEFAULT_TEMPLATE_LOADER_PATH = "classpath:/templates/";

	public static final String DEFAULT_PREFIX = "";

	public static final String DEFAULT_SUFFIX = ".ftlh";

	/**
	 * Well-known FreeMarker keys which are passed to FreeMarker's Configuration.
	 */
	private Map<String, String> settings = new HashMap<>();
FreeMarkerProperties 中则配置了 Freemarker 的基本信息,例如模板位置在 classpath:/templates/ ,再例如模板后缀为 .ftl,那么这些配置我们以后都可以在 application.properties 中进行修改
创建类说明
其他配置
如果我们要修改模版文件位置等,可以在 application.properties 中进行配置:
spring.freemarker.allow-request-override=false
spring.freemarker.allow-session-override=false
spring.freemarker.cache=false
spring.freemarker.charset=UTF-8
spring.freemarker.check-template-location=true
spring.freemarker.content-type=text/html
spring.freemarker.expose-request-attributes=false
spring.freemarker.expose-session-attributes=false
spring.freemarker.suffix=.ftlh
spring.freemarker.template-loader-path=classpath:/templates/
配置文件按照顺序依次解释如下:
-
HttpServletRequest的属性是否可以覆盖controller中model的同名项
-
HttpSession的属性是否可以覆盖controller中model的同名项
-
是否开启缓存
-
模板文件编码
-
是否检查模板位置
-
Content-Type的值
-
是否将HttpServletRequest中的属性添加到Model中
-
是否将HttpSession中的属性添加到Model中
-
模板文件后缀
-
模板文件位置
直接输出值
字符串:
可以直接输入一个字符串:
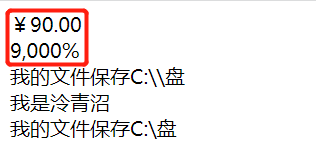
<div>${"我是泠青沼"}</div>
<div>${"我的文件保存C:\\盘"}</div>
\要进行转义
可以在目标字符串的引号前面增加 r 标记,在 r 标记后的文本内容会直接输出,如:
<div>${r"我的文件保存C:\\盘"}</div>

数字:
    <#assign price=90>
    <div>${price?string.currency}</div>//钱币符号显示
    <div>${price?string.percent}</div>//百分数显示
布尔类型:
<#assign flag=true>
<div>${flag?string('yes','no')}</div>

集合类型:
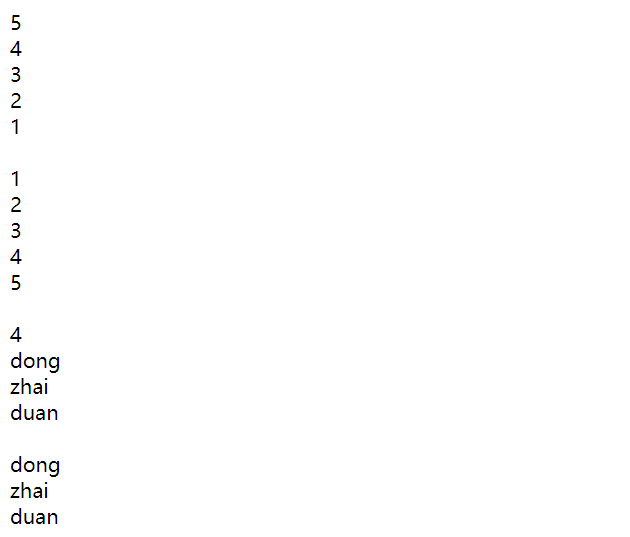
 <#list 5..1 as x>
        <div>${x}</div>
    </#list>
    <br>
    <#list 1..5 as x>
        <div>${x}</div>
    </#list>
    <br>
    <#list [2+2,"dong","zhai","duan"] as x>
        <div>${x}</div>
    </#list>
    <br>
    <#list ["dong","zhai","duan"] as x>
        <div>${x}</div>
    </#list>
    <br>
Map:
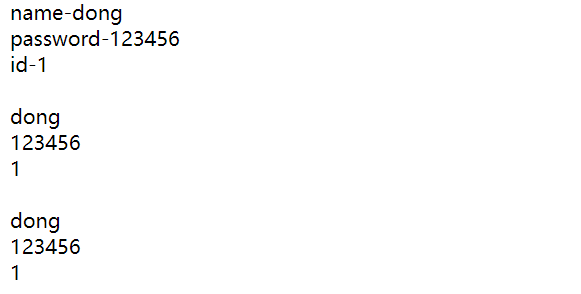
    <#assign userinfo={"name":"dong","password":"123456","id":"1"}>
    <#list userinfo?keys as key>
        <div>${key}-${userinfo[key]}</div>
    </#list>
    <br>
    <#list userinfo?values as value>
        <div>${value}</div>
    </#list>
    <br>
    <div>${userinfo.name}</div>
    <div>${userinfo.password}</div>
    <div>${userinfo.id}</div>
    <br>
输出变量
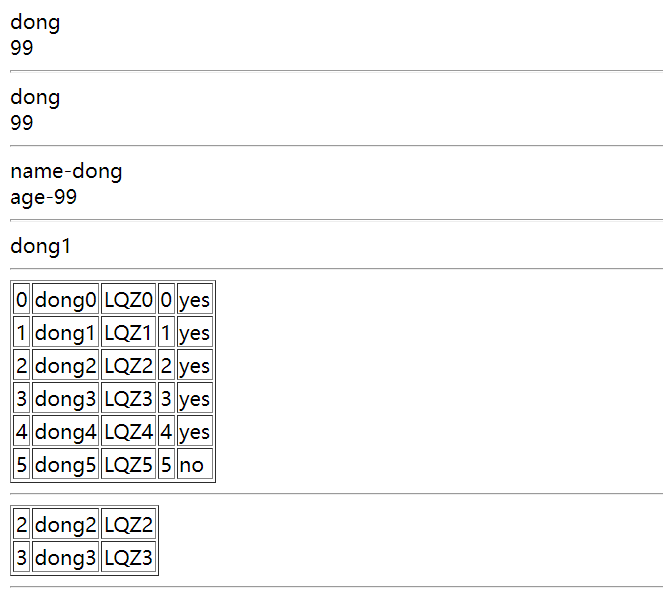
<div>${info['name']}</div>
<div>${info['age']}</div>
<hr>
<#list info?values as value>
    <div>${value}</div>
</#list>
<hr>
<#list info?keys as key>
    <div>${key}-${info[key]}</div>
</#list>
<hr>
<div>${users[1].name}</div>
<hr>
<table border="1">
    <#list users as user>
        <tr>
            <td>${user.id}</td>
            <td>${user.name}</td>
            <td>${user.password}</td>
            <td>${user_index}</td>//序列index
            <td>${user_has_next?string("yes","no")}</td>//判断是否有下一个
        </tr>
    </#list>
</table>
<hr>
<table border="1">
    <#list users[2..3] as user>
        <tr>
            <td>${user.id}</td>
            <td>${user.name}</td>
            <td>${user.password}</td>
        </tr>
    </#list>
</table>
<hr>
其他常见表达式
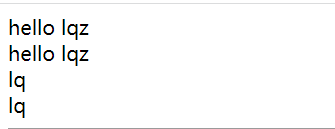
字符串操作:
<div>${"hello ${name}"}</div>
<div>${"hello "+name}</div>
<div>${name[0]}${name[1]}</div>
<div>${name[0..1]}</div>
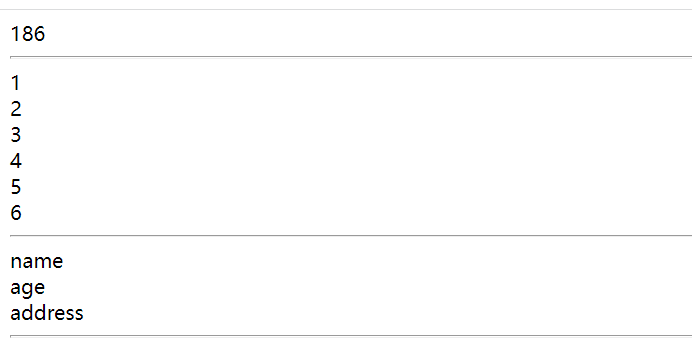
<div>
    <#assign age=88>
    <div>
        ${age*99/99+99-1}
    </div>
</div>
<hr>
<#list [1,2,3]+[4,5,6] as x>
    <div>${x}</div>
</#list>
<hr>
<#list (info+{"address":"jiu"})?keys as key>
    <div>${key}</div>
</#list>
比较表达式:
    <#assign age=88>
    <#if age lt 99>
        99
    </#if>
    <#if age gt 99>
        99
    </#if>
    <#if age gte 99>
        99
    </#if>
    <#if age lte 99>
        99
    </#if>
常见内置函数
<div>
    <div>${"lqing"?cap_first}</div>
    <div>${"LAZKOM"?lower_case}</div>
    <div>${"oppoint"?upper_case}</div>
    <div>${"op po in t"?trim}</div>
    <div>${users?size}</div>
    <div>${3.155?int}</div>
    <div>${birth?string("yyyy-MM-dd")}</div>
</div>
作用:
- 首字母大写
- 大写字母转小写
- 小写字母转大写
- 删除字符中的空格
- 计算输出集合中的个数
- 取小数中整数部分
- 日期的格式化


常见指令
if-else:
<div>
    <#assign age1=30>
    <#if age1 gt 60 >老年人
        <#elseif age1 gt 40>中年人
        <#elseif age1 gt 20>青年人
        <#else >少年
    </#if>
</div>
switch:
<div>
    <#assign x=10>
    <#switch x>
        <#case 1>1<#break>
        <#case 10>10<#break>
        <#default>100
    </#switch>
</div>
引用变量:
新建一个文件lqz.ftlh:
<h1>hello,,,,,,,dong</h1>
在本来的页面中加入:
<#include './lqz.ftlh'>

文本内容展示:
<#noparse>
<#include './lqz.ftlh'>
<div>
    <#assign x=10>
    <#switch x>
        <#case 1>1<#break>
        <#case 10>10<#break>
        <#default>100
    </#switch>
</div>
</#noparse>

宏
<#macro book bs ts> //定义宏
    <table>
        <tr>
            <td>${bs[0]}</td>
            <td>${ts[0]}</td>
            <td>${bs[1]}</td>
            <td>${ts[1]}</td>
        </tr>
    </table>
    <#nested>
</#macro>
//引用调用宏
<@book bs=["三国演义","红楼梦"] ts=["罗贯中","曹雪芹"]>
    <h1>hello!!! neated!!</h1>
</@book>

版权声明:本文内容由互联网用户自发贡献,该文观点仅代表作者本人。本站仅提供信息存储空间服务,不拥有所有权,不承担相关法律责任。如发现本站有涉嫌侵权/违法违规的内容, 请发送邮件至 举报,一经查实,本站将立刻删除。
文章由极客之家整理,本文链接:https://www.bmabk.com/index.php/post/15773.html

