
1.源码剖析的目的
用源码分析的方式走一下 Netty(服务器)的启动过程,更好的理解 Netty 的整体设计和运行机制。

2.源码剖析说明
(1)源码需要剖析到 Netty 调用 doBind 方法,追踪到 NioServerSocketChannel 的 doBind;
(2)并且要 Debug 程序到 NioEventLoop 类的 run 代码,无限循环,在服务器端运行。
3.源码剖析过程
3.1 服务器启动类源码
package io.netty.example.echo;

import io.netty.bootstrap.ServerBootstrap;
import io.netty.channel.ChannelFuture;
import io.netty.channel.ChannelInitializer;
import io.netty.channel.ChannelOption;
import io.netty.channel.ChannelPipeline;
import io.netty.channel.EventLoopGroup;
import io.netty.channel.nio.NioEventLoopGroup;
import io.netty.channel.socket.SocketChannel;
import io.netty.channel.socket.nio.NioServerSocketChannel;
import io.netty.example.util.ServerUtil;
import io.netty.handler.logging.LogLevel;
import io.netty.handler.logging.LoggingHandler;
import io.netty.handler.ssl.SslContext;

/**
 * Echoes back any received data from a client.
 */
public final class EchoServer {

    static final int PORT = Integer.parseInt(System.getProperty("port", "8007"));

    public static void main(String[] args) throws Exception {
        // Configure SSL.
        final SslContext sslCtx = ServerUtil.buildSslContext();

        // Configure the server.
        EventLoopGroup bossGroup = new NioEventLoopGroup(1);
        EventLoopGroup workerGroup = new NioEventLoopGroup();
        final EchoServerHandler serverHandler = new EchoServerHandler();
        try {
            ServerBootstrap b = new ServerBootstrap();
            b.group(bossGroup, workerGroup)
             .channel(NioServerSocketChannel.class)
             .option(ChannelOption.SO_BACKLOG, 100)
             .handler(new LoggingHandler(LogLevel.INFO))
             .childHandler(new ChannelInitializer<SocketChannel>() {
                 @Override
                 public void initChannel(SocketChannel ch) throws Exception {
                     ChannelPipeline p = ch.pipeline();
                     if (sslCtx != null) {
                         p.addLast(sslCtx.newHandler(ch.alloc()));
                     }
                     //p.addLast(new LoggingHandler(LogLevel.INFO));
                     p.addLast(serverHandler);
                 }
             });

            // Start the server.
            ChannelFuture f = b.bind(PORT).sync();

            // Wait until the server socket is closed.
            f.channel().closeFuture().sync();
        } finally {
            // Shut down all event loops to terminate all threads.
            bossGroup.shutdownGracefully();
            workerGroup.shutdownGracefully();
        }
    }
}
public abstract class MultithreadEventLoopGroup extends MultithreadEventExecutorGroup implements EventLoopGroup {
private static final InternalLogger logger = InternalLoggerFactory.getInstance(MultithreadEventLoopGroup.class);
// 默认的线程数
private static final int DEFAULT_EVENT_LOOP_THREADS;
static {
// 默认的线程数=cpu核数*2
DEFAULT_EVENT_LOOP_THREADS = Math.max(1, SystemPropertyUtil.getInt(
"io.netty.eventLoopThreads", NettyRuntime.availableProcessors() * 2));
if (logger.isDebugEnabled()) {
logger.debug("-Dio.netty.eventLoopThreads: {}", DEFAULT_EVENT_LOOP_THREADS);
}
}
/**
* @see MultithreadEventExecutorGroup#MultithreadEventExecutorGroup(int, Executor, Object...)
*/
protected MultithreadEventLoopGroup(int nThreads, Executor executor, Object... args) {
// DEFAULT_EVENT_LOOP_THREADS 默认的线程数
super(nThreads == 0 ? DEFAULT_EVENT_LOOP_THREADS : nThreads, executor, args);
}
// 代码省略.......
}public abstract class MultithreadEventExecutorGroup extends AbstractEventExecutorGroup {
private final EventExecutor[] children;
private final Set<EventExecutor> readonlyChildren;
private final AtomicInteger terminatedChildren = new AtomicInteger();
private final Promise<?> terminationFuture = new DefaultPromise(GlobalEventExecutor.INSTANCE);
private final EventExecutorChooserFactory.EventExecutorChooser chooser;
protected MultithreadEventExecutorGroup(int nThreads, Executor executor, Object... args) {
this(nThreads, executor, DefaultEventExecutorChooserFactory.INSTANCE, args);
}
protected MultithreadEventExecutorGroup(int nThreads, Executor executor,
EventExecutorChooserFactory chooserFactory, Object... args) {
// 校验 nThreads 参数是否正常
checkPositive(nThreads, "nThreads");
// 如果 executor 为空,创建默认的 ThreadPerTaskExecutor
if (executor == null) {
executor = new ThreadPerTaskExecutor(newDefaultThreadFactory());
}
// 初始化事件执行器数组
children = new EventExecutor[nThreads];
for (int i = 0; i < nThreads; i ++) {
// 标识符,true代表 初始化成功
boolean success = false;
try {
// 创建新的 EventExecutor,并添加到 EventExecutor数组中
children[i] = newChild(executor, args);
success = true;
} catch (Exception e) {
// TODO: Think about if this is a good exception type
throw new IllegalStateException("failed to create a child event loop", e);
} finally {
if (!success) {
for (int j = 0; j < i; j ++) {
children[j].shutdownGracefully();
}
for (int j = 0; j < i; j ++) {
EventExecutor e = children[j];
try {
while (!e.isTerminated()) {
e.awaitTermination(Integer.MAX_VALUE, TimeUnit.SECONDS);
}
} catch (InterruptedException interrupted) {
// Let the caller handle the interruption.
Thread.currentThread().interrupt();
break;
}
}
}
}
}
chooser = chooserFactory.newChooser(children);
final FutureListener<Object> terminationListener = new FutureListener<Object>() {
@Override
public void operationComplete(Future<Object> future) throws Exception {
if (terminatedChildren.incrementAndGet() == children.length) {
terminationFuture.setSuccess(null);
}
}
};
for (EventExecutor e: children) {
e.terminationFuture().addListener(terminationListener);
}
Set<EventExecutor> childrenSet = new LinkedHashSet<EventExecutor>(children.length);
Collections.addAll(childrenSet, children);
readonlyChildren = Collections.unmodifiableSet(childrenSet);
}
}public class NioEventLoopGroup extends MultithreadEventLoopGroup {
@Override
protected EventLoop newChild(Executor executor, Object... args) throws Exception {
SelectorProvider selectorProvider = (SelectorProvider) args[0];
SelectStrategyFactory selectStrategyFactory = (SelectStrategyFactory) args[1];
RejectedExecutionHandler rejectedExecutionHandler = (RejectedExecutionHandler) args[2];
EventLoopTaskQueueFactory taskQueueFactory = null;
EventLoopTaskQueueFactory tailTaskQueueFactory = null;
int argsLength = args.length;
if (argsLength > 3) {
taskQueueFactory = (EventLoopTaskQueueFactory) args[3];
}
if (argsLength > 4) {
tailTaskQueueFactory = (EventLoopTaskQueueFactory) args[4];
}
// 返回的是 NioEventLoop 对象
return new NioEventLoop(this, executor, selectorProvider,
selectStrategyFactory.newSelectStrategy(),
rejectedExecutionHandler, taskQueueFactory, tailTaskQueueFactory);
}
// 代码省略........
}说明
(1)先看启动类:main 方法中,首先创建了关于 SSL 的配置类。
(2)重点分析下,创建了两个 EventLoopGroup 对象:
EventLoopGroup bossGroup = new NioEventLoopGroup(1);
EventLoopGroup workerGroup = new NioEventLoopGroup();
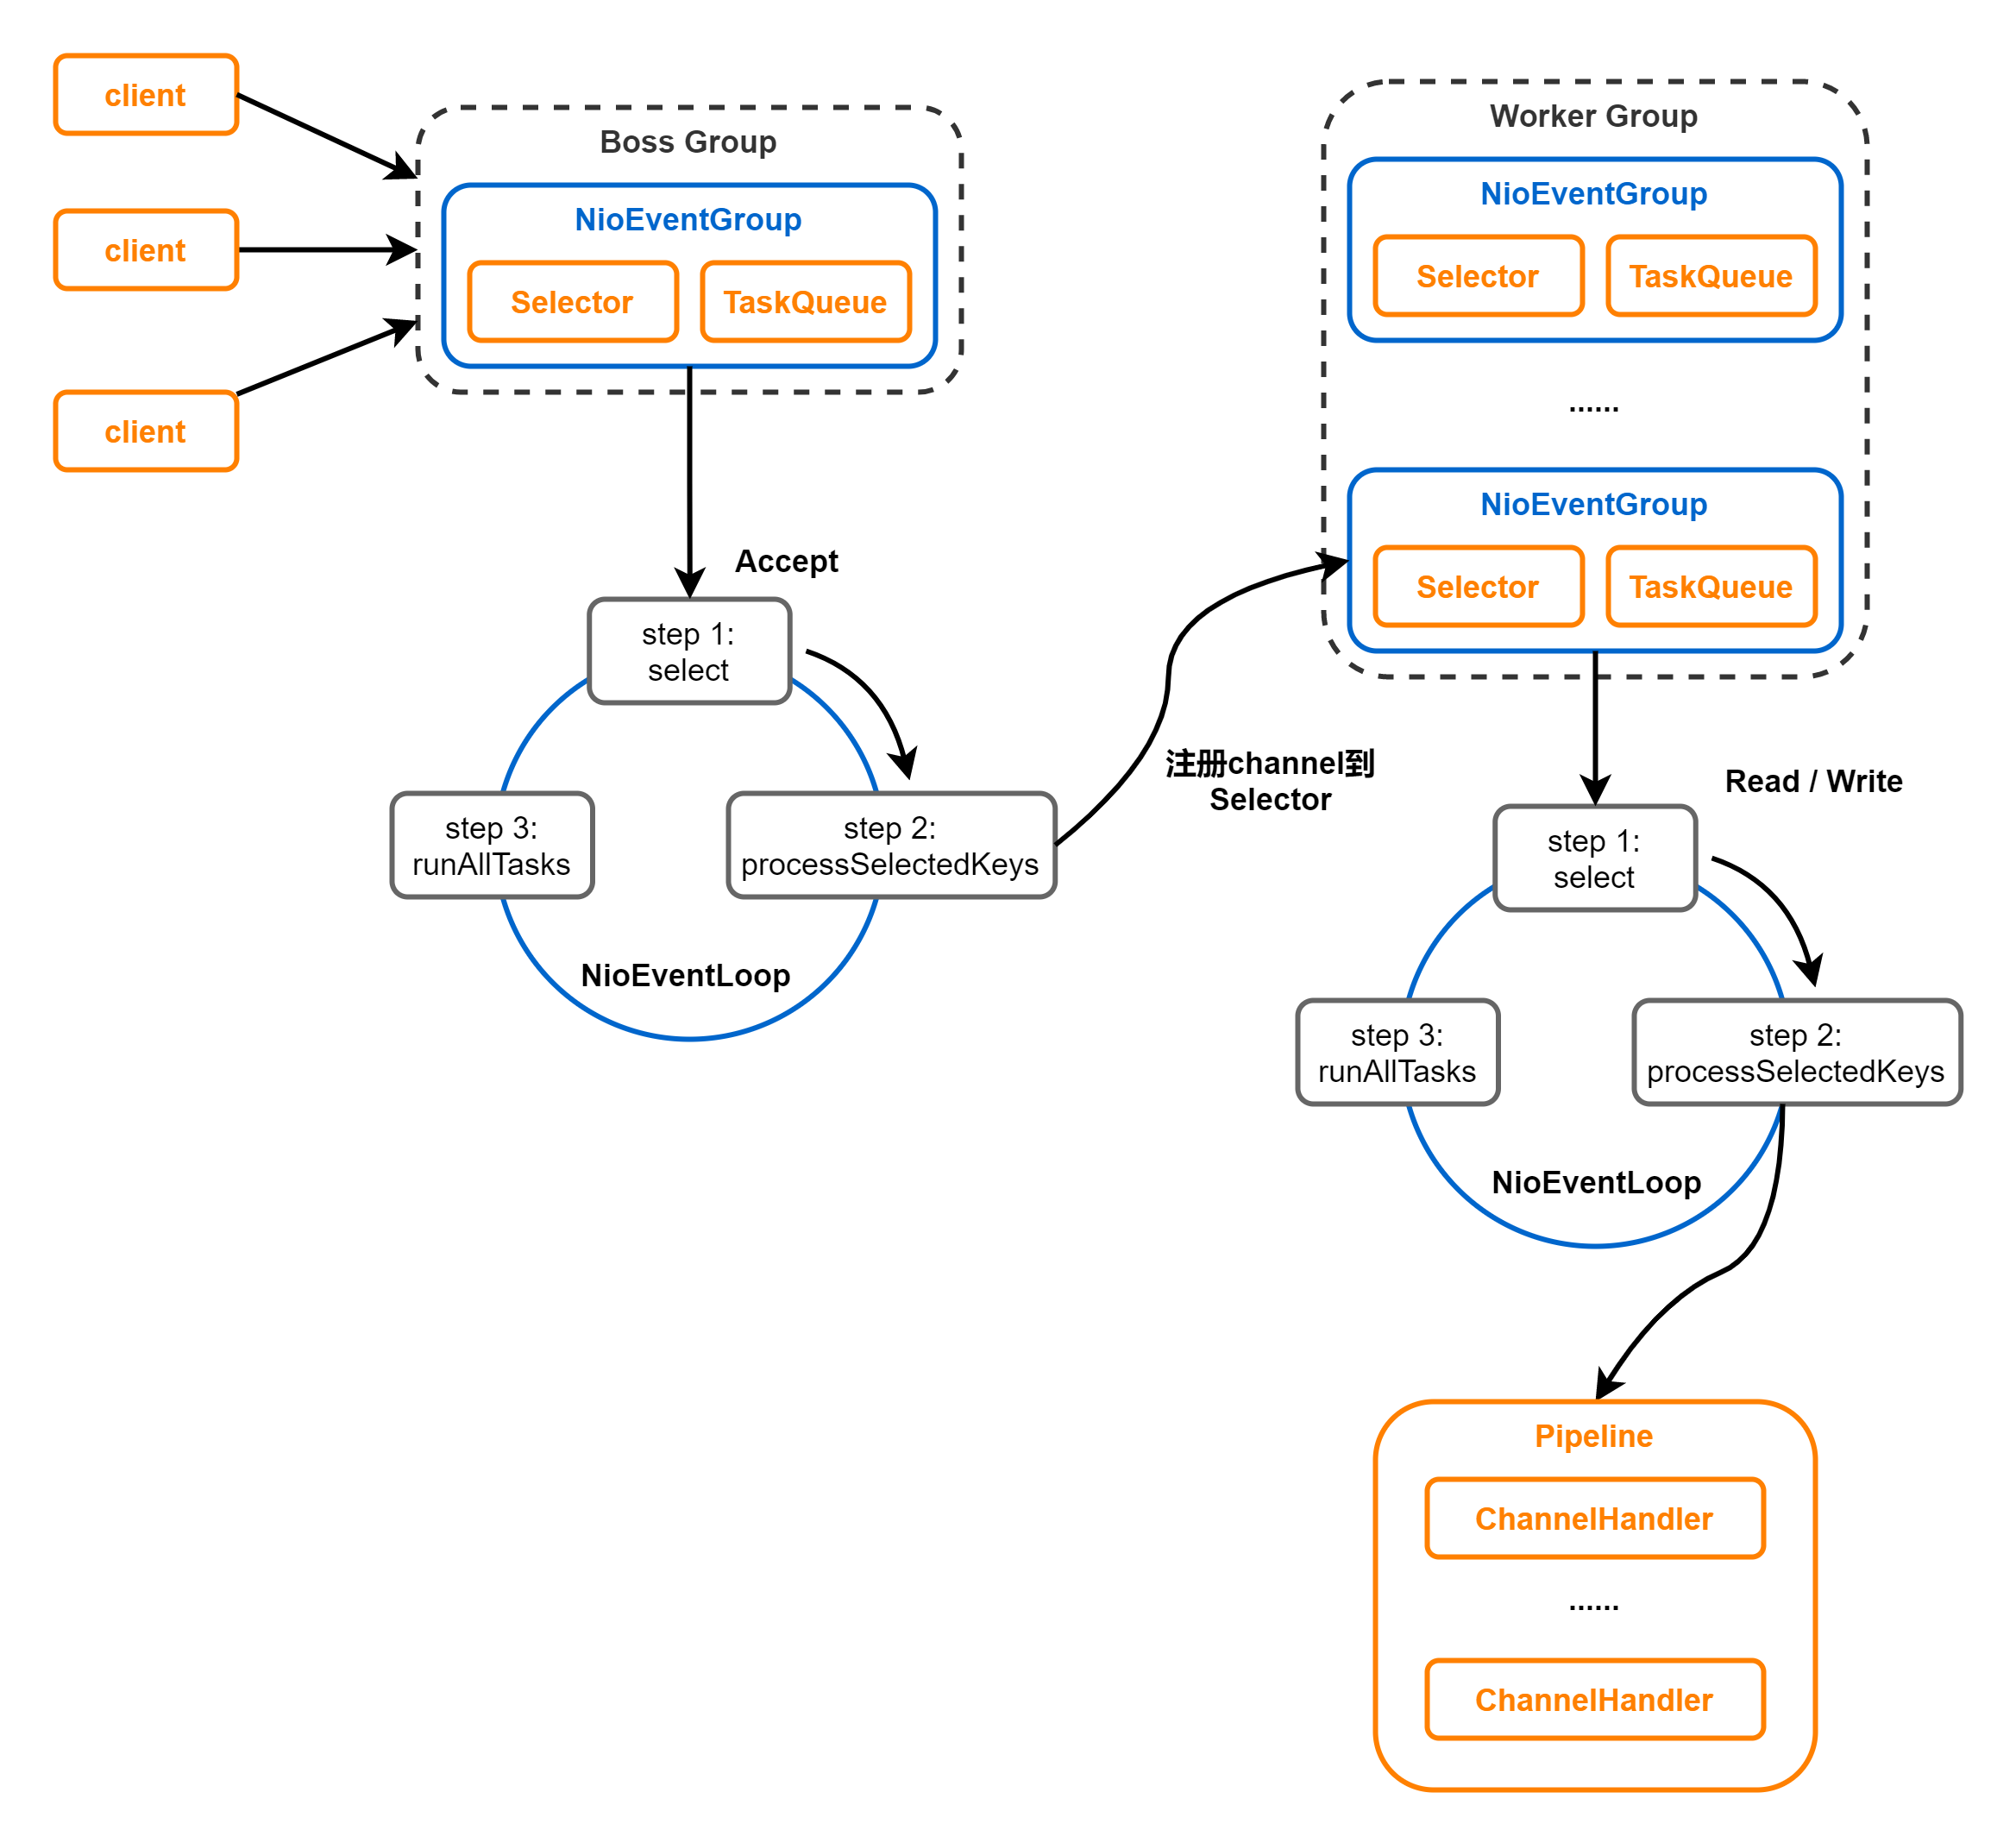
1.这两个对象是整个 Netty 的核心对象,可以说,整个 Netty 的运作都依赖于他们。bossGroup 用于接受 TCP 请求,他会将请求交给 workerGroup,workerGroup 会获取到真正的连接,然后和连接进行通信,比如,读写解码编码等操作。
2. EventLoopGroup 是事件循环组(线程组),含有多个 EventLoop,可以注册 channel,用于在时间循环中去进行选择(和选择器相关)。
3. new NioEventLoopGroup(1) :这个1表示 bossGroup 事件组有1个线程可以指定,如果 new NioEventLoopGroup() 会含有默认个线程 cpu核数*2,即可以充分的利用多核的优势。
EFAULT_EVENT_LOOP_THREADS = Math.max(1, SystemPropertyUtil.getInt(
“io.netty.eventLoopThreads”, NettyRuntime.availableProcessors() * 2));
4. children[i] = newChild(executor, args):会创建EventExecutor数组,每个元素的类型都是NioEventLoop。NioEventLoop 实现了 EventLoop 接口和 Executor 接口。
5. try 块中创建了一个 ServerBootstrap 对象,他是一个引导类,用于启动服务器和引导整个程序的初始化。它和 ServerChannel 关联,而 ServerChannel 继承了 Channel,有一些方法 remoteAddress 等。随后,变量 b 调用了 group 方法将两个 group 放入了自己的字段中,用于后期引导使用。
6.然后添加一个 channel,其中参数是一个 Class 对象,引导类将通过这个 Class 对象反射创建 ChannelFactory。然后添加了一些 TCP 的参数。 【】说明:Channel 的创建在 bind 方法中,可以 Debug 下 bind,会找到 channel = channelFactory.newChannel();】
7. 在添加了一个服务器专属的日志处理器 handler。
8. 在添加一个 SocketChannel (不是 ServerSocketChannel)的 handler。
9. 然后绑定端口并阻塞至连接成功。
10. 最后 main 线程阻塞等待关闭。
11. finally 块中的代码将在服务器关闭时优雅关闭所有资源。
3.2 服务器端处理器源码
@Sharable
public class EchoServerHandler extends ChannelInboundHandlerAdapter {

    @Override
    public void channelRead(ChannelHandlerContext ctx, Object msg) {
        ctx.write(msg);
    }

    @Override
    public void channelReadComplete(ChannelHandlerContext ctx) {
        ctx.flush();
    }

    @Override
    public void exceptionCaught(ChannelHandlerContext ctx, Throwable cause) {
        // Close the connection when an exception is raised.
        cause.printStackTrace();
        ctx.close();
    }
}
说明:
(1)这是一个普通的处理器类,用于处理客户端发送来的消息,在我们这里,我们简单的解析出客户端传过来的内容,然后打印,最后发送字符串给客户端。
3.3分析 EventLoopGroup 的过程
构造器方法
    public NioEventLoopGroup() {
        this(0);
    }

    public NioEventLoopGroup(int nThreads) {
        this(nThreads, (Executor) null);
    }

    public NioEventLoopGroup(int nThreads, Executor executor) {
        this(nThreads, executor, SelectorProvider.provider());
    }

    public NioEventLoopGroup(
            int nThreads, Executor executor, final SelectorProvider selectorProvider) {
        this(nThreads, executor, selectorProvider, DefaultSelectStrategyFactory.INSTANCE);
    }

    public NioEventLoopGroup(int nThreads, Executor executor, final SelectorProvider selectorProvider,
                             final SelectStrategyFactory selectStrategyFactory) {
        super(nThreads, executor, selectorProvider, selectStrategyFactory, RejectedExecutionHandlers.reject());
    }

    // 上面的 super()...的方法是父类:MultithreadEventExecutorGroup
    protected MultithreadEventLoopGroup(int nThreads, Executor executor, Object... args) {
        super(nThreads == 0 ? DEFAULT_EVENT_LOOP_THREADS : nThreads, executor, args);
    }

    protected MultithreadEventExecutorGroup(int nThreads, Executor executor, Object... args) {
        this(nThreads, executor, DefaultEventExecutorChooserFactory.INSTANCE, args);
    }
追踪源码得知,抽象类 MultithreadEventExecutorGroup 的构造方法 才是 NioEventLoopGroup 真正的构造方法。
3.4分析MultithreadEventExecutorGroup
/**
     * Create a new instance.
     *
     * @param nThreads          使用的线程数,默认为 cou核数*2
     * @param executor          执行器:如果传入null,则采用 Netty 默认的线程工厂和默认的执行器 ThreadPerTaskExecutor
     * @param chooserFactory    单例
     * @param args              在创建执行器的时候传入固定参数
     */
    protected MultithreadEventExecutorGroup(int nThreads, Executor executor,
                                            EventExecutorChooserFactory chooserFactory, Object... args) {
        // 校验 nThreads 参数是否正常
        checkPositive(nThreads, "nThreads");

        // 如果 executor 为空,创建默认的 ThreadPerTaskExecutor
        if (executor == null) {
            executor = new ThreadPerTaskExecutor(newDefaultThreadFactory());
        }

        // 初始化事件执行器数组
        children = new EventExecutor[nThreads];

        for (int i = 0; i < nThreads; i ++) {
            // 标识符,true代表 初始化成功
            boolean success = false;
            try {
                // 创建新的 EventExecutor,并添加到 EventExecutor数组中
                children[i] = newChild(executor, args);
                success = true;
            } catch (Exception e) {
                // TODO: Think about if this is a good exception type
                throw new IllegalStateException("failed to create a child event loop", e);
            } finally {
                if (!success) {
                    // 初始化未成功,优雅关闭资源
                    for (int j = 0; j < i; j ++) {
                        children[j].shutdownGracefully();
                    }

                    for (int j = 0; j < i; j ++) {
                        EventExecutor e = children[j];
                        try {
                            while (!e.isTerminated()) {
                                e.awaitTermination(Integer.MAX_VALUE, TimeUnit.SECONDS);
                            }
                        } catch (InterruptedException interrupted) {
                            // Let the caller handle the interruption.
                            Thread.currentThread().interrupt();
                            break;
                        }
                    }
                }
            }
        }

        //创建线程选择器
        chooser = chooserFactory.newChooser(children);

        final FutureListener<Object> terminationListener = new FutureListener<Object>() {
            @Override
            public void operationComplete(Future<Object> future) throws Exception {
                if (terminatedChildren.incrementAndGet() == children.length) {
                    terminationFuture.setSuccess(null);
                }
            }
        };

        // 为每一个单例单例线程池添加一个关闭监听器
        for (EventExecutor e: children) {
            e.terminationFuture().addListener(terminationListener);
        }

        Set<EventExecutor> childrenSet = new LinkedHashSet<EventExecutor>(children.length);
        // 将所有的单例线程池添加到一个 HashSet 中
        Collections.addAll(childrenSet, children);
        readonlyChildren = Collections.unmodifiableSet(childrenSet);
    }
说明:
(1)如果 executor 是 null,创建一个默认的 ThreadPerTaskExecutor,使用 Netty 默认的线程工厂。
(2)根据传入的线程数(CPU*2)创建一个线程池(单例线程池)数组。
(3)循环填充数组中的元素。如果异常,则关闭所有的单例线程池。
(4)根据线程选择工厂创建一个线程选择器。
(5)为每一个单例线程池添加一个关闭监听器。
(6)将所有的单例线程池添加到一个 HashSet 中。
3.5 ServerBootStrap 创建和构造过程
ServerBootStrap 是一个空构造,但是有默认的成员变量。
public class ServerBootstrap extends AbstractBootstrap<ServerBootstrap, ServerChannel> {

    private static final InternalLogger logger = InternalLoggerFactory.getInstance(ServerBootstrap.class);

    // The order in which child ChannelOptions are applied is important they may depend on each other for validation
    // purposes.
    private final Map<ChannelOption<?>, Object> childOptions = new LinkedHashMap<ChannelOption<?>, Object>();
    private final Map<AttributeKey<?>, Object> childAttrs = new ConcurrentHashMap<AttributeKey<?>, Object>();
    private final ServerBootstrapConfig config = new ServerBootstrapConfig(this);
    private volatile EventLoopGroup childGroup;
    private volatile ChannelHandler childHandler;

    public ServerBootstrap() { }

    // 代码省略......
}
分析 ServerBootStrap 基本使用情况
// 创建引导类
ServerBootstrap b = new ServerBootstrap();
// 初始化配置
b.group(bossGroup, workerGroup)
 .channel(NioServerSocketChannel.class)
 .option(ChannelOption.SO_BACKLOG, 100)
 .handler(new LoggingHandler(LogLevel.INFO))
 .childHandler(new ChannelInitializer<SocketChannel>() {
     @Override
     public void initChannel(SocketChannel ch) throws Exception {
         ChannelPipeline p = ch.pipeline();
         if (sslCtx != null) {
             p.addLast(sslCtx.newHandler(ch.alloc()));
         }
         //p.addLast(new LoggingHandler(LogLevel.INFO));
         p.addLast(serverHandler);
     }
 });
说明:
(1)链式调用:group() 方法,将 bossGroup 和 workerGroup 传入,boss 赋值给 parentGroup 属性,workerGroup 赋值给 childGroup 属性;
(2)channel() 方法传入 NioServerSocketChannel.class 对象。会根据这个 class 创建 channel 对象;
(3)option() 方法 TCP 参数,放在一个 LinkedHashMap 中;
(4)handler() 方法传入一个 handler,这个 handler 只专属于 ServerSocketChannel 而不是 SocketChannel;
(5)childHandler 传入一个 handler,这个 handler 将会在每个客户端连接的时候调用。共 SocketChannel 使用。
3.6 绑定端口的分析
服务器就是在这个 bind() 方法里启动完成的,bind() 方法代码,追踪到创建了一个端口对象,并做了一些空判断,核心代码 doBind。
    public ChannelFuture bind(SocketAddress localAddress) {
        validate();
        return doBind(ObjectUtil.checkNotNull(localAddress, "localAddress"));
    }
doBind 源码剖析,核心是两个方法 initAndRegister() 和 doBind0()
private ChannelFuture doBind(final SocketAddress localAddress) {
        final ChannelFuture regFuture = initAndRegister();
        final Channel channel = regFuture.channel();
        if (regFuture.cause() != null) {
            return regFuture;
        }

        if (regFuture.isDone()) {
            // At this point we know that the registration was complete and successful.
            ChannelPromise promise = channel.newPromise();
            // 执行 doBind() 方法,完成对端口的绑定
            doBind0(regFuture, channel, localAddress, promise);
            return promise;
        } else {
            // Registration future is almost always fulfilled already, but just in case it's not.
            final PendingRegistrationPromise promise = new PendingRegistrationPromise(channel);
            regFuture.addListener(new ChannelFutureListener() {
                @Override
                public void operationComplete(ChannelFuture future) throws Exception {
                    Throwable cause = future.cause();
                    if (cause != null) {
                        // Registration on the EventLoop failed so fail the ChannelPromise directly to not cause an
                        // IllegalStateException once we try to access the EventLoop of the Channel.
                        promise.setFailure(cause);
                    } else {
                        // Registration was successful, so set the correct executor to use.
                        // See https://github.com/netty/netty/issues/2586
                        promise.registered();

                        doBind0(regFuture, channel, localAddress, promise);
                    }
                }
            });
            return promise;
        }
    }
3.7 分析说明 initAndRegister
final ChannelFuture initAndRegister() {
        Channel channel = null;
        try {
            /**
            说明:channelFactory.newChannel() 方法的作用通过 ServerBootStrap 的通道工厂反射创建一个 NioServerSocketChannel,具体追踪源码可以得到下面结论。
            (1)通过 NIO 的 SelectorProvider 的 openServerSocketChannel 方法得到 JDK 的 channel。目的是让 Netty 包装 JDK 的 channel。
            (2)创建了一个唯一的 ChannelId,创建了一个 NioMessageUnsafe,用于操作消息,创建了一个 DefaultChannelPipeline 管道,是个双向链表结构,用于过滤所有的进出的消息。
            (3)创建了一个 NioServerSocketChannelConfig 对象,用于对外展示一些配置。
            */
            channel = channelFactory.newChannel();
            /**
            说明:init 初始化这个 NIOServerSocketChannel,具体追踪源码可以得到如下结论。
            (1)init 方法,这是个抽象方法(AbstractBootstrap类的),由 ServerBootstrap 实现(可以追踪一下源码 // setChannelOptions(channel,options,logger);)。
            (2)设置 NioServerSocketChannel 的 TCP 属性。
            (3)由于 LinkedHashMap 是非线程安全的,使用同步进行处理。
            (4)对 NioServerSocketChannel 的 ChannelPipeline 添加 ChannelInitializer 处理器。
            (5)可以看出,init 的方法的核心作用在和 ChannelPipeline 相关。
            (6)从 NioServerSocketChannel 的初始化过程中,我们知道。pipeline 是一个双向链表,并且,它本身就初始化了 head 和 tail,这里调用了它的 addLast() 方法,也就是将整个 handler 插入到 tail 的前面,因为 tail 永远会在后面,需要做一些系统的固定的工作。
            */
            init(channel);
        } catch (Throwable t) {
            if (channel != null) {
                // channel can be null if newChannel crashed (eg SocketException("too many open files"))
                channel.unsafe().closeForcibly();
                // as the Channel is not registered yet we need to force the usage of the GlobalEventExecutor
                return new DefaultChannelPromise(channel, GlobalEventExecutor.INSTANCE).setFailure(t);
            }
            // as the Channel is not registered yet we need to force the usage of the GlobalEventExecutor
            return new DefaultChannelPromise(new FailedChannel(), GlobalEventExecutor.INSTANCE).setFailure(t);
        }

        ChannelFuture regFuture = config().group().register(channel);
        if (regFuture.cause() != null) {
            if (channel.isRegistered()) {
                channel.close();
            } else {
                channel.unsafe().closeForcibly();
            }
        }

        // If we are here and the promise is not failed, it's one of the following cases:
        // 1) If we attempted registration from the event loop, the registration has been completed at this point.
        //    i.e. It's safe to attempt bind() or connect() now because the channel has been registered.
        // 2) If we attempted registration from the other thread, the registration request has been successfully
        //    added to the event loop's task queue for later execution.
        //    i.e. It's safe to attempt bind() or connect() now:
        //         because bind() or connect() will be executed *after* the scheduled registration task is executed
        //         because register(), bind(), and connect() are all bound to the same thread.

        return regFuture;
    }
说明:
(1)基本说明:initAndRegister() 初始化 NioServerSocketChannel 通道并注册各个 handler,返回一个 future;
(2)通过 ServerBootstrap 的通道工厂反射创建一个 NioServerSocketChannel;
(3)init 初始化这个 NioServerSocketChannel;
(4)config().group().register(channel) 通过ServerBootstrap 的 bossGroup 注册 NioServerSocketChannel。
(5)最后,返回这个异步执行的占位符即 regFuture。
init() 方法会调用 addLast,现在进入到 addLast 方法内查看
public class DefaultChannelPipeline implements ChannelPipeline {
    // 省略代码.....

    @Override
    public final ChannelPipeline addLast(EventExecutorGroup group, String name, ChannelHandler handler) {
        final AbstractChannelHandlerContext newCtx;
        synchronized (this) {
            // 检查该 handler 是否符合标准
            checkMultiplicity(handler);

            newCtx = newContext(group, filterName(name, handler), handler);

            addLast0(newCtx);

            // If the registered is false it means that the channel was not registered on an eventLoop yet.
            // In this case we add the context to the pipeline and add a task that will call
            // ChannelHandler.handlerAdded(...) once the channel is registered.
            if (!registered) {
                newCtx.setAddPending();
                callHandlerCallbackLater(newCtx, true);
                return this;
            }

            EventExecutor executor = newCtx.executor();
            if (!executor.inEventLoop()) {
                callHandlerAddedInEventLoop(newCtx, executor);
                return this;
            }
        }
        callHandlerAdded0(newCtx);
        return this;
    }

    // 省略代码.....
}
说明:
(1)addLast() 方法,在 DefaultChannelPipeline 类中;
(2)addLast() 方法这就是 pipeline 方法的核心;
(3)检查该 handler 是否符合标准;
(4)创建一个 AbstractChannelHandlerContext 对象,这里说一下,ChannelHandlerContext 对象是 ChannelHandler 和 ChannelPipeline 之间的关联,每当有 ChannelHandler 添加到 Pipeline 中时,都会创建Contex。Context 的主要功能是管理他所关联的 Handler 和同一个 Pipeline 中的其他 Handler 之间的交互。
(5)将 Context 添加到链表中,也就是追加到 tail 节点的前面。
(6)最后,同步或者异步或者晚点异步的调用 callHandlerAdded() 方法。
3.8 分析doBinid() 方法
前面说了 dobind 方法有2个重要的步骤,initAndRegister 说完,接下来看 doBind() 方法
public abstract class AbstractBootstrap<B extends AbstractBootstrap<B, C>, C extends Channel> implements Cloneable {
    // 代码省略.....

    private static void doBind0(
            final ChannelFuture regFuture, final Channel channel,
            final SocketAddress localAddress, final ChannelPromise promise) {

        // This method is invoked before channelRegistered() is triggered.  Give user handlers a chance to set up
        // the pipeline in its channelRegistered() implementation.
        channel.eventLoop().execute(new Runnable() {
            @Override
            public void run() {
                if (regFuture.isSuccess()) {
                    channel.bind(localAddress, promise).addListener(ChannelFutureListener.CLOSE_ON_FAILURE);
                } else {
                    promise.setFailure(regFuture.cause());
                }
            }
        });
    }

    // 代码省略.....

}
说明:
(1)该方法的参数为 initAndRegister 的 future,NioServerSocketChannel,端口地址,NioServerSocketChannel 的 promise;
这里可以根据前面下的断点,一直debug。
首先将调用 LoggingHandler 的 invokeBind 方法
@Override
    public ChannelFuture bind(final SocketAddress localAddress, final ChannelPromise promise) {
        ObjectUtil.checkNotNull(localAddress, "localAddress");
        if (isNotValidPromise(promise, false)) {
            // cancelled
            return promise;
        }

        final AbstractChannelHandlerContext next = findContextOutbound(MASK_BIND);
        EventExecutor executor = next.executor();
        if (executor.inEventLoop()) {
            next.invokeBind(localAddress, promise);
        } else {
            safeExecute(executor, new Runnable() {
                @Override
                public void run() {
                    next.invokeBind(localAddress, promise);
                }
            }, promise, null, false);
        }
        return promise;
    }
然后追到 DefaultChannelPipeline 类的 bind()
        @Override
        public void bind(
                ChannelHandlerContext ctx, SocketAddress localAddress, ChannelPromise promise) {
            unsafe.bind(localAddress, promise);
        }
继续追踪 AbstractChannel 的 bind()方法
@Override
        public final void bind(final SocketAddress localAddress, final ChannelPromise promise) {
            assertEventLoop();

            if (!promise.setUncancellable() || !ensureOpen(promise)) {
                return;
            }

            // See: https://github.com/netty/netty/issues/576
            if (Boolean.TRUE.equals(config().getOption(ChannelOption.SO_BROADCAST)) &&
                localAddress instanceof InetSocketAddress &&
                !((InetSocketAddress) localAddress).getAddress().isAnyLocalAddress() &&
                !PlatformDependent.isWindows() && !PlatformDependent.maybeSuperUser()) {
                // Warn a user about the fact that a non-root user can't receive a
                // broadcast packet on *nix if the socket is bound on non-wildcard address.
                logger.warn(
                        "A non-root user can't receive a broadcast packet if the socket " +
                        "is not bound to a wildcard address; binding to a non-wildcard " +
                        "address (" + localAddress + ") anyway as requested.");
            }

            boolean wasActive = isActive();
            try {
                // 最终的方法,执行成功后,执行通道的 fireChannelActive 方法,告诉所有的 handler,已经绑定成功
                doBind(localAddress);
            } catch (Throwable t) {
                safeSetFailure(promise, t);
                closeIfClosed();
                return;
            }

            if (!wasActive && isActive()) {
                invokeLater(new Runnable() {
                    @Override
                    public void run() {
                        pipeline.fireChannelActive();
                    }
                });
            }

            safeSetSuccess(promise);
        }
最终 doBind 就会追踪到 NioServerSocketChannel 的 doBind,说明 Netty 底层使用的是 NIO
    @SuppressJava6Requirement(reason = "Usage guarded by java version check")
    @Override
    protected void doBind(SocketAddress localAddress) throws Exception {
        if (PlatformDependent.javaVersion() >= 7) {
            javaChannel().bind(localAddress, config.getBacklog());
        } else {
            javaChannel().socket().bind(localAddress, config.getBacklog());
        }
    }
回到 bind 方法,最后一步:safeSetSuccess(promise); 告诉 promise 任务成功了。其可以执行监听器的方法了。到此整个启动过程结束。
继续执行代码就会进入到(NioEventLoop类)的一个循环代码,进行监听。
4.Netty启动过程梳理
-
创建两个EventLoopGroup线程池数组,数组默认大小是CPU*2,方便Channel注册选择线程池时候提高性能
-
BootStrap将boss设置为group属性,将worker设置为childer属性
-
通过bind方法启动,内部重要方法是initAndRegister 和 dobind方法
-
initAndRegister方法通过反射创建NioServerSocketChannel以及相关的NIO对象,pipeline,unsafe,同时也为pipeline初始化head节点和tail节点
-
在register0方法成功后调用在dobind方法中的doBind0,该方法会调用NioServerSocketChannel的doBind方法对JDK的channel和端口进行绑定,完成Netty服务器所有的启动后,开始监听连接事件
版权声明:本文内容由互联网用户自发贡献,该文观点仅代表作者本人。本站仅提供信息存储空间服务,不拥有所有权,不承担相关法律责任。如发现本站有涉嫌侵权/违法违规的内容, 请发送邮件至 举报,一经查实,本站将立刻删除。
文章由极客之音整理,本文链接:https://www.bmabk.com/index.php/post/142576.html

