
Ioc基于xml操作Bean管理
一、什么是Bean?
我认为Bean就是一个组件,我们在编写配置文件的时候,在创建对象的过程,其实就在创建Bean的过程,只不过,java之前创建对象的时候,是通过new来实现的,而我们现在创建对象是通过反射和代理的方式来使用它,从而自己也就有了对象
二、FactoryBean(工厂Bean)
什么是工厂Bean?
1.Spring 有两种类型bean,一种普通bean,另外一种工厂bean(FactoryBean)
2.普通bean:在配置文件中定义bean类型就是返回类型
3.工厂bean:在配置文件中定义bean类型可以和返回类型不一样
怎么样使用工厂Bean?
第一步:创建一个实体类,在实体类上继承FactoryBean接口(我们这次假设将返回的类的变为String型)
public class MyBean implements FactoryBean<String> {

    // 定义返回bean
    @Override
    public String getObject() throws Exception {
        String str = "Hello I am Factory";
        return str;
    }

    @Override
    public Class<?> getObjectType() {
        return null;
    }

    @Override
    public boolean isSingleton() {
        return false;
    }
}
第二步:编写xml配置文件
<?xml version="1.0" encoding="UTF-8"?>
<beans xmlns="http://www.springframework.org/schema/beans"
       xmlns:xsi="http://www.w3.org/2001/XMLSchema-instance"
       xsi:schemaLocation="http://www.springframework.org/schema/beans http://www.springframework.org/schema/beans/spring-beans.xsd">

    <bean id="myBean" class="com.ioc.spring5.factorybean.MyBean" scope="singleton">
    </bean>
</beans>
第三步:编写测试类测试
public class yc {
    @Test
    public void test(){
        ApplicationContext context =
                new ClassPathXmlApplicationContext("bean1.xml");
        String myBean = context.getBean("myBean",String.class);
        System.out.println(myBean);
    }
 }
运行结果:
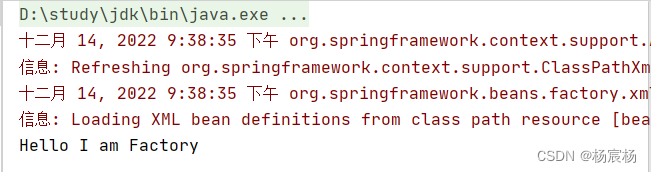

由运行结果我们可以看的出来,虽然我们配置文件配置的是MyBean对象,但返回的是一个String类型的语句
三、Bean作用域
作用域分为单实例和多实例,那什么是单实例,什么又是多实例呢?
举个例子,我们要创建两个User对象,如果这两个对象都是取自同一个地址,那么就叫作单实例,那如果两个对象不是取自同一个地址,那么我们就叫多实例
在上一个博客里面的一起找不同模块中,我们的曾对比过无论创建多少个User对象都是取自同一个地址,说明我们利用bean操作创建对象默认是单例对象
(1)在spring配置文件bean标签里面有属性(scope)用于设置是单实例还是多实例。
(2)scope属性值
第一个值 默认值,singleton,表示是单实例对象
第二个值 prototype, 表示是多实例对象
注:设置scope值是singleton时候,加载spring配置文件的时候就会创建单实例对象
设置scope值是prototype时候,不是加载spring配置文件时候创建对象,在调用getBean方法时侯创建多实例对象
怎样创建单例对象和多例对象?
第一步:创建一个实体类
public class User {
    public void greet(){
        System.out.println("欢迎光临");
    }
}
第二步:编写xml配置文件
创建多实例对象
<?xml version="1.0" encoding="UTF-8"?>
<beans xmlns="http://www.springframework.org/schema/beans"
       xmlns:xsi="http://www.w3.org/2001/XMLSchema-instance"
       xsi:schemaLocation="http://www.springframework.org/schema/beans http://www.springframework.org/schema/beans/spring-beans.xsd">

    <bean id="user" class="com.ioc.spring5.yy.User" scope="prototype"></bean>
</beans>
创建单实例对象
<?xml version="1.0" encoding="UTF-8"?>
<beans xmlns="http://www.springframework.org/schema/beans"
       xmlns:xsi="http://www.w3.org/2001/XMLSchema-instance"
       xsi:schemaLocation="http://www.springframework.org/schema/beans http://www.springframework.org/schema/beans/spring-beans.xsd">

    <bean id="user" class="com.ioc.spring5.yy.User" scope="singleton"></bean>
</beans>
四、Bean的生命周期
什么是生命周期?
从对象创建到对象销毁的过程
Bean的普通生命周期演示
实体类:
public class Orders {

    //无参数构造

    public  Orders(){
        System.out.println("第一步 执行无参构造创建bean实例");
    }

    private String oname;
    public void setOname(String oname){
        this.oname = oname;
        System.out.println("第二步 调用set方法设置属性值");
    }

    //创建执行时的初始化的方法
    public void initMethod(){
        System.out.println("第三步 执行初始化的方法");
    }

    //创建执行的销毁的方法
    public void destroyMethod(){
        System.out.println("第五步 执行销毁的方法");
    }
}
配置文件:
<?xml version="1.0" encoding="UTF-8"?>
<beans xmlns="http://www.springframework.org/schema/beans"
       xmlns:xsi="http://www.w3.org/2001/XMLSchema-instance"
       xsi:schemaLocation="http://www.springframework.org/schema/beans http://www.springframework.org/schema/beans/spring-beans.xsd">

    <bean id="orders" class="com.ioc.spring5.bean.Orders" init-method="initMethod" destroy-method="destroyMethod">
        <property name="oname" value="手机"></property>
    </bean>
</beans>
编写测试类:
@Test
public void test3(){
// ApplicationContext context =
// new ClassPathXmlApplicationContext("bean2.xml");
ClassPathXmlApplicationContext context =
new ClassPathXmlApplicationContext("bean2.xml");
Orders orders = context.getBean("orders",Orders.class);
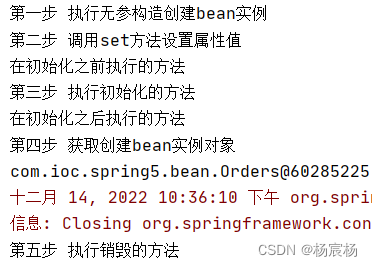
System.out.println("第四步 获取创建bean实例对象");
System.out.println(orders);
//手动让bean实例销毁
// ((ClassPathXmlApplicationContext)context).close();
context.close();
}
运行结果

添加后置处理器后的Bean生命周期演示
在上面的基础上
创建继承后置处理器接口的类
public class MyBeanPost implements BeanPostProcessor {
    @Override
    public Object postProcessBeforeInitialization(Object bean, String beanName) throws BeansException {
        System.out.println("在初始化之前执行的方法");
        return bean;
    }

    @Override
    public Object postProcessAfterInitialization(Object bean, String beanName) throws BeansException {
        System.out.println("在初始化之后执行的方法");
        return bean;
    }
}
修改xml配置文件,注入后置类
<?xml version="1.0" encoding="UTF-8"?>
<beans xmlns="http://www.springframework.org/schema/beans"
       xmlns:xsi="http://www.w3.org/2001/XMLSchema-instance"
       xsi:schemaLocation="http://www.springframework.org/schema/beans http://www.springframework.org/schema/beans/spring-beans.xsd">

    <bean id="orders" class="com.ioc.spring5.bean.Orders" init-method="initMethod" destroy-method="destroyMethod">
        <property name="oname" value="手机"></property>
    </bean>

    <!--配置后置处理器-->
    <bean id="myBeanPost" class="com.ioc.spring5.bean.MyBeanPost"></bean>
</beans>
运行结果:
注意点
为什么第一次要强转,第二次没有

因为最开始我们解析配置文件左边接受的对象是ApplicationContext,它里面没有close()方法,我们后来将接受的改为它的子类了,就可以直接调用了,因为它子类里面有close()
五、xml自动装配
什么是自动装配
根据指定装配规则(属性名称或者属性类型),Spring自动将匹配的属性值进行注入
怎么样实现自动装配?
假设我们有两个实体类:
public class Dept {
    @Override
    public String toString() {
        return "Dept{}";
    }
}
public class Emp {
    private Dept dept;
    public void setDept(Dept dept){
        this.dept=dept;
    }

    @Override
    public String toString() {
        return "Emp{" +
                "dept=" + dept +
                '}';
    }

    public void test(){
        System.out.println(dept);
    }
}
编写配置文件:
<?xml version="1.0" encoding="UTF-8"?>
<beans xmlns="http://www.springframework.org/schema/beans"
       xmlns:xsi="http://www.w3.org/2001/XMLSchema-instance"
       xsi:schemaLocation="http://www.springframework.org/schema/beans http://www.springframework.org/schema/beans/spring-beans.xsd">

    <!--实现自动装配
        bean标签属性autowire,配置自动装配
        autowire属性常用两个值,
            byName根据属性名注入,注入值bean的id值和类属性名一样
            byType根据属性类注入
    -->
    <bean id="emp" class="com.ioc.spring5.autowire.Emp"  autowire="byType">
<!--        <property name="dept" ref="dept"></property>-->
    </bean>
    <bean id="dept" class="com.ioc.spring5.autowire.Dept"></bean>
</beans>
因为相比普通配置,自动配置是因为我们bean标签里面里面多了autowire,可以根据name或type自动装配
版权声明:本文内容由互联网用户自发贡献,该文观点仅代表作者本人。本站仅提供信息存储空间服务,不拥有所有权,不承担相关法律责任。如发现本站有涉嫌侵权/违法违规的内容, 请发送邮件至 举报,一经查实,本站将立刻删除。
文章由半码博客整理,本文链接:https://www.bmabk.com/index.php/post/141577.html

