
闲话
周末又来咯~
一、Bean的作用域
关键字:scope
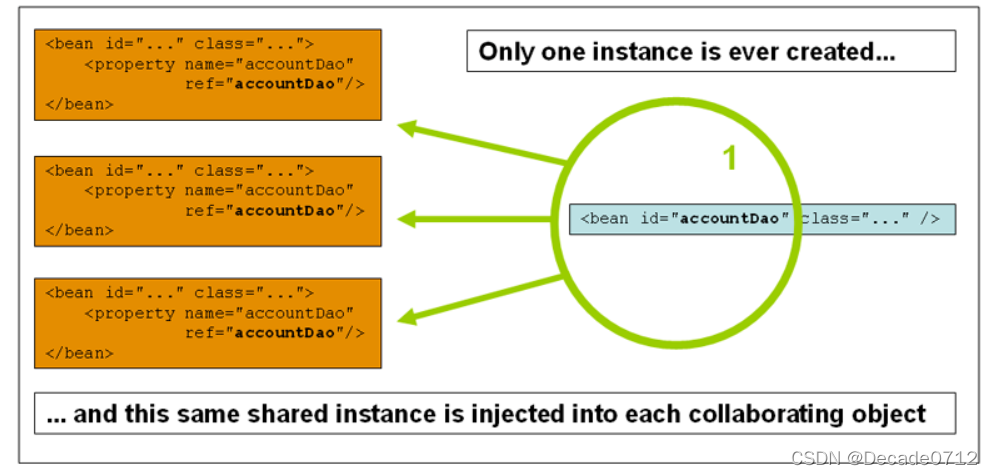
1、单例作用域(Spring的默认机制)—-singleton
当我们定义 Bean 且将其范围限定为单例时,Spring IOC 容器将只创建一个与之相关对象实例。此实例将存储在此类单例 Bean 的缓存中,后续所有对该命名 Bean 的请求和引用都将返回缓存的对象
如下图所示,我们左侧三个bean中对accountDao的引用,得到的都是右侧bean创建的对象

XML中配置如下
<bean id="user" class="com.decade.pojo.User" c:age="18" c:name="decade" scope="singleton"/>
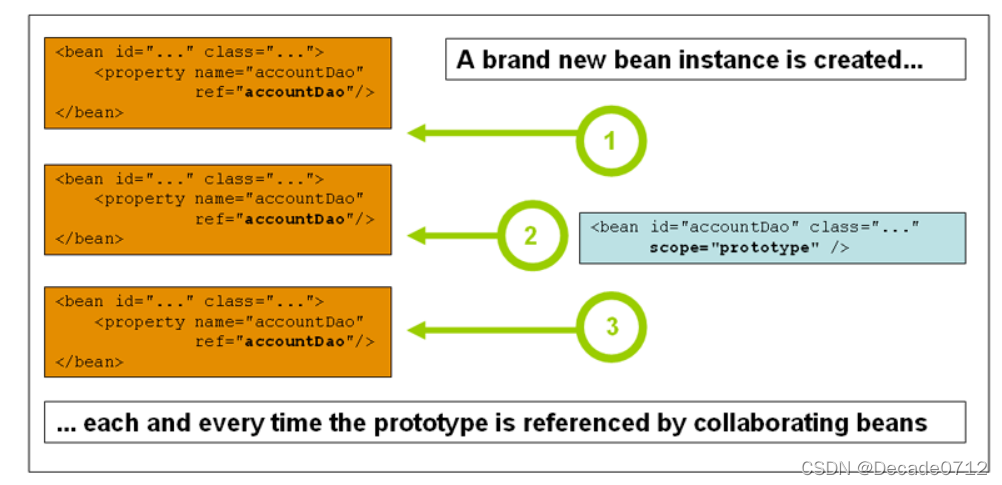
2、原型作用域—-prototype
与单例模式不同的是,每次我们请求或者引用某个原型模式的bean时,它都会创建一个新的对象实例
如下图所示,我们左侧对accountDao这个bean的每一次引用,都会创建一个新的对象实例
XML中配置如下
<bean id="user" class="com.decade.pojo.User" c:age="18" c:name="decade" scope="prototype"/>
3、请求作用域—-request
Bean 的作用域为 HTTP 请求级别,每次HTTP请求都会创建一个新的Bean,该作用域仅适用于web的Spring WebApplicationContext环境,当请求完成处理时,将丢弃作用域为请求的 Bean
XML配置如下
<bean id="loginAction" class="com.something.LoginAction" scope="request"/>
4、会话作用域—-session
作用域是HTTP Session级别的,Session中所有http请求共享同一个请求的bean实例,等到Session结束后就销毁bean
XML配置如下
<bean id="appPreferences" class="com.something.AppPreferences" scope="application"/>
5、全局作用域—-application
限定一个Bean的作用域为ServletContext的生命周期,它是ServletContext级别的,作为常规的ServletContext属性
XML配置如下
<bean id="appPreferences" class="com.something.AppPreferences" scope="application"/>
二、bean的自动装配
1、自动装配的理解
自动装配是Spring满足bean依赖的一种方式,Spring会在上下文中自动寻找,并自动给bean装配属性,我们不再需要对属性进行赋值
2、三种装配方式
1)在XML中显示配置,例如
<?xml version="1.0" encoding="UTF-8"?>
<beans xmlns="http://www.springframework.org/schema/beans"
       xmlns:xsi="http://www.w3.org/2001/XMLSchema-instance"
       xsi:schemaLocation="http://www.springframework.org/schema/beans
       http://www.springframework.org/schema/beans/spring-beans.xsd">

    <bean id="hello" class="com.decade.pojo.Hello">
        <property name="name" value="decade"/>
    </bean>
</beans>
2)在Java代码中显示配置
可以参考【Spring】使用JavaConfig实现配置
3)隐式的自动装配
自动装配分为2种装配方式:byName和byType
我们结合代码实例来理解一下
首先我们创建一个人的实体类,她有一个小猫
public class Cat {
    public void bark() {
        System.out.println("喵喵");
    }
}

public class People {
    private Cat cat;
    private String name;

    public Cat getCat() {
        return cat;
    }

    public void setCat(Cat cat) {
        this.cat = cat;
    }

    public String getName() {
        return name;
    }

    public void setName(String name) {
        this.name = name;
    }
}
然后我们在xml文件中注册这些对象
按照原来的配置方式,我们需要在bean定义时显式的装配属性cat
<?xml version="1.0" encoding="UTF-8"?>
<beans xmlns="http://www.springframework.org/schema/beans"
       xmlns:xsi="http://www.w3.org/2001/XMLSchema-instance"
       xsi:schemaLocation="http://www.springframework.org/schema/beans
        https://www.springframework.org/schema/beans/spring-beans.xsd">

    <bean id="cat" class="com.decade.pojo.Cat"/>

    <bean id="people" class="com.decade.pojo.People">
        <property name="name" value="decade"/>
        <property name="cat" ref="cat"/>
    </bean>
</beans>
但是我们现在使用隐式自动装配之后,xml文件变为下面这种配置了
<?xml version="1.0" encoding="UTF-8"?>
<beans xmlns="http://www.springframework.org/schema/beans"
       xmlns:xsi="http://www.w3.org/2001/XMLSchema-instance"
       xsi:schemaLocation="http://www.springframework.org/schema/beans
        https://www.springframework.org/schema/beans/spring-beans.xsd">

    <bean id="cat" class="com.decade.pojo.Cat"/>

    <!--
        使用byName自动注入,需要确保引用的bean的id唯一、并且和我们的属性set方法去掉set后的名字相同
        如果上面的cat改为cat2,那么自动注入就找不到对象了
        使用byType自动注入,需要确保bean指向的的class类型和我们的属性的类型保持一致
        它需要确保引用的bean的类型全局唯一,如果有2个bean的class指向同一个类,那么使用byType就会出错
    -->
    <bean id="people" class="com.decade.pojo.People" autowire="byName">
        <property name="name" value="decade"/>
    </bean>
</beans>
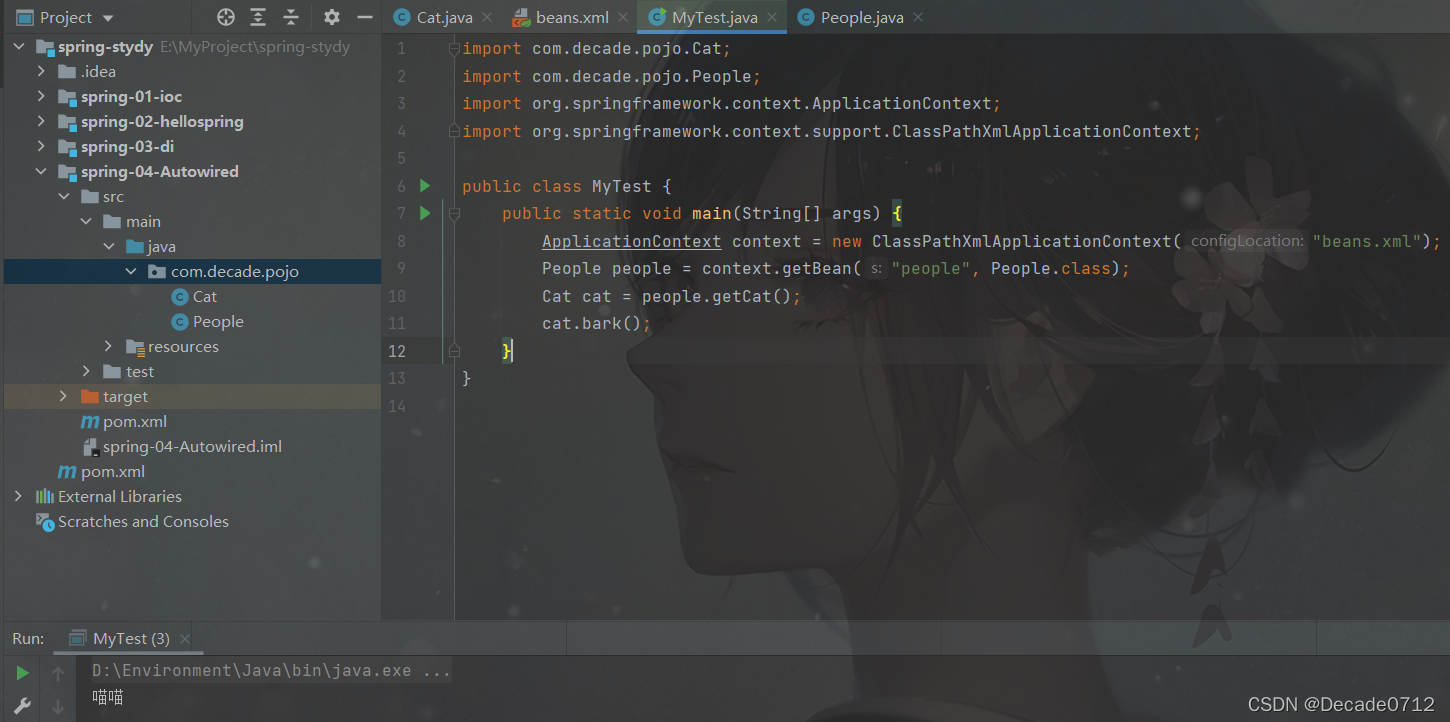
最后我们写一个测试类来进行测试
public class MyTest {
    public static void main(String[] args) {
        ApplicationContext context = new ClassPathXmlApplicationContext("beans.xml");
        People people = context.getBean("people", People.class);
        Cat cat = people.getCat();
        cat.bark();
    }
}
运行结果如下
三、使用注解实现自动装配
1、使用注解前提
1)导入约束
xmlns:context="http://www.springframework.org/schema/context"
http://www.springframework.org/schema/context
https://www.springframework.org/schema/context/spring-context.xsd
2)开启注解支持的配置
<context:annotation-config/>
整体配置如下
<?xml version="1.0" encoding="UTF-8"?>
<beans xmlns="http://www.springframework.org/schema/beans"
    xmlns:xsi="http://www.w3.org/2001/XMLSchema-instance"
    xmlns:context="http://www.springframework.org/schema/context"
    xsi:schemaLocation="http://www.springframework.org/schema/beans
        https://www.springframework.org/schema/beans/spring-beans.xsd
        http://www.springframework.org/schema/context
        https://www.springframework.org/schema/context/spring-context.xsd">

    <!--开启注解的支持 -->
    <context:annotation-config/>
</beans>
2、使用注解
1)@Autowired
-
@Autowired注解是Spring自己定义的,它默认是按照byType的方式实现自动注入
-
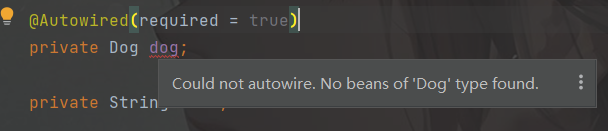
默认情况下,required属性默认为true,它要求@AutoWried装配的对象必须要在XML中被定义,如果允许不定义,可以设置当前对象的required属性为false,或者加上@Nullable注解
样例代码如下
import org.springframework.beans.factory.annotation.Autowired;

public class People {

    @Autowired(required = false)
    private Dog dog;

    public Dog getDog() {
        return dog;
    }
}
为true时,如果在spring的ioc容器中找不到对象就会报错
- 如果存在XML中定义了多个同类型的bean,我们可以使用@Qualifier注解指定使用哪一个bean
下面我们结合代码实例来进行理解,假设还是上面那个例子,我们的people对象有一只小猫和一只小狗,我们在beans.xml中进行了如下配置
<?xml version="1.0" encoding="UTF-8"?>
<beans xmlns="http://www.springframework.org/schema/beans"
      xmlns:xsi="http://www.w3.org/2001/XMLSchema-instance"
      xmlns:context="http://www.springframework.org/schema/context"
      xsi:schemaLocation="http://www.springframework.org/schema/beans
       https://www.springframework.org/schema/beans/spring-beans.xsd
       http://www.springframework.org/schema/context
       https://www.springframework.org/schema/context/spring-context.xsd">

   <!--开启注解的支持 -->
   <context:annotation-config/>

   <bean id="cat1" class="com.decade.pojo.Cat"/>
   <bean id="cat2" class="com.decade.pojo.Cat"/>
   <bean id="dog1" class="com.decade.pojo.Dog"/>
   <bean id="dog2" class="com.decade.pojo.Dog"/>

   <bean id="people" class="com.decade.pojo.People"/>
</beans>
可以看到,在Spring上下文中,Dog类和Cat类都有2个bean,所以我们在People类中引用时,使用@Qualifier注解进行区分,就像这里,我们使用cat1这个bean的对象实例
import org.springframework.beans.factory.annotation.Autowired;
import org.springframework.beans.factory.annotation.Qualifier;
import org.springframework.lang.Nullable;

public class People {
    @Autowired
    @Qualifier(value = "cat1")
    private Cat cat;

    @Nullable
    private Dog dog;

    private String name;

    public Cat getCat() {
        return cat;
    }

    public Dog getDog() {
        return dog;
    }

    public String getName() {
        return name;
    }

    public void setName(String name) {
        this.name = name;
    }
}
2)@Resource
- @Resource注解是JDK自己定义的,它默认是按照byName的方式实现自动注入,但是它也支持byType的方式。如果name匹配不上(即bean的id),那么就会根据type进行匹配
- 根据type进行匹配时,Spring上下文(即bean相关的XML)中只能存在一个该类型的bean(如果指定了type属性使用@Resource注入dog,那么就会报错)
- 也可以同时指定了name和type属性,例如@Resource(name = “dog2”, type = Dog.class),那么就会去Spring上下文中找唯一的bean进行装配
这是我们的XML配置
<?xml version="1.0" encoding="UTF-8"?>
<beans xmlns="http://www.springframework.org/schema/beans"
       xmlns:xsi="http://www.w3.org/2001/XMLSchema-instance"
       xmlns:context="http://www.springframework.org/schema/context"
       xsi:schemaLocation="http://www.springframework.org/schema/beans
        https://www.springframework.org/schema/beans/spring-beans.xsd
        http://www.springframework.org/schema/context
        https://www.springframework.org/schema/context/spring-context.xsd">

    <!--开启注解的支持 -->
    <context:annotation-config/>

    <bean id="cat1" class="com.decade.pojo.Cat"/>
    <bean id="dog1" class="com.decade.pojo.Dog"/>
    <bean id="dog2" class="com.decade.pojo.Dog"/>

    <bean id="people" class="com.decade.pojo.People"/>
</beans>
这是我们在Java代码中使用@Resource注解实现自动装配
import javax.annotation.Resource;

public class People {
    @Resource
    private Cat cat;

    @Resource(name = "dog2")
    private Dog dog;

    private String name;

    public Cat getCat() {
        return cat;
    }

    public Dog getDog() {
        return dog;
    }

    public String getName() {
        return name;
    }

    public void setName(String name) {
        this.name = name;
    }
}
如有错误,欢迎指正
版权声明:本文内容由互联网用户自发贡献,该文观点仅代表作者本人。本站仅提供信息存储空间服务,不拥有所有权,不承担相关法律责任。如发现本站有涉嫌侵权/违法违规的内容, 请发送邮件至 举报,一经查实,本站将立刻删除。
文章由半码博客整理,本文链接:https://www.bmabk.com/index.php/post/136786.html

