
一,概念
Spring Security 是 Spring 社区的一个顶级项目,也是 Spring Boot 官方推荐使用的安全框架。
== 两个重要的概念==
-
登录认证(Authentication)**
-
访问授权(Authorization)**
首先用户登录的时候传入登录信息,登录验证器完成登录认证并将登录认证好的信息存储到请求上下文,然后再进行其他操作,如在进行接口访问、方法调用时,权限认证器从上下文中获取登录认证信息,然后根据认证信息获取权限信息,通过权限信息和特定的授权策略决定是否授权。
二,具体实现案例
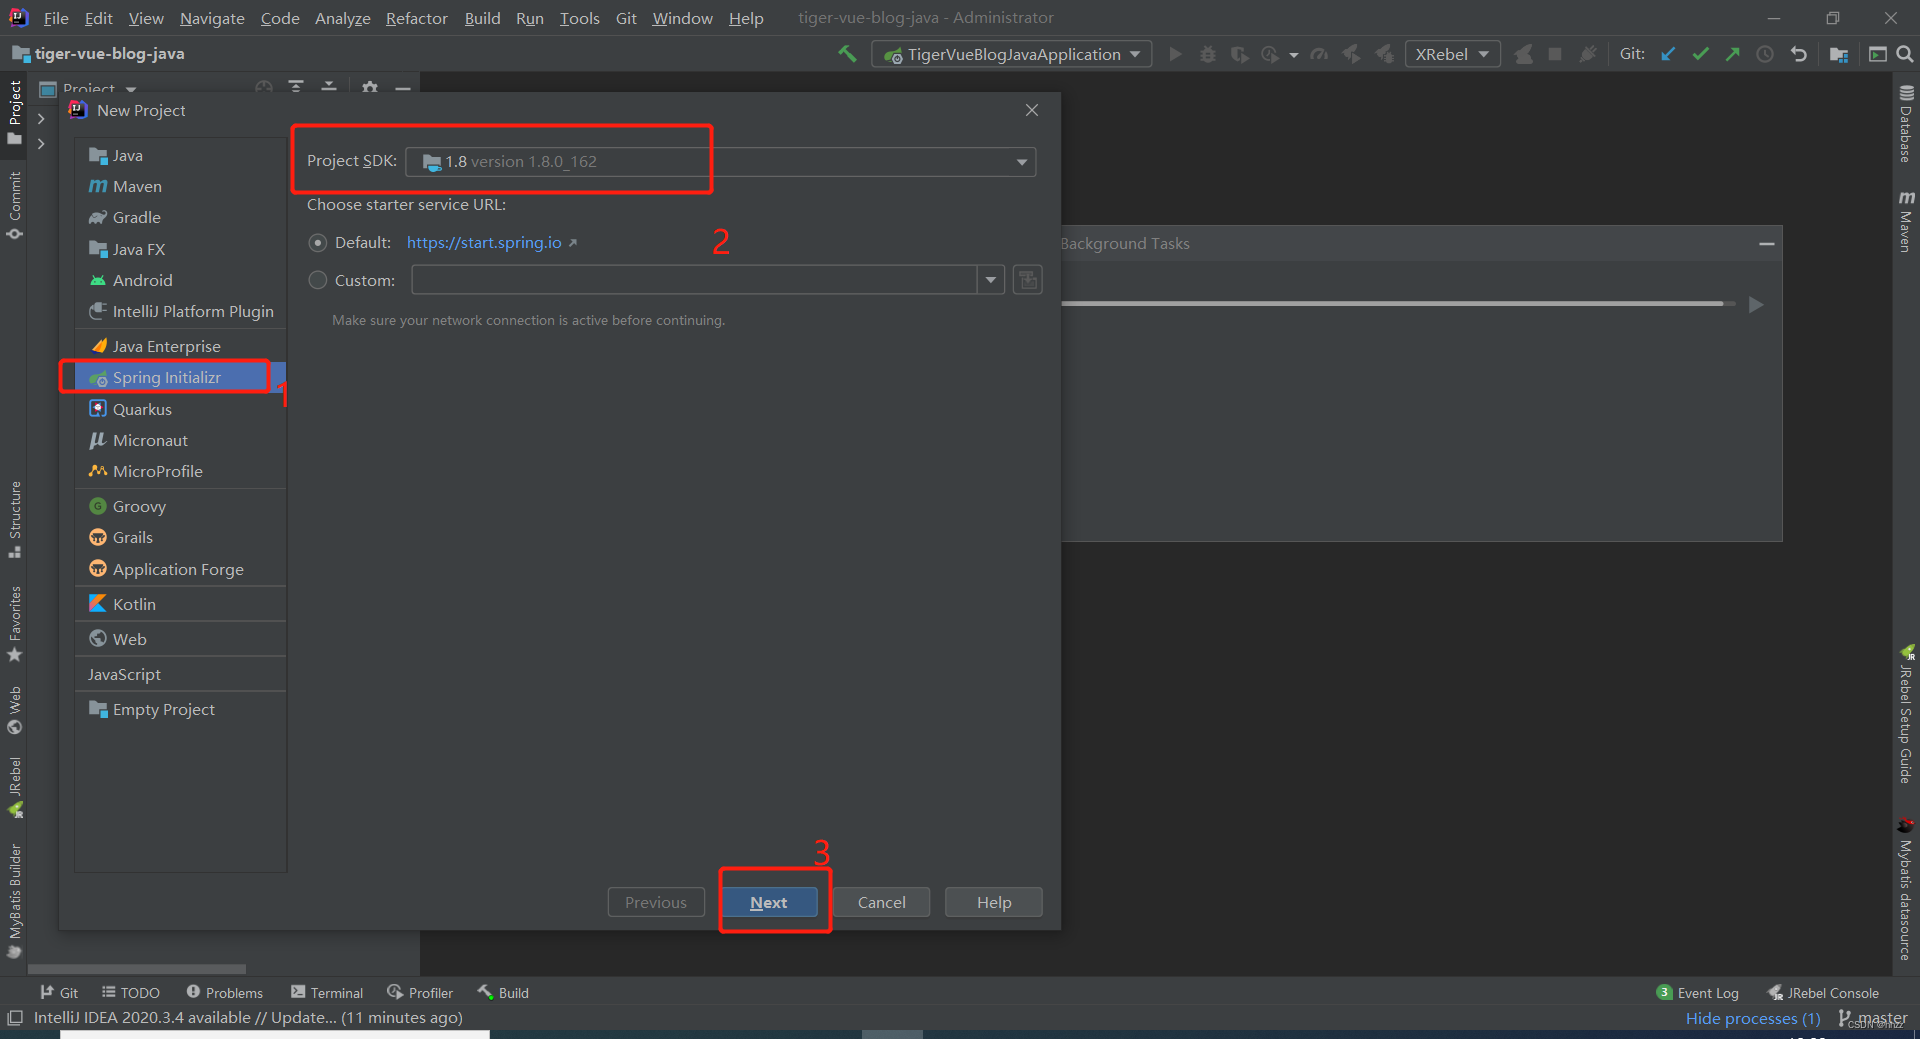
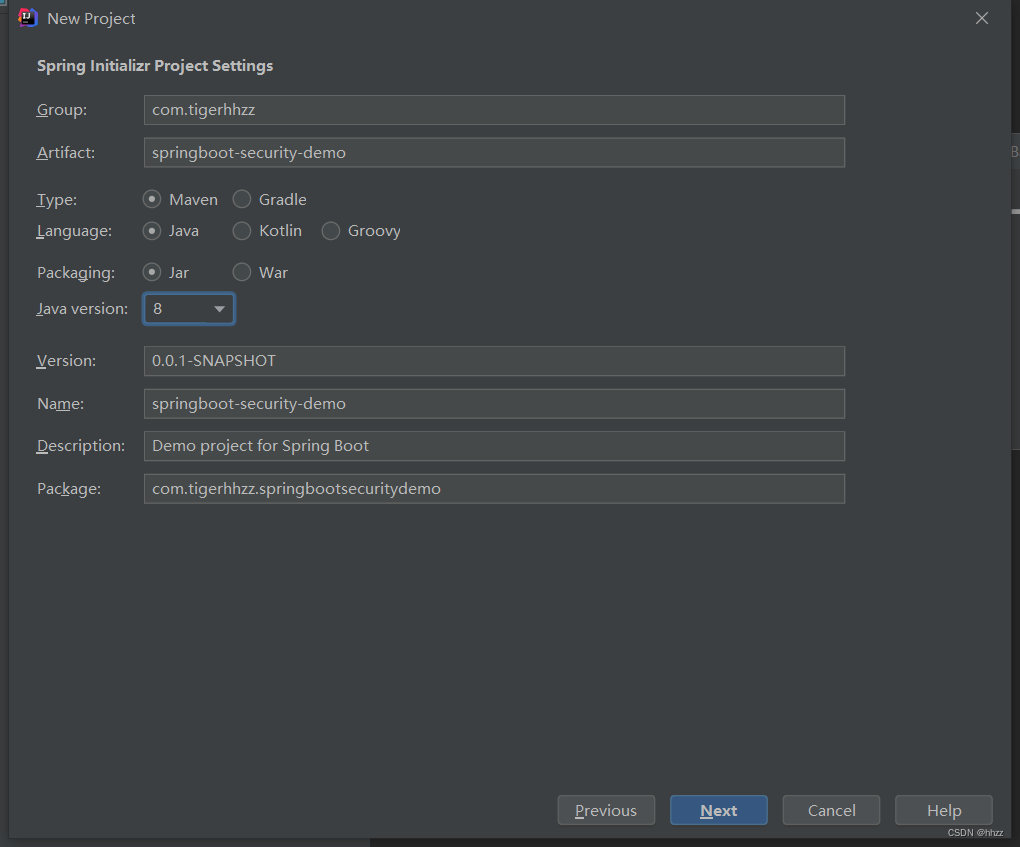
1,使用IDE新建一个spring boot项目

2,添加相关依赖(完整pom.xml)
<?xml version="1.0" encoding="UTF-8"?>
<project xmlns="http://maven.apache.org/POM/4.0.0" xmlns:xsi="http://www.w3.org/2001/XMLSchema-instance"
         xsi:schemaLocation="http://maven.apache.org/POM/4.0.0 https://maven.apache.org/xsd/maven-4.0.0.xsd">
    <modelVersion>4.0.0</modelVersion>
    <parent>
        <groupId>org.springframework.boot</groupId>
        <artifactId>spring-boot-starter-parent</artifactId>
        <version>2.6.7</version>
        <relativePath/> <!-- lookup parent from repository -->
    </parent>
    <groupId>com.tigerhhzz</groupId>
    <artifactId>springboot-security-demo</artifactId>
    <version>0.0.1-SNAPSHOT</version>
    <name>springboot-security-demo</name>
    <description>Demo project for Spring Boot</description>
    <properties>
        <java.version>1.8</java.version>
    </properties>
    <dependencies>

        <!--spring-boot-starter-web-->
        <dependency>
            <groupId>org.springframework.boot</groupId>
            <artifactId>spring-boot-starter-web</artifactId>
        </dependency>


        <!-- swagger -->
        <dependency>
            <groupId>io.springfox</groupId>
            <artifactId>springfox-swagger2</artifactId>
            <version>2.9.2</version>
        </dependency>
        <dependency>
            <groupId>io.springfox</groupId>
            <artifactId>springfox-swagger-ui</artifactId>
            <version>2.9.2</version>
        </dependency>
        <!-- spring security -->
        <dependency>
            <groupId>org.springframework.boot</groupId>
            <artifactId>spring-boot-starter-security</artifactId>
        </dependency>

        <!-- jwt -->
        <dependency>
            <groupId>io.jsonwebtoken</groupId>
            <artifactId>jjwt</artifactId>
            <version>0.9.1</version>
        </dependency>
        <!-- fastjson -->
        <dependency>
            <groupId>com.alibaba</groupId>
            <artifactId>fastjson</artifactId>
            <version>1.2.58</version>
        </dependency>
        <!--lombok-->
        <dependency>
            <groupId>org.projectlombok</groupId>
            <artifactId>lombok</artifactId>
            <optional>true</optional>
        </dependency>
        <dependency>
            <groupId>org.springframework.boot</groupId>
            <artifactId>spring-boot-starter-test</artifactId>
            <scope>test</scope>
        </dependency>
        <dependency>
            <groupId>org.springframework.security</groupId>
            <artifactId>spring-security-test</artifactId>
            <scope>test</scope>
        </dependency>
    </dependencies>

    <build>
        <plugins>
            <plugin>
                <groupId>org.springframework.boot</groupId>
                <artifactId>spring-boot-maven-plugin</artifactId>
                <configuration>
                    <excludes>
                        <exclude>
                            <groupId>org.projectlombok</groupId>
                            <artifactId>lombok</artifactId>
                        </exclude>
                    </excludes>
                </configuration>
            </plugin>
        </plugins>

        <!-- 打包时拷贝MyBatis的映射文件 -->
        <resources>
            <resource>
                <directory>src/main/java</directory>
                <includes>
                    <include>**/sqlmap/*.xml</include>
                </includes>
                <filtering>false</filtering>
            </resource>
            <resource>
                <directory>src/main/resources</directory>
                <includes>
                    <include>**/*.*</include>
                </includes>
                <filtering>true</filtering>
            </resource>
        </resources>

    </build>

</project>
3,添加相关配置
swagger 配置类和CorsConfig跨域配置类
swagger 配置类如下:
package com.tigerhhzz.config;

import org.springframework.context.annotation.Bean;
import org.springframework.context.annotation.Configuration;
import springfox.documentation.builders.ApiInfoBuilder;
import springfox.documentation.builders.ParameterBuilder;
import springfox.documentation.builders.PathSelectors;
import springfox.documentation.builders.RequestHandlerSelectors;
import springfox.documentation.schema.ModelRef;
import springfox.documentation.service.ApiInfo;
import springfox.documentation.service.Parameter;
import springfox.documentation.spi.DocumentationType;
import springfox.documentation.spring.web.plugins.Docket;
import springfox.documentation.swagger2.annotations.EnableSwagger2;

import java.util.ArrayList;
import java.util.List;

/**
 * @author tigerhhzz
 */
@Configuration
@EnableSwagger2
public class SwaggerConfig {

    @Bean
    public Docket createRestApi(){
        // 添加请求参数,我们这里把token作为请求头部参数传入后端
        ParameterBuilder parameterBuilder = new ParameterBuilder();
        List<Parameter> parameters = new ArrayList<Parameter>();
        //添加令牌属性,可以在接口调用的时候传递令牌
        parameterBuilder.name("Authorization").description("令牌").modelRef(new ModelRef("string")).parameterType("header")
                .required(false).build();
        parameters.add(parameterBuilder.build());
        return new Docket(DocumentationType.SWAGGER_2).apiInfo(apiInfo()).select().apis(RequestHandlerSelectors.any())
                .paths(PathSelectors.any()).build().globalOperationParameters(parameters);
    }

    private ApiInfo apiInfo(){
        return new ApiInfoBuilder()
                .title("SpringBoot API接口文档")
                .description("This is a restful api document of Spring Boot.")
                .version("1.0")
                .build();
    }
}
CorsConfig跨域配置类如下:
package com.tigerhhzz.config;

import org.springframework.context.annotation.Configuration;
import org.springframework.web.servlet.config.annotation.CorsRegistry;
import org.springframework.web.servlet.config.annotation.WebMvcConfigurer;

/**
 * @author tigerhzz
 */
@Configuration
public class CorsConfig implements WebMvcConfigurer {

    @Override
    public void addCorsMappings(CorsRegistry registry) {
        // 允许跨域访问的路径
        registry.addMapping("/**")
                // 允许跨域访问的源
                .allowedOrigins("*")
                // 允许请求方法
                .allowedMethods("POST", "GET", "PUT", "OPTIONS", "DELETE")
                // 预检间隔时间
                .maxAge(168000)
                // 允许头部设置
                .allowedHeaders("*")
                // 是否发送cookie
                .allowCredentials(true);
    }
}
4,WebSecurityConfig安全配置类(最重要的类)
package com.tigerhhzz.config;

import com.tigerhhzz.security.JwtAuthenticationFilter;
import com.tigerhhzz.security.JwtAuthenticationProvider;
import com.tigerhhzz.security.JwtLoginFilter;
import org.springframework.beans.factory.annotation.Autowired;
import org.springframework.context.annotation.Bean;
import org.springframework.context.annotation.Configuration;
import org.springframework.http.HttpMethod;
import org.springframework.security.authentication.AuthenticationManager;
import org.springframework.security.config.annotation.authentication.builders.AuthenticationManagerBuilder;
import org.springframework.security.config.annotation.method.configuration.EnableGlobalMethodSecurity;
import org.springframework.security.config.annotation.web.builders.HttpSecurity;
import org.springframework.security.config.annotation.web.configuration.EnableWebSecurity;
import org.springframework.security.config.annotation.web.configuration.WebSecurityConfigurerAdapter;
import org.springframework.security.core.userdetails.UserDetailsService;
import org.springframework.security.web.authentication.UsernamePasswordAuthenticationFilter;
import org.springframework.security.web.authentication.logout.HttpStatusReturningLogoutSuccessHandler;

/**
 * @author tigerhhzz
 *在这个配置类中,我们主要做了以下几个配置: *
 * 1. 访问路径URL的授权策略,如登录、Swagger访问免登录认证等 *
 * 2. 指定了登录认证流程过滤器 JwtLoginFilter,由它来触发登录认证 *
 * 3. 指定了自定义身份认证组件 JwtAuthenticationProvider,并注入 UserDetailsService *
 * 4. 指定了访问控制过滤器 JwtAuthenticationFilter,在授权时解析令牌和设置登录状态 *
 * 5. 指定了退出登录处理器,因为是前后端分离,防止内置的登录处理器在后台进行跳转* *
 *
 */
@Configuration
@EnableWebSecurity
@EnableGlobalMethodSecurity(prePostEnabled = true)
public class WebSecurityConfig extends WebSecurityConfigurerAdapter {

    @Autowired
    private UserDetailsService userDetailsService;

    @Override
    public void configure(AuthenticationManagerBuilder auth) throws Exception {
        // 使用自定义登录身份认证组件
        auth.authenticationProvider(new JwtAuthenticationProvider(userDetailsService));
    }

    @Override
    protected void configure(HttpSecurity http) throws Exception {
        // 禁用 csrf, 由于使用的是JWT,我们这里不需要csrf
        http.cors().and().csrf().disable()
                .authorizeRequests()
                // 跨域预检请求
                .antMatchers(HttpMethod.OPTIONS, "/**").permitAll()
                // 登录URL
                .antMatchers("/login").permitAll()
                // swagger
                .antMatchers("/swagger**/**").permitAll()
                .antMatchers("/webjars/**").permitAll()
                .antMatchers("/v2/**").permitAll()
                // 其他所有请求需要身份认证
                .anyRequest().authenticated();
        // 退出登录处理器
        http.logout().logoutSuccessHandler(new HttpStatusReturningLogoutSuccessHandler());
        // 开启登录认证流程过滤器,如果使用LoginController的login接口, 需要注释掉此过滤器,根据使用习惯二选一即可
        http.addFilterBefore(new JwtLoginFilter(authenticationManager()), UsernamePasswordAuthenticationFilter.class);
        // 访问控制时登录状态检查过滤器
        http.addFilterBefore(new JwtAuthenticationFilter(authenticationManager()), UsernamePasswordAuthenticationFilter.class);
    }

/*    @Override
    public void configure(AuthenticationManagerBuilder auth) throws Exception {
        // 指定自定义的获取信息获取服务
        auth.userDetailsService(userDetailsService);
    }*/

    @Bean
    @Override
    public AuthenticationManager authenticationManager() throws Exception {
        return super.authenticationManager();
    }


}
三,总结–安全相关的工具类
- 密码加密、解密和比对的工具类
- token生成,解析的操作工具类
- 未授权统一处理的工具类
- 退出删除token的退出处理工具类
- 认证和授权过滤器
- 相关的实体类
- 核心的安全配置类
版权声明:本文内容由互联网用户自发贡献,该文观点仅代表作者本人。本站仅提供信息存储空间服务,不拥有所有权,不承担相关法律责任。如发现本站有涉嫌侵权/违法违规的内容, 请发送邮件至 举报,一经查实,本站将立刻删除。
文章由半码博客整理,本文链接:https://www.bmabk.com/index.php/post/135771.html

