
一:Mybatis的介绍
MyBatis 本是apache的一个开源项目iBatis, 2010年这个项目由apache software foundation 迁移到了google code,并且改名为MyBatis。2013年11月迁移到Github。
MyBatis是一个优秀的持久层框架,它对jdbc的操作数据库的过程进行封装,使开发者只需要关注SQL本身,而不需要花费精力去处理例如注册驱动、创建connection、创建statement、手动设置参数、结果集检索等jdbc繁杂的过程代码。
Mybatis通过xml或注解的方式将要执行的各种statement(statement、preparedStatemnt、CallableStatement)配置起来,并通过java对象和statement中的sql进行映射生成最终执行的sql语句,最后由mybatis框架执行sql并将结果映射成java对象并返回。
二:jdbc的问题
使用传统的JDBC操作数据库,如下所示:
//使用JDBC连接数据库
	@Test
	public  void testJdbcWay(){
		Connection connection = null;
		PreparedStatement preparedStatement = null;
		ResultSet resultSet = null;
		try {
			// 加载数据库驱动
			Class.forName("com.mysql.jdbc.Driver");

			// 通过驱动管理类获取数据库链接
			connection = DriverManager.getConnection("jdbc:mysql://localhost:3306/myssh?characterEncoding=utf-8", "root", "mao15897610067");
			// 定义sql语句 ?表示占位符
			String sql = "select * from user where username = ?";
			// 获取预处理statement
			preparedStatement = (PreparedStatement) connection.prepareStatement(sql);
			// 设置参数,第一个参数为sql语句中参数的序号(从1开始),第二个参数为设置的参数值
			preparedStatement.setString(1, "王五");
			// 向数据库发出sql执行查询,查询出结果集
			resultSet = preparedStatement.executeQuery();
			// 遍历查询结果集
			while (resultSet.next()) {
				System.out.println(resultSet.getString("id") + "  " + resultSet.getString("username"));
			}
		} catch (Exception e) {
			e.printStackTrace();
		} finally {
			// 释放资源
			if (resultSet != null) {
				try {
					resultSet.close();
				} catch (SQLException e) {
					// TODO Auto-generated catch block
					e.printStackTrace();
				}
			}
			if (preparedStatement != null) {
				try {
					preparedStatement.close();
				} catch (SQLException e) {
					// TODO Auto-generated catch block
					e.printStackTrace();
				}
			}
			if (connection != null) {
				try {
					connection.close();
				} catch (SQLException e) {
					// TODO Auto-generated catch block
					e.printStackTrace();
				}
			}
		}
	}
1、 数据库连接创建、释放频繁造成系统资源浪费,从而影响系统性能。如果使用数据库连接池可解决此问题。
2、 Sql语句在代码中硬编码,造成代码不易维护,实际应用中sql变化的可能较大,sql变动需要改变java代码。
3、 使用preparedStatement向占有位符号传参数存在硬编码,因为sql语句的where条件不一定,可能多也可能少,修改sql还要修改代码,系统不易维护。
4、对结果集解析存在硬编码(查询列名),sql变化导致解析代码变化,系统不易维护,如果能将数据库记录封装成pojo对象解析比较方便
三:Mybatis架构流程

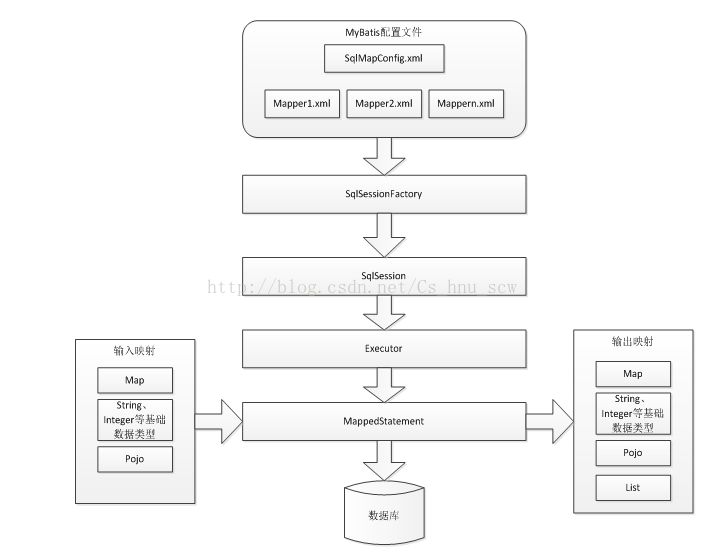
文字解析上面的流程:
1、 mybatis配置
SqlMapConfig.xml,此文件作为mybatis的全局配置文件,配置了mybatis的运行环境等信息。
mapper.xml文件即sql映射文件,文件中配置了操作数据库的sql语句。此文件需要在SqlMapConfig.xml中加载。
2、 通过mybatis环境等配置信息构造SqlSessionFactory即会话工厂
3、 由会话工厂创建sqlSession即会话,操作数据库需要通过sqlSession进行。
4、 mybatis底层自定义了Executor执行器接口操作数据库,Executor接口有两个实现,一个是基本执行器、一个是缓存执行器。
5、 Mapped Statement也是mybatis一个底层封装对象,它包装了mybatis配置信息及sql映射信息等。mapper.xml文件中一个sql对应一个Mapped Statement对象,sql的id即是Mapped statement的id。
6、 Mapped Statement对sql执行输入参数进行定义,包括HashMap、基本类型、pojo,Executor通过Mapped Statement在执行sql前将输入的java对象映射至sql中,输入参数映射就是jdbc编程中对preparedStatement设置参数。
7、 Mapped Statement对sql执行输出结果进行定义,包括HashMap、基本类型、pojo,Executor通过Mapped Statement在执行sql后将输出结果映射至java对象中,输出结果映射过程相当于jdbc编程中对结果的解析处理过程。
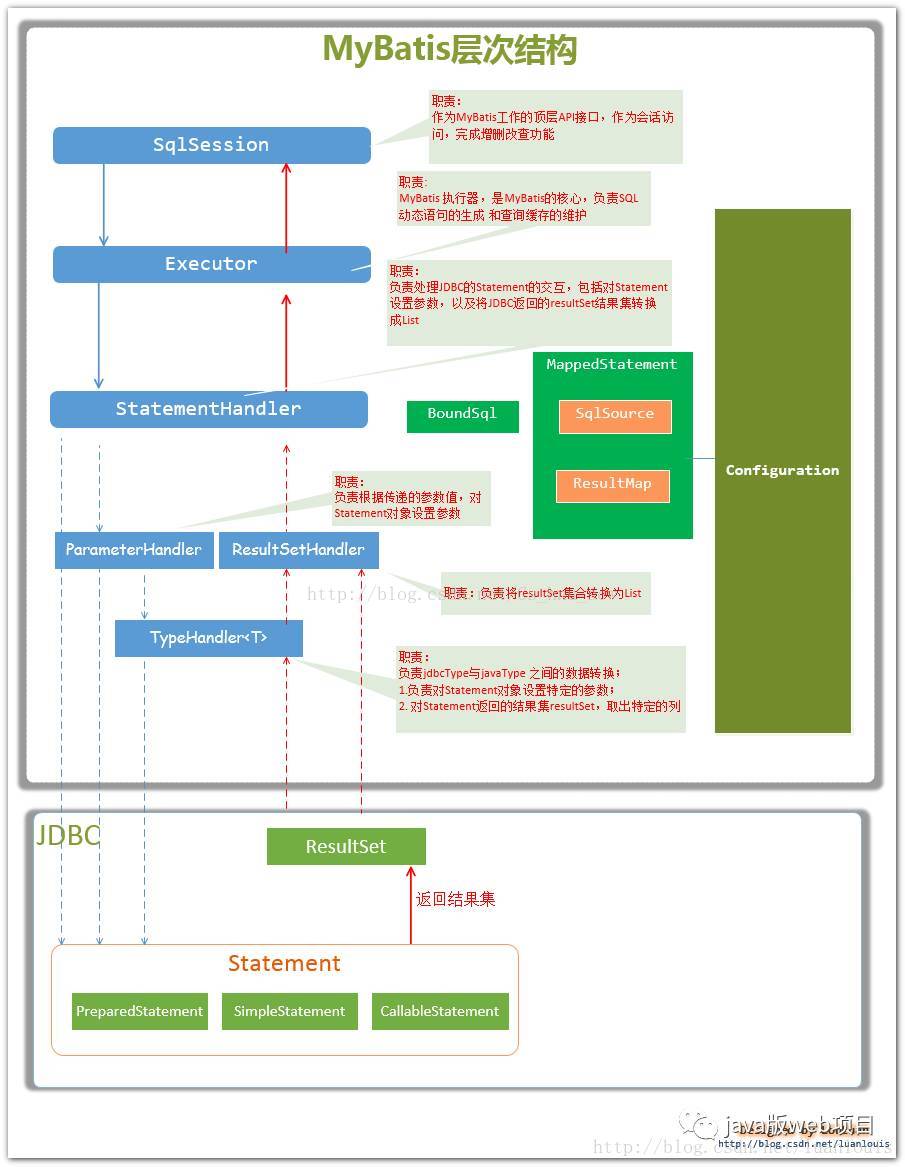
核心部件:
1:SqlSession 作为MyBatis工作的主要顶层API,表示和数据库交互的会话,完成必要数据库增删改查功能
2:Executor MyBatis执行器,是MyBatis 调度的核心,负责SQL语句的生成和查询缓存的维护
3:StatementHandler 封装了JDBC Statement操作,负责对JDBC statement 的操作,如设置参数、将Statement结果集转换成List集合。
4:ParameterHandler 负责对用户传递的参数转换成JDBC Statement 所需要的参数,
5:ResultSetHandler 负责将JDBC返回的ResultSet结果集对象转换成List类型的集合;
6:TypeHandler 负责java数据类型和jdbc数据类型之间的映射和转换
7:MappedStatement MappedStatement维护了一条<select|update|delete|insert>节点的封装,
8:SqlSource 负责根据用户传递的parameterObject,动态地生成SQL语句,将信息封装到BoundSql对象中,并返回
9:BoundSql 表示动态生成的SQL语句以及相应的参数信息
10:Configuration MyBatis所有的配置信息都维持在Configuration对象之中。
PS:上面说的只是个人觉得重要的组件而已的,其实还有很多其他的组件的。上面的组件的关系如下所示:(这个参考一下Java版web项目公众号中有介绍的一点内容)
四:Mybatis配置
步骤:(1)导包
(2)编写实体javaBean对象实体类
(3)编写配置wenjxml,命令为sqlMapConfig.xml
<?xml version="1.0" encoding="UTF-8" ?>
<!DOCTYPE configuration
PUBLIC "-//mybatis.org//DTD Config 3.0//EN"
"http://mybatis.org/dtd/mybatis-3-config.dtd">
<configuration>
	<!-- 和spring整合后 environments配置将废除    -->
	<environments default="development">
		<environment id="development">
			<!-- 使用jdbc事务管理 -->
			<transactionManager type="JDBC" />
			<!-- 数据库连接池 -->
			<dataSource type="POOLED">
				<property name="driver" value="com.mysql.jdbc.Driver" />
				<property name="url"
					value="jdbc:mysql://localhost:3306/mybatis?characterEncoding=utf-8" />
				<property name="username" value="root" />
				<property name="password" value="root" />
			</dataSource>
		</environment>
	</environments>

	<!-- Mapper的位置  Mapper.xml 写Sql语句的文件的位置 -->
	<mappers>
 		<mapper resource="sqlmap/User.xml" />
	</mappers>
</configuration>
(4)编写Map配置文件,命名为随便,只要是xml后缀就行,比如User.xml
<?xml version="1.0" encoding="UTF-8" ?>
<!DOCTYPE mapper
PUBLIC "-//mybatis.org//DTD Mapper 3.0//EN"
"http://mybatis.org/dtd/mybatis-3-mapper.dtd">
<!-- 写Sql语句   -->
<mapper >


</mapper>
(5)编写测试代码(主要是熟悉操作数据库的流程),这里就用一个查询对应ID的个人用户信息为例子
import java.io.InputStream;
import java.util.Date;
import java.util.List;
import org.apache.ibatis.io.Resources;
import org.apache.ibatis.session.SqlSession;
import org.apache.ibatis.session.SqlSessionFactory;
import org.apache.ibatis.session.SqlSessionFactoryBuilder;
import org.junit.Test;

import com.itheima.mybatis.pojo.User;

public class MybatisFirstTest {

	@Test
	public void testMybatis() throws Exception {
		//加载核心配置文件
		String resource = "sqlMapConfig.xml";
		InputStream in = Resources.getResourceAsStream(resource);
		//创建SqlSessionFactory
		SqlSessionFactory sqlSessionFactory = new SqlSessionFactoryBuilder().build(in);
		//创建SqlSession
		SqlSession sqlSession = sqlSessionFactory.openSession();

		//执行Sql语句
		User user = sqlSession.selectOne("test.findUserById", 10);
		System.out.println(user);
	}}
(6)编写Map文件中所对应的数据库操作(这一步其实和第五步是相互协作的关系,所以没有很明显的顺序)
<?xml version="1.0" encoding="UTF-8" ?>
<!DOCTYPE mapper
PUBLIC "-//mybatis.org//DTD Mapper 3.0//EN"
"http://mybatis.org/dtd/mybatis-3-mapper.dtd">
<!-- 写Sql语句   -->
<mapper namespace="UserMapper">
	<!-- 通过ID查询一个用户 -->
	<select id="findUserById" parameterType="Integer" resultType="hnu.scw.bean.User">
		select * from user where id = #{v}
	</select>
</mapper>
其中属性的含义:
namespace:标识不同Map文件,以免出现其中有id信息一样的语句,这样就能够进行唯一的标识
id:为该sql语句设置一个名字
parameterType:设置sql语句中的参数的类型
resultType:标识为自动获取操作结果的返回类型
#{V}:标识为一个待定参数,相当于jdbc操作中的?操作的占位符含义,其中这个括号中的V可以为其他的内容,不一定要为V
PS:如果想在后台打印出执行的SQL语句信息,那么就需要添加个log4j.properties配置文件,这个在开发过程中,一般都非常有用的。
# Global logging configuration
log4j.rootLogger=DEBUG, stdout
# Console output...
log4j.appender.stdout=org.apache.log4j.ConsoleAppender
log4j.appender.stdout.layout=org.apache.log4j.PatternLayout
log4j.appender.stdout.layout.ConversionPattern=%5p [%t] - %m%n
五 :增删改查sql语句的编写(在map文件中)
<?xml version="1.0" encoding="UTF-8" ?>
<!DOCTYPE mapper
PUBLIC "-//mybatis.org//DTD Mapper 3.0//EN"
"http://mybatis.org/dtd/mybatis-3-mapper.dtd">
<!-- 写Sql语句   -->
<mapper namespace="test">
	<!-- 通过ID查询一个用户 -->
	<select id="findUserById" parameterType="Integer" resultType="hnu.scw.bean.User">
		select * from user where id = #{v}
	</select>

	<!-- //根据用户名称模糊查询用户列表
	#{}    select * from user where id = ?    占位符  ? ==  '五'
	${}    select * from user where username like '%五%'  字符串拼接
	 -->
	<select id="findUserByUsername" parameterType="String" resultType="hnu.scw.bean.User">
		select * from user where username like "%"#{v}"%"
	</select>

	<!-- 添加用户 (不返回ID)-->
	<insert id="insertUser" parameterType="hnu.scw.bean.User">
		insert into user (username,birthday,address,sex)
		values (#{username},#{birthday},#{address},#{sex})
	</insert>

	<!-- 添加用户 并返回需要的内容,比如返回ID ,其中keyProperty:代表对应实体中的属性 resultType:返回内容的类型  order:是在操作之前还是之后返回-->
	<insert id="insertUserback" parameterType="hnu.scw.bean.User">
		<selectKey keyProperty="id" resultType="Integer" order="AFTER">
			select LAST_INSERT_ID()
		</selectKey>
		insert into user (username,birthday,address,sex)
		values (#{username},#{birthday},#{address},#{sex})
	</insert>


	<!-- 更新数据操作 -->
	<update id="testupdatUser" parameterType="hnu.scw.bean.User">
		update user
		set username=#{username},sex=#{sex},birthday=#{birthday},address=#{address}
		where id = #{id}
	</update>

	<!-- 删除数据 -->
	<delete id="testdeleteUser" parameterType="Integer">
		delete from user where id = #{id}
	</delete>
</mapper>
PS:在模糊匹配中,还有以下个知识点(敲黑板)。
(1)#{}表示一个占位符号,通过#{}可以实现preparedStatement向占位符中设置值,自动进行java类型和jdbc类型转换。#{}可以有效防止sql注入。 #{}可以接收简单类型值或pojo属性值。如果parameterType传输单个简单类型值,#{}括号中可以是value或其它名称。
${}表示拼接sql串,通过${}可以将parameterType传入的内容拼接在sql中且不进行jdbc类型转换, ${}可以接收简单类型值或pojo属性值,如果parameterType传输单个简单类型值,${}括号中只能是value
(2)parameterType:指定输入参数类型,mybatis通过ognl从输入对象中获取参数值拼接在sql中。
resultType:指定输出结果类型,mybatis将sql查询结果的一行记录数据映射为resultType指定类型的对象。如果有多条数据,则分别进行映射,并把对象放到容器List中
对应的测试的使用方法如下所示:
package hnu.scw.test;
import java.io.IOException;
import java.io.InputStream;
import java.sql.Connection;
import java.sql.DriverManager;
import java.sql.ResultSet;
import java.sql.SQLException;
import java.util.Date;
import java.util.List;
import org.apache.ibatis.io.Resources;
import org.apache.ibatis.session.SqlSession;
import org.apache.ibatis.session.SqlSessionFactory;
import org.apache.ibatis.session.SqlSessionFactoryBuilder;
import org.junit.Test;

import com.mysql.jdbc.PreparedStatement;

import hnu.scw.bean.User;

public class MybatisTest {

	//使用JDBC连接数据库
	@Test
	public  void testJdbcWay(){
		Connection connection = null;
		PreparedStatement preparedStatement = null;
		ResultSet resultSet = null;
		try {
			// 加载数据库驱动
			Class.forName("com.mysql.jdbc.Driver");

			// 通过驱动管理类获取数据库链接
			connection = DriverManager.getConnection("jdbc:mysql://localhost:3306/myssh?characterEncoding=utf-8", "root", "mao15897610067");
			// 定义sql语句 ?表示占位符
			String sql = "select * from user where username = ?";
			// 获取预处理statement
			preparedStatement = (PreparedStatement) connection.prepareStatement(sql);
			// 设置参数,第一个参数为sql语句中参数的序号(从1开始),第二个参数为设置的参数值
			preparedStatement.setString(1, "王五");
			// 向数据库发出sql执行查询,查询出结果集
			resultSet = preparedStatement.executeQuery();
			// 遍历查询结果集
			while (resultSet.next()) {
				System.out.println(resultSet.getString("id") + "  " + resultSet.getString("username"));
			}
		} catch (Exception e) {
			e.printStackTrace();
		} finally {
			// 释放资源
			if (resultSet != null) {
				try {
					resultSet.close();
				} catch (SQLException e) {
					// TODO Auto-generated catch block
					e.printStackTrace();
				}
			}
			if (preparedStatement != null) {
				try {
					preparedStatement.close();
				} catch (SQLException e) {
					// TODO Auto-generated catch block
					e.printStackTrace();
				}
			}
			if (connection != null) {
				try {
					connection.close();
				} catch (SQLException e) {
					// TODO Auto-generated catch block
					e.printStackTrace();
				}
			}
		}
	}

	//根据ID查询用户数据
	@Test
	 public  void fun1() throws Exception{
		// 加载核心配置文件
		String resource = "sqlMapConfig.xml";
		InputStream in = Resources.getResourceAsStream(resource);
		// 创建SqlSessionFactory
		SqlSessionFactory sqlSessionFactory = new SqlSessionFactoryBuilder().build(in);
		// 创建SqlSession
		SqlSession sqlSession = sqlSessionFactory.openSession();
		// 执行Sql语句
		User user = sqlSession.selectOne("test.findUserById", 10);
		System.out.println(user);
	}

	//根据用户名称模糊查询用户列表
		@Test
	public void testfindUserByUsername() throws Exception {
			//加载核心配置文件
			String resource = "sqlMapConfig.xml";
			InputStream in = Resources.getResourceAsStream(resource);
			//创建SqlSessionFactory
			SqlSessionFactory sqlSessionFactory = new SqlSessionFactoryBuilder().build(in);
			//创建SqlSession
			SqlSession sqlSession = sqlSessionFactory.openSession();
			//执行Sql语句
			List<User> users = sqlSession.selectList("test.findUserByUsername", "五");
			for (User user2 : users) {
				System.out.println(user2);
			}
		}

	//添加用户(不返回ID)
	@Test
	public void testInsertUser() throws Exception {
			//加载核心配置文件
			String resource = "sqlMapConfig.xml";
			InputStream in = Resources.getResourceAsStream(resource);
			//创建SqlSessionFactory
			SqlSessionFactory sqlSessionFactory = new SqlSessionFactoryBuilder().build(in);
			//创建SqlSession
			SqlSession sqlSession = sqlSessionFactory.openSession();

			//执行Sql语句
			User user = new User();
			user.setUsername("佘超伟");
			user.setBirthday(new Date());
			user.setAddress("湖南大学");
			user.setSex("男");
			int i = sqlSession.insert("test.insertUser", user);
			sqlSession.commit();  //记住要提交
		}

	//添加用户(返回ID):关键在xml中的语句的格式不一样
	@Test
	public void testInsertUserBackId() throws Exception {
		// 加载核心配置文件
		String resource = "sqlMapConfig.xml";
		InputStream in = Resources.getResourceAsStream(resource);
		// 创建SqlSessionFactory
		SqlSessionFactory sqlSessionFactory = new SqlSessionFactoryBuilder().build(in);
		// 创建SqlSession
		SqlSession sqlSession = sqlSessionFactory.openSession();

		// 执行Sql语句
		User user = new User();
		user.setUsername("小可爱");
		user.setBirthday(new Date());
		user.setAddress("湖南大学");
		user.setSex("女");
		int i = sqlSession.insert("test.insertUserback", user);
		sqlSession.commit(); // 记住要提交
		System.out.println(user.getId());
	}

	//更新用户
	@Test
	public void testUpdataUser() throws Exception{
		// 加载核心配置文件
		String resource = "sqlMapConfig.xml";
		InputStream in = Resources.getResourceAsStream(resource);
		// 创建SqlSessionFactory
		SqlSessionFactory sqlSessionFactory = new SqlSessionFactoryBuilder().build(in);
		// 创建SqlSession
		SqlSession sqlSession = sqlSessionFactory.openSession();

		// 执行Sql语句
		User user = new User();
		user.setId(29);
		user.setUsername("小可爱wxx");
		user.setBirthday(new Date());
		user.setAddress("湖南大学123123123123");
		user.setSex("女");
		int i = sqlSession.update("test.testupdatUser", user);
		sqlSession.commit(); // 记住要提交
	}

	//删除用户
	@Test
	public void testDeleteUser() throws Exception{
		// 加载核心配置文件
		String resource = "sqlMapConfig.xml";
		InputStream in = Resources.getResourceAsStream(resource);
		// 创建SqlSessionFactory
		SqlSessionFactory sqlSessionFactory = new SqlSessionFactoryBuilder().build(in);
		// 创建SqlSession
		SqlSession sqlSession = sqlSessionFactory.openSession();

		sqlSession.delete("test.testdeleteUser", 29);
		sqlSession.commit(); // 记住要提交
	}

}
注意以下:
selectOne查询一条记录,如果使用selectOne查询多条记录则抛出异常:
org.apache.ibatis.exceptions.TooManyResultsException: Expected one result (or null) to be returned by selectOne(), but found: 3
at org.apache.ibatis.session.defaults.DefaultSqlSession.selectOne(DefaultSqlSession.java:70)
selectList可以查询一条或多条记录。
六:mybatis与Hibernate的区别(面试景点问题)
(1)Mybatis和hibernate不同,它不完全是一个ORM框架,因为MyBatis需要程序员自己编写Sql语句。mybatis可以通过XML或注解方式灵活配置要运行的sql语句,并将java对象和sql语句映射生成最终执行的sql,最后将sql执行的结果再映射生成java对象。
(2)Mybatis学习门槛低,简单易学,程序员直接编写原生态sql,可严格控制sql执行性能,灵活度高,非常适合对关系数据模型要求不高的软件开发,例如互联网软件、企业运营类软件等,因为这类软件需求变化频繁,一但需求变化要求成果输出迅速。但是灵活的前提是mybatis无法做到数据库无关性,如果需要实现支持多种数据库的软件则需要自定义多套sql映射文件,工作量大。
(3)Hibernate对象/关系映射能力强,数据库无关性好,对于关系模型要求高的软件(例如需求固定的定制化软件)如果用hibernate开发可以节省很多代码,提高效率。但是Hibernate的学习门槛高,要精通门槛更高,而且怎么设计O/R映射,在性能和对象模型之间如何权衡,以及怎样用好Hibernate需要具有很强的经验和能力才行。
总之,按照用户的需求在有限的资源环境下只要能做出维护性、扩展性良好的软件架构都是好架构,所以框架只有适合才是最好
七:Mybatis解决了JDBC的问题(问题在前面有提到过了)
1、 数据库连接创建、释放频繁造成系统资源浪费从而影响系统性能,如果使用数据库连接池可解决此问题。
解决:在SqlMapConfig.xml中配置数据连接池,使用连接池管理数据库链接。
2、 Sql语句写在代码中造成代码不易维护,实际应用sql变化的可能较大,sql变动需要改变java代码。
解决:将Sql语句配置在XXXXmapper.xml文件中与java代码分离。
3、 向sql语句传参数麻烦,因为sql语句的where条件不一定,可能多也可能少,占位符需要和参数一一对应。
解决:Mybatis自动将java对象映射至sql语句,通过statement中的parameterType定义输入参数的类型。
4、 对结果集解析麻烦,sql变化导致解析代码变化,且解析前需要遍历,如果能将数据库记录封装成pojo对象解析比较方便。
解决:Mybatis自动将sql执行结果映射至java对象,通过statement中的resultType定义输出结果的类型。
八:Mapper接口开发取代Dao层和Dao层实现类的开发(实际开发用这种多,用原始的Dao层很少)
步骤:(1)创建Mapper接口
package hnu.scw.mapper;

import hnu.scw.bean.User;

public interface UserDaoMapper {

	// 编写需要实现操作的Mapper方法,要遵循四个原则
	// 接口 方法名 == User.xml 中 id 名
	// 返回值类型 与 Mapper.xml文件中返回值类型要一致
	// 方法的入参类型 与Mapper.xml中入参的类型要一致
	// 命名空间 绑定此接口
	public User findUserById(Integer id);

}
Mapper接口开发需要遵循以下规范:
1、 Mapper.xml文件中的namespace与mapper接口的类路径相同。
2、 Mapper接口方法名和Mapper.xml中定义的每个statement的id相同
3、 Mapper接口方法的输入参数类型和mapper.xml中定义的每个sql的parameterType的类型相同
4、 Mapper接口方法的输出参数类型和mapper.xml中定义的每个sql的resultType的类型相同
(2)修改Mapper.xml文件中的命名空间,气命名要与上面创建的Mapper接口类路径一样
<mapper namespace="hnu.scw.mapper.UserDaoMapper">
	<!-- 通过ID查询一个用户 -->
	<select id="findUserById" parameterType="Integer" resultType="hnu.scw.bean.User">
		select * from user where id = #{v}
	</select>
(3)好了,上面就已经可以了,是不是很简单和方便呢?编写一个测试类,来测试以下哦!!!!!
package hnu.scw.test;

import java.io.IOException;
import java.io.InputStream;

import org.apache.ibatis.io.Resources;
import org.apache.ibatis.session.SqlSession;
import org.apache.ibatis.session.SqlSessionFactory;
import org.apache.ibatis.session.SqlSessionFactoryBuilder;
import org.junit.Test;

import hnu.scw.bean.User;
import hnu.scw.mapper.UserDaoMapper;

public class testMapper {

	@Test
	public void test1() throws IOException{
		// 加载核心配置文件
		String resource = "sqlMapConfig.xml";
		InputStream in = Resources.getResourceAsStream(resource);
		// 创建SqlSessionFactory
		SqlSessionFactory sqlSessionFactory = new SqlSessionFactoryBuilder().build(in);
		//获取session
		SqlSession session = sqlSessionFactory.openSession();
		//获取对应操作的Mapper
		UserDaoMapper mapper = session.getMapper(UserDaoMapper.class);
		//进行操作
		User user = mapper.findUserById(10);
		System.out.println(user);
	}
}
对这个知识点,进行小结以下:
(1)electOne和selectList
动态代理对象调用sqlSession.selectOne()和sqlSession.selectList()是根据mapper接口方法的返回值决定,如果返回list则调用selectList方法,如果返回单个对象则调用selectOne方法。
(2)namespace命名空间
mybatis官方推荐使用mapper代理方法开发mapper接口,程序员不用编写mapper接口实现类,使用mapper代理方法时,输入参数可以使用pojo包装对象或map对象,保证dao的通用性。
九:sqlMapConfig.xml详解标签内容
SqlMapConfig.xml中配置的内容和顺序如下:(请注意配置的顺序,否则会导致配置出现问题)
properties(属性)
settings(全局配置参数)
typeAliases(类型别名)
typeHandlers(类型处理器)
objectFactory(对象工厂)
plugins(插件)
environments(环境集合属性对象)
environment(环境子属性对象)
transactionManager(事务管理)
dataSource(数据源)
mappers(映射器)
(1)proerties标签:引用properties配置数据库内容
properties内容:
jdbc.driver=com.mysql.jdbc.Driver
jdbc.url=jdbc:mysql://localhost:3306/myssh?characterEncoding=utf-8
jdbc.username=root
jdbc.password=mao15897610067
进行配置:
<properties resource="jdbc.properties"></properties>PS:注意这配置中的路径,不需要加classpath,所以这个和Hibernate中进行配置还是有点不一样的。
进行使用:
<!-- 数据库连接池 -->
			<dataSource type="POOLED">
				<property name="driver" value="com.mysql.jdbc.Driver" />
				<property name="url"
					value="jdbc:mysql://localhost:3306/myssh?characterEncoding=utf-8" />
				<property name="username" value="root" />
				<property name="password" value="mao15897610067" />
			</dataSource>
等价于::(自己可以对比以下,开发中一般都是使用properties进行配置,这样方便)
<!-- 数据库连接池 -->
			<dataSource type="POOLED">
				<property name="driver" value="${jdbc.driver}" />
				<property name="url"
					value="jdbc:mysql://localhost:3306/myssh?characterEncoding=utf-8" />
				<property name="username" value="root" />
				<property name="password" value="mao15897610067" />
			</dataSource>
(2)typeAliases–自定义别名标签:方便在写mapper文件中进行简短的使用名字,而不用加入路径
<!-- 别名 包以其子包下所有类   头字母大小都行-->
	<typeAliases>
 		<typeAlias type="hnu.scw.User" alias="User"/>
	<!--	<package name="com.itheima.mybatis.pojo"/> -->
	</typeAliases>
其中:<typeAlias>用来配置单个的别名;package用来配置包下的多个别名,但是如果这样的话,那么对应的Mapper文件的名字就要与Mapper接口名字相同,否则找不到该配置文件,会导致错误
使用的形式就可以变成下面的:
<!-- 通过ID查询一个用户 -->
	<select id="findUserById" parameterType="Integer" resultType="hnu.scw.bean.User">
		select * from user where id = #{v}
	</select>
配置别名后:(对比两种使用方法的区别)
<!-- 通过ID查询一个用户 -->
	<select id="findUserById" parameterType="Integer" resultType="User">
		select * from user where id = #{v}
	</select>
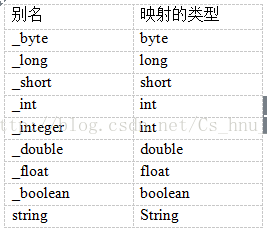
PS:加一点小知识…….。。。。。。。。系统自带支持的别名
(3)mappers映射器标签
<!-- Mapper的位置  Mapper.xml 写Sql语句的文件的位置 -->
	<mappers>
<!-- 		<mapper resource="sqlmap/User.xml" class="" url=""/> -->
<!-- 		<mapper resource="sqlmap/User.xml" class="" url=""/> -->
<!-- 		<mapper class="com.itheima.mybatis.mapper.UserMapper" /> -->
<!-- 		<mapper url="" /> -->
		<package name="com.itheima.mybatis.mapper"/>
	</mappers>
同理,package一般用于表很多的情况下,进行同意的配置,而maper一般用于单个单个的配置,缺点很明显就是如果mapper文件多了,那么就需要写很多个。另外,mapper标签中的三个属性,即resource,class,url的功能一样,只能同时用其中一个,而且建议用的是resource,并且url非常不建议使用
1. <mapper resource=” ” />
使用相对于类路径的资源(现在的使用方式)
如:<mapper resource=”sqlmap/User.xml” />
2. <mapper class=” ” />
使用mapper接口类路径
如:<mapper class=”cn.itcast.mybatis.mapper.UserMapper”/>
3 <package name=””/>
注册指定包下的所有mapper接口
如:<package name=”cn.itcast.mybatis.mapper”/>
注意:此种方法要求mapper接口名称和mapper映射文件名称相同,且放在同一个目录中。
十:Mapper文件中的输入类型为封装JavaBean实体对象的形式(也叫QueryVo方法)
步骤:(1)编写QueryVo类
public class QueryVo {
	// 包含其他的pojo
	private User user;

	public User getUser() {
		return user;
	}
	public void setUser(User user) {
		this.user = user;
	}
}
(2)编写Mapper.xml文件
<!-- //根据用户名称模糊查询用户列表 -->
	<select id="findUserByUsername" parameterType="QueryVo" resultType="hnu.scw.User">
		select * from user where username like "%"#{user.username}"%"
	</select>
十一:Mapper文件中的输出类似为基本类型
Mapper.xml文件中的编写
<!-- //返回查询内容的条数-->
	<select id="findUserByUsername"  resultType="Integer">
		select count(*) from user
	</select>
十二:Mapper文件配置中使用ResultMap属性
resultType可以指定将查询结果映射为pojo,但需要pojo的属性名和sql查询的列名一致方可映射成功。
如果sql查询字段名和pojo的属性名不一致,可以通过resultMap将字段名和属性名作一个对应关系 ,resultMap实质上还需要将查询结果映射到pojo对象中。
resultMap可以实现将查询结果映射为复杂类型的pojo,比如在查询结果映射对象中包括pojo和list实现一对一查询和一对多查询。
使用情况:比如碰到实体类中的属性名与数据库中的字段名不一致,那么按照正常情况下就无法映射了,因为有时候无法保证数据库中的字段名就刚好对应实体类中的属性名。比如数据库字段有个为user_id,而实体类中为userid(区别:有无下划线),那么这样映射就会出现问题。
功能:解决数据库和实体类属性匹配出现不一致的问题
步骤:编写Mapper.xml文件
<resultMap type="Orders" id="orders">
		<result column="user_id" property="userId"/>
	</resultMap>

	<select id="selectOrdersList" resultMap="orders">
		SELECT id, user_id, number, createtime, note FROM orders
	</select>
备注:讲解例子中,其中数据库字段和实体类属性之间就是有user_id不同,如果有多个不同的,那么再多写几个<result>标签即可,如果相同的就可以省略不写
十三:动态sql的知识点(在Mapper.xml文件中的内容)
(1)if标签和where标签
<!-- 根据条件查询用户 -->
<select id="queryUserByWhere" parameterType="user" resultType="user">
	SELECT * FROM `user`
<!-- where标签可以自动添加where,同时处理sql语句中第一个and关键字 -->
	<where>
		<if test="sex != null">
			AND sex = #{sex}
		</if>
		<if test="username != null and username != ''">
			AND username LIKE
			'%${username}%'
		</if>
	</where>
</select>
PS:标签if表示的是:进行对所设定的test中的属性进行判断,就是相当于一个if语句。因为在实际开发中,可能会出现要查询的字段出现特殊情况,比如空,或者null
标签where表示的是:where标签可以自动添加where,同时处理sql语句中第一个and关键字
(2)sql片段:功能就是将Mapper.xml文件中出现多次的sql语句进行提取,然后通过标识来进行使用
<!-- 声明sql片段 -->
<sql id="userFields">
	select * from user
</sql>
这样的话,上面那个就可以改造成如下所示:(通过<include refid=“userFields” />)
<!-- 根据条件查询用户 -->
<select id="queryUserByWhere" parameterType="user" resultType="user">
	<include redid = "userFields">
<!-- where标签可以自动添加where,同时处理sql语句中第一个and关键字 -->
	<where>
		<if test="sex != null">
			AND sex = #{sex}
		</if>
		<if test="username != null and username != ''">
			AND username LIKE
			'%${username}%'
		</if>
	</where>
</select>
(3)foreach标签:循环遍历传入的参数数值
参考用例:比如想传入多个用户的id值,然后返回这些查询到的数据内容。。这样的话就可以用foreach来实现
Mapper接口的代码:(对应可以出现三种传值的方式,所以每种都进行讲解,因为这里面有几个大坑)
package hnu.scw.mapper;

import java.util.List;

import hnu.scw.bean.QueryVo;
import hnu.scw.bean.User;

public interface UserDaoMapper {

	//传入多个ID数值,返回多个对象(三种情况的参数传入,分别是数组,集合,还有对象封装类)
//	public List<User> selectUsersByIds(Integer[] arrs);
	public List<User> selectUsersByIds(List<Integer> arrlist);
//	public List<User> selectUsersByIds(QueryVo vo);
}
Mapper.xml文件配置的语句
情况一:传入参数是以集合List来进行传入
<!-- 根据多个ID的传入,返回对象 -->
	<select id="selectUsersByIds" parameterType="hnu.scw.bean.QueryVo" resultType="hnu.scw.bean.User">
		select * from user
		<where>
		 	id in
		 	<foreach collection="list" item="id" open="(" close=")" separator=",">
		 		#{id}
		 	</foreach>
		 </where>
	</select>
PS:如果使用的传入参数是List类型,那么一定要记住,在collection标签中的内容是list,不能改变
测试代码:
情况二:传入参数是以数据的形式进行传入
<!-- 根据多个ID的传入,返回对象 -->
	<select id="selectUsersByIds" parameterType="hnu.scw.bean.QueryVo" resultType="hnu.scw.bean.User">
		select * from user
		<where>
		 	id in
		 	<foreach collection="array" item="id" open="(" close=")" separator=",">
		 		#{id}
		 	</foreach>
		 </where>
	</select>
PS:如果使用的传入参数是数组类型,那么一定要记住,在collection标签中的内容是arryay,不能改变
情况三:传入参数是以封装对象的形式传入
其中,QueryVo代码如下:
package hnu.scw.bean;

import java.util.List;

public class QueryVo {
	public Integer[] arr;
	public List<Integer> arrlist;
	public Integer[] getArr() {
		return arr;
	}
	public void setArr(Integer[] arr) {
		this.arr = arr;
	}
	public List<Integer> getArrlist() {
		return arrlist;
	}
	public void setArrlist(List<Integer> arrlist) {
		this.arrlist = arrlist;
	}


}
配置文件代码:
<!-- 根据多个ID的传入,返回对象 -->
	<select id="selectUsersByIds" parameterType="hnu.scw.bean.QueryVo" resultType="hnu.scw.bean.User">
		select * from user
		<where>
		 	id in
		 	<foreach collection="arr" item="id" open="(" close=")" separator=",">
		 		#{id}
		 	</foreach>
		 </where>
	</select>
PS:如果使用的传入参数是封装对象类型,那么,在collection标签中的内容只要和封装对象中相对应要使用的属性相同即可。所以,因为后面代码用的是数组的,所以就用了属性名字为arr的。如果后面是要用集合的,那么就可以如下所示:
<!-- 根据多个ID的传入,返回对象 -->
	<select id="selectUsersByIds" parameterType="hnu.scw.bean.QueryVo" resultType="hnu.scw.bean.User">
		select * from user
		<where>
		 	id in
		 	<foreach collection="arrlist" item="id" open="(" close=")" separator=",">
		 		#{id}
		 	</foreach>
		 </where>
	</select>
综合上面,就可以又如下的测试代码:(自己根据使用的是哪个Mapper接口方法参数,就选择对应的测试方法)
//传入多个ID,获取对象
	@Test
	public void testselectByIds() throws IOException{
		// 加载核心配置文件
		String resource = "sqlMapConfig.xml";
		InputStream in = Resources.getResourceAsStream(resource);
		// 创建SqlSessionFactory
		SqlSessionFactory sqlSessionFactory = new SqlSessionFactoryBuilder().build(in);
		// 获取session
		SqlSession session = sqlSessionFactory.openSession();
		// 获取对应操作的Mapper
		UserDaoMapper mapper = session.getMapper(UserDaoMapper.class);

//		List<Integer> users = new ArrayList<Integer>();
//		users.add(16);
//		users.add(22);
//		users.add(26);

		Integer[] arr = new Integer[3];
		arr[0] = 16;
		arr[1] = 22;
		arr[2] = 26;

		QueryVo vo = new QueryVo();
//		vo.setArrlist(users);
		vo.setArr(arr);

		List<User> userlist = mapper.selectUsersByIds(vo);
		for (User user : userlist) {
			System.out.println(user);
		}

	}
十四:Mapper.xml中设置一对一的映射(比如一张订单对应一个人)
比如订单实体类:
package hnu.scw.bean;

import java.io.Serializable;
import java.util.Date;

public class Orders  implements Serializable{

	/**
	 *
	 */
	private static final long serialVersionUID = 1L;

	private Integer id;

    private Integer userId;

    private String number;

    private Date createtime;

    private String note;

    //附加对象  用户对象
    private User user;

    public User getUser() {
		return user;
	}

	public void setUser(User user) {
		this.user = user;
	}

	public Integer getId() {
        return id;
    }

    public void setId(Integer id) {
        this.id = id;
    }

    public Integer getUserId() {
        return userId;
    }

    public void setUserId(Integer userId) {
        this.userId = userId;
    }

    public String getNumber() {
        return number;
    }

    public void setNumber(String number) {
        this.number = number == null ? null : number.trim();
    }

    public Date getCreatetime() {
        return createtime;
    }

    public void setCreatetime(Date createtime) {
        this.createtime = createtime;
    }

    public String getNote() {
        return note;
    }

    public void setNote(String note) {
        this.note = note == null ? null : note.trim();
    }

	@Override
	public String toString() {
		return "Orders [id=" + id + ", userId=" + userId + ", number=" + number + ", createtime=" + createtime
				+ ", note=" + note + ", user=" + user + "]";
	}


}
Mapper接口方法:
package hnu.scw.mapper;
import java.util.List;
import hnu.scw.bean.Orders;
import hnu.scw.bean.QueryVo;
import hnu.scw.bean.User;
public interface UserDaoMapper {
	//一对一查询
	public List<Orders> selectOrders();
}
Mapper.xml配置
<!-- 根据商品中的id,查到对应的用户信息和商品信息,也就是一对一查询 -->
	<resultMap type="hnu.scw.bean.Orders" id="orderanduser">
		<result column="number" property="number"/>
		<result column="createtime" property="createtime"/>
		<result column="user_id" property="userId"/>
		<!-- 设置为一对一 -->
		<association property="user" javaType="hnu.scw.bean.User">
			<result column="username" property="username"/>
		</association>
	</resultMap>
	<select id="selectOrders" resultMap="orderanduser">
		SELECT
	 	o.id,
	    o.user_id,
	    o.number,
	 	o.createtime,
	 	u.username
	 	FROM orders o
	 	left join user u
	 	on o.user_id = u.id
	</select>
PS:当进行了联表查询,则在resulteMap中进行配置的时候,需要显示什么就要进行配置,而不能像单表一样,不同字段就不写出来
十五:Mapper.xml配置一对多
User实体类:
package com.itheima.mybatis.pojo;

import java.io.Serializable;
import java.util.Date;
import java.util.List;

public class User implements Serializable {
	/**
	 *
	 */
	private static final long serialVersionUID = 1L;
	private Integer id;
	private String username;// 用户姓名
	private String sex;// 性别
	private Date birthday;// 生日
	private String address;// 地址

	//附加对象List
	private List<Orders> ordersList;
	public List<Orders> getOrdersList() {
		return ordersList;
	}
	public void setOrdersList(List<Orders> ordersList) {
		this.ordersList = ordersList;
	}
	public Integer getId() {
		return id;
	}
	public void setId(Integer id) {
		this.id = id;
	}
	public String getUsername() {
		return username;
	}
	public void setUsername(String username) {
		this.username = username;
	}
	public String getSex() {
		return sex;
	}
	public void setSex(String sex) {
		this.sex = sex;
	}
	public Date getBirthday() {
		return birthday;
	}
	public void setBirthday(Date birthday) {
		this.birthday = birthday;
	}
	public String getAddress() {
		return address;
	}
	public void setAddress(String address) {
		this.address = address;
	}
	@Override
	public String toString() {
		return "User [id=" + id + ", username=" + username + ", sex=" + sex
				+ ", birthday=" + birthday + ", address=" + address + "]";
	}


}
这里的Mapper接口的方法就不写了(看下面代码都可以看出来是什么了)
Mapper.xml配置:
<!-- //一对多关联
	public List<User> selectUserList(); -->
	<resultMap type="User" id="user">
		<id column="user_id" property="id"/>
		<result column="username" property="username"/>
		<!-- 一对多 -->
		<collection property="ordersList" ofType="Orders">
			<id column="id" property="id"/>
			<result column="number" property="number"/>
		</collection>
	</resultMap>
	<select id="selectUserList" resultMap="user">
		SELECT
	 	o.id,
	    o.user_id,
	    o.number,
	 	o.createtime,
	 	u.username
	 	FROM user u
	 	left join orders o
	 	on o.user_id = u.id
	</select>
PS:一对多和一对多的区别主要是注意它们两者的配置是不同的,标签名也是不一样的。其他的大同小异的。
十六:Mybatis整合spring(下面主要就是以一个基本的例子作为示例)
步骤:(1)导包(spring框架包+mybatis框架包+它们两者结合的包)
(2)编写实体类(当然这个可以分一步步的来,因为实体类是不断进行添加的)
(3)编写配置文件(mybatis和spring)
sqlMapConfig.xml:
<?xml version="1.0" encoding="UTF-8"?>
<!DOCTYPE configuration
PUBLIC "-//mybatis.org//DTD Config 3.0//EN"
"http://mybatis.org/dtd/mybatis-3-config.dtd">
<configuration>
	<!-- 取别名 -->
	<typeAliases>
		<package name="hnu.scw.bean"/>
	</typeAliases>
</configuration>
applicationContext.xml:
<?xml version="1.0" encoding="UTF-8"?>
<beans xmlns="http://www.springframework.org/schema/beans"
	xmlns:context="http://www.springframework.org/schema/context" xmlns:p="http://www.springframework.org/schema/p"
	xmlns:aop="http://www.springframework.org/schema/aop" xmlns:tx="http://www.springframework.org/schema/tx"
	xmlns:xsi="http://www.w3.org/2001/XMLSchema-instance"
	xsi:schemaLocation="http://www.springframework.org/schema/beans http://www.springframework.org/schema/beans/spring-beans-4.0.xsd
	http://www.springframework.org/schema/context http://www.springframework.org/schema/context/spring-context-4.0.xsd
	http://www.springframework.org/schema/aop http://www.springframework.org/schema/aop/spring-aop-4.0.xsd http://www.springframework.org/schema/tx http://www.springframework.org/schema/tx/spring-tx-4.0.xsd
	http://www.springframework.org/schema/util http://www.springframework.org/schema/util/spring-util-4.0.xsd">

<!-- 读取数据库db.properties -->
<context:property-placeholder location="classpath:db.properties"/>

<!-- 创建数据库连接池 ,这里使用dbcp连接池,当然也可以用c3p0-->
<bean id="dataSource" class="org.apache.commons.dbcp.BasicDataSource" destroy-method="close">
	<property name="driverClassName" value="${jdbc.driver}"></property>
	<property name="url" value="${jdbc.url}"></property>
	<property name="username" value="${jdbc.username}"></property>
	<property name="password" value="${jdbc.password}"></property>
	<property name="maxIdle" value="5"></property>
	<property name="maxActive" value="10"></property>
</bean>

<!-- mybatis工厂 -->
<bean id="sqlSessionFactoryBean" class="org.mybatis.spring.SqlSessionFactoryBean">
	<!-- 注入连接池 -->
	<property name="dataSource" ref="dataSource"></property>
	<!-- 注入mybatis核心配置文件 -->
	<property name="configLocation" value="classpath:sqlMapConfig.xml"></property>
</bean>

</beans>
PS:在配置spring的xml文化中,主要开始是为了数据库中的对象进行容器配置。
(4)编写Mapper接口(主要是编写要进行的数据库操作,这个在前面都有很详细的讲解了)
package hnu.scw.mapper;
import hnu.scw.bean.User;
public interface UserMapper {

	//根据Id查询用户
	public User selectUserById(Integer id);
}
(5)编写操作实体类具体对应的Mapper.xml文件,我这里就取名为UserMapper.xml
<?xml version="1.0" encoding="UTF-8"?>
<!DOCTYPE mapper
PUBLIC "-//mybatis.org//DTD Mapper 3.0//EN"
"http://mybatis.org/dtd/mybatis-3-mapper.dtd">
<mapper namespace="hnu.scw.mapper.UserMapper">
	<!-- 根据ID查询用户 -->
	<select id="selectUserById" parameterType="Integer" resultType="User">
		select *
		from user
		where id = #{id}
	</select>

</mapper>
(6)applicationContext.xml文件中添加Mapper动态代理sessionFactory
<!-- 开启动态代理管理mapp -->
<bean id="userMap" class="org.mybatis.spring.mapper.MapperFactoryBean">
	<property name="sqlSessionFactory" ref="sqlSessionFactoryBean"></property>
	<property name="mapperInterface" value="hnu.scw.mapper.UserMapper"/>
</bean>
(7)sqlMapConfig.xml文件中添加Mapper文件的映射路径
<!-- 引入Mapper文件 -->
	<mappers>
		<mapper resource="sqlMap/UserMapper.xml"/>
	</mappers>
当然,这个配置的方法,有几种,可以用其他的形式,比如package标签来进行。这些前面都有讲解很详细(8)编写测试类(这个在实际的开发中,就是相当于Dao层接口的实现类中的数据库操作方法,然后用service层接口进行调用就可以了)
package junit;

import org.junit.Test;
import org.springframework.context.ApplicationContext;
import org.springframework.context.support.ClassPathXmlApplicationContext;

import hnu.scw.bean.User;
import hnu.scw.mapper.UserMapper;
/*
 * 模拟service层调用Dao层操作数据库
 */
public class TestMybatisSpring {
	@Test
	public void testSelectUserById(){
		//加载spring容器
		ApplicationContext ac = new ClassPathXmlApplicationContext("applicationContext.xml");
		//获取Mapper对象
		UserMapper bean = (UserMapper) ac.getBean("userMap");
		//操作数据库
		User user = bean.selectUserById(10);
		System.out.println(user);
	}
}
PS:(1)上面的例子中,在applicationContext.xml中,虽然用了动态代理Mapper的技术,但是很明显有个缺点,就是如果Mapper多了,那么就需要配置很多个类似的形式,那么就还有一种更简单的方法,就是通过扫描的方面,就可以用如下的代码。
<!-- Mapper动态代理开发   扫描 -->
	<bean class="org.mybatis.spring.mapper.MapperScannerConfigurer">
		<!-- 基本包 -->
		<property name="basePackage" value="com.itheima.mybatis.mapper"/>
	</bean>
那么在测试代码中就需要用下面的形式来获取Mapper对象。
UserMapper mapper = ac.getBean(UserMapper.class);
//UserMapper mapper = (UserMapper) ac.getBean("userMapper");
(2)在上面的例子中,当然还可以采取正常的Dao和Dao层实现层的形式来开发,而不用动态代理Mapper技术
就比如:Dao层接口代码:
package hnu.scw.dao;

import hnu.scw.bean.User;

public interface UserDao {
	//根据ID返回用户
	User findUserByid(Integer id);
}
Dao层实现类方法:
package hnu.scw.dao.imp;

import org.mybatis.spring.support.SqlSessionDaoSupport;

import hnu.scw.bean.User;
import hnu.scw.dao.UserDao;

public class UserDaoimp extends SqlSessionDaoSupport implements UserDao{

	@Override
	public User findUserByid(Integer id) {
		User user = getSqlSession().selectOne("hnu.scw.mapper.UserMapper.selectUserById", 10);
		return user;
	}

}
那么在applicationContext配置中就按照如下进行配置:
<!-- Dao原始Dao -->
	<bean id="userDao" class="com.itheima.mybatis.dao.UserDaoImpl">
		<property name="sqlSessionFactory" ref="sqlSessionFactoryBean"/>
	</bean>
测试代码:
//测试原始的开发模式
	@Test
	public void test(){
		ApplicationContext ac = new ClassPathXmlApplicationContext("applicationContext.xml");
		UserDao bean =  (UserDao) ac.getBean("userDao");
		User u = bean.findUserByid(10);
		System.out.println(u);
	}
所以综合以下:不管用的是原始方法还是用的动态代理的形式,都需要掌握,因为在不同的公司,不同的开发人员都会采用不同的形式,而且都是可以的,所以这就要求对每种都需要掌握。
哈哈,好了,上面这些内容就是关于Mybatis的最基本的知识了哦。相对Hibernate,这还是相对容易掌握的了。我也会持续更新这方面的内容的哦。。。如果还想了解其他的框架知识,可以看看我其他的文章哦!!!!
版权声明:本文内容由互联网用户自发贡献,该文观点仅代表作者本人。本站仅提供信息存储空间服务,不拥有所有权,不承担相关法律责任。如发现本站有涉嫌侵权/违法违规的内容, 请发送邮件至 举报,一经查实,本站将立刻删除。
文章由极客之音整理,本文链接:https://www.bmabk.com/index.php/post/12437.html

