
一:认识spring
1.spring是啥
介绍:Spring是一个开源框架,它由Rod Johnson创建。它是为了解决企业应用开发的复杂 性而创建的。
Spring使用基本的JavaBean来完成以前只可能由EJB完成的事情。
然而,Spring的用途不仅限于服务器端的开发。从简单性、可测试性和松耦合的角度 而言,任何Java应用都可以从Spring中受益。
目的:解决企业应用开发的复杂性
功能:使用基本的JavaBean代替EJB,并提供了更多的企业应用功能
范围:任何Java应用
简单来说,Spring是一个轻量级的控制反转(IoC)和面向切面(AOP)的容器框架。
①、中间层框架、万能胶
struts2、 spring、 hibernate
②、容器框架
JavaBean 项目中的一个个类
IOC和AOP

spring包含的核心模块

2. 什么是控制反转(或依赖注入)
控制反转(IoC=Inversion of Control)IoC,用白话来讲,就是由容器控制程序之间的(依赖)关系,而非传统实现中,由程序代码直接操控。这也就是所谓“控制反转”的概念所在:(依赖)控制权由应用代码中转到了外部容器,控制权的转移,是所谓反转。
IoC还有一个另外的名字:“依赖注入 (DI=Dependency Injection)” ,即由容器动态的将某种依赖关系注入到组件之中
案例:实现Spring的Ioc
3.如何在spring当中定义和配置一个JavaBean(使用无参构造方法+set方法创建一个JavaBean)
1. id:在容器中查找Bean的id(唯一、且不能以/开头)
2. class:bean的完整类名
3. name:在容器中查找Bean的名字(唯一、允许以/开头、允许多个值,多个值之间用逗号 或空格隔开)
4. scope:(singleton|prototype)默认是singleton
1. singleton(单例模式):在每个Spring IoC容器中一个bean定义对应一个对象实例
2. prototype(原型模式/多例模式):一个bean定义对应多个对象实例
5. abstract:将一个bean定义成抽象bean(抽象bean是不能实例化的),抽象类一定要定义成抽 象bean,非抽象类也可以定义成抽象bean
6.parent:指定一个父bean(必须要有继承关系才行)
7. init-method:指定bean的初始化方法
8. constructor-arg:使用有参数构造方法创建javaBean
二:ioc
解决以下两个问题:
1.更新版本需要改动原有代码
2.相关调用此方法的模块伴随着巨大的风险
先创建一个UserBiz接口
package com.lsy.ioc.biz;

public interface UserBiz {
	public void upload();
}
再创建两个实现类实现UserBiz接口(UserBizImpl1、UserBizImpl2)
UserBizImpl1
package com.lsy.ioc.biz.impl;
import com.lsy.ioc.biz.UserBiz;
/**
* 功能:上传功能
* 提出整改:
* 1.限定上传文件大小
* 2.限定上传文件类别
* 总结:
* 1.更新版本需要改动原有代码
* 2.相关调用此方法的模块伴随着巨大的风险
* @author zjjt
*/
public class UserBizImpl1 implements UserBiz{
@Override
public void upload() {
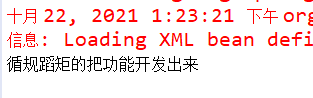
System.out.println("循规蹈矩的把功能开发出来");
}
}
UserBizImpl2
package com.lsy.ioc.biz.impl;
import com.lsy.ioc.biz.UserBiz;
/**
* 功能:上传功能
* 提出整改:
* 1.限定上传文件大小
* 2.限定上传文件类别
* 总结:
* 1.更新版本需要改动原有代码
* 2.相关调用此方法的模块伴随着巨大的风险
* @author zjjt
*/
public class UserBizImpl2 implements UserBiz{
@Override
public void upload() {
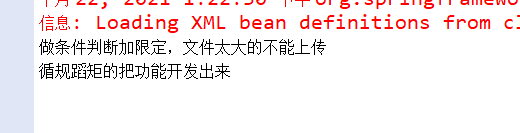
System.out.println("做条件判断加限定,文件太大的不能上传");
System.out.println("循规蹈矩的把功能开发出来");
}
}
再创建2个web层(PersonAction、UserAction)
PersonAction
package com.lsy.ioc.web;

import com.lsy.ioc.biz.UserBiz;
import com.lsy.ioc.biz.impl.UserBizImpl2;

/**
 * 给javabean赋初始化值   说白了就是传参
 * 1.set传参
 * 2.构造传参
 * 3.自动适配(基本不用)
 * @author zjjt
 *
 */
public class PersonAction {
	private UserBiz userBiz;
	private int age=18;
	private String sex="男";


	public UserBiz getUserBiz() {
		return userBiz;
	}
	public void setUserBiz(UserBiz userBiz) {
		this.userBiz = userBiz;
	}
	public void upload() {
		userBiz.upload();
	}
//	public static void main(String[] args) {
//		PersonAction personAction=new PersonAction();
//		personAction.upload();
//	}
}
UserAction
package com.lsy.ioc.web;

import com.lsy.ioc.biz.UserBiz;
import com.lsy.ioc.biz.impl.UserBizImpl1;

public class UserAction {
	private UserBiz userBiz;

	public UserBiz getUserBiz() {
		return userBiz;
	}
	public void setUserBiz(UserBiz userBiz) {
		this.userBiz = userBiz;
	}
	public void upload() {
		userBiz.upload();
	}
	public static void main(String[] args) {
		UserAction userAction=new UserAction();
		userAction.upload();
	}
}
PersonAction结果展示

UserAction结果展示
缺陷:如果要加好多个,那么就会建很多的类,特别麻烦
解决方法(使用spring-context.xml配置文件)
导入xml文件(spring-context.xml)
该配置文件配置的是整个项目中包含的所有的javabean
目的:统一管理
<?xml version="1.0" encoding="UTF-8"?>
<beans xmlns="http://www.springframework.org/schema/beans"
	xmlns:xsi="http://www.w3.org/2001/XMLSchema-instance"
	xmlns:aop="http://www.springframework.org/schema/aop"
	xmlns:context="http://www.springframework.org/schema/context"
	xsi:schemaLocation="http://www.springframework.org/schema/beans http://www.springframework.org/schema/beans/spring-beans.xsd
		http://www.springframework.org/schema/aop http://www.springframework.org/schema/aop/spring-aop-4.3.xsd
		http://www.springframework.org/schema/context http://www.springframework.org/schema/context/spring-context-4.3.xsd">

<!-- 本文件中配置整个项目中包含的所有的javabean,目的在于spring统一管理

-->
</beans>
新建实体类(IocTest )用于做测试
package com.lsy.ioc.test;

import org.springframework.context.ApplicationContext;
import org.springframework.context.support.ClassPathXmlApplicationContext;

import com.lsy.ioc.web.ParamAction;
import com.lsy.ioc.web.PersonAction;
import com.lsy.ioc.web.UserAction;
import com.lsy.ioc.web.UserAction2;
import com.lsy.ioc.web.UserAction3;

public class IocTest {
	public static void main(String[] args) {
		ApplicationContext applicationContext=new ClassPathXmlApplicationContext("/spring-context.xml");
//		PersonAction personAction = (PersonAction)applicationContext.getBean("personAction");
//		personAction.upload();

	}
}
做配置
<?xml version="1.0" encoding="UTF-8"?>
<beans xmlns="http://www.springframework.org/schema/beans"
	xmlns:xsi="http://www.w3.org/2001/XMLSchema-instance"
	xmlns:aop="http://www.springframework.org/schema/aop"
	xmlns:context="http://www.springframework.org/schema/context"
	xsi:schemaLocation="http://www.springframework.org/schema/beans http://www.springframework.org/schema/beans/spring-beans.xsd
		http://www.springframework.org/schema/aop http://www.springframework.org/schema/aop/spring-aop-4.3.xsd
		http://www.springframework.org/schema/context http://www.springframework.org/schema/context/spring-context-4.3.xsd">

<!-- 本文件中配置整个项目中包含的所有的javabean,目的在于spring统一管理

-->
<!-- <bean name="userBiz1" class="com.lsy.ioc.biz.impl.UserBizImpl1"></bean> -->
<bean name="userBiz1" class="com.lsy.ioc.biz.impl.UserBizImpl1"></bean>
<bean name="userBiz2" class="com.lsy.ioc.biz.impl.UserBizImpl2"></bean>
<bean name="personAction" class="com.lsy.ioc.web.PersonAction">
	<property name="userBiz" ref="userBiz2"></property>
</bean>
<bean name="userAction" class="com.lsy.ioc.web.UserAction">
	<property name="userBiz" ref="userBiz1"></property>
	</bean>
</beans>
结果展示
和上面一样,但是到时候直接改ref就行了,方便
三:spring传参
给javabean赋初始化值 传参
传参的三种方式:
1.set传参
第一步: 新建实体类(ParamAction)
package com.lsy.ioc.web;

import java.util.List;

public class ParamAction {
	private int age;
	private String name;
	private List<String> hobby;


	public int getAge() {
		return age;
	}


	public void setAge(int age) {
		this.age = age;
	}


	public String getName() {
		return name;
	}


	public void setName(String name) {
		this.name = name;
	}


	public List<String> getHobby() {
		return hobby;
	}


	public void setHobby(List<String> hobby) {
		this.hobby = hobby;
	}


	public ParamAction(int age, String name, List<String> hobby) {
		super();
		this.age = age;
		this.name = name;
		this.hobby = hobby;
	}


	public void execute() {
		System.out.println(this.name);
		System.out.println(this.age);
		System.out.println(this.hobby);
	}
}
第二步:写配置
<?xml version="1.0" encoding="UTF-8"?>
<beans xmlns="http://www.springframework.org/schema/beans"
	xmlns:xsi="http://www.w3.org/2001/XMLSchema-instance"
	xmlns:aop="http://www.springframework.org/schema/aop"
	xmlns:context="http://www.springframework.org/schema/context"
	xsi:schemaLocation="http://www.springframework.org/schema/beans http://www.springframework.org/schema/beans/spring-beans.xsd
		http://www.springframework.org/schema/aop http://www.springframework.org/schema/aop/spring-aop-4.3.xsd
		http://www.springframework.org/schema/context http://www.springframework.org/schema/context/spring-context-4.3.xsd">

<!-- 本文件中配置整个项目中包含的所有的javabean,目的在于spring统一管理

-->
<!-- <bean name="userBiz1" class="com.lsy.ioc.biz.impl.UserBizImpl1"></bean> -->
<bean name="userBiz1" class="com.lsy.ioc.biz.impl.UserBizImpl1"></bean>
<bean name="userBiz2" class="com.lsy.ioc.biz.impl.UserBizImpl2"></bean>
<bean name="personAction" class="com.lsy.ioc.web.PersonAction">
	<property name="userBiz" ref="userBiz2"></property>
</bean>
<bean name="userAction" class="com.lsy.ioc.web.UserAction">
	<property name="userBiz" ref="userBiz1"></property>
	</bean>
	<bean name="userAction2" class="com.lsy.ioc.web.UserAction2">
	<property name="userBiz" ref="userBiz1"></property>
	</bean>
	<bean name="userAction3" class="com.lsy.ioc.web.UserAction3">
	<property name="userBiz" ref="userBiz1"></property>
	</bean>

	<bean name="paramAction" class="com.lsy.ioc.web.ParamAction">
	<!-- <property name="name" value="李四"></property>
	<property name="age" value="18"></property>
	<property name="hobby">
		<list>
		<value>听歌</value>
		<value>打游戏</value>
		<value>睡觉</value>
		</list>
	</property> -->

	</bean>
</beans>
第三步:调用方法
package com.lsy.ioc.test;

import org.springframework.context.ApplicationContext;
import org.springframework.context.support.ClassPathXmlApplicationContext;

import com.lsy.ioc.web.ParamAction;
import com.lsy.ioc.web.PersonAction;
import com.lsy.ioc.web.UserAction;
import com.lsy.ioc.web.UserAction2;
import com.lsy.ioc.web.UserAction3;

public class IocTest {
	public static void main(String[] args) {
		ApplicationContext applicationContext=new ClassPathXmlApplicationContext("/spring-context.xml");
//		PersonAction personAction = (PersonAction)applicationContext.getBean("personAction");
//		personAction.upload();


//		ParamAction paramAction = (ParamAction)applicationContext.getBean("paramAction");
//		paramAction.execute();
	}
}
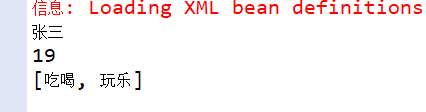
结果展示
2.构造传参
第一步:写构造方法
package com.lsy.ioc.web;

import java.util.List;

public class ParamAction {
	private int age;
	private String name;
	private List<String> hobby;


	public ParamAction() {
		super();
	}


	public ParamAction(int age, String name, List<String> hobby) {
		super();
		this.age = age;
		this.name = name;
		this.hobby = hobby;
	}


	public void execute() {
		System.out.println(this.name);
		System.out.println(this.age);
		System.out.println(this.hobby);
	}
}
第二步:更改配置
<?xml version="1.0" encoding="UTF-8"?>
<beans xmlns="http://www.springframework.org/schema/beans"
	xmlns:xsi="http://www.w3.org/2001/XMLSchema-instance"
	xmlns:aop="http://www.springframework.org/schema/aop"
	xmlns:context="http://www.springframework.org/schema/context"
	xsi:schemaLocation="http://www.springframework.org/schema/beans http://www.springframework.org/schema/beans/spring-beans.xsd
		http://www.springframework.org/schema/aop http://www.springframework.org/schema/aop/spring-aop-4.3.xsd
		http://www.springframework.org/schema/context http://www.springframework.org/schema/context/spring-context-4.3.xsd">

<!-- 本文件中配置整个项目中包含的所有的javabean,目的在于spring统一管理

-->
<!-- <bean name="userBiz1" class="com.lsy.ioc.biz.impl.UserBizImpl1"></bean> -->
<bean name="userBiz1" class="com.lsy.ioc.biz.impl.UserBizImpl1"></bean>
<bean name="userBiz2" class="com.lsy.ioc.biz.impl.UserBizImpl2"></bean>
<bean name="personAction" class="com.lsy.ioc.web.PersonAction">
	<property name="userBiz" ref="userBiz2"></property>
</bean>
<bean name="userAction" class="com.lsy.ioc.web.UserAction">
	<property name="userBiz" ref="userBiz1"></property>
	</bean>
	<bean name="userAction2" class="com.lsy.ioc.web.UserAction2">
	<property name="userBiz" ref="userBiz1"></property>
	</bean>
	<bean name="userAction3" class="com.lsy.ioc.web.UserAction3">
	<property name="userBiz" ref="userBiz1"></property>
	</bean>

	<bean name="paramAction" class="com.lsy.ioc.web.ParamAction">

	<constructor-arg name="name" value="张三"></constructor-arg>
	<constructor-arg name="age" value="19"></constructor-arg>
	<constructor-arg name="hobby">
	<list>
	<value>吃喝</value>
	<value>玩乐</value>
	</list>

	</constructor-arg>
	</bean>
</beans>
第三步:调用方法
package com.lsy.ioc.test;

import org.springframework.context.ApplicationContext;
import org.springframework.context.support.ClassPathXmlApplicationContext;

import com.lsy.ioc.web.ParamAction;
import com.lsy.ioc.web.PersonAction;
import com.lsy.ioc.web.UserAction;
import com.lsy.ioc.web.UserAction2;
import com.lsy.ioc.web.UserAction3;

public class IocTest {
	public static void main(String[] args) {
		ApplicationContext applicationContext=new ClassPathXmlApplicationContext("/spring-context.xml");

		ParamAction paramAction = (ParamAction)applicationContext.getBean("paramAction");
		paramAction.execute();
	}
}
3.自动装配(基本不用)
四:spring与tomcat整合
问题:如果按照上面方法进行建模,那么当足够多的时候那个,建模的时间也会越来越久,效率也就低了,影响性能
解决方法:使用监听器
第一步:新建一个监听器(SpringLoaderListener)
package com.lsy.ioc.listener;

import javax.servlet.ServletContextEvent;
import javax.servlet.ServletContextListener;

import org.springframework.context.ApplicationContext;
import org.springframework.context.support.ClassPathXmlApplicationContext;

public class SpringLoaderListener implements ServletContextListener{

	@Override
	public void contextInitialized(ServletContextEvent sce) {
		System.out.println("监听器方法执行....");
		ApplicationContext applicationContext=new ClassPathXmlApplicationContext("/spring-context.xml");
		sce.getServletContext().setAttribute("SpringContext", applicationContext);


	}
}
第二步:在web.xml中配置监听器
<web-app xmlns="http://xmlns.jcp.org/xml/ns/javaee"
         xmlns:xsi="http://www.w3.org/2001/XMLSchema-instance"
         xsi:schemaLocation="http://xmlns.jcp.org/xml/ns/javaee http://xmlns.jcp.org/xml/ns/javaee/web-app_3_1.xsd"
         version="3.1">
  <display-name>Archetype Created Web Application</display-name>
	<listener>
	<listener-class>com.lsy.ioc.listener.SpringLoaderListener</listener-class>
	</listener>


</web-app>
第三步:新建servlet()
package com.lsy.ioc.web;

import java.io.IOException;

import javax.servlet.ServletException;
import javax.servlet.annotation.WebServlet;
import javax.servlet.http.HttpServlet;
import javax.servlet.http.HttpServletRequest;
import javax.servlet.http.HttpServletResponse;

import org.springframework.context.ApplicationContext;
import org.springframework.context.support.ClassPathXmlApplicationContext;

@WebServlet("/user")
public class UserServlet extends HttpServlet{
	protected void service(HttpServletRequest req, HttpServletResponse resp) throws ServletException, IOException {
		ApplicationContext springContext = (ApplicationContext)req.getServletContext().getAttribute("SpringContext");
		ParamAction paramAction = (ParamAction)springContext.getBean("paramAction");
		paramAction.execute();
	}
}
结果展示

这里先运行的第一次,都只执行了一次
我们继续运行

这是第二次运行的结果,可以看见监听器还是只执行了一次
结束!!!
版权声明:本文内容由互联网用户自发贡献,该文观点仅代表作者本人。本站仅提供信息存储空间服务,不拥有所有权,不承担相关法律责任。如发现本站有涉嫌侵权/违法违规的内容, 请发送邮件至 举报,一经查实,本站将立刻删除。
文章由极客之家整理,本文链接:https://www.bmabk.com/index.php/post/12226.html

