
目录
一、JDBC
1、基本介绍
▶ 概述
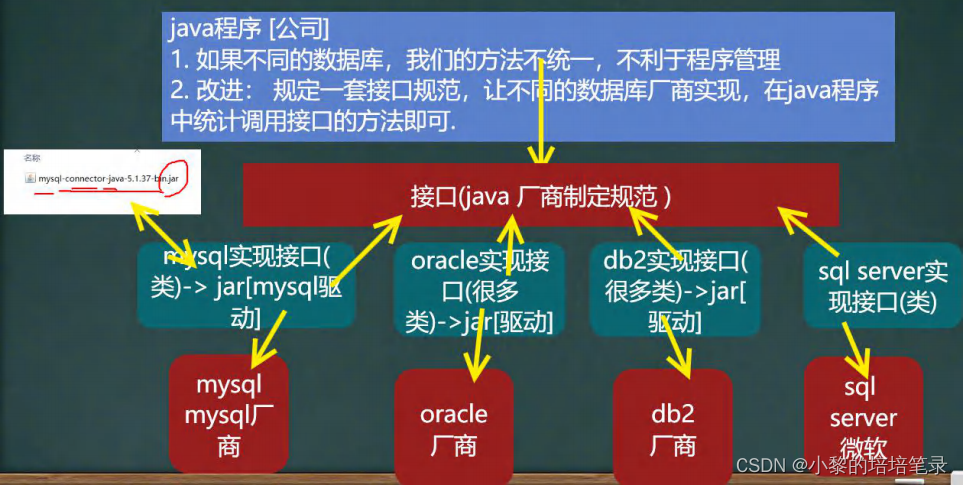
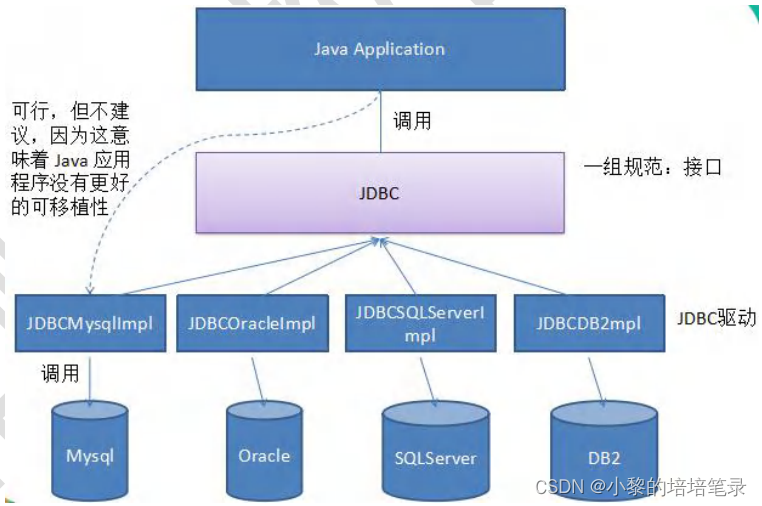
JDBC为访问不同的数据库提供了统一的接口,为使用者屏蔽了细节问题。Java程序员使用JDBC, 可以连接任何提供了JDBC驱动程序的数据库系统,从而完成对数据库的各种操作。
▶ 原理示意图
▶ JDBC的好处
JDBC是Java提供一套用于数据库操作的接口API, Java程序员只需要面向这套接口编程即可。不同的数据库厂商,需要针对这套接口,提供不同实现。
▶ API
JDBC API是一系列的接口, 它统一和规范了应用程序与数据库的连接、执行SQL 语句,井到得到返回结果等各类操作,相关类和接口在 java.sql与javax.sq包中。
2、JDBC 快速入门
▶ 编写步骤
- 注册驱动-加载Driver类
- 获取连接-得到Connection
- 执行增删改查-发送SQL给mysql执行
- 释放资源-关闭相关连接
▶ 第一个程序
public class Jdbc01 {
    public static void main(String[] args) throws SQLException {
        //前置工作: 在项目下创建一个文件夹比如 libs
        // 将 mysql.jar 拷贝到该目录下,点击 add to project ..加入到项目中

        //1. 注册驱动
        Driver driver = new Driver(); //创建 driver 对象

        //2. 得到连接
        //(1) jdbc:mysql:// 规定好表示协议,通过 jdbc 的方式连接 mysql
        //(2) localhost 主机,可以是 ip 地址
        //(3) 3306 表示 mysql 监听的端口
        //(4) hsp_db02 连接到 mysql dbms 的哪个数据库
        //(5) mysql 的连接本质就是前面学过的 socket 连接
        String url = "jdbc:mysql://localhost:3306/hsp_db02";

        //将 用户名和密码放入到 Properties 对象
        Properties properties = new Properties();

        //说明 user 和 password 是规定好,后面的值根据实际情况写
        properties.setProperty("user", "root");// 用户
        properties.setProperty("password", "123"); //密码

        Connection connect = driver.connect(url, properties);

        //3. 执行 sql
        String sql = "update actor set name='周星驰' where id = 1";

        //statement 用于执行静态 SQL 语句并返回其生成的结果的对象
        Statement statement = connect.createStatement();

        int rows = statement.executeUpdate(sql); // 如果是 dml 语句,返回的就是影响行数

        System.out.println(rows > 0 ? "成功" : "失败");

        //4. 关闭连接资源
        statement.close();
        connect.close();
}
3、获取数据库的五种方式
▶ 第一种方式
public void connect01() throws SQLException {

    Driver driver = new Driver(); //创建 driver 对象

    String url = "jdbc:mysql://localhost:3306/hsp_db02";

    //将 用户名和密码放入到 Properties 对象
    Properties properties = new Properties();

    //说明 user 和 password 是规定好,后面的值根据实际情况写
    properties.setProperty("user", "root");// 用户
    properties.setProperty("password", "123"); //密码

    Connection connect = driver.connect(url, properties);

    System.out.println(connect);
}
▶ 第二种方式
public void connect02() throws Exception {

    //使用反射加载 Driver 类 , 动态加载,更加的灵活,减少依赖性
    Class<?> aClass = Class.forName("com.mysql.jdbc.Driver");

    Driver driver = (Driver)aClass.newInstance();

    String url = "jdbc:mysql://localhost:3306/hsp_db02";

    //将 用户名和密码放入到 Properties 对象
    Properties properties = new Properties();

    //说明 user 和 password 是规定好,后面的值根据实际情况写
    properties.setProperty("user", "root");// 用户
    properties.setProperty("password", "123"); //密码

    Connection connect = driver.connect(url, properties);

    System.out.println("方式 2=" + connect);
}
▶ 第三种方式
public void connect03() throws Exception {

    //使用反射加载 Driver
    Class<?> aClass = Class.forName("com.mysql.jdbc.Driver");

    Driver driver = (Driver) aClass.newInstance();

    //创建 url 和 user 和 password
    String url = "jdbc:mysql://localhost:3306/hsp_db02";
    String user = "root";
    String password = "123";

    DriverManager.registerDriver(driver);//注册 Driver 驱动

    Connection connection = DriverManager.getConnection(url, user, password);

    System.out.println("第三种方式=" + connection);
}
▶ 第四种方式
public void connect04() throws Exception {
    //使用反射加载了 Driver 类
    //在加载 Driver 类时,完成注册
    /*
        源码: 1. 静态代码块,在类加载时,会执行一次.
        2. DriverManager.registerDriver(new Driver());
        3. 因此注册 driver 的工作已经完成
        static {
            try {
                DriverManager.registerDriver(new Driver());
            } catch (SQLException var1) {
                throw new RuntimeException("Can't register driver!");
            }
        }
    */

    Class.forName("com.mysql.jdbc.Driver");

    //创建 url 和 user 和 password
    String url = "jdbc:mysql://localhost:3306/hsp_db02";
    String user = "root";
    String password = "123";

    Connection connection = DriverManager.getConnection(url, user, password);

    System.out.println("第 4 种方式~ " + connection);
}
▶ 第五种方式
//使用配置文件,连接数据库更灵活
Connection connection = DriverManager.getConnection("jdbc:mysql://localhost:3306/testdb" "root""root");
//字符串各个值,比如端口,数据库,用户名,密码为了方便,
//我们可以将信息写入到·properties 文件中,方便操作

//配置文件
jdbc.properties
user=root
password=root
url-jdbc:mysgt://localhost:3306/girls
driver=com.mysqljdbc.Driver
public void connect05() throws Exception { //通过 Properties 对象获取配置文件的信息 Properties properties = new Properties(); properties.load(new FileInputStream("src\\mysql.properties")); //获取相关的值 String user = properties.getProperty("user"); String password = properties.getProperty("password"); String driver = properties.getProperty("driver"); String url = properties.getProperty("url"); Class.forName(driver);//建议写上 Connection connection = DriverManager.getConnection(url, user, password); System.out.println("方式 5 " + connection); }▶ 注意
1、mysqL驱动5.1.6可以无需CLass. forName(“com.mysql.jdbc.Driver”);
2、从jdk1.5以后使用了jdbc4,不再需要显示调用class.forName()注册驱动而是自动调用驱动jar包下META-INFservices java .sql.Driver文本中的类名称去注册。
3、建议还是写上CLass. forName(“com.mysqljdbc.Driver'”),更加明确。
二、API
1、ResultSet
▶ 基本介绍
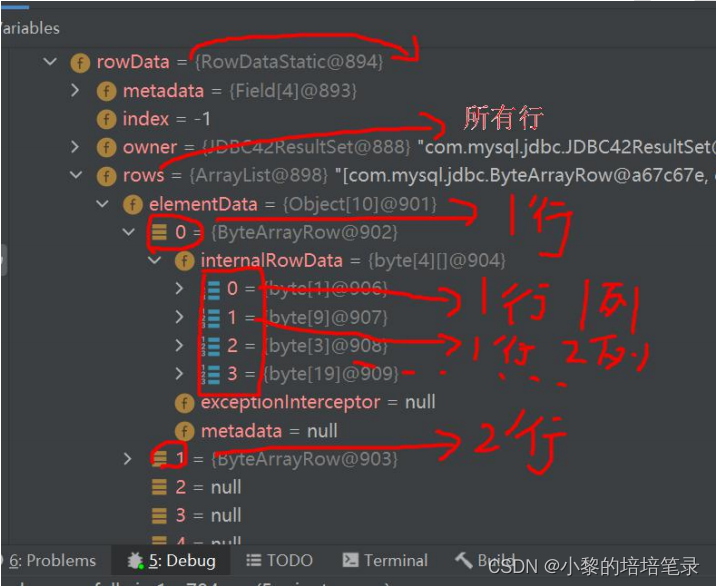
1、表示数据库结果集的数据表, 通常通过执行查询数据库的语句生成。
2、ResultSet对象保持一个光标指向其当前的数据行。 最初,光标位于第一行之前。
3、next方法将光标移动到下一行,并且由于在ResultSet对象中没有更多行时返回false 因此可以在while循环中使用循环来遍历结果集。
▶ 应用实例
▶ 代码实例
public class ResultSet_ {
    public static void main(String[] args) throws Exception {

        //通过 Properties 对象获取配置文件的信息
        Properties properties = new Properties();
        properties.load(new FileInputStream("src\\mysql.properties"));

        //获取相关的值
        String user = properties.getProperty("user");
        String password = properties.getProperty("password");
        String driver = properties.getProperty("driver");
        String url = properties.getProperty("url");

        //1. 注册驱动
        Class.forName(driver);//建议写上

        //2. 得到连接
        Connection connection = DriverManager.getConnection(url, user, password);

        //3. 得到 Statement
        Statement statement = connection.createStatement();

        //4. 组织 SqL
        String sql = "select id, name , sex, borndate from actor";

        //执行给定的 SQL 语句,该语句返回单个 ResultSet 对象
        ResultSet resultSet = statement.executeQuery(sql);

        //5. 使用 while 取出数据
        while (resultSet.next()) { // 让光标向后移动,如果没有更多行,则返回 false
            int id = resultSet.getInt(1); //获取该行的第 1 列

            //int id1 = resultSet.getInt("id"); 通过列名来获取值, 推荐
            String name = resultSet.getString(2);//获取该行的第 2 列
            String sex = resultSet.getString(3);
            Date date = resultSet.getDate(4);
            System.out.println(id + "\t" + name + "\t" + sex + "\t" + date);
        }

        //6. 关闭连接
        resultSet.close();
        statement.close();
        connection.close();
}
2、Statement
▶ 基本介绍
- Statement对象 用于执行静态SQL语句并返回其生成的结果的对象
- 在连接建立后,需要对数据库进行访问,执行命名或是SQL语句 可以通过:①Statement [存在SQL注入];②PreparedStatement [预处理];③CallableStatement [存储过程]
- Statement对象执行SQL语句,存在SQL注入风险
- SQL 注入是利用某些系统没有对用户输入的数据进行充分的检查, 而在用户输入数据中注入非法的SQL 语句段或命令,恶意攻击数据库。
- 要防范SQL 注入,只要用PreparedStatement(从Statement扩展而来)取代Statement 就可以了。
▶ sql 注入-- 创建一张表 管理员表 CREATE TABLE admin ( NAME VARCHAR(32) NOT NULL UNIQUE, pwd VARCHAR(32) NOT NULL DEFAULT '') CHARACTER SET utf8; -- 添加数据 INSERT INTO admin VALUES('tom', '123'); -- 查找某个管理是否存在 SELECT * FROM admin WHERE NAME = 'tom' AND pwd = '123' -- SQL -- 输入用户名 为 1' or -- 输入万能密码 为 or '1'= '1 SELECT * FROM admin WHERE NAME = '1' OR' AND pwd = 'OR '1'= '1' SELECT * FROM admin3、PreparedStatement
▶ 基本介绍
- PreparedStatement 执行的SQL 语句中的参数用问号(?)来表示,调用PreparedStatement 对象的 setXxx() 方法来设置这些参数 .setXxx()方法有两个参数,第一个参数是要设置的SQL语句中的参数的索引(从1开始),第二个是设置的SQL语句中的参数的值。
- 调用 executeQuery(): 返回 ResultSet 对象
- 调用 executeUpdate(): 执行更新,包括增、删、修改
▶ 预处理的好处
- 不再使用 +(加号) 拼接sq|语句,减少语法错误
- 有效的解决了sql注入问题!
- 大大减少了编译次数,效率较高
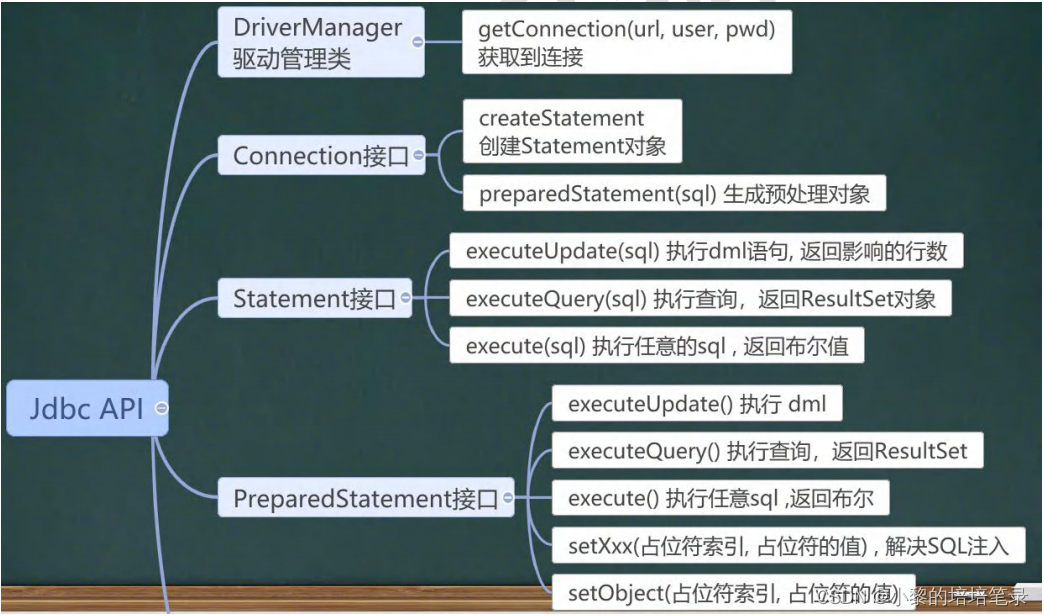
▶public class PreparedStatement_ { public static void main(String[] args) throws Exception { Scanner scanner = new Scanner(System.in); //让用户输入管理员名和密码 System.out.print("请输入管理员的名字: "); //next(): 当接收到 空格或者 '就是表示结束,如果希望看到 SQL 注入,这里需要用 nextLine String admin_name = scanner.nextLine(); System.out.print("请输入管理员的密码: "); String admin_pwd = scanner.nextLine(); //通过 Properties 对象获取配置文件的信息 Properties properties = new Properties(); properties.load(new FileInputStream("src\\mysql.properties")); //获取相关的值 String user = properties.getProperty("user"); String password = properties.getProperty("password"); String driver = properties.getProperty("driver"); String url = properties.getProperty("url"); //1. 注册驱动 Class.forName(driver);//建议写上 //2. 得到连接 Connection connection = DriverManager.getConnection(url, user, password); //3. 得到 PreparedStatement //组织 SqL , Sql 语句的 ? 就相当于占位符 String sql = "select name , pwd from admin where name =? and pwd = ?"; //preparedStatement 对象实现了 PreparedStatement 接口的实现类的对象 PreparedStatement preparedStatement = connection.prepareStatement(sql); //给 ? 赋值 preparedStatement.setString(1, admin_name); preparedStatement.setString(2, admin_pwd); //4. 执行 select 语句使用 executeQuery //如果执行的是 dml(update, insert ,delete) executeUpdate() //这里执行 executeQuery ,不要在写 sql ResultSet resultSet = preparedStatement.executeQuery(sql); if (resultSet.next()) { //如果查询到一条记录,则说明该管理存在 System.out.println("恭喜, 登录成功"); } else { System.out.println("对不起,登录失败"); } //关闭连接 resultSet.close(); preparedStatement.close(); connection.close(); } }4、JDBC API小结


三、封装 JDBCUtils
▶ 说明
在jdbc操作中,获取连接和释放资源是经常使用到可以将其封装JDBC连接的工具类JDBCUtils
完成JDBCUtils
▶ 完成 mysql 的连接和关闭资源
public class JDBCUtils {
    //定义相关的属性(4 个), 因为只需要一份,因此,我们做出 static
    private static String user; //用户名
    private static String password; //密码
    private static String url; //url
    private static String driver; //驱动名

    //在 static 代码块去初始化
    static {
        try {
            Properties properties = new Properties();
            properties.load(new FileInputStream("src\\mysql.properties"));

            //读取相关的属性值
            user = properties.getProperty("user");
            password = properties.getProperty("password");
            url = properties.getProperty("url");
            driver = properties.getProperty("driver");

        } catch (IOException e) {
            //在实际开发中,我们可以这样处理
            //1. 将编译异常转成 运行异常
            //2. 调用者,可以选择捕获该异常,也可以选择默认处理该异常,比较方便.
            throw new RuntimeException(e);
    }
}
▶ 连接数据库, 返回 Connection
public static Connection getConnection() {
    try {
        return DriverManager.getConnection(url, user, password);
    } catch (SQLException e) {
        //1. 将编译异常转成 运行异常
        //2. 调用者,可以选择捕获该异常,也可以选择默认处理该异常,比较方便.
        throw new RuntimeException(e);
    }
}
▶ 关闭相关资源
/*
    1. ResultSet 结果集
    2. Statement 或者 PreparedStatement
    3. Connection
    4. 如果需要关闭资源,就传入对象,否则传入 null
*/
public static void close(ResultSet set, Statement statement, Connection connection) {
    //判断是否为 null
    try {
        if (set != null) {
            set.close();
        }
        if (statement != null) {
            statement.close();
        }
        if (connection != null) {
            connection.close();
        }
    } catch (SQLException e) {
        //将编译异常转成运行异常抛出
        throw new RuntimeException(e);
    }
}
▶ 使用工具类完成select
public void testSelect() {
    //1. 得到连接
    Connection connection = null;

    //2. 组织一个 sql
    String sql = "select * from actor where id = ?";
    PreparedStatement preparedStatement = null;
    ResultSet set = null;

    //3. 创建 PreparedStatement 对象
    try {
        connection = JDBCUtils.getConnection();

        preparedStatement = connection.prepareStatement(sql);

        preparedStatement.setInt(1, 5);//给?号赋值

        //执行, 得到结果集
        set = preparedStatement.executeQuery();

        //遍历该结果集
        while (set.next()) {
            int id = set.getInt("id");
            String name = set.getString("name");
            String sex = set.getString("sex");
            Date borndate = set.getDate("borndate");
            String phone = set.getString("phone");
            System.out.println(id + "\t" + name + "\t" + sex + "\t" + borndate + "\t" + phone);
        }
    } catch (SQLException e) {
        e.printStackTrace();
    } finally {
        //关闭资源
        JDBCUtils.close(set, preparedStatement, connection);
    }
}
▶ 使用工具类完成dml
public void testDML() {//insert , update, delete
    //1. 得到连接
    Connection connection = null;

    //2. 组织一个 sql
    String sql = "update actor set name = ? where id = ?";

    // 测试 delete 和 insert ,自己玩.
    PreparedStatement preparedStatement = null;

    //3. 创建 PreparedStatement 对象
    try {
        connection = JDBCUtils.getConnection();
        preparedStatement = connection.prepareStatement(sql);

        //给占位符赋值
        preparedStatement.setString(1, "周星驰");
        preparedStatement.setInt(2, 4);

        //执行
        preparedStatement.executeUpdate();

    } catch (SQLException e) {
        e.printStackTrace();
    } finally {
        //关闭资源
        JDBCUtils.close(null, preparedStatement, connection);
    }
}
四、事务和批处理
1、事务
▶ 基本介绍
- JDBC程序中当一个Connection对象创建时,默认情况下是自动提交事务 : 每次执行一个SQL 语句时,如果执行成功,就会向数据库自动提交,而不能回滚。
- JDBC程序中为了让多个SQL语句作为一个整体执行,需要使用事务
- 调用 Connection 的setAutoCommit(false) 可以取消自动提交事务
- 在所有的SQL语句都成功执行后,调用Connection的 commit() : 方法提交事务
- 在其中某个操作失败或出现异常时,调用Connection 柚 rolbck() : 方法回滚事务
▶ 应用实例
public void useTransaction() {
    //1. 得到连接
    Connection connection = null;

    //2. 组织一个 sql
    String sql = "update account set balance = balance - 100 where id = 1";
    String sql2 = "update account set balance = balance + 100 where id = 2";
    PreparedStatement preparedStatement = null;

    //3. 创建 PreparedStatement 对象
    try {
        // 在默认情况下,connection 是默认自动提交
        connection = JDBCUtils.getConnection();

        //将 connection 设置为不自动提交
        connection.setAutoCommit(false); //开启了事务

        preparedStatement = connection.prepareStatement(sql);
        preparedStatement.executeUpdate(); // 执行第 1 条 sql

        int i = 1 / 0; //抛出异常

        preparedStatement = connection.prepareStatement(sql2);
        preparedStatement.executeUpdate(); // 执行第 3 条 sql

        //这里提交事务
        connection.commit();

    } catch (SQLException e) {
        //这里我们可以进行回滚,即撤销执行的 SQL
        //默认回滚到事务开始的状态.
        System.out.println("执行发生了异常,撤销执行的 sql");
    try {
        connection.rollback();
    } catch (SQLException throwables) {
        throwables.printStackTrace();
    }
        e.printStackTrace();
    } finally {
        //关闭资源
        JDBCUtils.close(null, preparedStatement, connection);
    }
}
2、批处理
▶ 基本介绍
- 当需要成批插入或者更新记录时.可以采用Java的量更新机制,这一机制允许多条语句一次性提交给数据库批量处理。通常情况下比单独提交处理更有效率。
- JDBC的批量处理语句包括下面方法 : ① addBatch() : 添加需要批量处理的SQL语句或参数;② executeBatch() : 执行批量处理语句;③ clearBatch() : 清空批处理包的语句
- JDBC连接MySQL时, 如果要使用批处理功能,请再url中加参数:rewriteBatchedStatements=true
- 批处理往往和PreparedStatement一起搭配使用,可以既减少编译次数,又减少运行次数,效率大大提高。
▶ 应用实例
注意:需要修改配置文件jdbc.properties url=jdbc:mysql://localhost:3306/数据库:rewriteBatcheds tatements=true
public void batch() throws Exception {
    Connection connection = JDBCUtils.getConnection();

    String sql = "insert into admin2 values(null, ?, ?)";

    PreparedStatement preparedStatement = connection.prepareStatement(sql);

    long start = System.currentTimeMillis();//开始时间

    for (int i = 0; i < 5000; i++) {//5000 执行
        preparedStatement.setString(1, "jack" + i);

        preparedStatement.setString(2, "666");

        preparedStatement.addBatch();

        //当有 1000 条记录时,在批量执行
        if((i + 1) % 1000 == 0) {//满 1000 条 sql
            preparedStatement.executeBatch();
            //清空一把
            preparedStatement.clearBatch();
        }
    }

    long end = System.currentTimeMillis();

    System.out.println("批量方式 耗时=" + (end - start));//批量方式 耗时=108

    //关闭连接
    JDBCUtils.close(null, preparedStatement, connection);
}
▶ 源码
        //将 sql 语句加入到批处理包中

        //1. 第一就创建 ArrayList - elementData => Object[]
        //2. elementData => Object[] 就会存放我们预处理的 sql 语句
        //3. 当 elementData 满后,就按照 1.5 扩容
        //4. 当添加到指定的值后,就 executeBatch
        //5. 批量处理会减少我们发送 sql 语句的网络开销,而且减少编译次数,因此效率提高
public void addBatch() throws SQLException {
        synchronized(this.checkClosed().getConnectionMutex()) {
            if (this.batchedArgs == null) {
                this.batchedArgs = new ArrayList();
            }
            for(int i = 0; i < this.parameterValues.length; ++i) {
                this.checkAllParametersSet(this.parameterValues[i], this.parameterStreams[i], i);
            }
            this.batchedArgs.add(newPreparedStatement.BatchParams(this.parameterValues,this.parameterStreams, this.isStream, this.streamLengths, this.isNull));
        }
}
五、数据库连接池
1、传统获取 Connection
▶ 基本介绍
- 传统的JDBC数据库连接使用 DriverManager来获取, 每次向数据库建立连接的时候都要将Connection 加载到内存中,再验证IP地址 用户名和密码(0.05s-1s时间).需要数据库连接的时候, 就向数据库要求一个,频繁的进行数据库连接操作将占用很多的系统资源 容易造成服务器崩溃。
- 每一次数据库连接,使用完后都得断开,如果程序出现异常而未能关闭,将导致数据库内存泄漏,最终将导致重启数据库。
- 传统获取连接的方式,不能控制创建的连接数量,和连接过多也可能导致内存泄漏,MySQL崩溃。
- 解决传统开发中的数据库连接问题,可以采用数据库连接池技术(connection pool)
▶ 数据库连接池种类
- JDBC的数据库连接池使用 javax.sql.DataSource 来表示,DataSource只是一个接口, 该接口通常由第三方提供实现[提供jar包]
- C3P0 数据库连接池,速度相对较慢,稳定性不错(hibernate, spring)
- DBCP数据库连接池,速度相对C3P0较快,但不稳定
- Proxool数据库连接池, 有监控连接池状态的功能,稳定性较C3P0差一点
- BoneCP 数据库连接池, 速度快
- Druid(德鲁伊)是阿里提供的数据库连接池,集DBCP、C3PO、Proxool 优点于一身的数据库连接池
2、C3P0应用实例
▶ 代码实现
方式 1: 相关参数,在程序中指定 user, url , password 等
public void testC3P0() throws Exception {
    //1. 创建一个数据源对象
    ComboPooledDataSource comboPooledDataSource = new ComboPooledDataSource();

    //2. 通过配置文件 mysql.properties 获取相关连接的信息
    Properties properties = new Properties();
    properties.load(new FileInputStream("src\\mysql.properties"));

    //读取相关的属性值
    String user = properties.getProperty("user");
    String password = properties.getProperty("password");
    String url = properties.getProperty("url");
    String driver = properties.getProperty("driver");

    //给数据源 comboPooledDataSource 设置相关的参数
    //注意:连接管理是由 comboPooledDataSource 来管理
    comboPooledDataSource.setDriverClass(driver);
    comboPooledDataSource.setJdbcUrl(url);
    comboPooledDataSource.setUser(user);
    comboPooledDataSource.setPassword(password);

    //设置初始化连接数
    comboPooledDataSource.setInitialPoolSize(10);

    //最大连接数
    comboPooledDataSource.setMaxPoolSize(50);

    //测试连接池的效率, 测试对 mysql 5000 次操作
    long start = System.currentTimeMillis();

    for (int i = 0; i < 5000; i++) {
        //这个方法就是从 DataSource 接口实现的
        Connection connection = comboPooledDataSource.getConnection();
        connection.close();
    }

    long end = System.currentTimeMillis();
    //c3p0 5000 连接 mysql 耗时=391
    System.out.println("c3p0 5000 连接 mysql 耗时=" + (end - start));
}
▶ 使用配置文件模板来完成(方式2)
将 c3p0 提供的 c3p0.config.xml 拷贝到 src 目录下,该文件指定了连接数据库和连接池的相关参数public void testC3P0() throws SQLException { ComboPooledDataSource comboPooledDataSource = new ComboPooledDataSource("hsp_edu"); //测试 5000 次连接 mysql long start = System.currentTimeMillis(); for (int i = 0; i < 500000; i++) { Connection connection = comboPooledDataSource.getConnection(); connection.close(); } long end = System.currentTimeMillis(); //c3p0 的第二种方式 耗时=413 System.out.println("c3p0 的第二种方式(500000) 耗时=" + (end - start));//1917 }3、Druid(德鲁伊)应用实例
▶ 代码实现
public void testDruid() throws Exception {
    //1. 加入 Druid jar 包
    //2. 加入 配置文件 druid.properties , 将该文件拷贝项目的 src 目录
    //3. 创建 Properties 对象, 读取配置文件
    Properties properties = new Properties();
    properties.load(new FileInputStream("src\\druid.properties"));

    //4. 创建一个指定参数的数据库连接池, Druid 连接池
    DataSource dataSource = DruidDataSourceFactory.createDataSource(properties);

    long start = System.currentTimeMillis();
    for (int i = 0; i < 500000; i++) {
        Connection connection = dataSource.getConnection();
        connection.close();
    }
    long end = System.currentTimeMillis();

    //druid 连接池 操作 500000 耗时=539
    System.out.println("druid 连接池 操作 500000 耗时=" + (end - start));
}
4、Apache—DBUtils
▶ 基本介绍
commons-dbutils 是 APache 组织提供的一个开源JDBC工具类库,它是对JDBC的封装,使用dbutils能极大简化jdbc编码的工作量。
▷ DbUtils类
1、QueryRunner类:该类封装了SQL的执行,是线程安全的。可以实现增、删、改、查、批处理
2、使用QueryRunner类实现查询
3、ResultSetHandler接口: 该接口用于处理 java.sql.ResultSet, 将数据按要求转换为另一形式,▶ 方法
- ArrayHandler : 把结果集中的第一行数据转成对象数组。
- ArrayListHandler : 把结果集中的每一行数据都转成一个数组,再存放到List中。
- BeanHandler : 将结果集中的第一行数据封装到一个对应的JavaBean实例中。
- BeanListHandler : 将结果集中的每一行数据都封装到一个对应的JavaBean实例中,存放到List里。
- ColumnListHandler : 将结果集中某一列的数据存放到List中。
- KeyedHandler(name) : 将结果集中的每行数据都封装到Ma P里,再把这些map再存到一个map里,其key为指定的。
- key.MapHandler : 将结果集中的第一行数据封装到一个Map里,key是列名, value就是对应的值。
- MapListHandler : 将结果集中的每一行数据都封装到一个Map里,然后再存放到List。
版权声明:本文内容由互联网用户自发贡献,该文观点仅代表作者本人。本站仅提供信息存储空间服务,不拥有所有权,不承担相关法律责任。如发现本站有涉嫌侵权/违法违规的内容, 请发送邮件至 举报,一经查实,本站将立刻删除。
文章由极客之音整理,本文链接:https://www.bmabk.com/index.php/post/119668.html

