
目录
1、request 继承体系
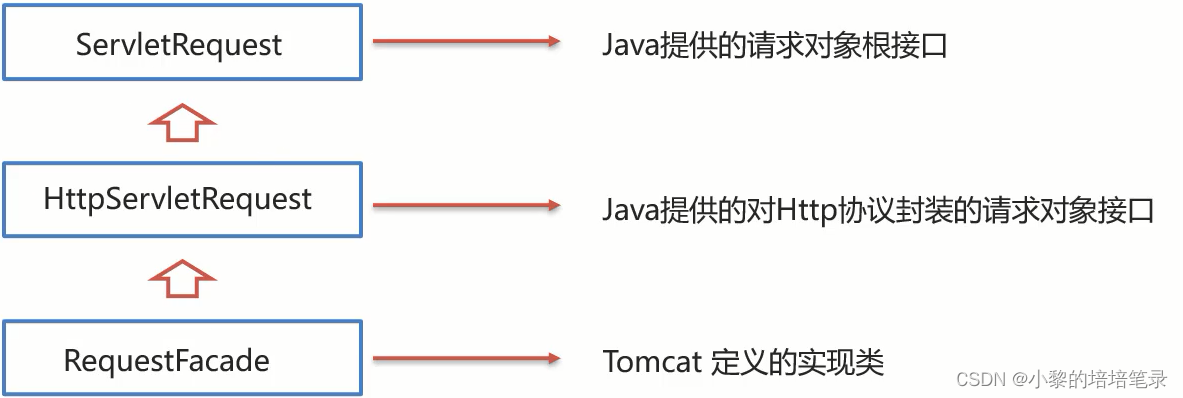
▶ 继承体系
▷ 从上图中可以看出,ServletRequest和HttpServletRequest都是Java提供的。
▷ ServletRequest和HttpServletRequest是继承关系,并且两个都是接口,接口是无法创建对象的。
▷ 这个时候,我们就需要用到Request继承体系中的`RequestFacade`:
● 该类实现了 HttpServletRequest接口,也间接实现了 ServletRequest接口。
● Servlet类中的service方法、doGet方法或者是doPost方法最终都是由Web服务器[Tomcat]来调用的,所以Tomcat提供了方法参数接口的具体实现类,并完成了对象的创建
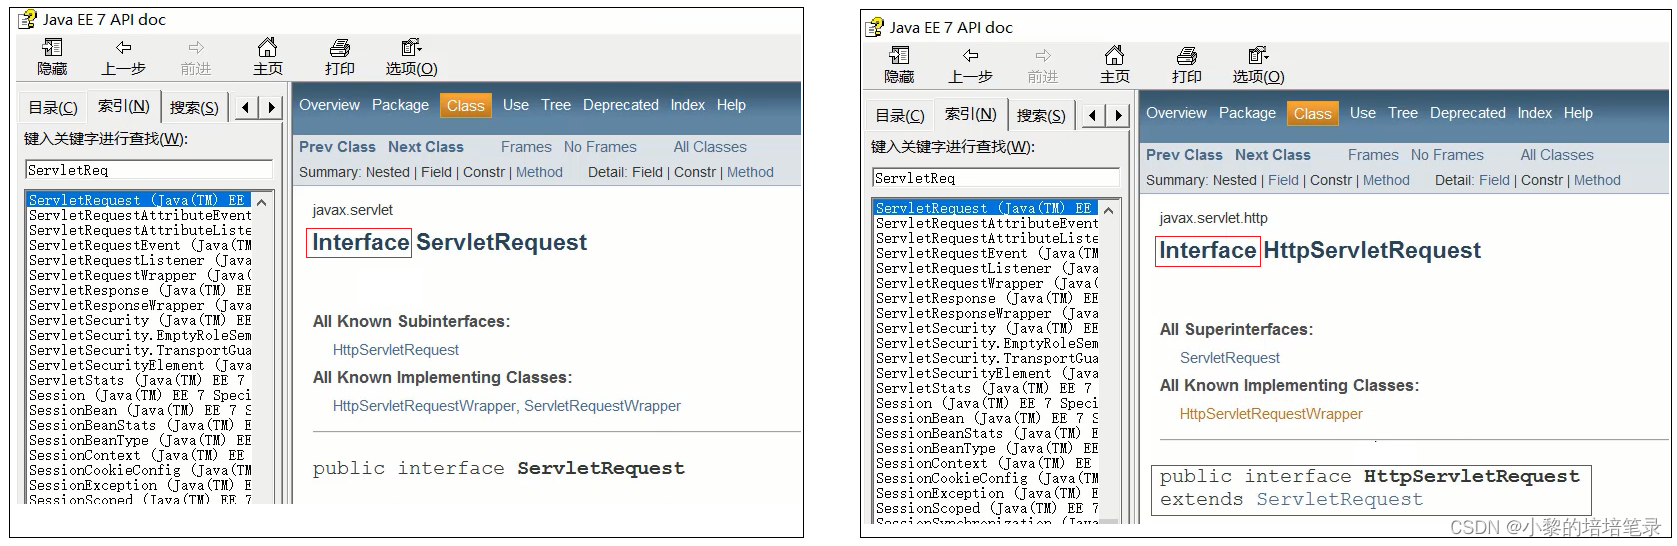
● 要想了解RequestFacade中都提供了哪些方法,我们可以直接查看JavaEE的API文档中关于ServletRequest和HttpServletRequest的接口文档,因为RequestFacade实现了其接口就需要重写接口中的方法。▷ 测试
1、编写一个Servlet,在方法中把request对象打印下
@WebServlet("/demo2")
public class ServletDemo2 extends HttpServlet {
    @Override
    protected void doGet(HttpServletRequest request, HttpServletResponse response) throws ServletException, IOException {
        System.out.println(request);
    }

    @Override
    protected void doPost(HttpServletRequest request, HttpServletResponse response) throws ServletException, IOException {
    }
}
2、启动服务器,运行访问`http://localhost:8080/request-demo/demo2`,(填自己对应的路径)得到运行结果:


2、request 获取请求参数
▶ 请求行
请求行包含三块内容,分别是`请求方式`、`请求资源路径`、`HTTP协议及版本`:
▶ request 对象对应的API方法
▷ 获取请求方式: `GET`
String getMethod()▷ 获取虚拟目录(项目访问路径): `/request-demo`
String getContextPath()▷ 获取URL(统一资源定位符): `http://localhost:8080/request-demo/req1`
StringBuffer getRequestURL()▷ 获取URI(统一资源标识符): `/request-demo/req1`
String getRequestURI()▷ 获取请求参数(GET方式): `username=zhangsan&password=123`
String getQueryString()▶ 测试1
@WebServlet("/req1")
public class RequestDemo1 extends HttpServlet {
    @Override
    protected void doGet(HttpServletRequest req, HttpServletResponse resp) throws ServletException, IOException {
        // String getMethod():获取请求方式: GET
        String method = req.getMethod();
        System.out.println(method);//GET

        // String getContextPath():获取虚拟目录(项目访问路径):/request-demo
        String contextPath = req.getContextPath();
        System.out.println(contextPath);

        // StringBuffer getRequestURL(): 获取URL(统一资源定位符):http://localhost:8080/request-demo/req1
        StringBuffer url = req.getRequestURL();
        System.out.println(url.toString());

        // String getRequestURI():获取URI(统一资源标识符): /request-demo/req1
        String uri = req.getRequestURI();
        System.out.println(uri);

        // String getQueryString():获取请求参数(GET方式): username=zhangsan
        String queryString = req.getQueryString();
        System.out.println(queryString);
    }
    @Override
    protected void doPost(HttpServletRequest req, HttpServletResponse resp) throws ServletException, IOException {
    }
}
启动服务器,访问`http://localhost:8080/request-demo/req1`,获取的结果如下:
▶ 获取请求头数据
对于请求头的数据,格式为`key: value`如下:
▶ 方法
String getHeader(String name)▶ 测试1
@WebServlet("/req1")
public class RequestDemo1 extends HttpServlet {
    @Override
    protected void doGet(HttpServletRequest req, HttpServletResponse resp) throws ServletException, IOException {
        //获取请求头: user-agent: 浏览器的版本信息
        String agent = req.getHeader("user-agent");
        System.out.println(agent);
    }
    @Override
    protected void doPost(HttpServletRequest req, HttpServletResponse resp) throws ServletException, IOException {
    }
}
重新启动服务器后,`http://localhost:8080/request-demo/req1`,获取的结果如下:
▶ 获取请求体数据
浏览器在发送GET请求的时候是没有请求体的,所以需要把请求方式变更为POST,请求体中的数据格式如下:
▶ 方法
对于请求体中的数据,Request对象提供了如下两种方式来获取其中的数据,分别是:
▷ 获取字节输入流,如果前端发送的是字节数据,比如传递的是文件数据,则使用该方法
ServletInputStream getInputStream()▷ 获取字符输入流,如果前端发送的是纯文本数据,则使用该方法
BufferedReader getReader()▶ 测试3
▷ 1. 在项目的webapp目录下添加一个html页面,名称为:`req.html`
<!DOCTYPE html>
<html lang="en">
<head>
    <meta charset="UTF-8">
    <title>Title</title>
</head>
<body>
<!--
    action:form表单提交的请求地址
    method:请求方式,指定为post
-->
<form action="/request-demo/req1" method="post">
    <input type="text" name="username">
    <input type="password" name="password">
    <input type="submit">
</form>
</body>
</html>
▷ 2. 在Servlet的doPost方法中获取数据
@WebServlet("/req1")
public class RequestDemo1 extends HttpServlet {
    @Override
    protected void doGet(HttpServletRequest req, HttpServletResponse resp) throws ServletException, IOException {
    }
    @Override
    protected void doPost(HttpServletRequest req, HttpServletResponse resp) throws ServletException, IOException {
        //在此处获取请求体中的数据
    }
}
▷ 3. 调用getReader() 或者 getInputStream()方法,因为目前前端传递的是纯文本数据,所以我们采用getReader()方法来获取
@WebServlet("/req1")
public class RequestDemo1 extends HttpServlet {
    @Override
    protected void doGet(HttpServletRequest req, HttpServletResponse resp) throws ServletException, IOException {
    }
    @Override
    protected void doPost(HttpServletRequest req, HttpServletResponse resp) throws ServletException, IOException {
         //获取post 请求体:请求参数
        //1. 获取字符输入流
        BufferedReader br = req.getReader();
        //2. 读取数据
        String line = br.readLine();
        System.out.println(line);
    }
}
注意:BufferedReader 流是通过 request对象来获取的,当请求完成后 request对象就会被销毁,request对象被销毁后,BufferedReader流就会自动关闭,所以此处就不需要手动关闭流了。
▷ 4. 启动服务器,通过浏览器访问`http://localhost:8080/request-demo/req.html`
点击`提交`按钮后,就可以在控制台看到前端所发送的请求数据
▶ 获取请求参数
▶ 什么是请求参数?
例如:想要登录网址,需要进入登录页面,在登录页面输入用户名和密码,将用户名和密码提交到后台,后台校验用户名和密码是否正确,如果正确,则正常登录,如果不正确,则提示用户名或密码错误。这个例子中,用户名和密码其实就是我们所说的请求参数。
▶ 什么是请求数据?
请求数据则是包含请求行、请求头和请求体的所有数据
▶ 请求参数和请求数据的关系是什么?
▷ 请求参数是请求数据中的部分内容
▷ 如果是GET请求,请求参数在请求行中
▷ 如果是POST请求,请求参数一般在请求体中
▶ 对于请求参数的获取,常用的有以下两种:
▷ GET方式:
String getQueryString()▷ POST方式:
BufferedReader getReader();▶ 案例
▷ 需求:
(1)发送一个GET请求并携带用户名,后台接收后打印到控制台
(2)发送一个POST请求并携带用户名,后台接收后打印到控制台
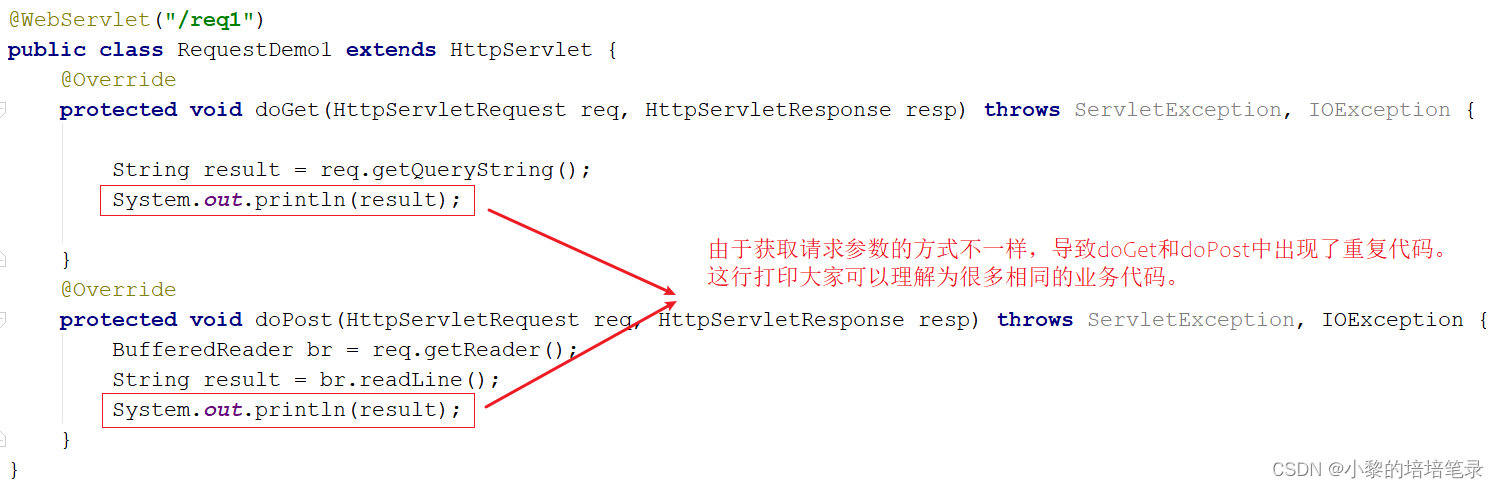
▷ 注意:GET请求和POST请求接收参数的方式不一样,具体实现的代码如下:
@WebServlet("/req1")
public class RequestDemo1 extends HttpServlet {
    @Override
    protected void doGet(HttpServletRequest req, HttpServletResponse resp) throws ServletException, IOException {
        String result = req.getQueryString();
        System.out.println(result);

    }
    @Override
    protected void doPost(HttpServletRequest req, HttpServletResponse resp) throws ServletException, IOException {
        BufferedReader br = req.getReader();
        String result = br.readLine();
        System.out.println(result);
    }
}
▷ 上述的代码,存在的问题
▷ 如何解决上述重复代码的问题呢?
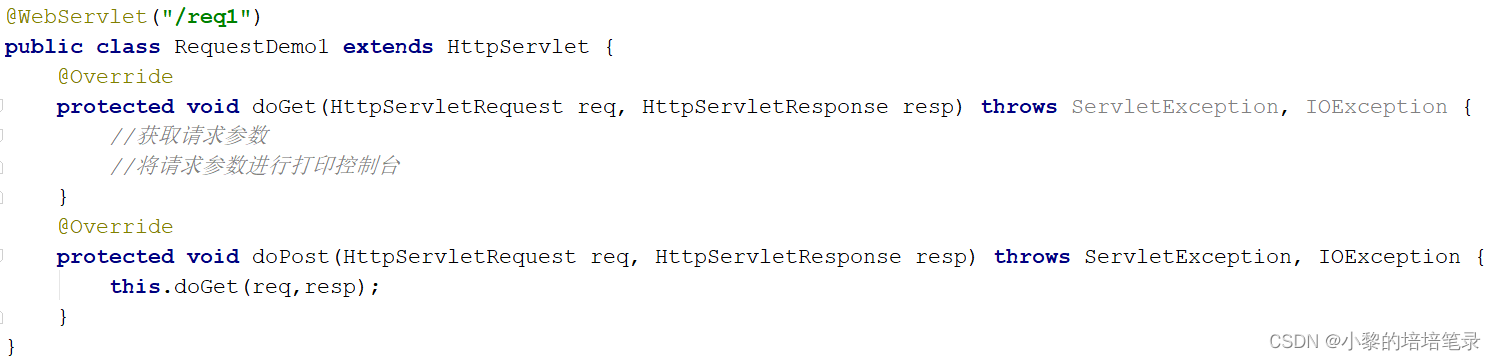
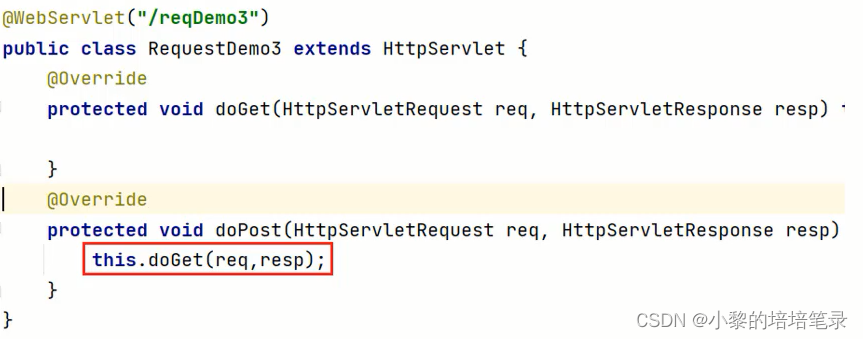
当然,也可以在doGet中调用doPost,在doPost中完成参数的获取和打印,另外需要注意的是,doGet和doPost方法都必须存在,不能删除任意一个。
▷ 如何实现上面的解决办法呢?
● 第一种方式:
@WebServlet("/req1")
public class RequestDemo1 extends HttpServlet {
    @Override
    protected void doGet(HttpServletRequest req, HttpServletResponse resp) throws ServletException, IOException {
        //获取请求方式
        String method = req.getMethod();
        //获取请求参数
        String params = "";
        if("GET".equals(method)){
            params = req.getQueryString();
        }else if("POST".equals(method)){
            BufferedReader reader = req.getReader();
            params = reader.readLine();
        }
        //将请求参数进行打印控制台
        System.out.println(params);

    }
    @Override
    protected void doPost(HttpServletRequest req, HttpServletResponse resp) throws ServletException, IOException {
        this.doGet(req,resp);
    }
}
使用request的getMethod()来获取请求方式,根据请求方式的不同分别获取请求参数值,这样就可以解决上述问题,但是以后每个Servlet都需要这样写代码,实现起来比较麻烦,这种方案我们不采用。
● 第二种方式
request对象已经将上述获取请求参数的方法进行了封装,并且request提供的方法实现的功能更强大,以后只需要调用request提供的方法即可。
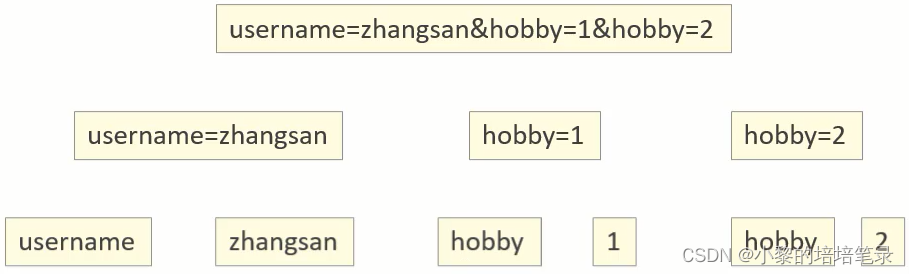
(1)根据不同的请求方式获取请求参数,获取的内容如下:
(2)把获取到的内容进行分割,内容如下:
(3)把分割后端数据,存入到一个Map集合中:
注意: 因为参数的值可能是一个,也可能有多个,所以Map的值的类型为String数组。
▷ request对象提供了如下方法:
● 获取所有参数Map集合
Map<String,String[]> getParameterMap()● 根据名称获取参数值(数组)
String[] getParameterValues(String name)● 根据名称获取参数值(单个值)
String getParameter(String name)▷ 测试上面的方法
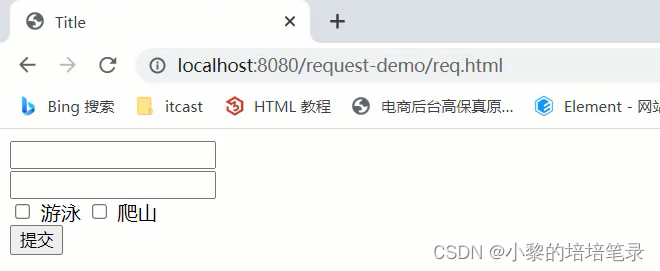
● 修改req.html页面,添加爱好选项,爱好可以同时选多个
<!DOCTYPE html>
<html lang="en">
<head>
    <meta charset="UTF-8">
    <title>Title</title>
</head>
<body>
<form action="/request-demo/req2" method="get">
    <input type="text" name="username"><br>
    <input type="password" name="password"><br>
    <input type="checkbox" name="hobby" value="1"> 游泳
    <input type="checkbox" name="hobby" value="2"> 爬山 <br>
    <input type="submit">

</form>
</body>
</html>
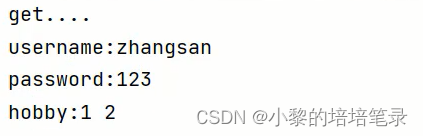
● 在Servlet代码中获取页面传递GET请求的参数值,获取GET方式的所有请求参数
@WebServlet("/req2")
public class RequestDemo2 extends HttpServlet {
    @Override
    protected void doGet(HttpServletRequest req, HttpServletResponse resp) throws ServletException, IOException {
        //GET请求逻辑
        System.out.println("get....");
        //1. 获取所有参数的Map集合
        Map<String, String[]> map = req.getParameterMap();
        for (String key : map.keySet()) {
            // username:zhangsan lisi
            System.out.print(key+":");

            //获取值
            String[] values = map.get(key);
            for (String value : values) {
                System.out.print(value + " ");
            }

            System.out.println();
        }
    }

    @Override
    protected void doPost(HttpServletRequest req, HttpServletResponse resp) throws ServletException, IOException {
    }
}
获取的结果为:
● 获取GET请求参数中的爱好,结果是数组值
@WebServlet("/req2")
public class RequestDemo2 extends HttpServlet {
    @Override
    protected void doGet(HttpServletRequest req, HttpServletResponse resp) throws ServletException, IOException {
        //GET请求逻辑.....

        String[] hobbies = req.getParameterValues("hobby");
        for (String hobby : hobbies) {
            System.out.println(hobby);
        }
    }

    @Override
    protected void doPost(HttpServletRequest req, HttpServletResponse resp) throws ServletException, IOException {
    }
}
```
获取的结果为:
● 获取GET请求参数中的用户名和密码,结果是单个值
@WebServlet("/req2")
public class RequestDemo2 extends HttpServlet {
    @Override
    protected void doGet(HttpServletRequest req, HttpServletResponse resp) throws ServletException, IOException {
        //GET请求逻辑
        //...
        String username = req.getParameter("username");
        String password = req.getParameter("password");
        System.out.println(username);
        System.out.println(password);
    }

    @Override
    protected void doPost(HttpServletRequest req, HttpServletResponse resp) throws ServletException, IOException {
    }
}
获取的结果为:
● 在Servlet代码中获取页面传递POST请求的参数值
1、将req.html页面form表单的提交方式改成post
2、将doGet方法中的内容复制到doPost方法中即可
▶ 简化代码
req.getParameter()方法使用的频率会比较高,以后我们再写代码的时候,就只需要按照如下格式来编写:
public class RequestDemo1 extends HttpServlet {
    @Override
    protected void doGet(HttpServletRequest req, HttpServletResponse resp) throws ServletException, IOException {
       //采用request提供的获取请求参数的通用方式来获取请求参数
       //编写其他的业务代码...
    }
    @Override
    protected void doPost(HttpServletRequest req, HttpServletResponse resp) throws ServletException, IOException {
        this.doGet(req,resp);
    }
}


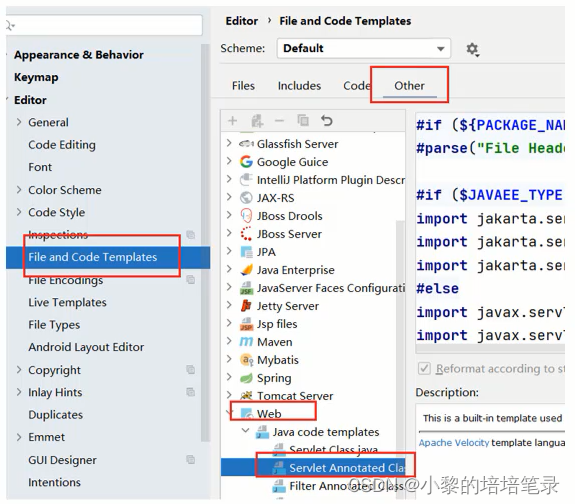
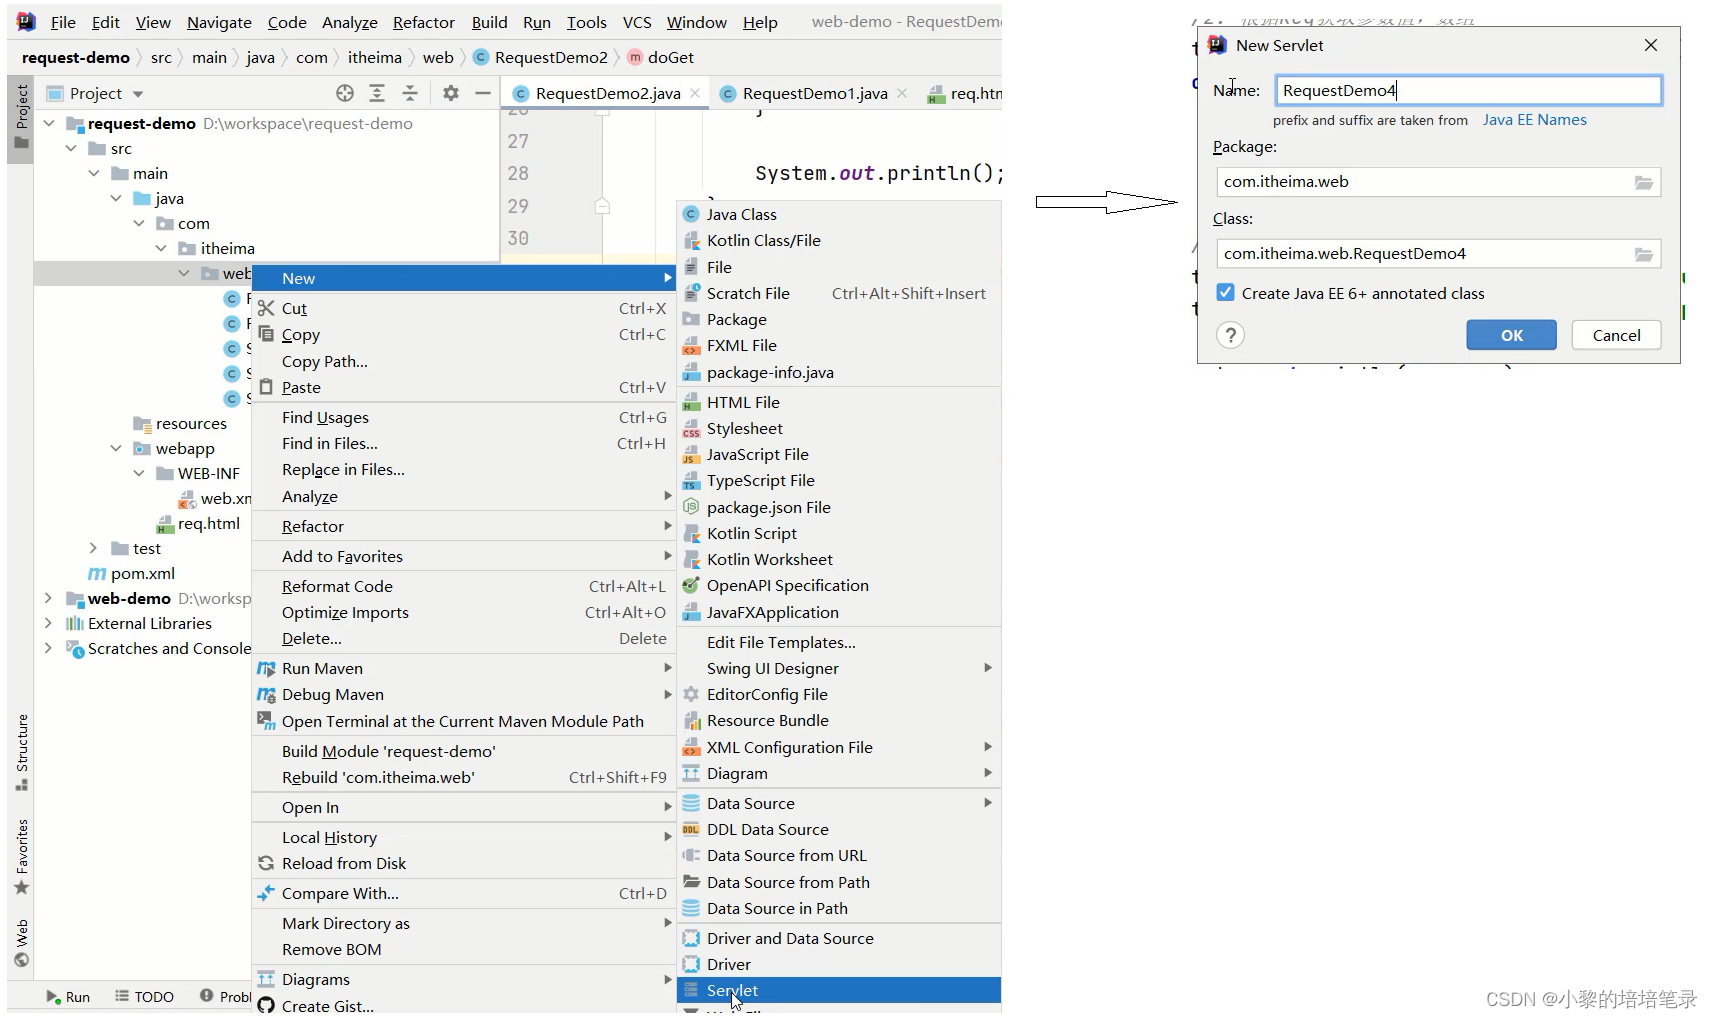
3、IDEA快速创建Servlet
▶ 快速创建
▷ 使用通用方式获取请求参数后,屏蔽了GET和POST的请求方式代码的不同,则代码可以定义如下格式:
▷ 由于格式固定,所以我们可以使用IDEA提供的模板来制作一个Servlet的模板,这样我们后期在创建Servlet的时候就会更高效,具体如何实现:
(1)按照自己的需求,修改Servlet创建的模板内容
(2)使用servlet模板创建Servlet类
▶ 请求参数中文乱码问题
▷ 问题展示:
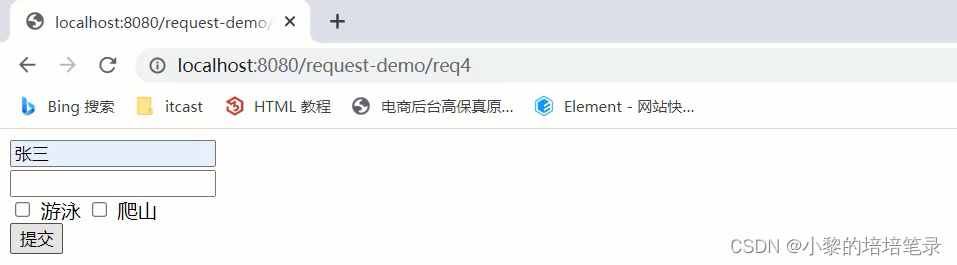
(1)将req.html页面的请求方式修改为get
<!DOCTYPE html>
<html lang="en">
<head>
    <meta charset="UTF-8">
    <title>Title</title>
</head>
<body>
<form action="/request-demo/req2" method="get">
    <input type="text" name="username"><br>
    <input type="password" name="password"><br>
    <input type="checkbox" name="hobby" value="1"> 游泳
    <input type="checkbox" name="hobby" value="2"> 爬山 <br>
    <input type="submit">

</form>
</body>
</html>
(2)在Servlet方法中获取参数,并打印
@WebServlet("/req4")
public class RequestDemo4 extends HttpServlet {
    @Override
    protected void doGet(HttpServletRequest request, HttpServletResponse response) throws ServletException, IOException {
       //1. 获取username
       String username = request.getParameter("username");
       System.out.println(username);
    }

    @Override
    protected void doPost(HttpServletRequest request, HttpServletResponse response) throws ServletException, IOException {
        this.doGet(request, response);
    }
}
(3)启动服务器,页面上输入中文参数
(4)查看控制台打印内容
(5)把req.html页面的请求方式改成post,再次发送请求和中文参数
(6)查看控制台打印内容,依然为乱码
通过上面的案例,会发现,不管是GET还是POST请求,在发送的请求参数中如果有中文,在后台接收的时候,都会出现中文乱码的问题。
▷ POST请求解决方案
1、分析出现中文乱码的原因:
● POST的请求参数是通过request的getReader()来获取流中的数据
● TOMCAT在获取流的时候采用的编码是ISO-8859-1
● ISO-8859-1编码是不支持中文的,所以会出现乱码
2、解决方案:
● 页面设置的编码格式为UTF-8
● 把TOMCAT在获取流数据之前的编码设置为UTF-8
● 通过request.setCharacterEncoding(“UTF-8”)设置编码,UTF-8也可以写成小写3、代码修改:
@WebServlet("/req4")
public class RequestDemo4 extends HttpServlet {
    @Override
    protected void doGet(HttpServletRequest request, HttpServletResponse response) throws ServletException, IOException {
        //1. 解决乱码: POST getReader()
        //设置字符输入流的编码,设置的字符集要和页面保持一致
        request.setCharacterEncoding("UTF-8");
        //2. 获取username
        String username = request.getParameter("username");
        System.out.println(username);
    }

    @Override
    protected void doPost(HttpServletRequest request, HttpServletResponse response) throws ServletException, IOException {
        this.doGet(request, response);
    }
}
▷ GET请求乱码问题
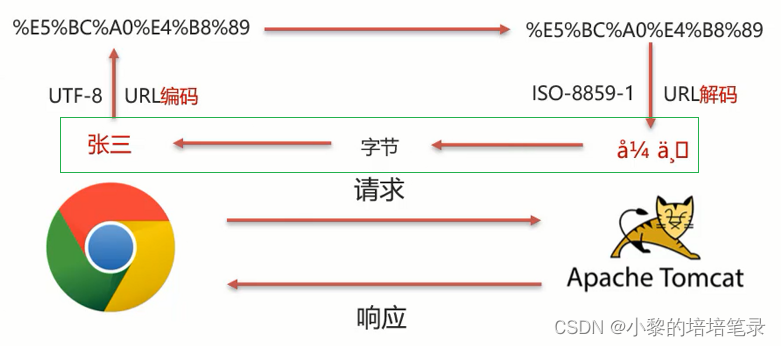
1、GET请求获取请求参数的方式是`request.getQueryString()`,getQueryString方法并没有通过流的方式获取数据
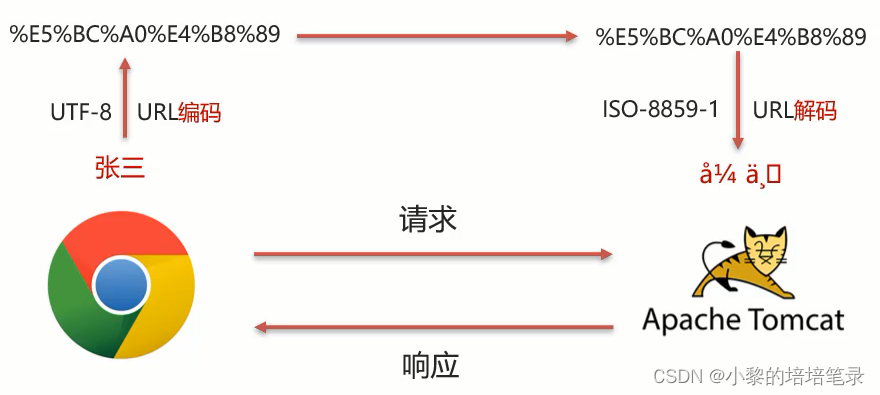
2、首先我们需要先分析下GET请求出现乱码的原因:
(1)浏览器通过HTTP协议发送请求和数据给后台服务器(Tomcat)
(2)浏览器在发送HTTP的过程中会对中文数据进行URL==编码==
(3)在进行URL编码的时候会采用页面`<meta>`标签指定的UTF-8的方式进行编码,`张三`编码后的结果为`%E5%BC%A0%E4%B8%89`
(4)后台服务器(Tomcat)接收到`%E5%BC%A0%E4%B8%89`后会默认按照`ISO-8859-1`进行URL==解码==
(5)由于前后编码与解码采用的格式不一样,就会导致后台获取到的数据为乱码。
注意:URL编码
(1)将字符串按照编码方式转为二进制
(2)每个字节转为2个16进制数并在前边加上%
3、在Java中已经为我们提供了编码和解码的API工具类可以让我们更快速的进行编码和解码:
● 编码:
java.net.URLEncoder.encode("需要被编码的内容","字符集(UTF-8)")● 解码:
java.net.URLDecoder.decode("需要被解码的内容","字符集(UTF-8)")例:
public class URLDemo {

  public static void main(String[] args) throws UnsupportedEncodingException {
        String username = "张三";
        //1. URL编码
        String encode = URLEncoder.encode(username, "utf-8");
        System.out.println(encode); //打印:%E5%BC%A0%E4%B8%89

       //2. URL解码
       //String decode = URLDecoder.decode(encode, "utf-8");//打印:张三
       String decode = URLDecoder.decode(encode, "ISO-8859-1");//打印:`å¼ ä¸ `
       System.out.println(decode);
    }
}
▷ GET请求解决方案
1、具体的实现步骤为:
● 按照ISO-8859-1编码获取乱码`å¼ ä¸`对应的字节数组
● 按照UTF-8编码获取字节数组对应的字符串public class URLDemo { public static void main(String[] args) throws UnsupportedEncodingException { String username = "张三"; //1. URL编码 String encode = URLEncoder.encode(username, "utf-8"); System.out.println(encode); //2. URL解码 String decode = URLDecoder.decode(encode, "ISO-8859-1"); System.out.println(decode); //此处打印的是对应的乱码数据 //3. 转换为字节数据,编码 byte[] bytes = decode.getBytes("ISO-8859-1"); for (byte b : bytes) { System.out.print(b + " "); } //此处打印的是:-27 -68 -96 -28 -72 -119 //4. 将字节数组转为字符串,解码 String s = new String(bytes, "utf-8"); System.out.println(s); //此处打印的是张三 } }▷ 测试
@WebServlet("/req4")
public class RequestDemo4 extends HttpServlet {
    @Override
    protected void doGet(HttpServletRequest request, HttpServletResponse response) throws ServletException, IOException {
        //1. 解决乱码:POST,getReader()
        //request.setCharacterEncoding("UTF-8");//设置字符输入流的编码

        //2. 获取username
        String username = request.getParameter("username");
        System.out.println("解决乱码前:"+username);

        //3. GET,获取参数的方式:getQueryString
        // 乱码原因:tomcat进行URL解码,默认的字符集ISO-8859-1
        //3.1 先对乱码数据进行编码:转为字节数组
        byte[] bytes = username.getBytes(StandardCharsets.ISO_8859_1);
        //3.2 字节数组解码
        username = new String(bytes, StandardCharsets.UTF_8);

        System.out.println("解决乱码后:"+username);

    }

    @Override
    protected void doPost(HttpServletRequest request, HttpServletResponse response) throws ServletException, IOException {
        this.doGet(request, response);
    }
}
注意:
● 把`request.setCharacterEncoding(“UTF-8”)`代码注释掉后,会发现GET请求参数乱码解决方案同时也可也把POST请求参数乱码的问题也解决了
● 只不过对于POST请求参数一般都会比较多,采用这种方式解决乱码起来比较麻烦,所以对于POST请求还是建议使用设置编码的方式进行。● 另外需要说明一点的是Tomcat8.0之后,已将GET请求乱码问题解决,设置默认的解码方式为UTF-8

4、request 请求转发
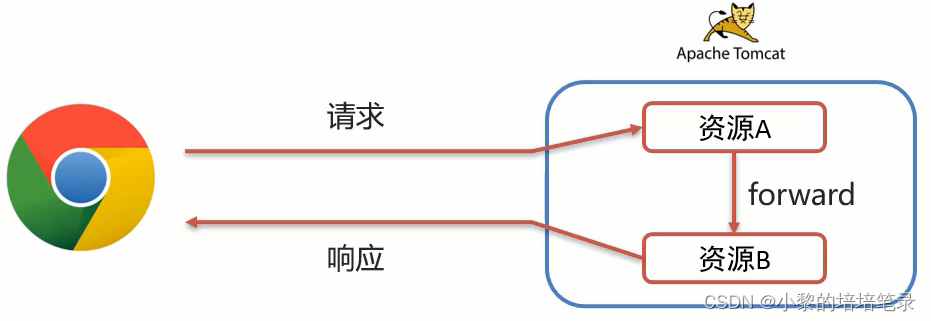
▶ 请求转发(forward) : 一种在服务器内部的资源跳转方式。
(1)浏览器发送请求给服务器,服务器中对应的资源A接收到请求
(2)资源A处理完请求后将请求发给资源B
(3)资源B处理完后将结果响应给浏览器
(4)请求从资源A到资源B的过程就叫请求转发
▶ 请求转发的实现方式
req.getRequestDispatcher("资源B路径").forward(req,resp);具体如何来使用,我们先来看下需求:
具体的实现步骤为:
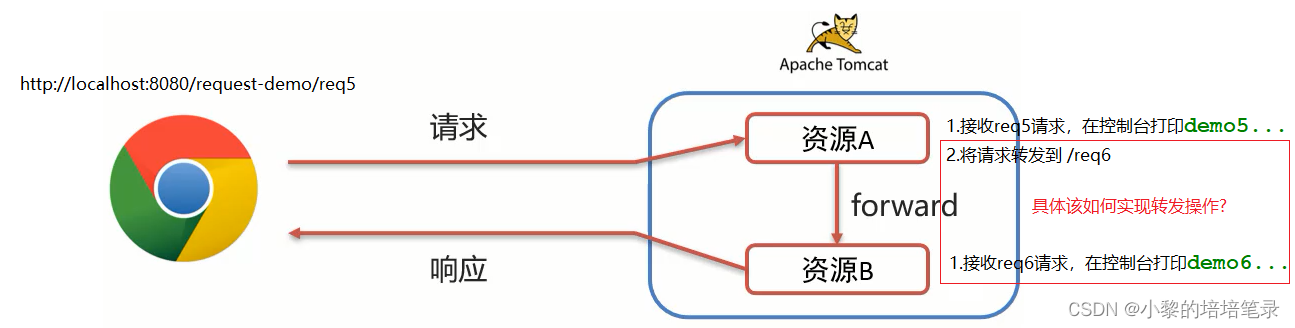
(1)创建RequestDemo5类
@WebServlet("/req5")
public class RequestDemo5 extends HttpServlet {
    @Override
    protected void doGet(HttpServletRequest request, HttpServletResponse response) throws ServletException, IOException {
        System.out.println("demo5...");
    }

    @Override
    protected void doPost(HttpServletRequest request, HttpServletResponse response) throws ServletException, IOException {
        this.doGet(request, response);
    }
}
(2)创建RequestDemo6类
@WebServlet("/req6")
public class RequestDemo6 extends HttpServlet {
    @Override
    protected void doGet(HttpServletRequest request, HttpServletResponse response) throws ServletException, IOException {
        System.out.println("demo6...");
    }

    @Override
    protected void doPost(HttpServletRequest request, HttpServletResponse response) throws ServletException, IOException {
        this.doGet(request, response);
    }
}
(3)在RequestDemo5的doGet方法中进行请求转发
@WebServlet("/req5")
public class RequestDemo5 extends HttpServlet {
    @Override
    protected void doGet(HttpServletRequest request, HttpServletResponse response) throws ServletException, IOException {
        System.out.println("demo5...");
        //请求转发
        request.getRequestDispatcher("/req6").forward(request,response);
    }

    @Override
    protected void doPost(HttpServletRequest request, HttpServletResponse response) throws ServletException, IOException {
        this.doGet(request, response);
    }
}
(4)启动测试
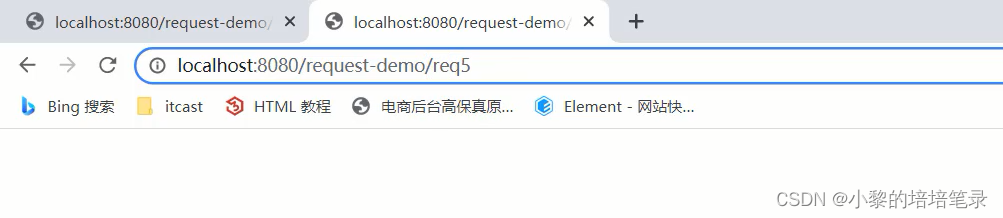
访问`http://localhost:8080/request-demo/req5`,就可以在控制台看到如下内容:
说明请求已经转发到了`/req6`
▶ 请求转发资源间共享数据: 使用Request对象
此处主要解决的问题是把请求从`/req5`转发到`/req6`的时候,如何传递数据给`/req6`。
需要使用request对象提供的三个方法:
● 存储数据到request域[范围,数据是存储在request对象]中
void setAttribute(String name,Object o);● 根据key获取值
Object getAttribute(String name);● 根据key删除该键值对
void removeAttribute(String name);▶ 接着上个需求使用共享数据
(1)修改RequestDemo5中的方法
@WebServlet("/req5")
public class RequestDemo5 extends HttpServlet {
    @Override
    protected void doGet(HttpServletRequest request, HttpServletResponse response) throws ServletException, IOException {
        System.out.println("demo5...");
        //存储数据
        request.setAttribute("msg","hello");
        //请求转发
        request.getRequestDispatcher("/req6").forward(request,response);

    }

    @Override
    protected void doPost(HttpServletRequest request, HttpServletResponse response) throws ServletException, IOException {
        this.doGet(request, response);
    }
}
(2)修改RequestDemo6中的方法
@WebServlet("/req6")
public class RequestDemo6 extends HttpServlet {
    @Override
    protected void doGet(HttpServletRequest request, HttpServletResponse response) throws ServletException, IOException {
        System.out.println("demo6...");
        //获取数据
        Object msg = request.getAttribute("msg");
        System.out.println(msg);

    }

    @Override
    protected void doPost(HttpServletRequest request, HttpServletResponse response) throws ServletException, IOException {
        this.doGet(request, response);
    }
}
(3)启动测试
访问`http://localhost:8080/request-demo/req5`,就可以在控制台看到如下内容:
此时就可以实现在转发多个资源之间共享数据。
▶ 请求转发的特点
● 浏览器地址栏路径不发生变化,虽然后台从`/req5`转发到`/req6`,但是浏览器的地址一直是`/req5`,未发生变化
● 只能转发到当前服务器的内部资源,不能从一个服务器通过转发访问另一台服务器
● 一次请求,可以在转发资源间使用request共享数据,虽然后台从`/req5`转发到`/req6`,但是这个只有一次请求


版权声明:本文内容由互联网用户自发贡献,该文观点仅代表作者本人。本站仅提供信息存储空间服务,不拥有所有权,不承担相关法律责任。如发现本站有涉嫌侵权/违法违规的内容, 请发送邮件至 举报,一经查实,本站将立刻删除。
文章由半码博客整理,本文链接:https://www.bmabk.com/index.php/post/119661.html

