
SpringMVC
1. SpringMVC概念
- Spring MVC 是一个Web 框架。
- Spring MVC 是基于Servlet API构建的。
MVC是 Model(模型) View(视图) Controller(控制器) 的缩写,它是一种设计模式。
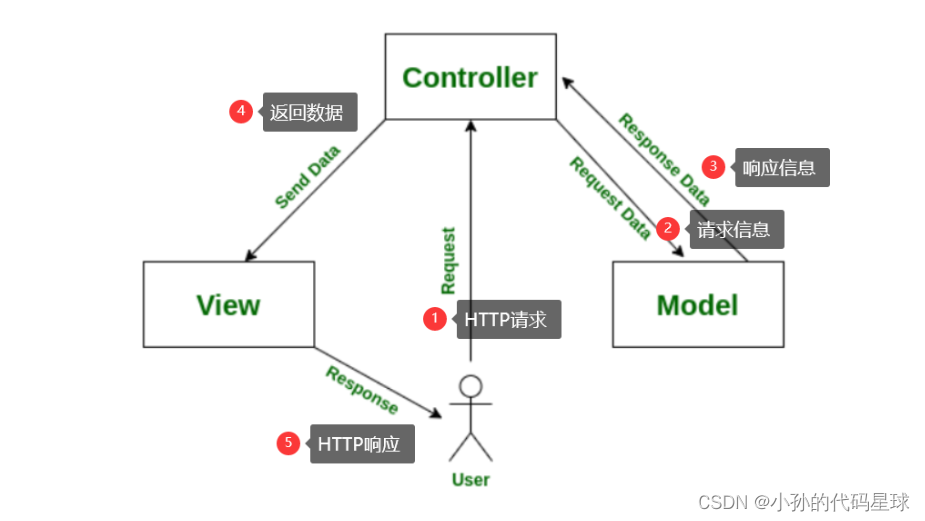

视图分为两种:
- 服务器端的视图【View】
- 客户端的视图
MVC 和 Spring MVC 有什么关系?
MVC 是一种设计思想。
Spring MVC 是对 MVC 设计思想具体实现的Web框架。
Spring MVC是一个基于 MVC 设计模式和 Servlet API 实现的 Web 项目,同时 Spring MVC 又是 Spring 框架中的一个Web 模块, 它随着Spring 的诞生而存在的一个框架。
2. SpringMVC主要实现
- 实现用户和程序的映射(在浏览器输入URL地址之后,能够在程序中匹配到相应方法)
- 服务器端要得到用户的请求参数
- 服务器端要将结果返回给用户(前端)
3. SpringMVC入门
3.1 SpringMVC 创建和连接
实现用户和程序的映射
-
方法一:@RequestMapping(“/xxx”)
![[外链图片转存失败,源站可能有防盗链机制,建议将图片保存下来直接上传(img-eJg5hilI-1676078271227)(C:\Users\17512\AppData\Roaming\Typora\typora-user-images\1674967308929.png)]](https://blog-1305504063.cos.ap-beijing.myqcloud.com/38ba46cb-b712-11ed-b991-5cea1d84200c.png)
@RequestMapping特征:-
@RequestMapping既能修饰类(可选)也能修饰方法。
2. 默认情况下 @RequestMapping 既能支持POST请求,也支持GET请求。 @RequestMapping参数拓展(只支持某种类型的请求方式,比如POST类型的请求方式): -
-
方法二:@GetMapping 和 PostMapping
//GET
// 写法1
@RequestMapping("/index")
// 写法2
@RequestMapping(value = "/index",method = RequestMethod.GET)
// 写法3
@GetMapping("/index")
//POST // 写法1 @RequestMapping(value = "/index",method = RequestMethod.POST) // 写法2 @PostMapping("/index")

3.2 获取参数
获取单个参数

获取多个参数

拓展功能:参数重命名
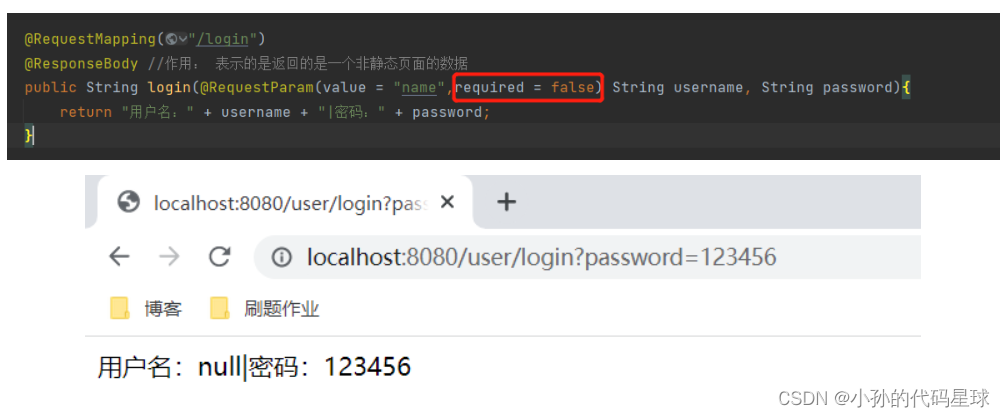
使用@RequestParam注解

将前端传递过来的name变成当前程序内的username

默认前端必须传入RequestParam注解的值,否则会报错。【除非设置 required = false】
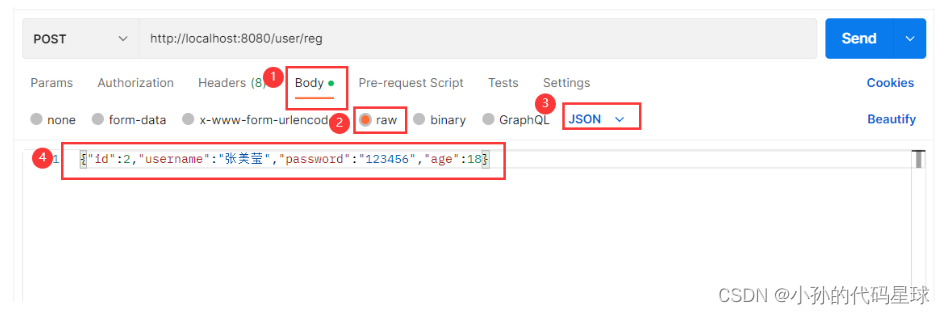
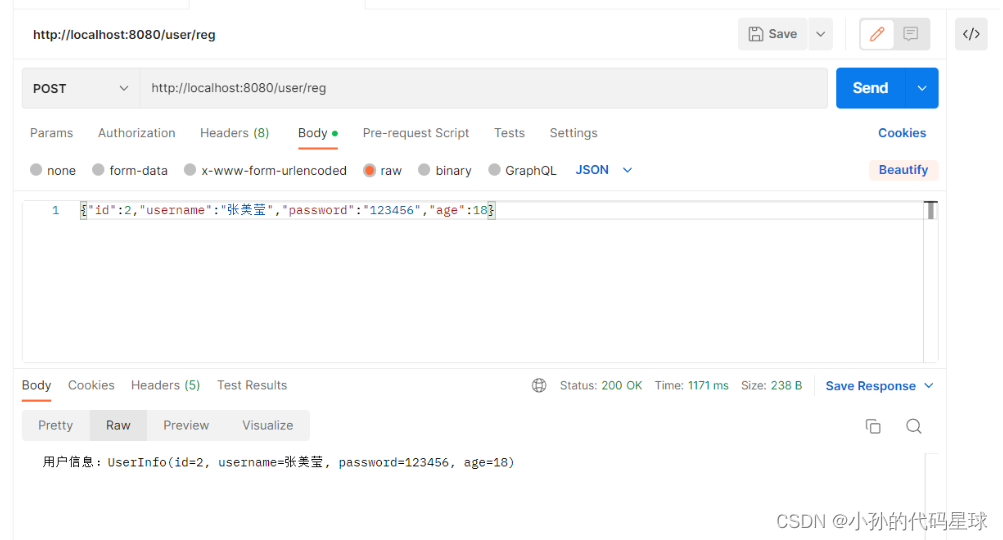
使用@RequestBody接收JSON对象
接收JSON格式的数据
使用Postman模拟发送 JSON 字符串给服务器
Fiddler 抓包请求
Fiddler 抓包响应

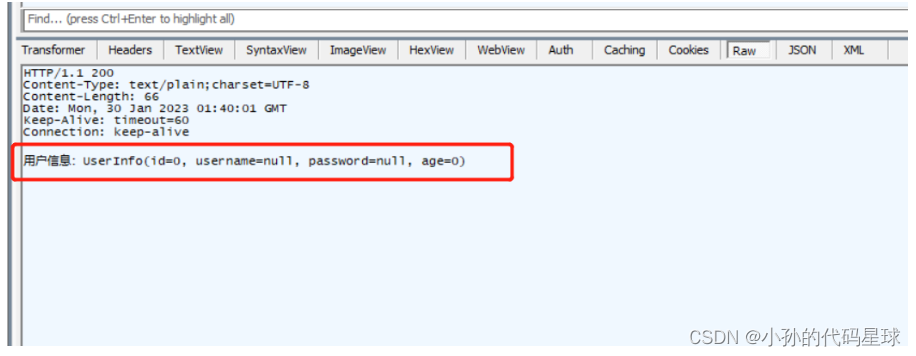
目前对象只能接收普通请求方式,无法接收JSON数据格式

使用注解@RequestBody就可以让服务器端接收JSON数据

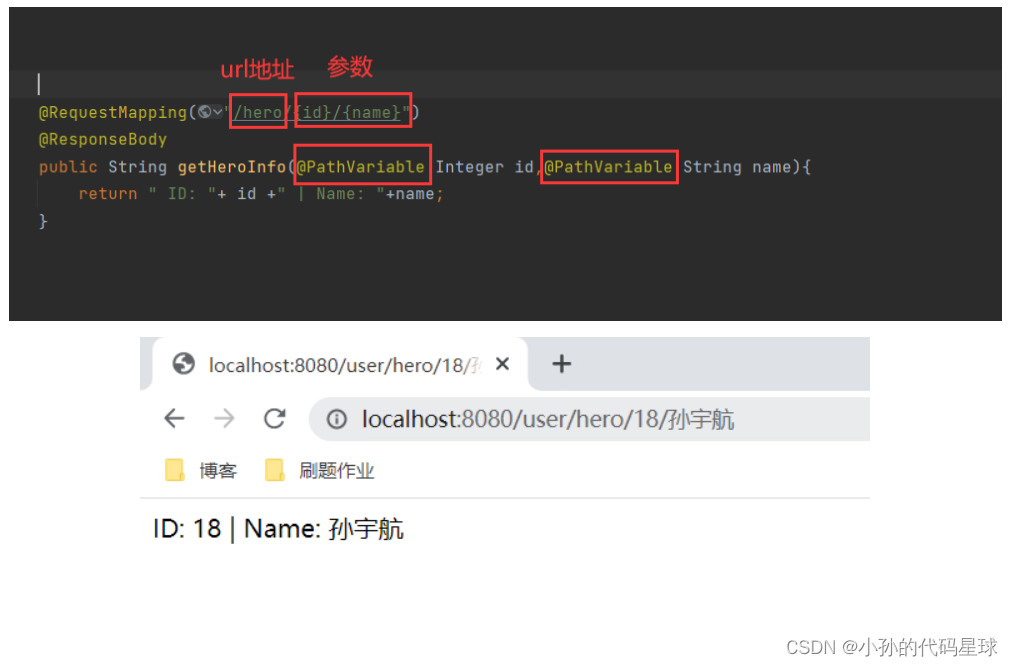
从URL地址中获取参数@PathVariable
【不是从URL地址中的参数部分获取参数】
上传文件 @RequestPart
使用Postman模拟上传文件

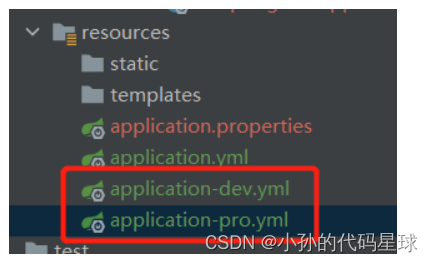
拓展功能:不同运行平台的配置文件设置
-
新建不同平台的配置文件【不同平台的配置文件的命名规则:application-平台.yml(properties)】
-
在主配置文件中设置运行的配置文件

获取Cookie
-
servlet 获取 Cookie


-
@CookieValue

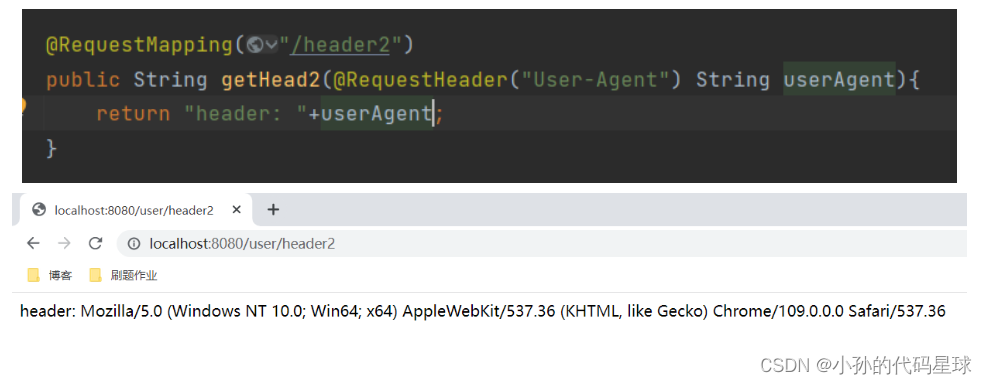
获取Header
- servlet获取Header

- @RuquestHeader
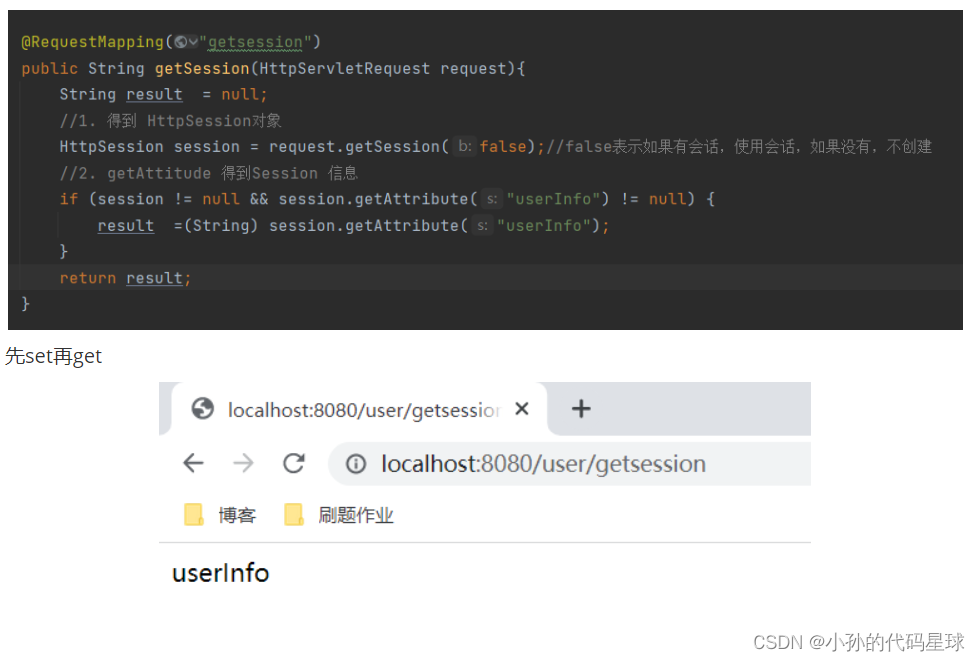
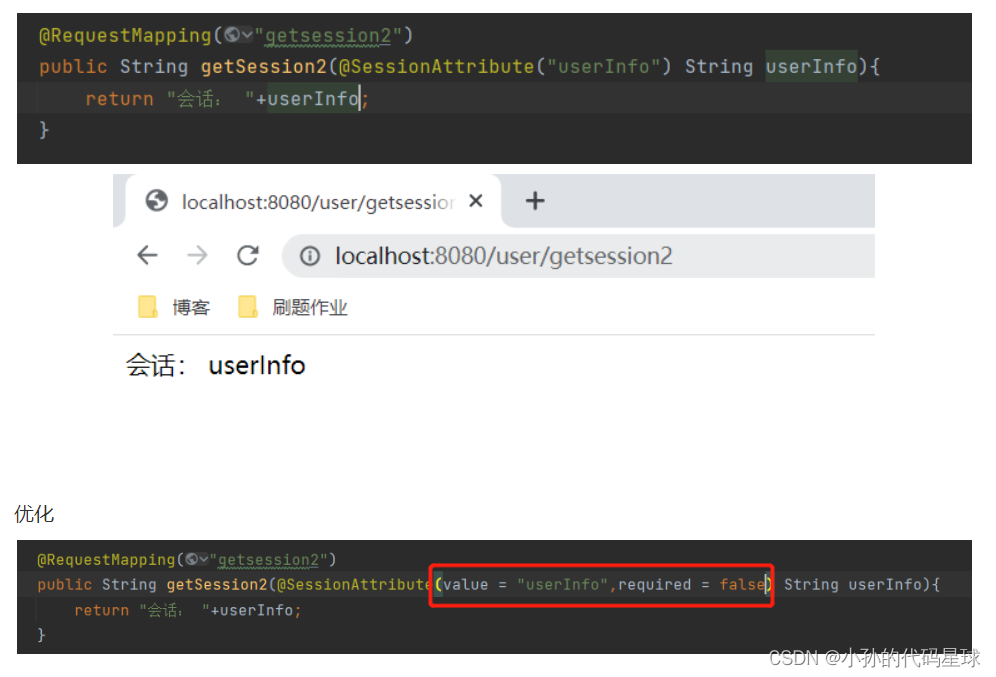
存储和获取Session

获取session的方法:
- servlet
- @SessionAttribute
拓展
@RestController //组合注解 = Controller + ResponseBody
3.3 返回数据
返回静态页面
@ResponseBody
返回text/html
练习:实现计算器功能
前端页面:
<!doctype html>
<html lang="en">
<head>
    <meta charset="UTF-8">
    <meta name="viewport"
          content="width=device-width, user-scalable=no, initial-scale=1.
0, maximum-scale=1.0, minimum-scale=1.0">
    <meta http-equiv="X-UA-Compatible" content="ie=edge">
    <title>计算器示例</title>
</head>
<body>
<form action="/calc">
    <h1>计算器</h1>
    数字1:<input name="num1" type="text"><br>
    数字2:<input name="num2" type="text"><br>
    <input type="submit" value=" 点击相加 ">
</form>
</body>
</html>
后端代码:
package com.example.springmvc.controller;

import org.springframework.web.bind.annotation.RequestMapping;
import org.springframework.web.bind.annotation.RestController;

/**
 * @author SunYuHang
 * @date 2023-01-31 09:41
 * @ClassName : CalcController  //类名
 */

@RestController
public class CalcController {


    @RequestMapping("/calc")
    public String calc(Integer num1,Integer num2){
        if (num1 == null || num2 == null){
            return "<h1>参数错误!</h1><a href='javascript:history.go(-1)'>返回上一个页面</a>";
        }
        return "<h1>结果: "+ (num1+num2)+"</h1><a href='javascript:history.go(-1)'>返回上一个页面</a>";
    }
}
返回JSON对象
练习:实现登录功能
前端代码:
<!doctype html>
<html lang="en">
<head>
    <meta charset="UTF-8">
    <meta name="viewport"
          content="width=device-width, user-scalable=no, initial-scale=1.
0, maximum-scale=1.0, minimum-scale=1.0">
    <meta http-equiv="X-UA-Compatible" content="ie=edge">
    <script src="js/jquery-1.9.1.min.js"></script>
    <title>Document</title>
    <script>
        // ajax 提交
        function mysub(){
            //1. 判空
            var username = jQuery("#username");
            var password = jQuery("#password");
            if (jQuery.trim(username.val())==""){
                alert("请先输入用户名!");
                username.focus();// 光标重置
                return;
            }
            if (jQuery.trim(password.val())==""){
                alert("请输入密码!");
                password.focus();// 光标重置
                return;
            }
            jQuery.ajax({
                url: "/user/login2",
                type: "POST",
                data:{
                    "username":username.val(),
                    "password":password.val()
                },
                success: function (result){
                    alert(JSON.stringify(result));
                }
            });
        }
    </script>
</head>
<body>
<div style="text-align: center;">
    <h1>登录</h1>
    ⽤户:<input id="username">
    <br>
    密码:<input id="password" type="password">
    <br>
    <input type="button" value=" 提交 " onclick="mysub()" style="margin-top: 20px;margin-left: 50px;">
</div>
</body>
</html>
后端代码:
@RequestMapping("/login2")
    public HashMap<String,Object> login2(String username,String password){
        HashMap<String,Object> result = new HashMap<String,Object>();
        int state = 200;
        String msg = "";
        int data = -1; // 等于 1, 表示登陆成功,否则登陆失败
        if (StringUtils.hasLength(username) && StringUtils.hasLength(password) ) {
            if (username.equals("admin") && password.equals("admin")) {
                data =1;
                msg="";
            }else{
                msg="用户名或密码错误";
            }
        }else{//参数为空
            msg = "非法参数";

        }
        result.put("state",state);
        result.put("data",data);
        result.put("msg",msg);
        return result;
    }
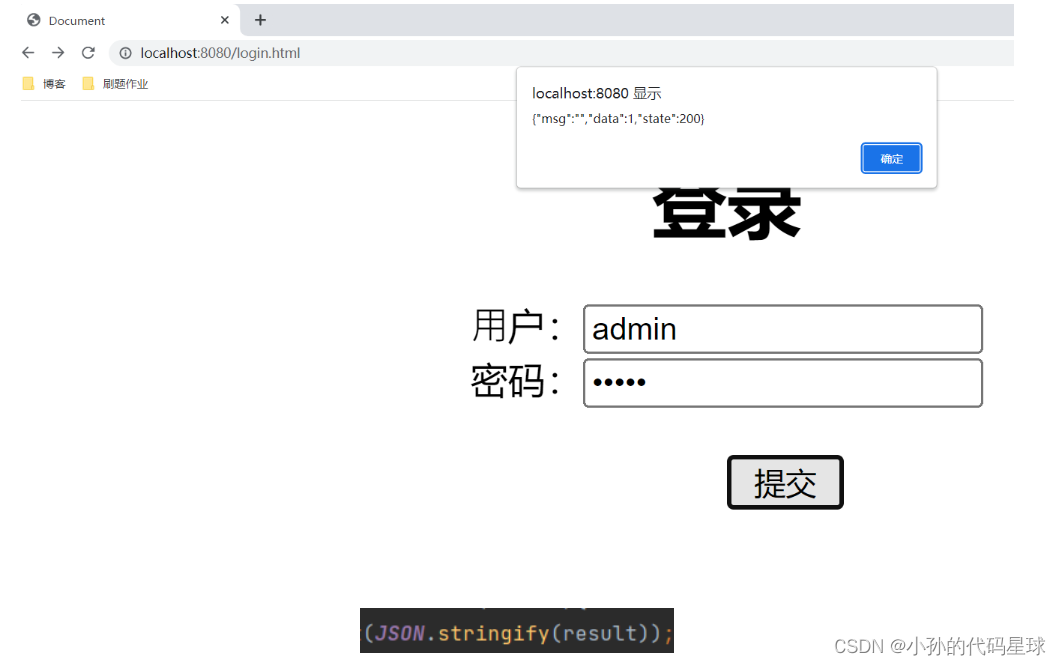
JSON.stringify(result)
请求转发或请求重定向
-
请求转发 forward
/**
     * 请求转发实现方式 1  请求转发是服务器端帮用户实现的
     * @return
     */
    @RequestMapping("/fw")
    public String myForward(){
        return "forward:/hello.html";
    }
    //省略
    @RequestMapping("/fw1")
    public String myForward1(){
        return "/hello.html";
    }
/** * 请求转发实现方式 2 * @param request * @param response * @throws ServletException * @throws IOException */ @RequestMapping("fw2") public void myForward2(HttpServletRequest request, HttpServletResponse response) throws ServletException, IOException { request.getRequestDispatcher("/hello.html").forward(request,response); } -
请求重定向 redirect
/**
     * 请求重定向方式 1 重定向请求发生在客户端,服务器端不会对用户进行请求操作
     * @return
     */
    @RequestMapping("/rd")
    public String myRedirect(){
        return "redirect:/hello.html";
    }
/**
     * 请求重定向方式 2
     * @param response
     * @throws IOException
     */
    @RequestMapping("/rd2")
    public void myRedirect2(HttpServletResponse response) throws IOException {
        response.sendRedirect("hello.html");
    }
请求重定向 VS 请求转发
- 定义不同
- 跳转方式不同
- 数据共享不同
- 最终URL地址不同
- 代码实现不同
版权声明:本文内容由互联网用户自发贡献,该文观点仅代表作者本人。本站仅提供信息存储空间服务,不拥有所有权,不承担相关法律责任。如发现本站有涉嫌侵权/违法违规的内容, 请发送邮件至 举报,一经查实,本站将立刻删除。
文章由半码博客整理,本文链接:https://www.bmabk.com/index.php/post/119502.html

