
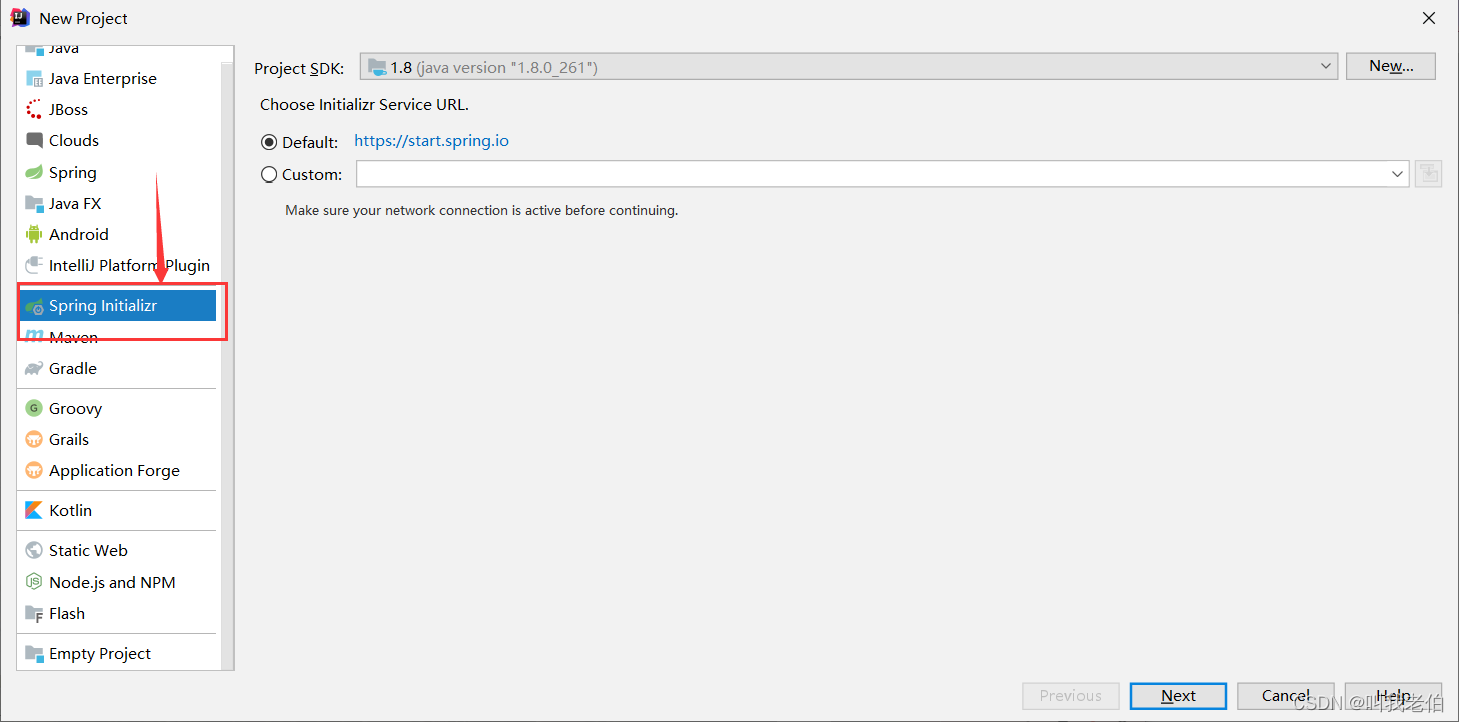
- 创建项目
File->new->project->Spring Initializr(统一了java 8)

基于pom.xml有刚才导入的依赖,将第一个版本号改为2.1.3.RELEASE然后刷新
<parent>
<groupId>org.springframework.boot</groupId>
<artifactId>spring-boot-starter-parent</artifactId>
<version>2.1.3.RELEASE</version>
<relativePath/> <!-- lookup parent from repository -->
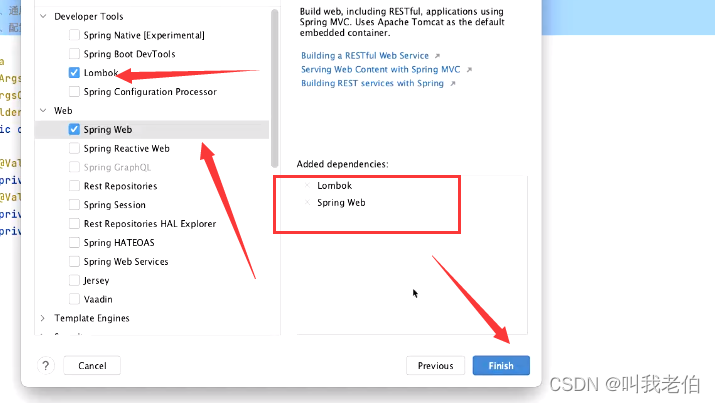
</parent>2. 框架搭建过程
- 搭建:主要框架组成、通用部分(公共的返回结果封装、公共常量、分页封装)
- 框架组成
    - spring boot [2.1.RELEASE]
    - spring Mvc (web依赖)
    - Mybatis
        - 熟练使用(CRUD、链表查询、常见报错)
    - Mybatis Plus
    - Lombok
    - Swagger
    - 日志
        - log4j2
        - logback(默认)
    -关注点
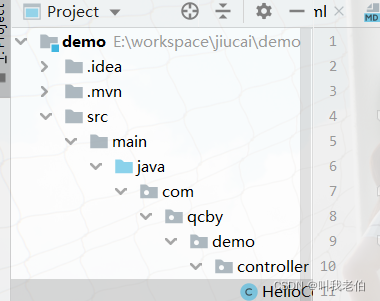
3.创建controller包和包下测试用包HelloController
package com.qcby.demo.controller;


import org.springframework.stereotype.Controller;
import org.springframework.web.bind.annotation.RequestMapping;
import org.springframework.web.bind.annotation.ResponseBody;
import org.springframework.web.bind.annotation.RestController;

@RestController
//@Controller
//@ResponseBody
@RequestMapping("hello")
public class HelloController {

    @RequestMapping
    public String index(String name){
        return "hello world:" +name;
    }
}
把DemoApplication中的项目启动,会报错,将test文件夹下的DemoApplicationTests当中的junit一行删除,程序会自动导入junit,就可以启动成功。(注意最后两行)

4.打开网页,输入localhost:8080/hello?name=ws
启动成功的话,就证明 – spring boot – spring Mvc 测试成功
二、mybatis整合
1.加入mybatis依赖,点击刷新
 	<dependency>
            <groupId>org.mybatis.spring.boot</groupId>
            <artifactId>mybatis-spring-boot-starter</artifactId>
            <version>2.1.1</version>
      </dependency>
        <dependency>
            <groupId>mysql</groupId>
            <artifactId>mysql-connector-java</artifactId>
            <scope>runtime</scope>
      </dependency>
2.在resources下面删掉原先的.yml文件,并新建一个application.yml文件
按如下进行配置文件修改
spring:
  datasource:
    url: jdbc:mysql://81.70.242.198:3306/qcby_jiucai?useUnicode=true&characterEncoding=utf-8&serverTimezone=CTT
    username: root
    password: 写入自己的数据库密码
    driver-class-name: com.mysql.cj.jdbc.Driver
mybatis:
  mapper-locations: classpath:mapper/*.xml  #对应mapper映射xml文件所在路径
  type-aliases-package: com.qcby.demo.entity  #对应实体类路径
  configuration:
    map-underscore-to-camel-case: true
mapper-locations: classpath:mapper/*.xml
这句话对应着要在resources文件夹下新建一个mapper文件夹,上面是自动扫描到mapper文件夹下.xml文件
type-aliases-package: com.qcby.demo.entity #对应实体类路径
这句话是在demo下新建一个实体类文件夹entity,并把路径复制过来
3.创建mapper接口,在demo下面建立mapper文件夹,创建个接口UserMapper
package com.qcby.demo.mapper;

import com.qcby.demo.entity.User;

import java.util.List;

public interface UserMapper {


        List<User> listAll();

}
4.启动类修改,加上
  // 启动类修改
  @MapperScan("com.qcby.demo.mapper")//路径为mapper路径
  @SpringBootApplication
package com.qcby.demo;
import org.mybatis.spring.annotation.MapperScan;
import org.springframework.boot.SpringApplication;
import org.springframework.boot.autoconfigure.SpringBootApplication;
// 启动类修改
@MapperScan("com.qcby.demo.mapper")
@SpringBootApplication
public class DemoApplication {
public static void main(String[] args) {
SpringApplication.run(DemoApplication.class, args);
}
}
5.在resources的mapper下面创建UserMapper.xml文件
<?xml version="1.0" encoding="UTF-8"?>
<!DOCTYPE mapper PUBLIC "-//mybatis.org//DTD Mapper 3.0//EN" "http://mybatis.org/dtd/mybatis-3-mapper.dtd">
<mapper namespace="com.qcby.demo.mapper.UserMapper">  <!-- 这里是mapper接口的路径-->
   <!-- 自定义映射规则( 默认映射规则:名称一样映射)-->
    <resultMap id="BaseResultMap" type="com.qcby.demo.entity.User">  <!-- 这里是实体类接口的路径-->
<!--        <id column="id" jdbcType="BIGINT" property="id" />-->
<!--        <result column="name" jdbcType="VARCHAR" property="name" />-->
    </resultMap>
<!--    xml里面定义了一变量-->
    <sql id="Base_Column_List">
              id,username,password,head_img,remark,balance
  </sql>


    <select id="listAll" resultType="com.qcby.demo.entity.User">
       select
        <include refid="Base_Column_List"></include>
        from user
    </select>
    <select id="listAll1" resultType="com.qcby.demo.entity.User">
       select
        <include refid="Base_Column_List"></include>
        from user
    </select>
    <select id="listAll2" resultType="com.qcby.demo.entity.User">
       select
        <include refid="Base_Column_List"></include>
        from user
    </select>
</mapper>
6.在entity中建立User(这里的字段是数据库user中的字段)
package com.qcby.demo.entity;
import lombok.Data;
@Data
public class User {

    private Long id;
    private String username;
    private String password;
    private String headImg;
    private String remark;
    private double balance;
}
7.在demo下面建立service,并建立UserService接口文件
package com.qcby.demo.service;

import com.qcby.demo.entity.User;

import java.util.List;

public interface UserService {

    List<User> listAll();
}
8.在service下面建立impl文件夹并建立UserServiceImpl文件
package com.qcby.demo.service.impl;


import com.qcby.demo.entity.User;
import com.qcby.demo.mapper.UserMapper;
import com.qcby.demo.service.UserService;
import org.springframework.beans.factory.annotation.Autowired;
import org.springframework.stereotype.Service;

import java.util.List;

@Service
public class UserServiceImpl implements UserService {
    @Autowired
    private UserMapper userMapper;

    @Override
    public List<User> listAll() {
        return userMapper.listAll();
    }
}
9.demo的controller下新建UserController
package com.qcby.demo.controller;


import com.qcby.demo.entity.User;
import com.qcby.demo.service.UserService;
import org.springframework.beans.factory.annotation.Autowired;
import org.springframework.web.bind.annotation.RequestMapping;
import org.springframework.web.bind.annotation.RestController;

import java.util.List;

@RestController
@RequestMapping("user")
public class UserController {
    @Autowired
    private UserService userService;

    @RequestMapping("listAll")
    public List<User> listAll(){
        return userService.listAll();
    }
}
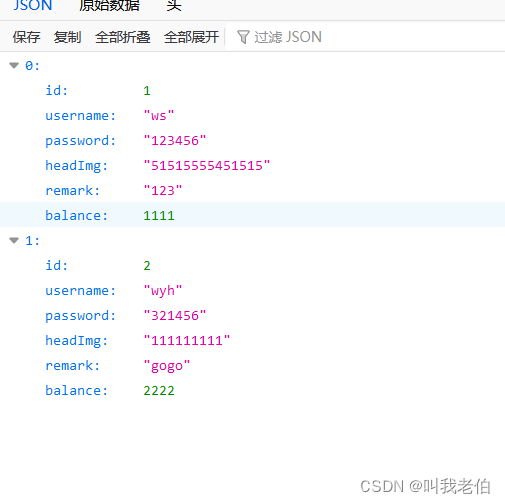
10.数据库
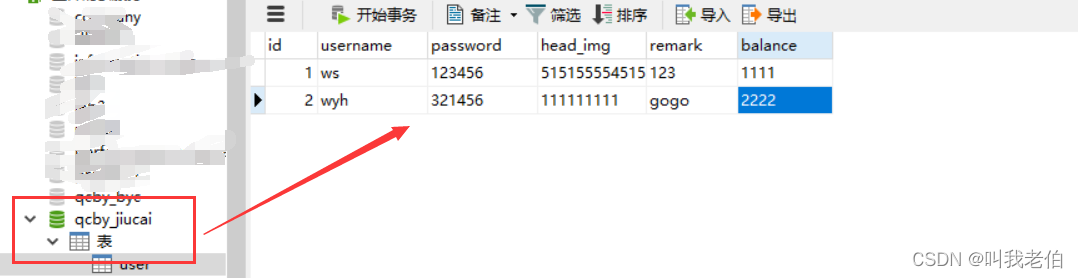
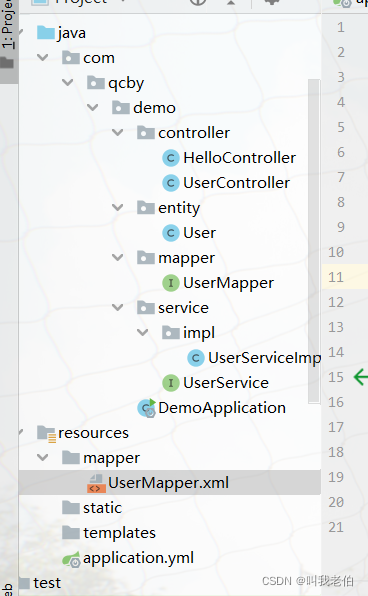
11.文件路径
10.启动—-http://localhost:8080/user/listAll
版权声明:本文内容由互联网用户自发贡献,该文观点仅代表作者本人。本站仅提供信息存储空间服务,不拥有所有权,不承担相关法律责任。如发现本站有涉嫌侵权/违法违规的内容, 请发送邮件至 举报,一经查实,本站将立刻删除。
文章由半码博客整理,本文链接:https://www.bmabk.com/index.php/post/115403.html

