
Gateway+Nacos+Sleuth+Zipkin网关链路追踪(测试及源码),Gateway+FeignClient+Nacos通过网关远程调用微服务(一)
- 问题背景
-
-
- Gateway+Nacos+Sleuth+Zipkin网关链路追踪(测试及源码),Gateway+FeignClient+Nacos通过网关远程调用微服务(一)
- Gateway+Nacos+Sleuth+Zipkin网关链路追踪(测试及源码),Gateway+Nacos+Sleuth链路追踪(二)
- Gateway+Nacos+Sleuth+Zipkin网关链路追踪(测试及源码),Gateway+Nacos+Zipkin安装部署可视化http方式链路追踪(三)
- Gateway+Nacos+Sleuth+Zipkin网关链路追踪(测试及源码),Gateway+Nacos+Zipkin持久化mysql存储rabbitmq消息队列链路追踪(四)
-
- 项目搭建
- 2 service1项目搭建
- 测试步骤
- 心得
- Lyric: 种麦芽糖的山坡
问题背景
使用gateway网关远程调用微服务非常常用,并配合追踪链路,本文先介绍使用gateway网关配置路由的方式访问远程微服务
注意事项:
- 默认JDK环境
- nacos服务器的搭建和外部调用微服务的方式可以参考我的另一篇文章
- 大家可以通过本文的代码自己创建工程,也可以直接下载本文源码
Gateway+Nacos+Sleuth+Zipkin网关链路追踪(测试及源码),Gateway+FeignClient+Nacos通过网关远程调用微服务(一)
Gateway+Nacos+Sleuth+Zipkin网关链路追踪(测试及源码),Gateway+Nacos+Sleuth链路追踪(二)
Gateway+Nacos+Sleuth+Zipkin网关链路追踪(测试及源码),Gateway+Nacos+Zipkin安装部署可视化http方式链路追踪(三)
Gateway+Nacos+Sleuth+Zipkin网关链路追踪(测试及源码),Gateway+Nacos+Zipkin持久化mysql存储rabbitmq消息队列链路追踪(四)
项目搭建
1 gateway网关搭建
1.1 创建gateway工程,引入pom依赖
<?xml version="1.0" encoding="UTF-8"?>
<project xmlns="http://maven.apache.org/POM/4.0.0" xmlns:xsi="http://www.w3.org/2001/XMLSchema-instance"
         xsi:schemaLocation="http://maven.apache.org/POM/4.0.0 https://maven.apache.org/xsd/maven-4.0.0.xsd">
    <modelVersion>4.0.0</modelVersion>
    <parent>
        <groupId>org.springframework.boot</groupId>
        <artifactId>spring-boot-starter-parent</artifactId>
        <version>2.2.1.RELEASE</version>
        <relativePath/> <!-- lookup parent from repository -->
    </parent>
    <groupId>com.yg</groupId>
    <artifactId>gateway</artifactId>
    <version>0.0.1-SNAPSHOT</version>
    <name>gateway</name>
    <description>gateway</description>
    <properties>
        <java.version>1.8</java.version>
    </properties>
    <dependencies>

        <dependency>
            <groupId>org.springframework.cloud</groupId>
            <artifactId>spring-cloud-starter-gateway</artifactId>
<!--            <version>2.1.0.RELEASE</version>-->
        </dependency>

        <dependency>
            <groupId>org.projectlombok</groupId>
            <artifactId>lombok</artifactId>
            <optional>true</optional>
        </dependency>
        <dependency>
            <groupId>org.springframework.boot</groupId>
            <artifactId>spring-boot-starter-test</artifactId>
<!--            <scope>test</scope>-->
        </dependency>

        <dependency>
            <groupId>com.alibaba.cloud</groupId>
            <artifactId>spring-cloud-starter-alibaba-nacos-discovery</artifactId>
<!--            <version>2.1.0.RELEASE</version>-->
        </dependency>
    </dependencies>
    <dependencyManagement>
        <dependencies>
            <dependency>
                <groupId>org.springframework.cloud</groupId>
                <artifactId>spring-cloud-dependencies</artifactId>
                <version>Hoxton.RELEASE</version>
                <type>pom</type>
                <scope>import</scope>
            </dependency>

            <dependency>
                <groupId>com.alibaba.cloud</groupId>
                <artifactId>spring-cloud-alibaba-dependencies</artifactId>
                <version>2.2.1.RELEASE</version>
                <type>pom</type>
                <scope>import</scope>
            </dependency>
        </dependencies>
    </dependencyManagement>

    <build>
        <plugins>
            <plugin>
                <groupId>org.springframework.boot</groupId>
                <artifactId>spring-boot-maven-plugin</artifactId>
                <configuration>
                    <excludes>
                        <exclude>
                            <groupId>org.projectlombok</groupId>
                            <artifactId>lombok</artifactId>
                        </exclude>
                    </excludes>
                </configuration>
            </plugin>
        </plugins>
    </build>
</project>
1.2 添加application配置,- Path=/three/** #路径匹配规则,微服务控制类必须有一个统一的入口区分域,不然网关不能访问,@RequestMapping(“/three”),@RequestMapping(“/four”)
server:
  port: 3900

spring:
  application:
    name: gateway
  cloud:
    nacos:
      discovery:
        server-addr: localhost:8848
    gateway:
      discovery:
        locator:
          enabled: true
          lower-case-service-id: true
#      routes:
#        - id: service2  #设置路由id(理论上是可以随便写的)
#          uri: lb://service2 #设置路由的url lb://nacos服务注册名称 lb://service1 http://localhost:3901
#          predicates:
#            - Path=/three/** #路径匹配规则,微服务必须有一个统一的入口,不然网关不能访问,@RequestMapping("/three")
#        - id: service1  #设置路由id(理论上是可以随便写的)
#          uri: lb://service1 #设置路由的url lb://nacos服务注册名称 lb://service1 http://localhost:3901
#          predicates:
#            - Path=/four/** #路径匹配规则,@RequestMapping("/four")
1.3 gateway启动类
package com.yg.gateway;

import org.springframework.boot.SpringApplication;
import org.springframework.boot.autoconfigure.SpringBootApplication;
import org.springframework.cloud.client.discovery.EnableDiscoveryClient;

@SpringBootApplication
@EnableDiscoveryClient
public class GatewayApplication {

    public static void main(String[] args) {
        SpringApplication.run(GatewayApplication.class, args);
    }

}
2 service1项目搭建
2.1 创建service1项目,引入pom公共依赖
<?xml version="1.0" encoding="UTF-8"?>
<project xmlns="http://maven.apache.org/POM/4.0.0" xmlns:xsi="http://www.w3.org/2001/XMLSchema-instance"
         xsi:schemaLocation="http://maven.apache.org/POM/4.0.0 https://maven.apache.org/xsd/maven-4.0.0.xsd">
    <modelVersion>4.0.0</modelVersion>
    <groupId>com.yg</groupId>
    <artifactId>sleuthTest</artifactId>
    <version>0.0.1-SNAPSHOT</version>
    <packaging>pom</packaging>

    <parent>
        <groupId>org.springframework.boot</groupId>
        <artifactId>spring-boot-starter-parent</artifactId>
        <version>2.2.1.RELEASE</version>
        <relativePath/> <!-- lookup parent from repository -->
    </parent>

    <modules>
        <module>service1</module>
        <module>service2</module>
    </modules>

    <name>sleuthTest</name>
    <description>sleuthTest</description>
    <properties>
        <java.version>1.8</java.version>
    </properties>
    <dependencies>
        <dependency>
            <groupId>org.springframework.boot</groupId>
            <artifactId>spring-boot-starter-web</artifactId>
        </dependency>

        <dependency>
            <groupId>org.projectlombok</groupId>
            <artifactId>lombok</artifactId>
            <optional>true</optional>
        </dependency>
        <dependency>
            <groupId>org.springframework.boot</groupId>
            <artifactId>spring-boot-starter-test</artifactId>
            <scope>test</scope>
        </dependency>


        <dependency>
            <groupId>org.springframework.cloud</groupId>
            <artifactId>spring-cloud-starter-openfeign</artifactId>
            <version>2.1.0.RELEASE</version>
        </dependency>
        <dependency>
            <groupId>com.alibaba.cloud</groupId>
            <artifactId>spring-cloud-starter-alibaba-nacos-discovery</artifactId>
<!--            <version>2.1.0.RELEASE</version>-->
        </dependency>

    </dependencies>

    <dependencyManagement>
        <dependencies>
            <!--Spring Cloud-->
            <dependency>
                <groupId>org.springframework.cloud</groupId>
                <artifactId>spring-cloud-dependencies</artifactId>
                <version>Hoxton.RELEASE</version>
                <type>pom</type>
                <scope>import</scope>
            </dependency>

            <dependency>
                <groupId>com.alibaba.cloud</groupId>
                <artifactId>spring-cloud-alibaba-dependencies</artifactId>
                <version>2.2.1.RELEASE</version>
                <type>pom</type>
                <scope>import</scope>
            </dependency>

        </dependencies>
    </dependencyManagement>

    <build>
        <plugins>
            <plugin>
                <groupId>org.springframework.boot</groupId>
                <artifactId>spring-boot-maven-plugin</artifactId>
                <configuration>
                    <excludes>
                        <exclude>
                            <groupId>org.projectlombok</groupId>
                            <artifactId>lombok</artifactId>
                        </exclude>
                    </excludes>
                </configuration>
            </plugin>
        </plugins>
    </build>

</project>
2.2 引入service1单独的pom文件
<?xml version="1.0" encoding="UTF-8"?>
<project xmlns="http://maven.apache.org/POM/4.0.0" xmlns:xsi="http://www.w3.org/2001/XMLSchema-instance"
         xsi:schemaLocation="http://maven.apache.org/POM/4.0.0 https://maven.apache.org/xsd/maven-4.0.0.xsd">
    <modelVersion>4.0.0</modelVersion>
    <groupId>com.yg</groupId>
    <artifactId>service1</artifactId>
    <version>0.0.1-SNAPSHOT</version>
    <packaging>jar</packaging>

    <parent>
        <groupId>com.yg</groupId>
        <artifactId>sleuthTest</artifactId>
        <version>0.0.1-SNAPSHOT</version>
    </parent>

    <name>service1</name>
    <description>service1</description>
    <properties>
        <java.version>1.8</java.version>
    </properties>
    <dependencies>

    </dependencies>

</project>
2.3 service1启动类,添加@EnableDiscoveryClient、@EnableFeignClients注解
package com.yg.service1;

import org.springframework.boot.SpringApplication;
import org.springframework.boot.autoconfigure.SpringBootApplication;
import org.springframework.cloud.client.discovery.EnableDiscoveryClient;
import org.springframework.cloud.openfeign.EnableFeignClients;

@EnableFeignClients
@SpringBootApplication
@EnableDiscoveryClient
public class Service1Application {

    public static void main(String[] args) {
        SpringApplication.run(Service1Application.class, args);
    }
}
2.4 添加application配置,添加nacos注册中心
server:
  port: 3901

spring:
  application:
    name: service1
  cloud:
    nacos:
      discovery:
        server-addr: localhost:8848  # 以服务名进行注册
2.5 创建controller类
package com.yg.service1.controller;
import org.springframework.beans.factory.annotation.Autowired;
import org.springframework.web.bind.annotation.GetMapping;
import org.springframework.web.bind.annotation.RequestMapping;
import org.springframework.web.bind.annotation.RestController;
@RestController
@RequestMapping("/four")
public class Service1Controller {
@Autowired
private Service2Controller service2Controller;
@GetMapping("/t1")
public String test(){
System.out.println("Test success");
return "I am YuanGe";
}
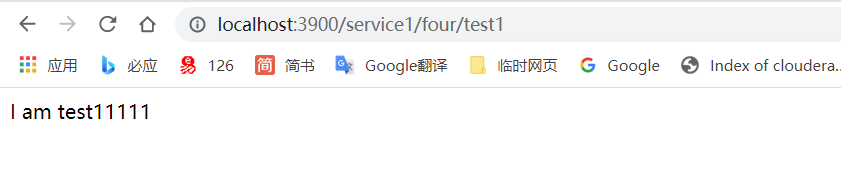
@GetMapping("/test1")
public String test1(){
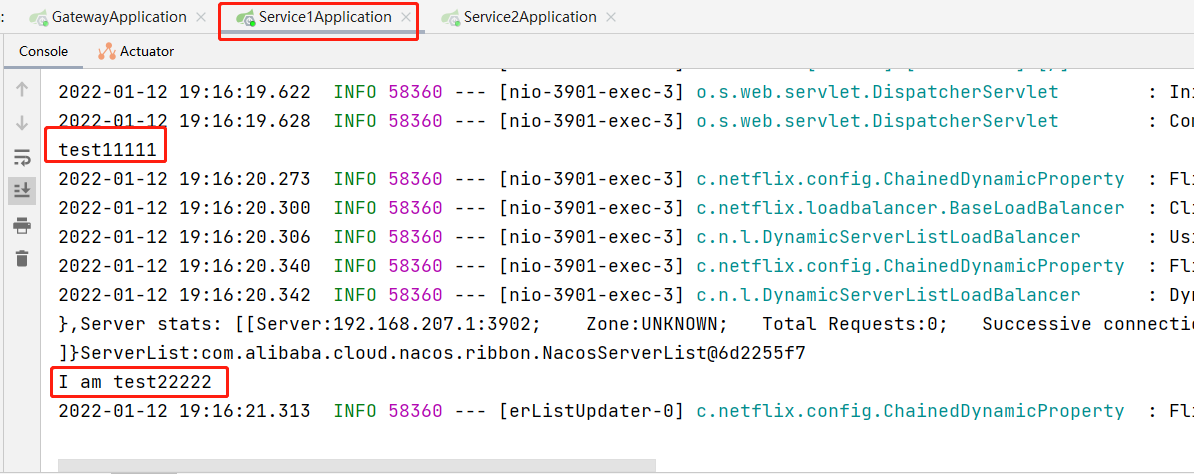
System.out.println("test11111");
System.out.println(service2Controller.getTest2());
return "I am test11111";
}
}
2.6 创建feignclient远程调用接口类
package com.yg.service1.controller;

import com.yg.service1.fallback.Service2ControllerFallbackFactory;
import org.springframework.cloud.openfeign.FeignClient;
import org.springframework.web.bind.annotation.GetMapping;

@FeignClient(value = "service2",fallbackFactory = Service2ControllerFallbackFactory.class)
public interface Service2Controller {

    @GetMapping("/three/test2")
    String getTest2();
}
2.7 实现FallbackFactory
package com.yg.service1.fallback;

import com.yg.service1.controller.Service2Controller;
import feign.hystrix.FallbackFactory;
import org.springframework.stereotype.Component;

@Component
public class Service2ControllerFallbackFactory implements FallbackFactory<Service2Controller> {
    @Override
    public Service2Controller create(Throwable throwable) {
        return null;
    }
}
3 service2项目搭建
3.1 引入pom依赖
<?xml version="1.0" encoding="UTF-8"?>
<project xmlns="http://maven.apache.org/POM/4.0.0" xmlns:xsi="http://www.w3.org/2001/XMLSchema-instance"
         xsi:schemaLocation="http://maven.apache.org/POM/4.0.0 https://maven.apache.org/xsd/maven-4.0.0.xsd">
    <modelVersion>4.0.0</modelVersion>
    <groupId>com.yg</groupId>
    <artifactId>service2</artifactId>
    <version>0.0.1-SNAPSHOT</version>
    <packaging>jar</packaging>

    <parent>
        <groupId>com.yg</groupId>
        <artifactId>sleuthTest</artifactId>
        <version>0.0.1-SNAPSHOT</version>
    </parent>

    <name>service2</name>
    <description>service2</description>
    <properties>
        <java.version>1.8</java.version>
    </properties>
    <dependencies>

    </dependencies>
</project>
3.2 添加application配置
server:
  port: 3902

spring:
  application:
    name: service2
  cloud:
    nacos:
      discovery:
        server-addr: localhost:8848
3.3 service2启动类
package com.yg.service2;

import org.springframework.boot.SpringApplication;
import org.springframework.boot.autoconfigure.SpringBootApplication;
import org.springframework.cloud.client.discovery.EnableDiscoveryClient;

@SpringBootApplication
@EnableDiscoveryClient
public class Service2Application {

    public static void main(String[] args) {
        SpringApplication.run(Service2Application.class, args);
    }
}
3.4 service2控制类
package com.yg.service2.controller;
import org.springframework.web.bind.annotation.GetMapping;
import org.springframework.web.bind.annotation.RequestMapping;
import org.springframework.web.bind.annotation.RestController;
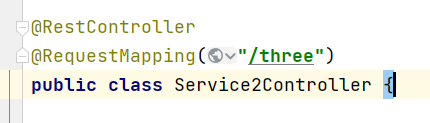
@RestController
@RequestMapping("/three")
public class Service2Controller {
@GetMapping("/t2")
public String test(){
System.out.println("Received");
return "I am YuanGe";
}
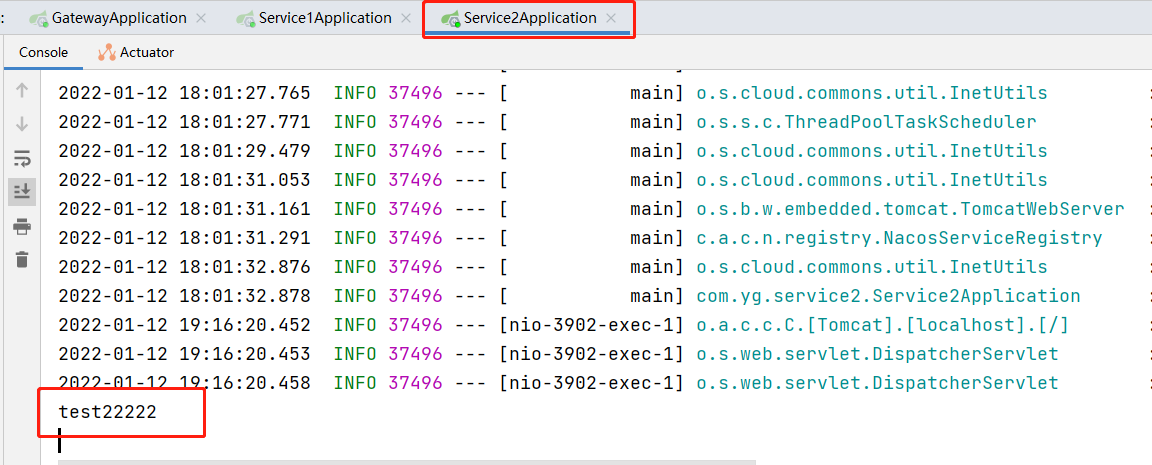
@GetMapping("/test2")
public String test2(){
System.out.println("test22222");
return "I am test22222";
}
}
3.5 整体项目架构目录

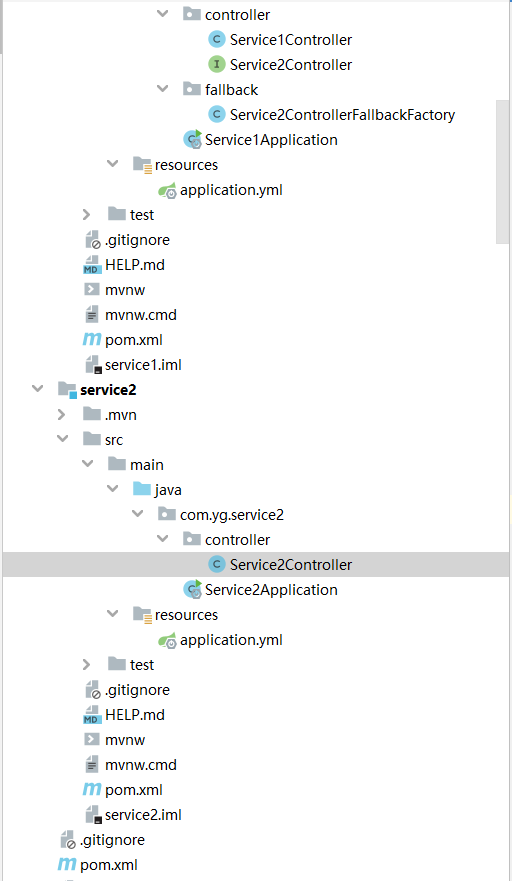
测试步骤
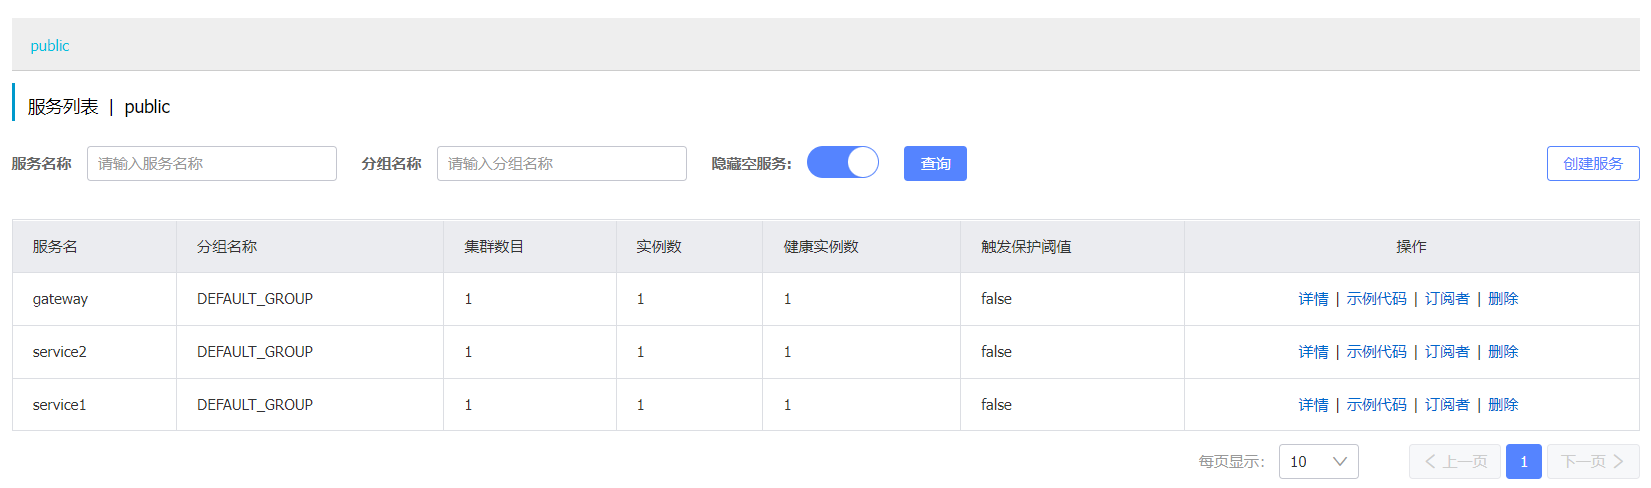
1 启动nacos服务端,gateway,service1,service2


2 查看注册中心页面http://localhost:8848/nacos/,账号密码都为:nacos
3 使用service1微服务名远程调用service2微服务
心得
- 在测试的途中都遇到了几个小问题,写了一个错误的配置如下,- Path=/** #这样写没有问题,但是控制类需要属于不同的域,如果没有在控制类上写上@RequestMapping注解,微服务过多就找不到API了


spring:
  application:
    name: gateway
  cloud:
    gateway:
      routes:
        - id: service2
          uri: lb://service2
          predicates:
            - Path=/** #这样写单服务是没有问题,但是微服务有两个及以上,控制类需要属于不同的域,如果没有在控制类上写上@RequestMapping注解,微服务过多就找不到API了
        - id: service1
          uri: lb://service1
          predicates:
            - Path=/**
service2和service1分别添加@RequestMapping(“/three”),@RequestMapping(“/four”)注解,更改写法:
spring:
  application:
    name: gateway
  cloud:
    gateway:
      routes:
        - id: service2  #设置路由id(理论上是可以随便写的)
          uri: lb://service2 #设置路由的url lb://nacos服务注册名称 lb://service1 http://localhost:3901
          predicates:
            - Path=/three/** #路径匹配规则,微服务必须有一个统一的入口,不然网关不能访问,@RequestMapping("/three")
        - id: service1  #设置路由id(理论上是可以随便写的)
          uri: lb://service1 #设置路由的url lb://nacos服务注册名称 lb://service1 http://localhost:3901
          predicates:
            - Path=/four/** #路径匹配规则,@RequestMapping("/four")

作为程序员第 18 篇文章,每次写一句歌词记录一下,看看人生有几首歌的时间,wahahaha … 
Lyric: 种麦芽糖的山坡
版权声明:本文内容由互联网用户自发贡献,该文观点仅代表作者本人。本站仅提供信息存储空间服务,不拥有所有权,不承担相关法律责任。如发现本站有涉嫌侵权/违法违规的内容, 请发送邮件至 举报,一经查实,本站将立刻删除。
文章由极客之家整理,本文链接:https://www.bmabk.com/index.php/post/110858.html

